
Popular categories
Looking for a yarn?


Comments / Questions (65)
![]() Jette wrote:
Jette wrote:
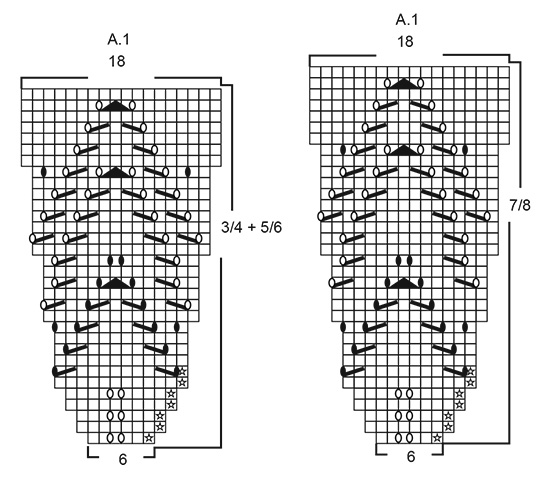
Hvad menes der med 11 rapporter i bredden. Jeg strikker 3/4 år og mønsteret er på 18 masker det går ikke op i 66 masker.
19.12.2025 - 09:06DROPS Design answered:
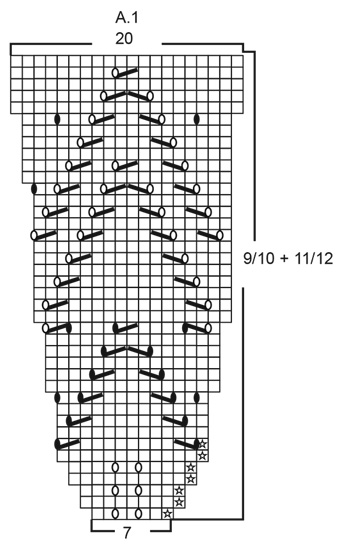
Hei Jette. Når man strikker etter et diagram starter man motsatt av det når man leser, altså nederst til høyre og "leser" mot venstre. Diagram A.1 starter med 6 masker og man gjentar diagrammet 11 ganger i bredden = 6 x 11 = 66 masker, og det stemmer med det som står i oppskriften. Når man har strikket diagram A.1 i høyden består diagrammet av 18 masker = 18 x 11 = 198 masker, som også stemmer med det står i oppskriften. mvh DROPS Design
22.12.2025 - 13:18
![]() Yvonne wrote:
Yvonne wrote:
Die Anleitung war sehr gut verständlich und einfach zu stricken. Bei den Zunahmen welche durch einen Umschlag beschrieben wurden habe ich eine Masche vom Querfaden aufgenommen.
08.12.2025 - 13:31
![]() Anne Røstad wrote:
Anne Røstad wrote:
Når man skal plassere disse 6 maskemarkørene for økning, hvor er det omgangen starter?
07.11.2025 - 11:30DROPS Design answered:
Hei Anne, Begynnelsen av omgangen på bolen er under et erme (i siden). Hilsen Drops Team.
12.11.2025 - 07:15
![]() Loly wrote:
Loly wrote:
Hola cuando decís que pongamos los seis marcadores para hacer el cuerpo , no entiendo cuál es el primero .si es el de comienzo de vuelta o hay que empezar la vuelta en otro sitio necesito que me respondáis gracias
13.10.2025 - 13:55
![]() Elisabeth wrote:
Elisabeth wrote:
Guten Tag, zunächst einmal ganz lieben Dank für die vielen schönen Anleitungen. Ich kenne mich nicht gut mit Diagrammen aus. Wie werden die Rückreihen gestrickt, auch von rechts, wie die Hinreihe, oder von links nach rechts? Danke für Ihre Anwort Elisabeth Villmer
30.08.2025 - 15:09DROPS Design answered:
Liebe Elisabeth, wenn in Reihen gestrickt wird, lesen Sie die Rück-Reihen immer von links nach rechts. In Runden, wie bei dieser Anleitung, lesen Sie jede Zeile des Diagramms von rechts nach links, also so, wie Sie ja auch stricken - immer in dieselbe Richtung in Runden (bzw. abwechselnd in die eine und in die andere Richtung beim Stricken in Reihen). Viel Spaß beim Stricken!
15.09.2025 - 10:00
![]() Anne wrote:
Anne wrote:
Danke für die Antwort, leider wurde meine Frage nicht richtig verstanden oder ich habe sie nicht klar gestellt. Wieviel cm nach der 4. Zunahme von 12Maschen erfolgt die erste Zunahme von 8 Maschen? (Größe 134/140)
04.02.2025 - 12:40DROPS Design answered:
Liebe Anne, sorry für das Misverständnis, die 1. von den 12 x 8 Zunahmen beginnen Sie ca 3,5 cm nach der letzten von den 4 x 12 Zunahmen. Viel Spaß beim Stricken!
04.02.2025 - 15:24
![]() Anne wrote:
Anne wrote:
Hallo. Ich arbeite in Größe 134/140. Nachdem ich beim Rumpfteil 4x12M alle 2cm vor und nach den Markierungen zugenommen habe, folgt die nächste Anweisung mit 12x8M alle 3,5cm. Erfolgt die erste 8M Zunahme 3,5cm nach der 4. 12M Zunahme der ersten Anweisung? Oder unmittelbar nach der 4. Zunahme? Vielen Dank!
03.02.2025 - 22:37DROPS Design answered:
Liebe Anne, nach den 4 x 12 Zunahmen alle 2 cm (48 Zunahmen), wird man nur 8 Maschen in 9/10 Jahre 12 Mal (96 Zunahmen) alle 3,5 cm zunehmen so haben Sie 160+48+96=304 Maschen. Viel Spaß beim Stricken!
04.02.2025 - 09:16
![]() Ella Gootgarts wrote:
Ella Gootgarts wrote:
When dividing for body and sleeves the round ends in the centre of the back. How do I get to put the 1st marker into the first stitch =side, when my working yarn remains in the middle of the back? Should the 6 new casted stitches be put on the thread together with 62 stitches of the sleeve?
18.12.2024 - 04:02DROPS Design answered:
Hi Ella, After inserting the marker, work across the remaining stitches on the back piece (to the marker) and begin the new rounds on the body from here. The 6 cast-on stitches are included in the rounds on the body as they are the bottom of the armholes. Happy knitting!
18.12.2024 - 06:52
![]() Steph wrote:
Steph wrote:
Merci pour votre précédente réponse. J'ai une autre question sur les premières augmentations de la partie basse de la robe. Pour la taille 11/12 ans, n'est ce pas plutôt tous les 2,5 cm qu'il faut augmenter (contrairement au 1,5 qui est indiqué) ?
11.11.2024 - 14:41DROPS Design answered:
Bonjour Steph, en taille 11/12 ans, on augmente bien 4 fois tous les 1,5 cm. Bon tricot!
11.11.2024 - 16:16
![]() Steph wrote:
Steph wrote:
Bonjour, J'ai fini le haut de la robe. Et je m'interroge sur le placement des marqueurs. Si le début de tour est maintenant sous la manche cela signifie que nous devons tricoter un demi dos avant de le rejoindre et donc ce demi dos aura toujours un rang d'avance sur les autres parties du tour. N'est ce pas embêtant ? 2e question : est il possible de placer les marqueurs entre 2 mailles et pas dans la maille ? Merci pour vos éclairages
10.11.2024 - 11:07DROPS Design answered:
Bonjour Steph, tout à fait, au début du bas de la robe, tricotez jusque sous la 1ère manche, les tours commencent désormais ici. Vous pouvez choisir de placer vos marqueurs avant au lieu de dans la maille indiquée, pensez juste à bien augmenter comme il faut (aux bons endroits). Bon tricot!
11.11.2024 - 09:18
|
||||||||||||||||||||||
Woodland Fairy#woodlandfairydress |
||||||||||||||||||||||
 |
 |
|||||||||||||||||||||
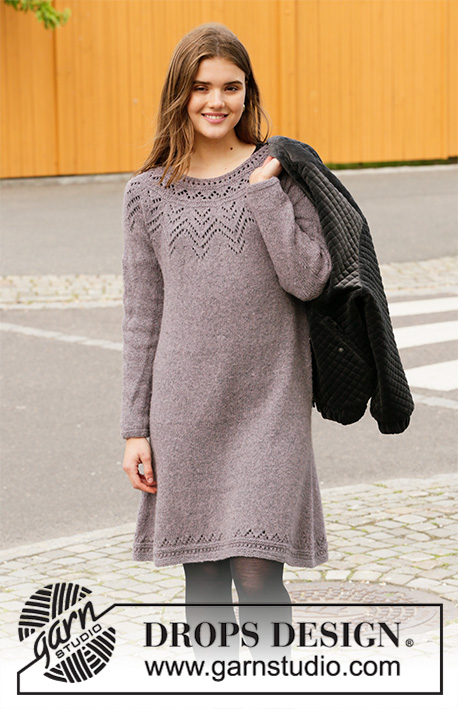
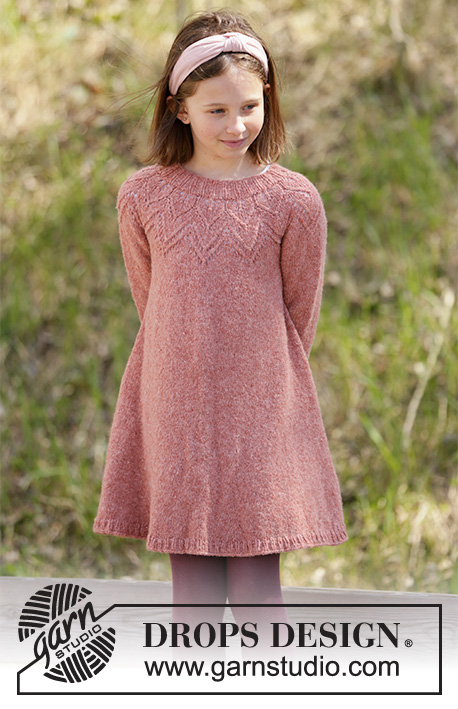
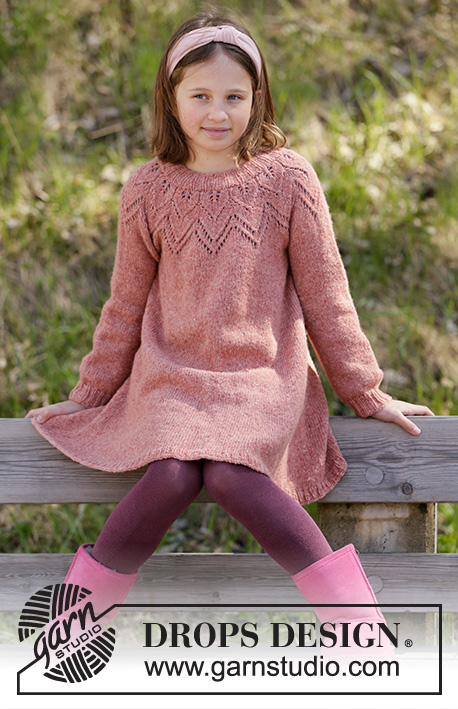
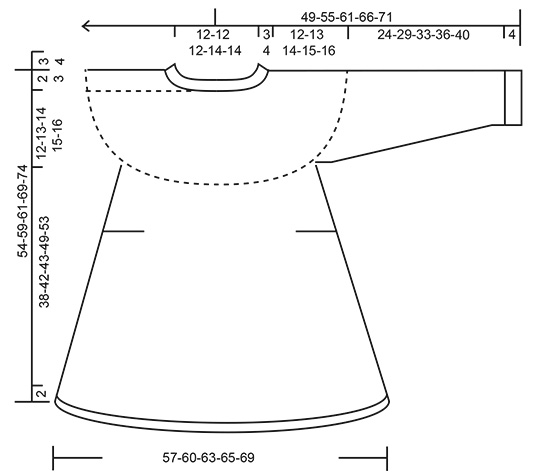
Knitted dress for children in DROPS Sky or DROPS Merino Extra Fine. The piece is worked top down with lace pattern. Sizes 3-12 years.
DROPS Children 34-25 |
||||||||||||||||||||||
|
------------------------------------------------------- EXPLANATIONS FOR THE PATTERN: ------------------------------------------------------- INCREASE TIP: Increase with 1 yarn over; on the next round work the yarn over twisted to avoid a hole. PATTERN: See diagram A.1; choose your size in the diagram. ------------------------------------------------------- START THE PIECE HERE: ------------------------------------------------------- DRESS: The yoke is worked in the round, top down. After the piece has been divided for body and sleeves, the body is continued in the round with circular needle, and the sleeves are workedin the round with double pointed needles. YOKE: Cast on 72-78-84-90-96 stitches with short circular needle size 3.5 mm and Sky. Insert 1 marker at the beginning of the round (= mid back). Work rib with knit 1/ purl 2 for 3-3-4-4-4 cm (= neck). The piece is now measured from here. Change to short circular needle size 4 mm and knit 2 rounds, adjusting on the first round the number of stitches to 66-72-78-84-91 stitches. Then work A.1 (= 11-12-13-12-13 repeats in width) – see diagram for the correct size! REMEMBER THE KNITTING TENSION! Change to a longer circular needle when you have increased enough stitches. When A.1 has been completed there are 198-216-234-240-260 stitches on the needle. On the next round increase 14-12-10-24-20 stitches evenly spaced while at the same time working stocking stitch = 212-228-244-264-280 stitches. Continue with stocking stitch until the piece measures 12-13-14-15-16 cm (without the rib). The next round is worked as follows: Knit 31-33-35-37-39 stitches (= half the back piece), place the next 44-48-52-58-62 stitches on 1 thread for sleeve (without working them), cast on 6 new stitches, knit 62-66-70-74-78 stitches (= front piece), place the next 44-48-52-58-62 stitches on 1 thread for sleeve (without working them), cast on 6 new stitches and knit 31-33-35-37-39 stitches (= half the back piece). BODY: = 136-144-152-160-168 stitches. THE PIECE IS NOW MEASURED FROM HERE! Now insert 6 markers in the piece as follows: Marker 1 is inserted in the first stitch at the beginning of the round (= side), marker 2 is inserted in the 23rd-25th-26th-27th-28th stitch, marker 3 is inserted in the 47th-49th-52nd-55th-58th stitch, marker 4 is inserted in the 69th-73rd-77th-81st-86th stitch (= side), marker 5 is inserted in the 91st-97th-102nd-107th-114th stitch, marker 6 is inserted in the 115th-121st-128th-135th-144th stitch (there are 21-23-24-25-24 stitches left on the round after the last marker). READ INCREASE TIP! On the next round increase 1 stitch on each side of each marker (12 stitches increased on round) and repeat these increases every 1½-2-2-2-1½ cm a total of 4 times. Then increase as follows: Increase 1 stitch on each side of markers 1 and 4 (= sides), 1 stitch after markers 2 and 5 and 1 stitch before markers 3 and 6 – READ INCREASE TIP (= 8 stitches increased per round). Increase in the different sizes as follows: 3/4 years: Increase approx every 3 cm a total of 11 times. 5/6 years: Increase approx. every 3 cm a total of 11 times. 7/8 years: Increase approx. every 3 cm a total of 12 times. 9/10 years: Increase approx. every 3½ cm a total of 12 times. 11/12 years: Increase approx. every 4 cm a total of 12 times. There are now 272-280-296-304-312 stitches on the round. Work until the piece measures 38-42-43-49-53 cm. On the next round increase 34-35-37-38-39 stitches evenly spaced – READ INCREASE TIP (increase after approx. each 8th stitch) = 306-315-333-342-351 stitches. Change to circular needle size 3.5 mm and work rib with knit 1/ purl 2 for 2 cm. Loosely cast off with knit on the next round. SLEEVE: Place the stitches from the one thread on double pointed needles size 4 mm and knit up 1 stitch in each of the 6 stitches cast on in the side of the body (insert 1 marker in the middle of these stitches) = 50-54-58-64-68 stitches. THE PIECE IS NOW MEASURED FROM HERE! Work stocking stitch in the round. When the piece measures 24-29-33-36-40 cm from the marker adjust the number of stitches to 42-42-48-48-48 stitches. Change to double pointed needles size 3.5 mm and work rib with knit 1/ purl 2 for 4 cm. Loosely cast off with knit on the next round. Work the other sleeve in the same way. |
||||||||||||||||||||||
Diagram explanations |
||||||||||||||||||||||
|
||||||||||||||||||||||
 |
||||||||||||||||||||||
 |
||||||||||||||||||||||
 |
||||||||||||||||||||||
Have you finished this pattern?Tag your pictures with #dropspattern #woodlandfairydress or submit them to the #dropsfan gallery. Do you need help with this pattern?You'll find 24 tutorial videos, a Comments/Questions area and more by visiting the pattern on garnstudio.com. © 1982-2026 DROPS Design A/S. We reserve all rights. This document, including all its sub-sections, has copyrights. Read more about what you can do with our patterns at the bottom of each pattern on our site. |
||||||||||||||||||||||


With over 40 years in knitting and crochet design, DROPS Design offers one of the most extensive collections of free patterns on the internet - translated to 17 languages. As of today we count 324 catalogues and 12290 patterns translated into English (UK/cm). 12290
We work hard to bring you the best knitting and crochet have to offer, inspiration and advice as well as great quality yarns at incredible prices! Would you like to use our patterns for other than personal use? You can read what you are allowed to do in the Copyright text at the bottom of all our patterns. Happy crafting!
Post a comment to pattern DROPS Children 34-25
We would love to hear what you have to say about this pattern!
If you want to leave a question, please make sure you select the correct category in the form below, to speed up the answering process. Required fields are marked *.