
Popular categories
Looking for a yarn?


Comments / Questions (40)
![]() Selva AKINCI wrote:
Selva AKINCI wrote:
Could you please restore the original pattern? As I have stated in my previous comment the instructions on this page belong to another pattern. I would love to knit this cardigan for my grandson. Thank you.
27.07.2020 - 15:04DROPS Design answered:
Dear Mrs Akinci, thanks for your feedback, we'll make sure to edit the US-pattern - remember you can inbetween follow the UK-English pattern converting cm into inches here. Thank you. Happy knitting!
29.07.2020 - 11:09
![]() Selva AKINCI wrote:
Selva AKINCI wrote:
Please note that the instructions (except for the charts) do not belong to the pattern Precious Moments, but rather to another pattern described as "tunic top with a large collar in Muskat".
26.07.2020 - 22:34
![]() Eva wrote:
Eva wrote:
Guten Tag, ich habe paar Fragen: Ich muss bei der Pfeil insgesamt 3 M am Rumpf abnehmen und bei der Pfeil 2 zunehmen, warum? Die a1 Rapport wiederholt sich bei mir 18 mal, was passiert mit der Muster, wie stricke ich weiter, da fehlen immer 2 Maschen! 3. Frage : die a1 b wird im Rapport nur einmal gestricht, am Ende ,— oder? Vielen Dank Mit freundlichen Grüßen Eva
31.03.2020 - 09:43DROPS Design answered:
Liebe Eva, in die 4. Grösse haben Sie 117 M - 3 M = 114 M. Jetzt stricken Sie: 4 Blendemaschen, A.1A (= 4 Maschen x 26 = 104 M), A.1B (= 2 M), 4 Blendemaschen = 4+104+2+4=114 M. Viel Spaß beim stricken!
31.03.2020 - 10:18
![]() Bouzid Zineb wrote:
Bouzid Zineb wrote:
J'ai trouvé l'emmanchure sous les bras un peu trop serré, j'ai rajouté 4 mailles a la jonction avec les manches et j'ai une emmanchure plus souple.
23.11.2019 - 14:21
![]() Claudia wrote:
Claudia wrote:
Ich bin eine geübte Strickerin mit fast 30 Jahren Strickerfahrung... diese Anleitung ist eine Katastrophe ... schade um die Wolle...
26.09.2019 - 18:18DROPS Design answered:
Liebe Claudia, Die DROPS-Muster werden von Tausenden und Abertausenden Menschen auf der ganzen Welt gestrickt und gehäkelt. Wir verstehen jedoch, dass in bestimmten Ländern mit anderen Strick- / Häkeltraditionen als in Skandinavien unsere Muster möglicherweise anders geschrieben sind als in einigen anderen Ländern. Natürlich möchten wir, dass alle unsere Muster verstehen. Aus diesem Grund haben wir eine umfangreiche Bibliothek mit Lernvideos sowie schrittweisen Lektionen erstellt, in denen erklärt wird, wie wir die verwendeten Techniken befolgen und wie die Diagramme in unseren Mustern gelesen werden. Probieren Sie es aus!
27.09.2019 - 08:33
![]() Lena Henriksen wrote:
Lena Henriksen wrote:
Der mangler i mine øjne en rapport-markering i højden på A3.A. jeg har strikket med 3 pinde mellem lusene - eller er det meningen, der skal være 3 og 5 pinde imellem ?
17.08.2019 - 10:25DROPS Design answered:
Hej Lena, Det er ikke sikkert at det skal være lige mange pinde imellem hver... men vi skal se på det og hvis det er fejl, så vil diagrammet blive rettet. Du er naturligvis velkommen til at strikke lusene på hver 4.pind inden du får svar :)
10.09.2019 - 15:25
![]() Lena Henriksen wrote:
Lena Henriksen wrote:
Har strikket trøjen i størrelse < 0. I hvertfald i den størrelse er der en fejl i ryg/forstykke: Skift til rundpind 4 og strik næste pind således fra retsiden: 4 kantmasker retstrik, strik A.1A til der er 6 masker tilbage på pinden (= (12) 15-17-18-20 (21-23) rapporter à 6 masker), strik A.1B (= 1 maske) og afslut med 4 kantmasker retstrik. 6 masker tilbage på pinden skal være 5 masker. Ellers passer det heller ikke med A.1B der er 1 maske + 4 masker til kant.
17.08.2019 - 10:22DROPS Design answered:
Hej Lena, det skal vi se på. Tak for info :)
30.09.2019 - 10:56
![]() Isabelle Con wrote:
Isabelle Con wrote:
Liebes Team, kann es sein, dass sich vielleicht ein Fehler in der Anleitung versteckt? Im Abschnitt dran Rumpfteils steht: „A.1A bis noch 6 Maschen auf der Nadel sind (= (12) 15-17-18-20 (21-23) Rapporte à 6 Maschen), A.1B (= 1 Maschen) und enden mit 4 Blenden-Maschen kraus rechts. “ Doch wenn ich noch 6M über habe, dann 1x A.1B stricke (=1M), dann habe ich 5M über. Was mache ich also mit den letzten M vor der Blende, die aus 4M Kraus-rechts besteht? Viele Grüße, Isabelle
15.08.2019 - 11:51DROPS Design answered:
Liebe Frau Con, so wird es gestrickt: 4 Blende-Maschen kraus rechts, dann (12)15-17-18-20 (21-23) x A.1A stricken (= über die nächsten (72)90-102-108-120 (126-138) Maschen, 1 M in A.1B und 4 Blende-Maschen, jetzt haben Sie: 4+ (72)90-102-108-120 (126-138) +1 + 4 = (81) 99-111-117-129 (135-147) Maschen. Viel Spaß beim stricken!
15.08.2019 - 15:04
![]() Mary wrote:
Mary wrote:
Wieviel Gramm der Drops Merino Extra Fina Wolle benötige ich etwa?
06.08.2019 - 10:34DROPS Design answered:
Dear Mary, die Garnmenge für jede Größe finden Sie oben in der Anleitung - hier lesen Sie mehr. Viel Spaß beim stricken!
07.08.2019 - 11:52
![]() Shari wrote:
Shari wrote:
It seems that pages 8 and 11 are not printing. All the other pages printed out, but I couldn’t get those two to print.
16.07.2019 - 18:06DROPS Design answered:
Dear Mrs Shari, just check that your printers settings didn't saved previous settings, so that all pages will be printed. Happy knitting!
17.07.2019 - 11:18
|
|||||||||||||
Precious Moments#preciousmomentsjacket |
|||||||||||||
 |
 |
||||||||||||
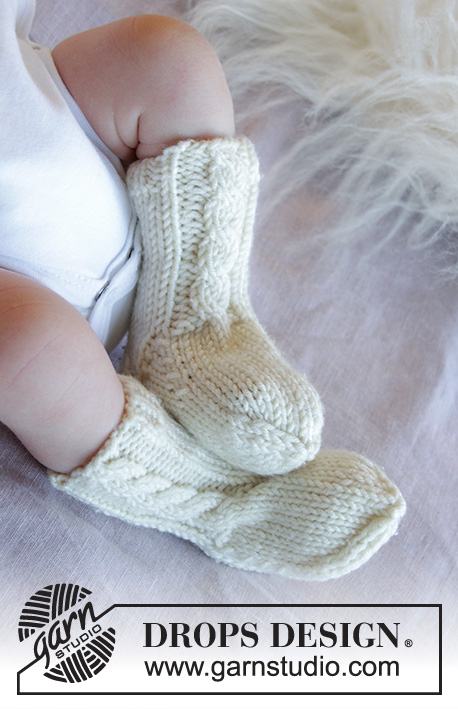
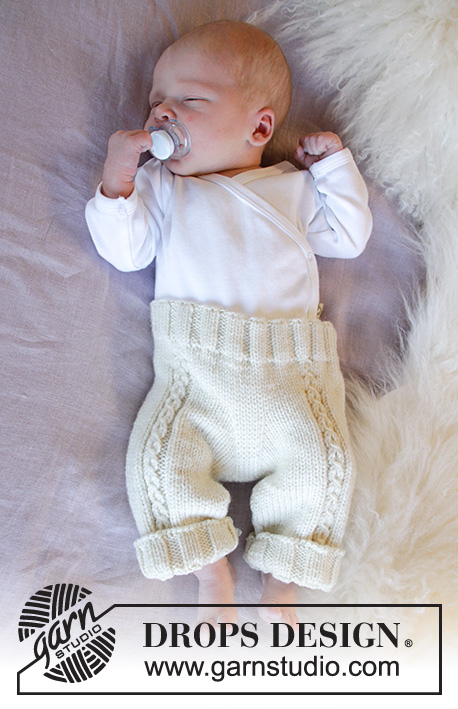
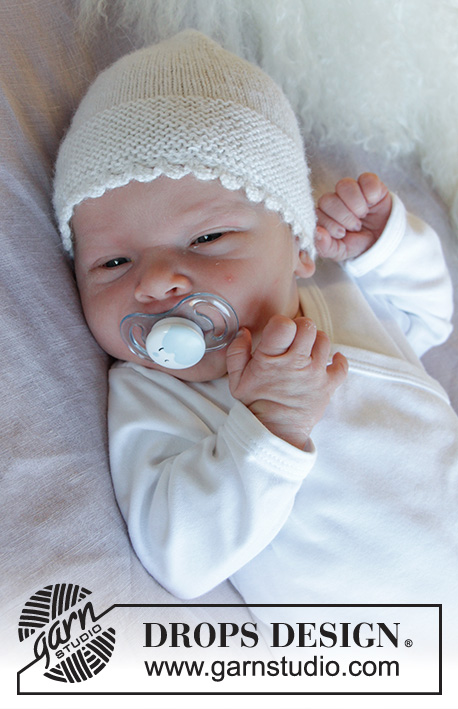
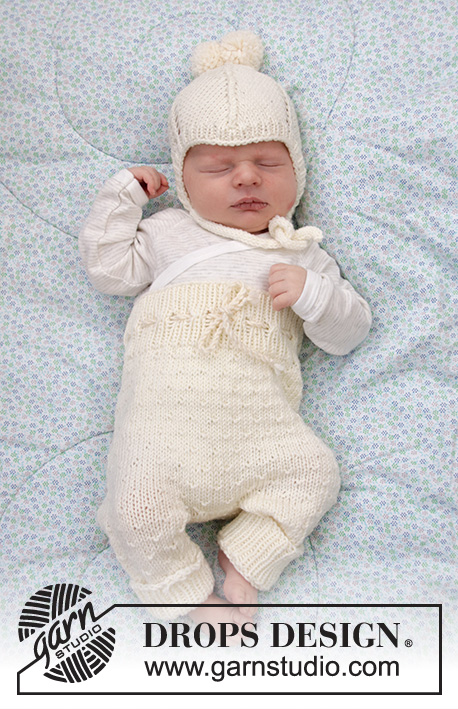
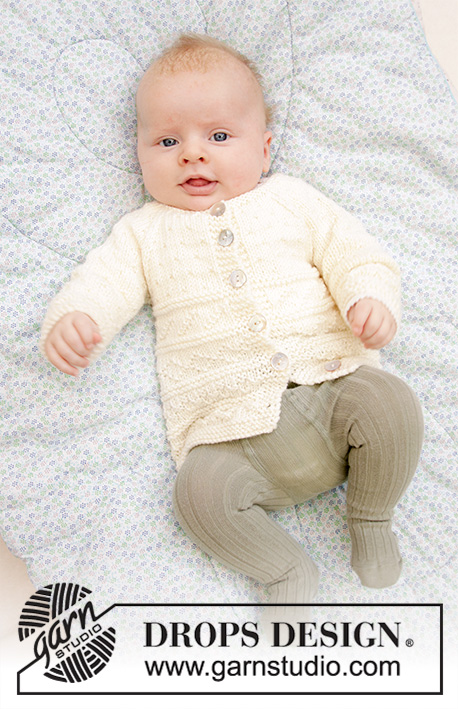
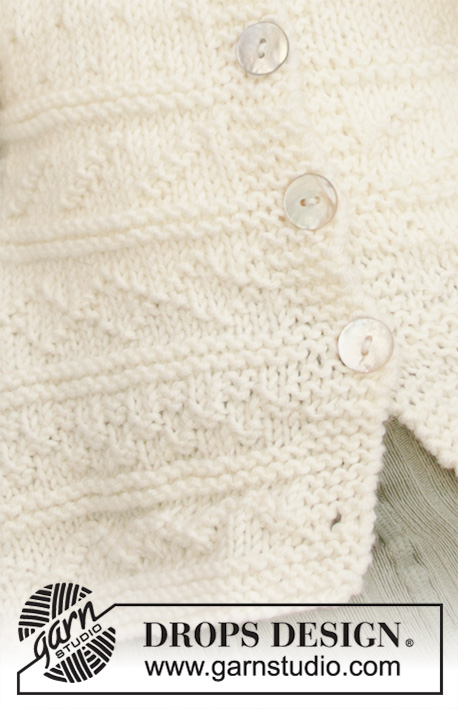
Knitted jacket for babies with raglan in DROPS Merino Extra Fine. The piece is worked bottom up with textured pattern. Sizes premature to 3/4 years.
DROPS Baby 33-11 |
|||||||||||||
|
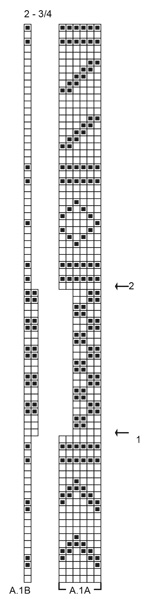
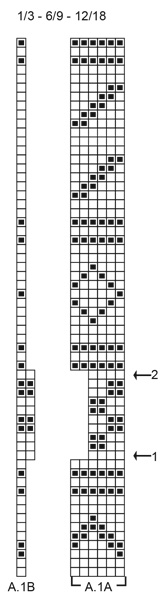
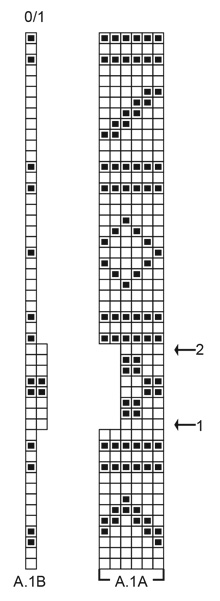
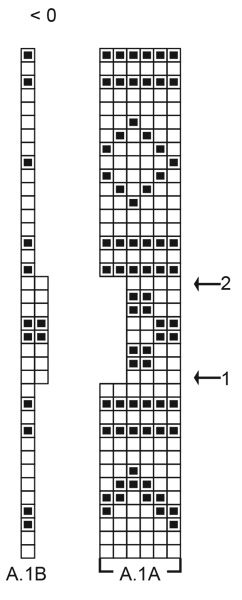
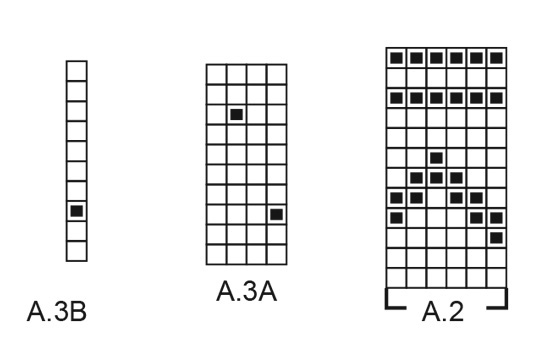
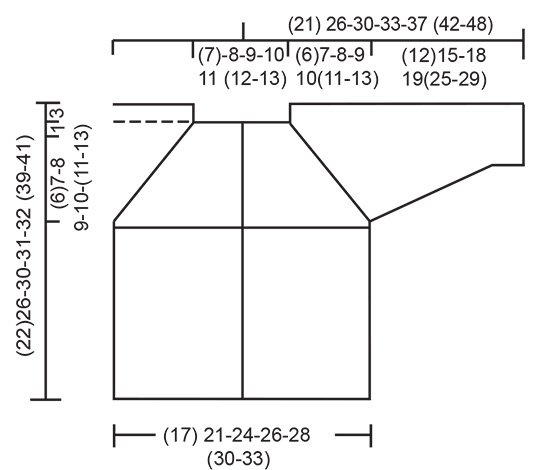
------------------------------------------------------- EXPLANATIONS FOR THE PATTERN: ------------------------------------------------------- RIDGE/GARTER STITCH (worked back and forth): 1 ridge in height = Knit 2 rows. RIDGE/GARTER STITCH (worked in the round): 1 ridge in height = 2 rounds; Knit 1 round and purl 1 round. PATTERN: See diagrams A.1 to A.3. Choose diagram for your size in A.1. The diagrams show all rows in the pattern seen from the right side. INCREASE TIP (for mid under sleeve): Start 1 stitch before the stitch with the marker, make 1 yarn over, work the stitch with the marker, 1 yarn over (= 2 stitches increased). On the next round work the yarn overs twisted to avoid holes. The increased stitches are worked into the pattern as you go. RAGLAN: Decrease to raglan on each side of the 4 markers in each transition between body and sleeves (= 8 stitches decreased on each decrease-row). All decreases are worked from the right side! Start 2 stitches before the marker, knit 2 together, marker, slip 1 stitch as if to knit, knit 1 and pass the slipped stitch over the knitted stitch. INCREASE/DECREASE TIP (evenly spaced): To work out how to increase/decrease evenly, count the total number of stitches on needle (e.g. 50 stitches) and divide by the number of increases/decreases to be made (e.g. 6) = 8.3. In this example, increase by making 1 yarn over after approx. each 8th stitch. On the next row work the yarn overs twisted to avoid holes. When decreasing, knit together approx. each 7th and 8th stitch. BUTTONHOLES: Work buttonholes on right band (when the garment is worn). 1 buttonhole = Start from the right side and knit the 2nd and 3rd stitch from the edge together, then make 1 yarn over. On the next row knit the yarn over to leave a hole. Work buttonholes when the piece measures: (the last buttonhole is worked on the last row before the neck as described in the text). <0 MONTH: 2, 5, 8, 11, 15 and 18 cm 0/1 MONTH: 2, 6, 10, 14, 18 and 22 cm 1/3 MONTHS: 2, 6, 10, 14, 18, 22 and 26 cm 6/9 MONTHS: 2, 6, 10, 14, 18, 22 and 27 cm 12/18 MONTHS: 2, 6, 10, 14, 18, 23 and 28 cm 2 YEARS: 2, 6, 11, 16, 21, 26, 30 and 35 cm 3/4 YEARS: 2, 7, 12, 17, 22, 27, 32 and 37 cm ------------------------------------------------------- START THE PIECE HERE: ------------------------------------------------------- JACKET - SHORT OVERVIEW OF THE PIECE: The body is worked back and forth with circular needle, from mid front and bottom up as far as the armholes. Then the sleeves are worked in the round with double pointed needles. Body and sleeves are joined together and the yoke is continued back and forth to finished length. BODY: Cast on (81) 99-111-117-129 (135-147) stitches with circular needle size 3.5 mm and Merino Extra Fine. Work 3 RIDGES – see description above. Change to circular needle size 4 mm and work the next row as follows, from the right side: 4 band stitches in garter stitch, work A.1A until there are 5 stitches left on the row (= (12) 15-17-18-20 (21-23) repeats of 6 stitches), A.1B (= 1 stitch) and finish with 4 band stitches in garter stitch. See diagram for right size in A.1A and A.1 B. Continue this pattern. REMEMBER THE KNITTING TENSION and BUTTONHOLES on right band – see description above. On the row marked with arrow-1 in A.1A (wrong side) decrease (3) 1-1-3-3 (1-1) stitches evenly spaced - do not decrease over band stitches = (78) 98-110-114-126 (134-146) stitches on needle. The next row is worked as follows from the right side: 4 band stitches in garter stitch, work A.1A until there are 6 stitches left on row (= (17) 22-25-26-29 (31-34) repeats of 4 stitches), A.1B (= 2 stitches) and finish with 4 band stitches in garter stitch. Continue this pattern. On the row marked with arrow-2 in A.1A increase (3) 1-1-3-3 (1-1) stitches evenly spaced = (81) 99-111-117-129 (135-147) stitches on the needle and the pattern is continued as before. When A.1 has been completed the piece measures approx. (12)15-18-18-18 (24-24) cm. Work 1 row from the right side. Then work next row from the wrong side: Knit 4 band stitches in garter stitch, purl (17) 21-24-24-28 (29-32) AT THE SAME TIME increase (0) 0-1-1-1 (0-1) stitch = (21) 25-29-29-33 (33-37) stitches (= front piece), cast off (4) 4-4-6-6 (6-6) stitches for armhole, purl (31) 41-47-49-53 (57-63) stitches, AT THE SAME TIME increase (2) 0-2-0-0 (0-2) stitches evenly spaced = (33) 41-49-49-53 (57-65) stitches (= back piece), cast off (4) 4-4-6-6 (6-6) stitches for armhole and purl (17) 21-24-24-28 (29-32) stitches AT THE SAME TIME increase (0) 0-1-1-1 (0-1) stitch, and finish with 4 band stitches in garter stitch = (21) 25-29-29-33 (33-37) stitches (= front piece). Lay the piece to one side and work the sleeves. SLEEVE: Cast on (30) 30-30-36-36 (36-42) stitches with double pointed needles size 3.5 mm and Merino Extra Fine. Work 3 RIDGES in the round – see description above. Change to double pointed needles size 4 mm and work A.2 in the round (= (5) 5-5-6-6 (6-7) repeats of 6 stitches). When A.2 has been completed work A.3A in the round. AT THE SAME TIME on the first round adjust the number of stitches to (28) 32-32-36-36 (36-40) stitches (there is now room for (7) 8-8-9-9 (9-10) repeats of 4 stitches) – see INCREASE/DECREASE TIP (evenly spaced). Insert 1 marker in the first stitch of the round (= mid under sleeve) and allow the marker to follow your work upwards. When the piece measures 6 cm increase 2 stitches mid under sleeve – see INCREASE TIP. Increase like this every (2½) 3-2½-3-2½ (2-2 ½) cm a total of (3) 3-5-5-7 (9-10) times = (34) 38-42-46-50 (54-60) stitches. Continue working until the piece measures approx. (12) 15-18-19-22 (25-29) cm but stop after round 3 or 8 in A.3A. The next round is worked as follows: Cast off (2) 2-2-3-3 (3-3) stitches for the armhole, knit (30) 34-38-40-44 (48-54) stitches, then cast off the remaining (2) 2-2-3-3-(3-3) stitches for armhole. Cut the strand and work the other sleeve in the same way. YOKE: Place the sleeves on the same circular needle as the body, where you cast off stitches for the armholes (without working the stitches) = (135) 159-183-187-207 (219-247) stitches on needle. The next row is worked as follows from the right side (when A.3 is worked (on both front-/back pieces and sleeves) it is important to continue the diagram from where you finished on the sleeves): Work 4 band stitches in garter stitch, A.3A over the next (16) 20-24-24-28 (28-32) stitches (= (4) 5-6-6-7 (7-8) repeats of 4 stitches), A.3 B (= 1 stitch), insert 1 marker (= front piece), continue A.3A over the next (30) 34-38-40-44 (48-54) stitches, insert 1 marker (= sleeve), work A.3A over the next (32) 40-48-48-52 (56-64) stitches (= (8) 10-12-12-13 (14-16) repeats of 4 stitches), A.3B (= 1 stitch), insert 1 marker (= back piece), continue A.3A over the next (30) 34-38-40-44 (48-54) stitches, insert 1 marker (= sleeve), work A.3A over the next (16) 20-24-24-28 (28-32) stitches, A.3 B and finish with 4 band stitches in garter stitch (= front piece). Continue this pattern back and forth. AT THE SAME TIME on the next row from the right side decrease to RAGLAN – see description above (= 8 stitches decreased). Decrease like this every 2nd row (i.e. each row from the right side) a total of (8) 10-11-12-14 (15-17) times. After the last decrease to raglan there are (71) 79-95-91-95 (99-111) stitches left on the needle. On the next row from the right side decrease (13) 17-29-19-19 (19-27) stitches evenly spaced – read DECREASE TIP, in addition work the last buttonhole on this row = (58) 62-66-72-76 (80-84) stitches on needle. Change to circular needle size 3.5 mm and knit 1 row from the wrong side, knit 1 row from the right side and knit 1 more row from the wrong side. Cast off with knit from the right side. The jacket measures approx. (22) 26-30-31-32 (39-41) cm from the shoulder down. ASSEMBLY: Sew openings under the sleeves. Sew buttons onto left band. |
|||||||||||||
Diagram explanations |
|||||||||||||
|
|||||||||||||
 |
|||||||||||||
 |
|||||||||||||
 |
|||||||||||||
 |
|||||||||||||
 |
|||||||||||||
 |
|||||||||||||
Have you finished this pattern?Tag your pictures with #dropspattern #preciousmomentsjacket or submit them to the #dropsfan gallery. Do you need help with this pattern?You'll find 25 tutorial videos, a Comments/Questions area and more by visiting the pattern on garnstudio.com. © 1982-2026 DROPS Design A/S. We reserve all rights. This document, including all its sub-sections, has copyrights. Read more about what you can do with our patterns at the bottom of each pattern on our site. |
|||||||||||||


With over 40 years in knitting and crochet design, DROPS Design offers one of the most extensive collections of free patterns on the internet - translated to 17 languages. As of today we count 324 catalogues and 12290 patterns translated into English (UK/cm). 12290
We work hard to bring you the best knitting and crochet have to offer, inspiration and advice as well as great quality yarns at incredible prices! Would you like to use our patterns for other than personal use? You can read what you are allowed to do in the Copyright text at the bottom of all our patterns. Happy crafting!
Post a comment to pattern DROPS Baby 33-11
We would love to hear what you have to say about this pattern!
If you want to leave a question, please make sure you select the correct category in the form below, to speed up the answering process. Required fields are marked *.