
Popular categories
Looking for a yarn?


Comments / Questions (40)
![]() Caroline wrote:
Caroline wrote:
Hej jeg er i gang med at strikke forstykke/ryg og er på den pind hvor der tages ud til ærmegab. Jeg har strikket forstykket, på vrangsiden, og taget ud til ærmegab og er nu igang med bagstykket. Her står der at det næste stykke (bagstykket) skal strikkes ret, selvom forstykket skulle strikkes vrang. Der er ingen billeder af bagstykket i opskriften, så jeg kan ikke se om der skal være et stykke uden glatstrik på bagstykket?
20.11.2022 - 20:50DROPS Design answered:
Hei Caroline. Her ser det ut som det er feil i den danske teksten. Har sammelignet med den norske, engelske og svenske teksten, og der skal det strikkes vrang på bakstykket også. Vi vil forandre den danske teksten asap, takk for at du gjorde oss oppmerksom på dette. mvh DROPS Design
21.11.2022 - 13:59
![]() Chris Whitehead wrote:
Chris Whitehead wrote:
Are there any written instructions for this pattern. I'm terrible with graphs and I really love this.
13.11.2022 - 09:54DROPS Design answered:
Dear Chris, the pattern is only available in the format you see online. If you need help understanding the diagrams you may read the following lesson: https://www.garnstudio.com/lesson.php?id=68&cid=19. Happy knitting!
13.11.2022 - 17:18
![]() Annick Brochet wrote:
Annick Brochet wrote:
Bonjour, j’ai tricoté le dos/devant, les manches mais je bloque au niveau du montage de ces morceaux. Je n’arrive pas à raccorder les morceaux entre eux pour continuer le haut du devant, le dos et l’autre côté. Depuis le nbre d’années que je tricoté cela ne m’était jamais arrivé,. Quelqu’7n aurait-il la gentillesse de m’aider svp ? Merci d'avance à tous et toutes.
02.10.2022 - 12:05DROPS Design answered:
Bonjour Mme Brochet, cette vidéo montre comment placer les manches au-dessus des mailles rabattues de l'emmanchure, les premiers rangs paraissent parfois un peu techniques, mais après quelques rangs, ce sera plus facile, vous pouvez vous aider d'une autre aiguille circulaire ou tricoter les premiers rangs avec la technique du magic loop (pour vous permettre de passer les manches plus facilement). Bon tricot!
03.10.2022 - 09:04
![]() Brochet wrote:
Brochet wrote:
Petite précision concernant mon précédent. Je commence à tricoter le modèle 33-11 mais je bègue à compter du 4ème rang du point fantastique. Le reste sans charge. M7
13.05.2022 - 17:40DROPS Design answered:
Bonjour Mme Brochet, dites-nous si vous avez encore des questions ou si la réponse précédente a pu vous aider - une dernière précision: les mailles blanches sont des mailles jersey endroit et les carrés noirs sont des mailles jersey envers, ainsi ce sera peut-être plus simple de vous repérer. Bon tricot!
16.05.2022 - 10:41
![]() Brochet wrote:
Brochet wrote:
Bonjour je commence à exécuter le modêle me-064-by et á partir du 4ème rang du point fantaisie je bloque. Auriez-vous la gentillesse de m’expliquer comment je dois procéder pour réaliser le premier motif svp ? Cordialement Annick B
13.05.2022 - 17:14DROPS Design answered:
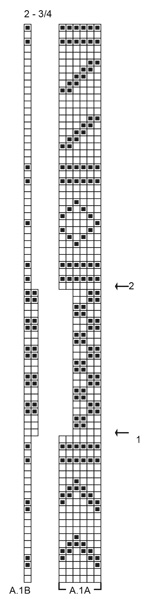
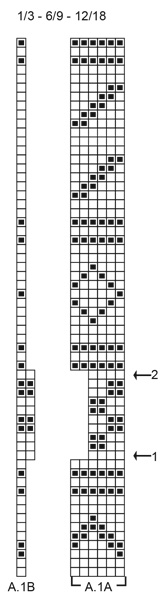
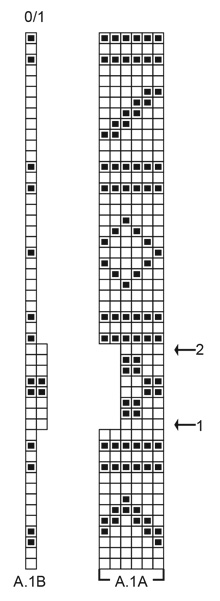
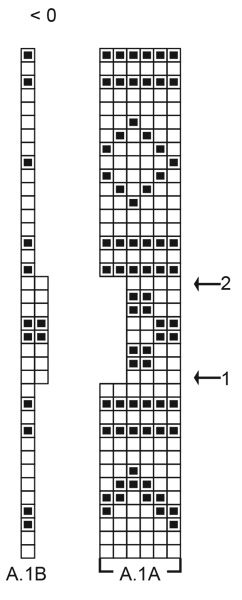
Bonjour Mme Brochet, lisez les diagrammes en commençant en bas à droite et de droite à gauche sur l'endroit puis de gauche à droite sur l'envers, soit sur l'endroit: on répète A.1A et on termine par A.1B; au 4ème rang (sur l'endroit), on tricoter A.1B (= 1 m end), puis A.1A (= 2 m end, 1 m env, 2 m end, 1 m env) et répétez de (à) jusqu'aux 4 mailles de bordure devant. Bon tricot!
16.05.2022 - 08:07
![]() Lene wrote:
Lene wrote:
Hej Jeg er ved at strikke ærme i str 3 år. Ærmet skal måle i alt 25 cm står der men det kan jeg ikke få til at passe. Jeg skal først strikke 6 cm og derefter tage 2 masker ud 9 gange for hver 2 1/2 cm det får jeg til at være 22 1/2 cm + 6 cm = 28 1/2 cm hvad gør jeg med længden er den 25 cm eller 28 1/2 cm?
23.03.2022 - 13:59DROPS Design answered:
Hei Lene. Oppskriften er blitt rettet, se linken nederst på oppskriften med rød skrift. mvh DROPS Design
28.03.2022 - 11:43
![]() Shelley Morris wrote:
Shelley Morris wrote:
I really love this pattern but is it available with instructions using straight needles? I cannot knit in the round using circular needles.
03.02.2022 - 21:43DROPS Design answered:
Dear Mrs Morris, only sleeves are worked in the round, you can then adjust them easily into straight needles - read more here. Happy knitting!
04.02.2022 - 08:37
![]() Noel wrote:
Noel wrote:
Oops I think I left this as a comment rather than question: Last row of body is worked on the right side AND first row of yoke is worked from the right side. Is that an error? Hopefully this will be my last question. :) Thanks, Noel
28.01.2022 - 19:02DROPS Design answered:
Dear Noel, please see answer below.
31.01.2022 - 00:04
![]() Noel wrote:
Noel wrote:
Last row of body is worked on the right side AND first row of yoke is worked from the right side. Is that an error? Hopefully this will be my last question. :) Thanks, Noel
28.01.2022 - 14:55DROPS Design answered:
Dear Noel, yes, it's correct. The body is worked back and forth and the sleeves are worked in the round. So the yoke's first row is worked on the right side so that it matches the pattern in the sleeves. Happy knitting!
31.01.2022 - 00:03
![]() Noel wrote:
Noel wrote:
Thanks
28.01.2022 - 12:11
|
|||||||||||||
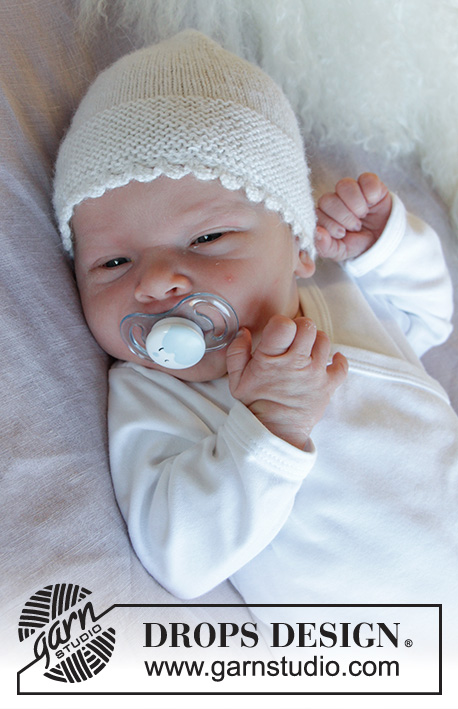
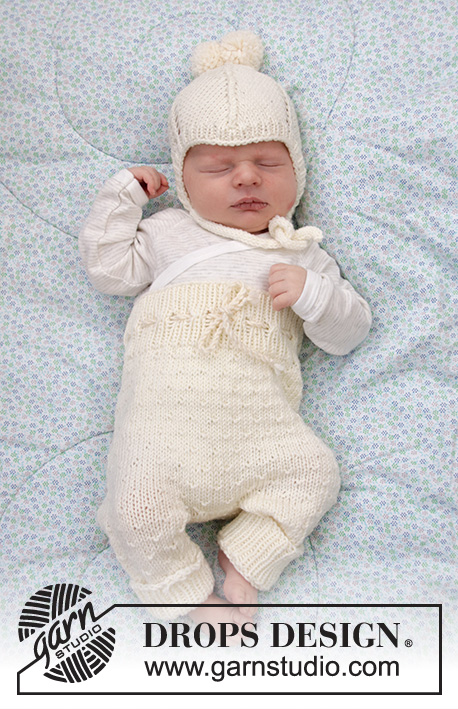
Precious Moments#preciousmomentsjacket |
|||||||||||||
 |
 |
||||||||||||
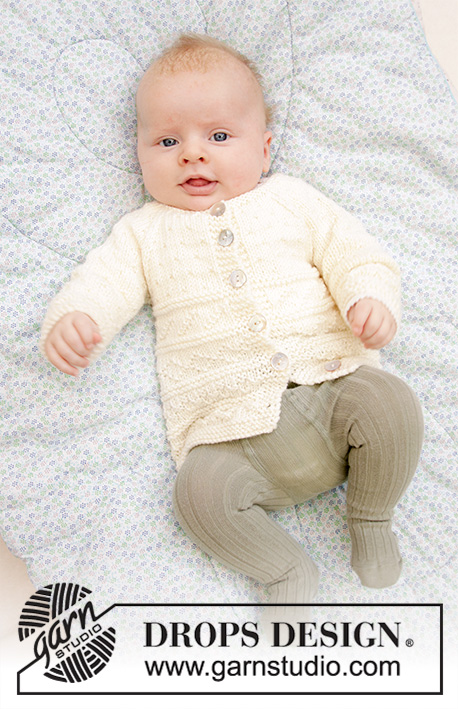
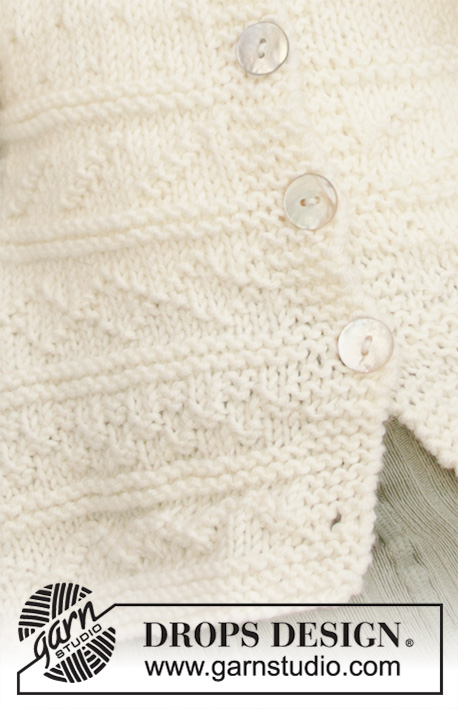
Knitted jacket for babies with raglan in DROPS Merino Extra Fine. The piece is worked bottom up with textured pattern. Sizes premature to 3/4 years.
DROPS Baby 33-11 |
|||||||||||||
|
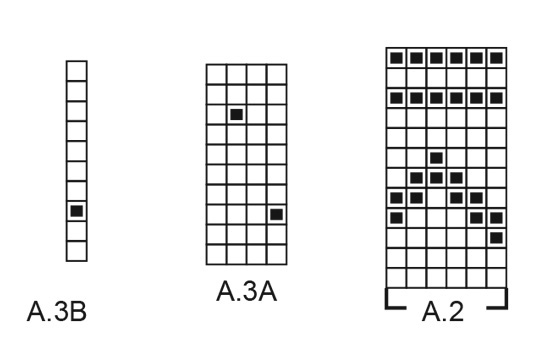
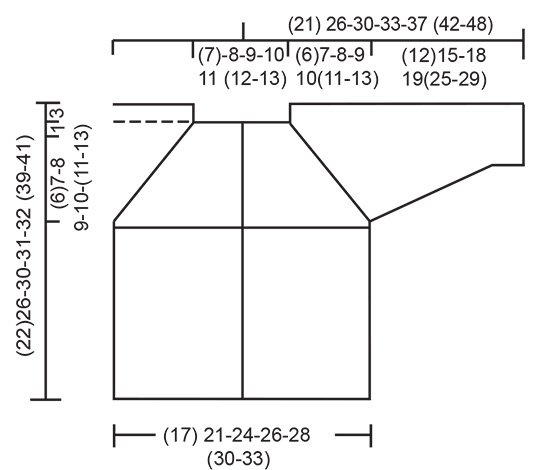
------------------------------------------------------- EXPLANATIONS FOR THE PATTERN: ------------------------------------------------------- RIDGE/GARTER STITCH (worked back and forth): 1 ridge in height = Knit 2 rows. RIDGE/GARTER STITCH (worked in the round): 1 ridge in height = 2 rounds; Knit 1 round and purl 1 round. PATTERN: See diagrams A.1 to A.3. Choose diagram for your size in A.1. The diagrams show all rows in the pattern seen from the right side. INCREASE TIP (for mid under sleeve): Start 1 stitch before the stitch with the marker, make 1 yarn over, work the stitch with the marker, 1 yarn over (= 2 stitches increased). On the next round work the yarn overs twisted to avoid holes. The increased stitches are worked into the pattern as you go. RAGLAN: Decrease to raglan on each side of the 4 markers in each transition between body and sleeves (= 8 stitches decreased on each decrease-row). All decreases are worked from the right side! Start 2 stitches before the marker, knit 2 together, marker, slip 1 stitch as if to knit, knit 1 and pass the slipped stitch over the knitted stitch. INCREASE/DECREASE TIP (evenly spaced): To work out how to increase/decrease evenly, count the total number of stitches on needle (e.g. 50 stitches) and divide by the number of increases/decreases to be made (e.g. 6) = 8.3. In this example, increase by making 1 yarn over after approx. each 8th stitch. On the next row work the yarn overs twisted to avoid holes. When decreasing, knit together approx. each 7th and 8th stitch. BUTTONHOLES: Work buttonholes on right band (when the garment is worn). 1 buttonhole = Start from the right side and knit the 2nd and 3rd stitch from the edge together, then make 1 yarn over. On the next row knit the yarn over to leave a hole. Work buttonholes when the piece measures: (the last buttonhole is worked on the last row before the neck as described in the text). <0 MONTH: 2, 5, 8, 11, 15 and 18 cm 0/1 MONTH: 2, 6, 10, 14, 18 and 22 cm 1/3 MONTHS: 2, 6, 10, 14, 18, 22 and 26 cm 6/9 MONTHS: 2, 6, 10, 14, 18, 22 and 27 cm 12/18 MONTHS: 2, 6, 10, 14, 18, 23 and 28 cm 2 YEARS: 2, 6, 11, 16, 21, 26, 30 and 35 cm 3/4 YEARS: 2, 7, 12, 17, 22, 27, 32 and 37 cm ------------------------------------------------------- START THE PIECE HERE: ------------------------------------------------------- JACKET - SHORT OVERVIEW OF THE PIECE: The body is worked back and forth with circular needle, from mid front and bottom up as far as the armholes. Then the sleeves are worked in the round with double pointed needles. Body and sleeves are joined together and the yoke is continued back and forth to finished length. BODY: Cast on (81) 99-111-117-129 (135-147) stitches with circular needle size 3.5 mm and Merino Extra Fine. Work 3 RIDGES – see description above. Change to circular needle size 4 mm and work the next row as follows, from the right side: 4 band stitches in garter stitch, work A.1A until there are 5 stitches left on the row (= (12) 15-17-18-20 (21-23) repeats of 6 stitches), A.1B (= 1 stitch) and finish with 4 band stitches in garter stitch. See diagram for right size in A.1A and A.1 B. Continue this pattern. REMEMBER THE KNITTING TENSION and BUTTONHOLES on right band – see description above. On the row marked with arrow-1 in A.1A (wrong side) decrease (3) 1-1-3-3 (1-1) stitches evenly spaced - do not decrease over band stitches = (78) 98-110-114-126 (134-146) stitches on needle. The next row is worked as follows from the right side: 4 band stitches in garter stitch, work A.1A until there are 6 stitches left on row (= (17) 22-25-26-29 (31-34) repeats of 4 stitches), A.1B (= 2 stitches) and finish with 4 band stitches in garter stitch. Continue this pattern. On the row marked with arrow-2 in A.1A increase (3) 1-1-3-3 (1-1) stitches evenly spaced = (81) 99-111-117-129 (135-147) stitches on the needle and the pattern is continued as before. When A.1 has been completed the piece measures approx. (12)15-18-18-18 (24-24) cm. Work 1 row from the right side. Then work next row from the wrong side: Knit 4 band stitches in garter stitch, purl (17) 21-24-24-28 (29-32) AT THE SAME TIME increase (0) 0-1-1-1 (0-1) stitch = (21) 25-29-29-33 (33-37) stitches (= front piece), cast off (4) 4-4-6-6 (6-6) stitches for armhole, purl (31) 41-47-49-53 (57-63) stitches, AT THE SAME TIME increase (2) 0-2-0-0 (0-2) stitches evenly spaced = (33) 41-49-49-53 (57-65) stitches (= back piece), cast off (4) 4-4-6-6 (6-6) stitches for armhole and purl (17) 21-24-24-28 (29-32) stitches AT THE SAME TIME increase (0) 0-1-1-1 (0-1) stitch, and finish with 4 band stitches in garter stitch = (21) 25-29-29-33 (33-37) stitches (= front piece). Lay the piece to one side and work the sleeves. SLEEVE: Cast on (30) 30-30-36-36 (36-42) stitches with double pointed needles size 3.5 mm and Merino Extra Fine. Work 3 RIDGES in the round – see description above. Change to double pointed needles size 4 mm and work A.2 in the round (= (5) 5-5-6-6 (6-7) repeats of 6 stitches). When A.2 has been completed work A.3A in the round. AT THE SAME TIME on the first round adjust the number of stitches to (28) 32-32-36-36 (36-40) stitches (there is now room for (7) 8-8-9-9 (9-10) repeats of 4 stitches) – see INCREASE/DECREASE TIP (evenly spaced). Insert 1 marker in the first stitch of the round (= mid under sleeve) and allow the marker to follow your work upwards. When the piece measures 6 cm increase 2 stitches mid under sleeve – see INCREASE TIP. Increase like this every (2½) 3-2½-3-2½ (2-2 ½) cm a total of (3) 3-5-5-7 (9-10) times = (34) 38-42-46-50 (54-60) stitches. Continue working until the piece measures approx. (12) 15-18-19-22 (25-29) cm but stop after round 3 or 8 in A.3A. The next round is worked as follows: Cast off (2) 2-2-3-3 (3-3) stitches for the armhole, knit (30) 34-38-40-44 (48-54) stitches, then cast off the remaining (2) 2-2-3-3-(3-3) stitches for armhole. Cut the strand and work the other sleeve in the same way. YOKE: Place the sleeves on the same circular needle as the body, where you cast off stitches for the armholes (without working the stitches) = (135) 159-183-187-207 (219-247) stitches on needle. The next row is worked as follows from the right side (when A.3 is worked (on both front-/back pieces and sleeves) it is important to continue the diagram from where you finished on the sleeves): Work 4 band stitches in garter stitch, A.3A over the next (16) 20-24-24-28 (28-32) stitches (= (4) 5-6-6-7 (7-8) repeats of 4 stitches), A.3 B (= 1 stitch), insert 1 marker (= front piece), continue A.3A over the next (30) 34-38-40-44 (48-54) stitches, insert 1 marker (= sleeve), work A.3A over the next (32) 40-48-48-52 (56-64) stitches (= (8) 10-12-12-13 (14-16) repeats of 4 stitches), A.3B (= 1 stitch), insert 1 marker (= back piece), continue A.3A over the next (30) 34-38-40-44 (48-54) stitches, insert 1 marker (= sleeve), work A.3A over the next (16) 20-24-24-28 (28-32) stitches, A.3 B and finish with 4 band stitches in garter stitch (= front piece). Continue this pattern back and forth. AT THE SAME TIME on the next row from the right side decrease to RAGLAN – see description above (= 8 stitches decreased). Decrease like this every 2nd row (i.e. each row from the right side) a total of (8) 10-11-12-14 (15-17) times. After the last decrease to raglan there are (71) 79-95-91-95 (99-111) stitches left on the needle. On the next row from the right side decrease (13) 17-29-19-19 (19-27) stitches evenly spaced – read DECREASE TIP, in addition work the last buttonhole on this row = (58) 62-66-72-76 (80-84) stitches on needle. Change to circular needle size 3.5 mm and knit 1 row from the wrong side, knit 1 row from the right side and knit 1 more row from the wrong side. Cast off with knit from the right side. The jacket measures approx. (22) 26-30-31-32 (39-41) cm from the shoulder down. ASSEMBLY: Sew openings under the sleeves. Sew buttons onto left band. |
|||||||||||||
Diagram explanations |
|||||||||||||
|
|||||||||||||
 |
|||||||||||||
 |
|||||||||||||
 |
|||||||||||||
 |
|||||||||||||
 |
|||||||||||||
 |
|||||||||||||
Have you finished this pattern?Tag your pictures with #dropspattern #preciousmomentsjacket or submit them to the #dropsfan gallery. Do you need help with this pattern?You'll find 25 tutorial videos, a Comments/Questions area and more by visiting the pattern on garnstudio.com. © 1982-2026 DROPS Design A/S. We reserve all rights. This document, including all its sub-sections, has copyrights. Read more about what you can do with our patterns at the bottom of each pattern on our site. |
|||||||||||||


With over 40 years in knitting and crochet design, DROPS Design offers one of the most extensive collections of free patterns on the internet - translated to 17 languages. As of today we count 324 catalogues and 12290 patterns translated into English (UK/cm). 12290
We work hard to bring you the best knitting and crochet have to offer, inspiration and advice as well as great quality yarns at incredible prices! Would you like to use our patterns for other than personal use? You can read what you are allowed to do in the Copyright text at the bottom of all our patterns. Happy crafting!
Post a comment to pattern DROPS Baby 33-11
We would love to hear what you have to say about this pattern!
If you want to leave a question, please make sure you select the correct category in the form below, to speed up the answering process. Required fields are marked *.