
Popular categories
Looking for a yarn?


Comments / Questions (16)
![]() Ann Kristin Staberg wrote:
Ann Kristin Staberg wrote:
Lurer på om disse garnet Drops Brushed alpaca silk skal strikke i to tråder eller en tråd?
30.08.2021 - 10:18DROPS Design answered:
Hei Ann Kristin. Denne jakke med riller og rundfelling strikkes med 1 tråd DROPS Brushed Alpaca Silk, men kan f.eks strikkes med 2 tråder DROPS Alpaca. mvh DROPS design
30.08.2021 - 12:47
![]() Beatrice Mikha wrote:
Beatrice Mikha wrote:
The photo makes the article look thick,is it really only one strand of alpaca silk used?
22.07.2021 - 09:14DROPS Design answered:
Hi Beatrice, Yes, the Brushed Alpaca Silk is a yarn from group C, which is a medium thick yarn. Happy crafting!
22.07.2021 - 09:46
![]() Francine wrote:
Francine wrote:
Bonjour,j'ai une difficulté avec les augmentations de l'empiecement: je n'obtiens pas le même nombre de mailles entre les lignes. Faut-il augmenter avant et après la maille A1 sur le même rang? Merci de votre aide.
22.11.2019 - 20:01DROPS Design answered:
Bonjour Francine, on augmente dans 1 motif de A.1 sur 3 tous les 4 rangs, ainsi on va d'abord augmenter 1 m dans le 1er A.1, puis tricoter les 2 suivants comme avant; la 2ème fois, on augmente 1 m dans le 2ème A.1 (les 2 premiers A.1 ont le même nombre de mailles, le dernier se tricote comme avant). La 3ème fois, augmente dans le 3ème A.1, ainsi tous les A.1 ont le même nombre de mailles. On répète ces 3 types d'augmentations le nombre de fois requis pour la taille. En fonction de la taille, le nombre de mailles dans chaque A.1 sera différent à la fin de l'empiècement. Bon tricot!
25.11.2019 - 08:07
![]() Kristina Skjemstad wrote:
Kristina Skjemstad wrote:
Det står ulike størrelser, men jeg finner ingen steder det står hvor stor - altså mål på de ulike størrelsene. Så da er spørsmålet hvor stor er de ulike størrelsene?
02.10.2019 - 22:15DROPS Design answered:
Hej. Du finner målskiss längst ner på oppskriften, där ser du mål i alla storlekar. Lycka till!
03.10.2019 - 07:10
![]() Ann Kristin wrote:
Ann Kristin wrote:
Når vi skifter til pinne 5, hvilken omgang skal vi begynne på i mønster; rettomgang eller xx0?
08.07.2019 - 19:20DROPS Design answered:
Hei Ann Kristin, Du begynner på første omgang; dvs, rett fra retten. God fornøyelse!
09.07.2019 - 07:32
![]() Lyne wrote:
Lyne wrote:
Je ne comprend pas bien les explications pour les augmentations. L'empiecement ne fait de belles lignes comme on voit sur le modèle. Pouvez vous m'aider ?
16.04.2019 - 00:20DROPS Design answered:
Bonjour Lyne, vous devez augmenter d'abord avant la m endroit de A.1 puis après la m endroit de A.1, cette maille endroit doit continuer tout du long pour former les fameuses lignes. Les augmentations vont se faire dans les mailles point mousse entre les mailles endroit. Bon tricot!
23.04.2019 - 10:23
![]() Monika Bourgat wrote:
Monika Bourgat wrote:
Hi, möchte die Jacke 2 faedig mit Alpaca und Alpaca Kid silk stricken.....beides Gruppe A...Reichen 200g Alpaca wolle und wieviel gramm Alpaca kid silk benötige ich....?????
22.03.2019 - 11:56DROPS Design answered:
Liebe Frau Bourgat, hier lesen Sie mehr über Garnalternativen sowie wie man die neue Garnmenge kalkuliert. Viel Spaß beim stricken!
22.03.2019 - 13:33
![]() Anne Marie wrote:
Anne Marie wrote:
Det står at det økes på hver 4. pinne (= fra retten). Vil ikke det si på retten og vrangen annenhver gang?
25.08.2018 - 15:26DROPS Design answered:
Hei Anne Marie, Du øker hver 4. pinne (eller 2. hver pinne fra retten). God fornøyelse!
28.08.2018 - 08:07
![]() Anne Maroe wrote:
Anne Maroe wrote:
Det står at det økes på hver 4. pinne (= fra retten). Vil ikke det si på retten og vrangen annenhver gang?
25.08.2018 - 15:24
![]() Lone Skov wrote:
Lone Skov wrote:
Hvor finder jeg diagram A-1 nu har jeg prøvet flere gange men det er her ikke, i har ellers lavet rettelser. Hilsen Lone Skov
22.08.2018 - 12:53DROPS Design answered:
Hei Lone. Diagram A.1 ligger helt i bunnen av siden, til høyre for målskissen. Vi har nå sjekket, og det er synlig fra både pc og mobil når vi sjekker. Får du det ikke opp uansett hvaslags enhet du bruker?
23.08.2018 - 09:07
|
||||||||||
Francine#francinecardigan |
||||||||||
 |
 |
|||||||||
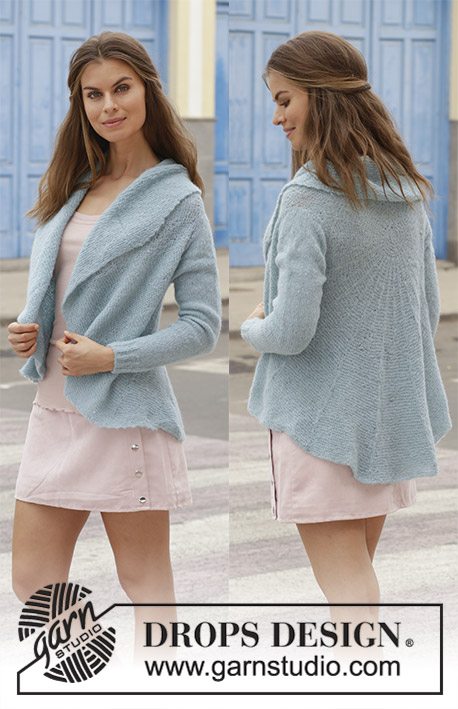
Knitted jacket with garter stitch and round yoke, worked top down. Sizes S - XXXL. The piece is worked in DROPS Brushed Alpaca Silk.
DROPS 188-12 |
||||||||||
|
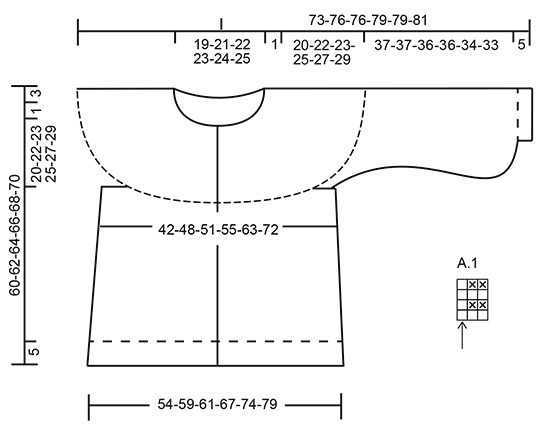
INFORMATION FOR THE PATTERN: RIDGE/GARTER STITCH (worked back and forth): 1 ridge = Knit 2 rows. PATTERN: See diagram A.1. INCREASE TIP-1 (for yoke): Increase stitches alternately before and after the last knitted stitch in A.1 – See arrow in diagram. i.e. the first increase is after the last knitted stitch and the second is increased before the last knitted stitch. Increase as follows: Make 1 yarn over between 2 stitches, the yarn over is worked twisted on the next row. Then the increased stitch is worked in garter stitch. In other words, each time you increase there will be 1 more stitch in garter stitch in the A.1 you increased in. INCREASE TIP-2 (for increases in sides of body and on sleeves): Work until there are 2 stitches left before the marker thread, make 1 yarn over, knit 4 stitches (the marker thread sits in the middle of these 4 stitches), make 1 yarn over (= 2 stitches increased). Increase like this at both marker threads on the body. The yarn overs are worked twisted on the next row/round to avoid holes. DECREASE TIP (for sleeves): Work until there are 3 stitches left before the marker thread, slip 1 stitch as if to knit, knit 1, pass the slipped stitch over the knitted stitch, knit 2 stitches (the marker thread sits in the middle of these 2 stitches), knit the next 2 stitches together (= 2 stitches decreased). BUTTONHOLES: Work buttonholes on the right band (when the garment is worn). Work from the right side, when there are 3 stitches left on the row as follows: Make 1 yarn over, knit the next 2 stitches together and knit the last stitch. On the next row knit the yarn over to leave a hole. The first buttonhole is worked when the rib in the neck measures approx. 1½-2 cm. The next 6 buttonholes are then worked with approx. 7-7½-7½-8-8-8 cm between each one. ---------------------------------------------------------- JACKET: The piece is worked back and forth, top down. The yoke is worked, then you divide the piece and the sleeves and body are finished separately. The sleeves are worked in the round with double pointed needles /short circular needle. YOKE: Cast on 94-98-104-108-112-114 stitches (including 5 band stitches in each side of the piece) with circular needle size 4 mm. Work 2 RIDGES – see description above. The next row is worked as follows from the right side: Work 5 band stitches in garter stitch, knit 16-17-18-19-20-21 stitches and increase 4-5-4-5-4-6 stitches evenly over these stitches (= left front piece), * knit 1, 1 yarn over *, work from *-* over the next 10 stitches (= left sleeve = 10 stitches increased), knit 32-34-37-39-41-42 stitches and increase 6-9-6-8-6-10 stitches evenly over these stitches (= back piece), * knit 1, 1 yarn over *, work from *-* over the next 10 stitches (= right sleeve = 10 stitches increases), knit 16-17-19-20-21-21 stitches and increase 4-5-3-5-4-5 stitches evenly over these stitches and finish with 5 band stitches in garter stitch (= right front piece) = 128-137-137-146-146-155 stitches. Knit 1 row from the wrong side, the yarn overs are worked twisted to avoid holes. Change to circular needle size 5 mm. Then work the next row from the right side as follows: Work 5 band stitches in garter stitch, 1 stitch in stocking stitch, A.1 (= 3 stitches) until there are 5 stitches left (= 39-42-42-45-45-48 times in width), finish with 5 band stitches in garter stitch. Continue the pattern like this AT THE SAME TIME as you increase as follows: YOKE SHAPING: Increase alternately in every 3rd repeat of A.1 in width every 4th row (= from the right side) as follows: INCREASE 1: Work 5 band stitches in garter stitch, 1 stitch in stocking stitch, * increase 1 stitch – read INCREASE TIP-1, in first A.1, then work the next 2 repeats of A.1 in width as before *, work from *-* until there are 5 stitches left, finish with 5 band stitches in garter stitch = 13-14-14-15-15-16 stitches increased. Work 3 rows of pattern. REMEMBER THE KNITTING TENSION! INCREASE 2: Work 5 band stitches in garter stitch, 1 stitch in stocking stitch, * work 1 repeat of A.1 as before, increase 1 stitch in the next A.1, work the next repeat of A.1 as before *, work from *-* until there are 5 stitches left, finish with 5 band stitches in garter stitch = 13-14-14-15-15-16 stitches increased. Work 3 rows of pattern. INCREASE 3: Work 5 band stitches in garter stitch, 1 stitch in stocking stitch, * work 2 repeats of A.1 as before, increase 1 stitch in the next A.1 *, work from *-* until there are 5 stitches left, finish with 5 band stitches in garter stitch = 13-14-14-15-15-16 stitches increased. Work 3 rows of pattern. Repeat increases 1 to 3 a total of 3-3-3-3-4-4 times (= a total of 9-9-9-9-12-12 increase-rows), then increase 1is repeated 0-1-1-1-1-1 more time (= a total of 9-10-10-10-13-13 increase-rows), then increase 2 is repeated 0-0-1-1-0-1 more time (= a total of 9-10-11-11-13-14 increase-rows) = 245-277-291-311-341-379 stitches. Continue with pattern until the piece measures 21-23-24-26-28-30 cm from the cast-on edge. The next row from the right side is worked as follows: Work 5 band stitches in garter stitch, knit 32-37-39-43-48-56 stitches (= front piece), place the next 54-60-64-66-70-74 stitches on 1 thread (= sleeve), cast on 8-8-10-10-12-12 new stitches on the needle, insert 1 marker thread in the middle of these new stitches (= in side under sleeve), knit the next 63-73-76-84-95-110 stitches (= back piece), place the next 54-60-64-66-70-74 stitches on 1 thread (= sleeve), cast on 8-8-10-10-12-12 new stitches on the needle, insert 1 marker thread in the middle of these new stitches (= in side under sleeve), knit 32-37-38-42-48-55 stitches and finish with 5 band stitches in garter stitch (= front piece). Body and sleeves are finished separately. THE PIECE IS NOW MEASURED FROM HERE! BODY: = 153-173-183-199-225-255 stitches. Continue working in stocking stitch with 5 band stitches in garter stitch in each side of the piece. When the piece measures 3 cm from where the sleeves were placed on 1 thread, increase 1 stitch on each side of the marker threads (= 4 stitches increased) – read INCREASE TIP-2! Increase like this every 2½-3-3-2½-3-5 cm a total of 10-9-9-10-9-6 times = 193-209-219-239-261-279 stitches. When the piece measures 31-31-32-32-32-32 cm from where the sleeves were placed on the thread, work the next row from the wrong side as before AT THE SAME TIME as you increase 3-3-1-1-3-1 stitches evenly on row = 196-212-220-240-264-280 stitches. Change to circular needle size 4 mm.Then work rib on the next row from the right side as follows: Work 5 band stitches in garter stitch, knit 2 stitches, rib (purl 2 / knit 2) until there are 5 stitches left, finish with 5 band stitches in garter stitch. Work like this for 5 cm. Cast off with knit over knit and purl over purl. Make sure that the cast-off edge is not tight; you can cast off with a needle 1 size larger if necessary. The piece measures approx. 36-36-37-37-37-37 cm from where the sleeves were separated from the body and a total of 60-62-64-66-68-70 cm from the shoulder. SLEEVE: The piece is worked in the round with double pointed needles / short circular needle. Place the 54-60-64-66-70-74 stitches from the thread in the one side of the piece on double pointed needles size 5 mm and knit up 1 stitch in each of the 8-8-10-10-12-12 stitches cast on under the sleeve, insert 1 marker thread in the middle of these new stitches = 62-68-74-76-82-86 stitches. Work stocking stitch. When the piece measures 3 cm from where the sleeves were separated from the body, decrease 1 stitch on each side of the marker thread (= 2 stitches decreased) – read DECREASE TIP! Decrease like this every 3 cm a total of 4-4-5-5-6-6 times = 54-60-64-66-70-74 stitches. Then increase 1 stitch on each side of the marker thread (= 2 stitches increased). Increase like this every 3-3-3-3-2-2 cm a total of 7-6-6-7-7-7 times = 68-72-76-80-84-88 stitches. Change to short circular needle when necessary. When the piece measures 37-37-36-36-34-33 cm from where the sleeve was separated from the body, change to double pointed needles size 4 mm and work 1 round where all stitches are knitted together 2 and 2 = 34-36-38-40-42-44 stitches. Then work rib (= purl 2 / knit 2) AT THE SAME TIME as you increase 2-0-2-0-2-0 stitches evenly on round = 36-36-40-40-44-44 stitches. Cast off with knit over knit and purl over purl when the piece measures 42-42-41-41-39-38 cm from where the sleeve was separated from the body and a total of 63-65-65-67-67-68 cm from the neck. Work the other sleeve in the same way. |
||||||||||
Diagram explanations |
||||||||||
|
||||||||||
 |
||||||||||
Have you finished this pattern?Tag your pictures with #dropspattern #francinecardigan or submit them to the #dropsfan gallery. Do you need help with this pattern?You'll find 22 tutorial videos, a Comments/Questions area and more by visiting the pattern on garnstudio.com. © 1982-2026 DROPS Design A/S. We reserve all rights. This document, including all its sub-sections, has copyrights. Read more about what you can do with our patterns at the bottom of each pattern on our site. |
||||||||||


With over 40 years in knitting and crochet design, DROPS Design offers one of the most extensive collections of free patterns on the internet - translated to 17 languages. As of today we count 324 catalogues and 12290 patterns translated into English (UK/cm). 12290
We work hard to bring you the best knitting and crochet have to offer, inspiration and advice as well as great quality yarns at incredible prices! Would you like to use our patterns for other than personal use? You can read what you are allowed to do in the Copyright text at the bottom of all our patterns. Happy crafting!
Post a comment to pattern DROPS 188-12
We would love to hear what you have to say about this pattern!
If you want to leave a question, please make sure you select the correct category in the form below, to speed up the answering process. Required fields are marked *.