
Popular categories
Looking for a yarn?


Comments / Questions (27)
![]() Mary Lou Williams wrote:
Mary Lou Williams wrote:
Do you do anything to finish the neck edge?
30.03.2019 - 23:48DROPS Design answered:
Dear Mrs Williams, there is no finishing edge on neck to this pattern. Happy knitting!
01.04.2019 - 16:12
![]() Mary Lou Williams wrote:
Mary Lou Williams wrote:
Do you do any finishing to the neck edge?
30.03.2019 - 23:44
![]() Mary Lou Williams wrote:
Mary Lou Williams wrote:
Do you do any finishing to the neck edge. It doesn"t look very finished!
30.03.2019 - 23:41DROPS Design answered:
Dear Ms. Williams, no, there is no special finishing for the neck edge in this pattern. But of course you can use some of your favourite edging - knitted or crocheted. You only have to do it loose enough, so the garment stay flat. Happy knitting!
31.03.2019 - 17:38
![]() Domi wrote:
Domi wrote:
Bonjour, je désirerais faire ce modèle pour ma nièce de 16 ans qui taille XS, pensez-vous qu'en diminuant la taille des aiguilles du 9 au 8 ou au 7 peut me permettre d'atteindre cette taille XS ?Merci de votre réponse. Cordialement.
10.12.2018 - 20:06DROPS Design answered:
Bonjour Domi, nous ne sommes malheureusement pas en mesure de pouvoir ajuster chacun de nos modèles à chaque demande. Vous pouvez vous aider du schéma des mesures et ajuster en fonction de votre tension. Votre magasin saura vous assister si nécessaire - même par mail ou téléphone. Bon tricot!
11.12.2018 - 08:49
![]() Cherylin wrote:
Cherylin wrote:
I am confused by the instructions to skip 53-59-61 etc stitches in the second row after casting on. Does this mean to slip them or to SKP?
15.11.2018 - 06:00DROPS Design answered:
Dear Cherylin, after you have worked the first round purling all sts, you will now insert 2 markers (without working the sts): insert the 1st marker in the first st on the round, then count 53..77 sts (see size) and insert a marker in the next stitch (= 54th, ... 78th stitch - see size). You will not work the stitches on this round, just count them and insert the markers. Happy knitting!
15.11.2018 - 09:10
![]() Pauliina Lilja wrote:
Pauliina Lilja wrote:
Hei, onkohan tämä ohje kuitenkin alhaalta ylös eikä ylhäältä alas? Kiitos ihanasta ohjeesta! I think if this pattern is bottom up, no top down. Best regards Pauliina
22.03.2018 - 08:43DROPS Design answered:
Hei! Kiitos viestistä, malli neulotaan tietysti alhaalta ylös. Otsikko on korjattu.
22.03.2018 - 14:16
![]() Anne Sophie wrote:
Anne Sophie wrote:
Bonjour! J'ai une question sur le partie à la en aller retours du devant et du dos. Que voulez vous dire par alterner 3 mailles au point mousse et 3 mailles en point jersey ? Faut-il faire tout un rang en maille endroit puis faire un rang alterner 3 mailles endroits puis 3 mailles envers ? Merci d'avance
29.12.2017 - 23:00DROPS Design answered:
Bonjour Anne-Sophie, tout à fait, sur l'endroit, vous tricoterez en mailles endroit, mais sur l'envers, il vous faudra alterner mailles envers et mailles endroit pour que, vu sur l'endroit, vous ayez bien: 3 m point mousse, *3 m jersey, 3 m point mousse*. Bon tricot!
02.01.2018 - 10:28
![]() Ingegerd Jonsson wrote:
Ingegerd Jonsson wrote:
Hur gör om man inte vill använda rundstickor.? Kanske för att gör sprund vid sidorna.
13.12.2017 - 10:52Lada wrote:
Hi! My question is: was it a designer's idea to tuck in sleeves? Or it happened by chance? I gonna knit this jumper and already ordered yarn. So I would like to know what should come out finally. Thank you.
28.11.2017 - 15:44DROPS Design answered:
Dear Lada, the bottom of sleeve will be folded when piece is done. You can check the measurements for your size in chart so that you will be sure that the sleeve will be long enough to fold the bottom. Happy knitting!
29.11.2017 - 08:15
![]() Lise wrote:
Lise wrote:
Hej. Jeg har nu fået strikket en dejlige sweater til min datte, men efter første gangs brug, er hendes bukser og blusen hun havde under ødelagt, fordi svweateren fnuller forfærdelig meget. Hvad gør jeg nu? Hilsen Lise Erikstrup
14.04.2017 - 22:51DROPS Design answered:
Hei Lise. For at Melody skal gi en mohair look vil alltid være litt løse overskuddsfiber som faller av ved brukt, dette vil avta etterhvert. Du kan også bruke en klesrulle for å fjerne løse fibrer før bruk.
21.04.2017 - 07:55
|
|
Randi#randisweater |
|
 |
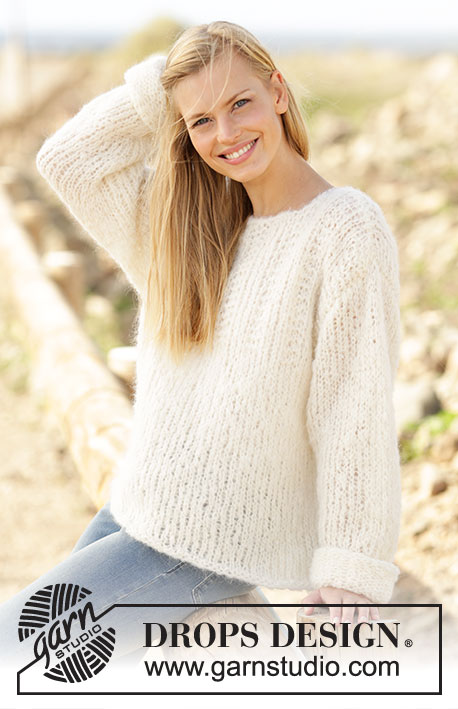 |
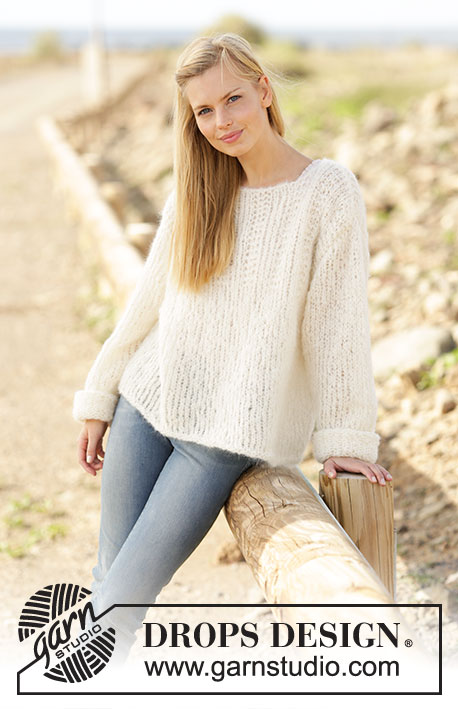
Knitted jumper with textured pattern on yoke and folded sleeve edges, worked bottom up in DROPS Melody. Size: S - XXXL
DROPS 175-26 |
|
|
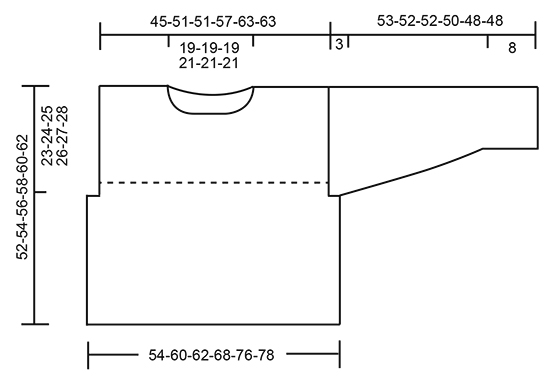
GARTER STITCH (back and forth): Knit all rows. 1 ridge = Knit 2 rows. INCREASE TIP: Increase as follows before stitch with marker: Work until 1 stitch remains before stitch with marker, make a yarn over. Increase as follows after stitch with marker: Work 1 stitch, make a yarn over. On next round knit yarn overs twisted to avoid holes. ---------------------------------------------------------- JUMPER: Body is first worked in the round on circular needle, then divide the piece and finish front and back piece separately back and forth. Sleeves are worked in the round on double pointed needles and sleeve cap is worked back and forth. Cast on 108-120-124-136-152-156 stitches on circular needle size 9 mm with Melody. Purl 1 round. Insert 1 marker in first stitch, skip 53-59-61-67-75-77 stitches and insert 1 marker in next stitch. Work in stocking stitch. REMEMBER THE KNITTING TENSION! When piece measures 29-30-31-32-33-34 cm, cast off 7-7-9-9-11-13 stitches in each side for armholes (i.e. stitch with marker and 3-3-4-4-5-6 stitches on each side of both markers). Work front and back piece back and forth separately. BACK PIECE: Worked back and forth. = 47-53-53-59-65-65 stitches. Work 2 rows in stocking stitch. Work next row from right side as follows: Work 1 edge stitch in GARTER STITCH - see explanation above, work 3 stitches in garter stitch, * 3 stitches in stocking stitch, 3 stitches in garter stitch *, repeat from *-* until 1 stitch remains on row, 1 edge stitch in garter stitch. Continue pattern like this. When piece measures 50-52-54-56-58-60 cm, cast off the middle 17-17-17-19-19-19 stitches for neck and finish each shoulder separately. Then cast off 1 stitch on next row from neck =14-17-17-19-22-22 stitches remain for shoulder. Cast off when piece measures 52-54-56-58-60-62 cm. FRONT PIECE: Worked back and forth. = 47-53-53-59-65-65 stitches. Work 2 rows in stocking stitch. Then work pattern as on back piece. When piece measures 44-46-48-48-50-52 cm, cast off the middle 11-11-11-13-13-13 stitches for neck and finish each shoulder separately. Then cast off on every row from neck as follows: 2 stitches 1 time and 1 stitch 2 times = 14-17-17-19-22-22 stitches remain for shoulder. Cast off when piece measures 52-54-56-58-60-62 cm. SLEEVE: Worked in the round on double pointed needles. Cast on 21-22-23-24-25-26 stitches on double pointed needles size 9 mm. Purl 1 round from right side. Insert 1 marker in the first stitch on round. Then work in stocking stitch. When sleeve measures 8 cm in all sizes, increase 1 stitch on each side of marker - READ INCREASE TIP. Increase like this every 4th round 9-11-8-6-1-1 times in total and every 5th-0-3rd-3rd-3rd-3rd round 2-0-4-6-12-12 times in total = 43-44-47-48-51-52 stitches. When piece measures 50-49-49-47-45-45 cm (shorter measurements in the larger sizes because of wider shoulders), cast off 7-7-9-9-11-13 stitches mid under sleeve (i.e. stitch with marker and 3-3-4-4-5-6 stitches on each side of stitch with marker). Then work a small sleeve cap back and forth in stocking stitch. Cast off stitches at beginning of every row in each side as follows: Cast off 5 stitches 1 time and 4 stitches 1 time = 18-19-20-21-22-21 stitches. Cast off. Piece measures approx. 53-52-52-50-48-48 cm. Work another sleeve the same way. ASSEMBLY: Sew shoulders together with grafting/kitchener stitches inside cast-off edge. Then sew sleeves in body: Sew inside edge stitch in garter stitch on body and cast-off edge on sleeves. Fold the sleeve edges up 2 times and fasten with a small stitch in each side. |
|
 |
|
Have you finished this pattern?Tag your pictures with #dropspattern #randisweater or submit them to the #dropsfan gallery. Do you need help with this pattern?You'll find 23 tutorial videos, a Comments/Questions area and more by visiting the pattern on garnstudio.com. © 1982-2026 DROPS Design A/S. We reserve all rights. This document, including all its sub-sections, has copyrights. Read more about what you can do with our patterns at the bottom of each pattern on our site. |
|


With over 40 years in knitting and crochet design, DROPS Design offers one of the most extensive collections of free patterns on the internet - translated to 17 languages. As of today we count 324 catalogues and 12290 patterns translated into English (UK/cm). 12290
We work hard to bring you the best knitting and crochet have to offer, inspiration and advice as well as great quality yarns at incredible prices! Would you like to use our patterns for other than personal use? You can read what you are allowed to do in the Copyright text at the bottom of all our patterns. Happy crafting!
Post a comment to pattern DROPS 175-26
We would love to hear what you have to say about this pattern!
If you want to leave a question, please make sure you select the correct category in the form below, to speed up the answering process. Required fields are marked *.