
Popular categories
Looking for a yarn?


Comments / Questions (59)
![]() Lydia wrote:
Lydia wrote:
Bonjour, Je vais tricoter les manches (je fais la taille M) et j’ai un doute concernant l’explication suivante : « Reprendre les mailles en attente d’un côté… 92 m et monter 12 m à la fin du 1er tour. » Ne faudrait-il pas relever des mailles plutôt que d’en monter ? En montant des mailles, il me semble qu’il y aurait un trou au niveau des manches. Pourriez-vous m’éclairer, s’il vous plaît ? Merci beaucoup !
01.11.2025 - 23:25DROPS Design answered:
Bonjour Lydia, dans ce modèle, les mailles sous les manches sont montées séparément et seront cousues à la fin contre les mailles montées lors de la division de l'empiècement pour refermer le trou (cf ASSEMBLAGE). Bon tricot!
03.11.2025 - 07:55
![]() Sylvie wrote:
Sylvie wrote:
Bonjour. Est il possible de faire ce modèle au point mousse avec un autre point par exemple au point jersey ou au point de riz ou de blé. Merci pour votre réponse
07.07.2025 - 21:05DROPS Design answered:
Bonjour Sylvie, l'echantillon pour le point mousse est different en hauteur, donc dans ce genre de pull le changement de point va etre assez complique. Bon tricot!
09.07.2025 - 08:28
![]() Sylvie wrote:
Sylvie wrote:
Bonjour. Je n'ai pas compris comment faire un domino. Pouvez vous m'aider ? Je ne comprends pas les explications. Merci et bonne journée
06.03.2025 - 05:44DROPS Design answered:
Bonjour Sylvie, le domino va se tricoter différemment en fonction de la taille, cf DOMINO au tout début des explications + choisissez le paragraphe correspondant à la taille suivie. Vous allez augmenter aux marqueurs indiqués aux rangs 2, 4, 6 et 8 (taille S à XL) / aux rangs 2,4,6,8 et 10 (taille XXL et XXXL) - numérotez vos marqueurs si besoin pour mieux vous y retrouvez et augmentez ainsi = au milieu dos + pour les manches et pour les devants. Bon tricot!
06.03.2025 - 10:59
![]() Lucie wrote:
Lucie wrote:
Bonjour, je vais attacher les mailles du dos, c'est-à-dire les mailles à partir du côté jusqu'à la pointe du bas du domino au milieu dos. Pour le rang 1, est il bien de tricoter l'endroit jusqu'à la fin du rang après 2 fois de 2 m ens tourse à l'end ? Merci "RANG 1 (= sur l'endroit): 1 m end, 1 jeté, 2 m ens torse à l'end (= dans le brin arrière au lieu du brin avant), 2 m ens torse à l'end, terminer le rang à l'end (= 1 diminution)."
27.02.2025 - 11:38DROPS Design answered:
Bonjour Lucie, tout à fait, le 1er rang se tricote sur l'endroit avec 2 diminutions + 1 jeté (on diminue 1 seule maille) et jusqu'à la fin du rang (= mailles de la bordure). Au rang suivant = sur l'envers, vous tricotez les 2 mailles suivantes en attente avec la dernière maille de la bordure pour l'attacher. Bon tricot!
27.02.2025 - 16:46
![]() Lucie wrote:
Lucie wrote:
Cela dire que je dois faire seulement 10 rangs (rangs 1-8 puis rang 1 et rang 2) comme on enlève 4 m. pour les 8 rangs ? Merci pour l'aide
02.02.2025 - 23:59DROPS Design answered:
Lorsque vous attachez les mailles de la bordure à celles du devant droit, vous tricotez, sur l'envers, la dernière maille de la bordure avec les 2 premières mailles du devant droit (aux rangs 2 et 8). Vous devez ainsi répéter les 8 rangs: de 1 à 8 jusqu'à ce que toutes les mailles en attente en bas du devant droit ont été tricotées/attachées à celles de la bordure. Bon tricot!
03.02.2025 - 10:23
![]() Lucie wrote:
Lucie wrote:
Bonjour, suite à la j'ai 5 marqueurs sur l'aiguille (deux marqueurs dans les deux côtés - 6 m. après la bordure, deux pour les sous-manches, un pour le milieu du dos). Dans ''Répéter les rangs 1-8 jusqu'à ce que toutes les mailles avant le marqueur sur le côté (= celles du devant droit) ... la bordure.'' Est il jusqu'au 1er marqueur que je dois arrêter ? (voir la suite)
02.02.2025 - 23:59DROPS Design answered:
Bonjour Lucie, lorsque vous tricotez la bordure du bas, vous allez d'abord tricoter à partir du bas du devant droit jusqu'à ce que toutes les mailles du côté droit du gilet (le côté sous la manche = jusqu'au marqueur sur le côté de l'ouvrage) aient été tricotées, autrement dit, toutes les mailles du devant droit doivent avoir été tricotées avec celles de la bordure, au rang suivant, vous allez commencer à attacher les mailles du dos (en commençant par le côté droit du dos, car on ne coupe pas le fil). Bon tricot!
03.02.2025 - 10:20
![]() Lucie wrote:
Lucie wrote:
Bonjour, est-il nécessaire de changer la couleur tous les deux rangs pour ces 8 rangs comme comme avant en rayures ? J'ai un doute pour le rang 5, car les rang 3 et 4 sont en brume de roses. Le rang 4 ne finit pas jusqu'à la fin puis on doit tourner pour continuer au rang 5. Donc, je ne sais pas si je dois changer la couleur en naturel pour rang 5 ?
09.09.2024 - 19:06DROPS Design answered:
Bonjour Lucie, vous n'êtes pas obligée de faire les rayures si vous ne les voulez pas, sinon tricotez ainsi: les rangs 1 et 2 en naturel (on tricote toutes les mailles), les rangs 3 à 8 (y compris les rangs raccourcis) en brume de roses. Bon tricot!
10.09.2024 - 09:09
![]() Lucie wrote:
Lucie wrote:
Bonjour, est-il nécessaire de changer la couleur tous les deux rangs pour ces 8 rangs comme comme avant en rayures ? J'ai un doute pour le rang 5, car les rang 3 et 4 sont en brume de roses. Le rang 4 ne finit pas jusqu'à la fin puis on doit tourner pour continuer au rang 5. Donc, je ne sais pas si je dois changer la couleur en naturel pour rang 5 ?
05.09.2024 - 15:06
![]() Lucie wrote:
Lucie wrote:
Ensuite, je dois tricoter 8 rangs pour le DEVANT DROIT. Je n'ai pas vraiment compris le rang 2 : "... glisser ensuite les 2 premières m de l'empiècement sur l'aiguille gauche et tricoter 3 m ens à l'end." Ici les 2 premières mailles de l'empiècement sont elles la fin du dernier rang de l'empiècement que je venais terminer ?
01.09.2024 - 17:21DROPS Design answered:
Bonjour Lucie, les 2 premières mailles de l'empiècement sont les 2 premières des 293 m en attente, au2ème rang de la bordure (sur l'envers de la bordure), vous mettez ces 2 mailles sur l'aiguille gauche et vous tricotez 3 m ens à l'endroit = la dernière maille de la bordure et ces 2 mailles de l'empiècement; Vous répèterez ceci au rang 8 (les 2 m suivantes en attente), ainsi tous les rangs 2 et 8 de la bordure, vous attachez la bordure à l'empiècement. Bon tricot!
02.09.2024 - 09:09
![]() Lucie wrote:
Lucie wrote:
Bonjour, j'ai terminé l'empiècement, c'est à dire que j'ai 293 mailles (taille M) sur l'aiguille. Je vais ensuite tricoter la partie du bas. Je n'ai pas compris comment on attache l'empiècement et la partie du bas que je vais ensuite tricoter. Je vois que je dois monter 28 mailles avec l'aiguillet. Faut il que je prenne une autre aiguille pour monter les 28 mailles en naturel ? Dois-je couper le fil du dernier rang terminé de l'empiècement ? (voir la suite du meesage)
01.09.2024 - 17:20DROPS Design answered:
Bonjour Lucie, vous pouvez laisser les 293 m sur une autre aiguille pour pouvoir les reprendre plus facilement, et monter les 28 m de la bordure avec l'aiguille circulaire 3,5, suivez ensuite les explications de la bordure devant droit rang après rang: vous allez tricoter des rangs raccourcis pour former le côté évasé du bas du gilet et en même temps, au 1er et au 8ème rang de la bordure, vous tricotez la dernière maille de la bordure avec les 2 premières des 293 m en attente; continuez ainsi, autrement dit, à chaque fois que vous tricotez le rang 1 et le rang 8, vous attachez la bordure au bas de l'empiècement. Bon tricot!
02.09.2024 - 09:07
|
|||||||
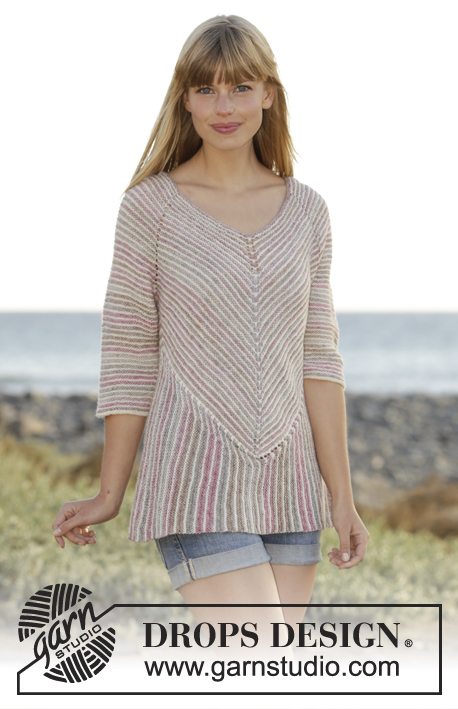
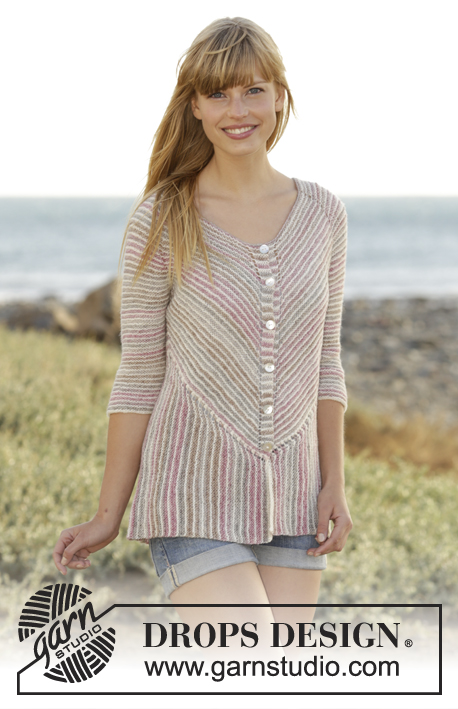
Crayons Cardigan#crayonscardigan |
|||||||
 |
 |
||||||
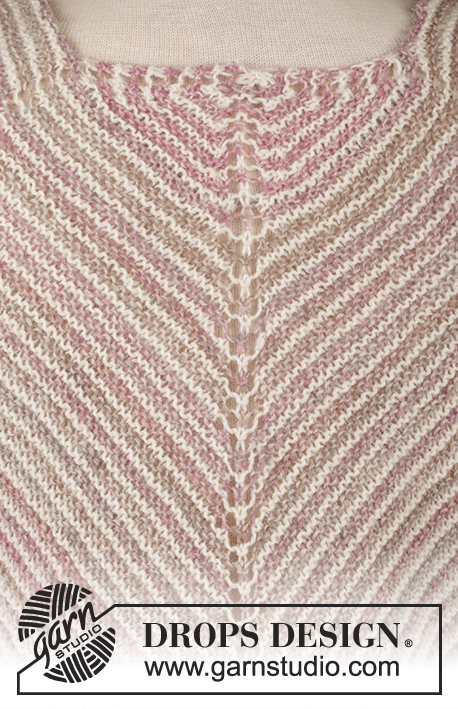
Knitted DROPS jacket worked diagonally in garter st with stripes and domino squares in ”Fabel”. Worked top down. Size: S - XXXL.
DROPS 167-35 |
|||||||
|
FABEL: Cast on with different colour so that stripes fit vertically. In size S-M-L-XXXL cast on with off white. In size XL-XXL cast on with rose mist. GARTER ST (back and forth): K all rows. 1 ridge = 2 rows K. GARTER ST (worked in the round): 1 ridge = 2 rounds. * K 1 round and P 1 round *, repeat from *-*. STRIPES: Work stripes in the different sizes as follows: SIZE S-M-L-XXXL: 1 ridge (first row = RS) with off white. 1 ridge (first row = RS) with rose mist. SIZE XL-XXL: 1 ridge (first row = RS) with rose mist. 1 ridge (first row = RS) with off white. DOMINO SQUARE: SIZE S-M-L-XL: ROW 1 (= WS): K all sts. ROW 2 (= RS): Inc 1 YO after 1st-2nd-4th-5th marker and 1 YO before 3rd-4th-6th-7th marker (= 8 sts inc on row). ROW 3 (and all rows from WS): K all sts, do not work YOs twisted; they should make holes. ROW 4: Inc 2 YOs after 1st and 4th marker as follows: Work to and with st with marker, 1 YO, K 1, 1 YO. Inc 2 YOs before 4th and 7th marker as follows: Work until 1 st remains before st with marker, 1 YO, K 1, 1 YO (= 8 sts inc on back and front piece). ROW 6: As 2nd row. ROW 8: Inc 1 YO after 1st and 4th marker and 1 YO before 4th and 7th marker (= 4 sts inc on back and front piece). ROW 10: As 2nd row. SIZE XXL-XXXL: ROW 1 (= WS): K all sts. ROW 2 (= RS): Inc 1 YO after 1st-2nd-4th-5th marker and 1 YO before 3rd-4th-6th-7th marker (= 8 sts inc on row). ROW 3 (and all rows from WS): K all sts, do not work YOs twisted; they should make holes. ROW 4: Inc 2 YOs after 1st and 4th marker as follows: Work to and with st with marker, 1 YO, K 1, 1 YO. Inc 2 YOs before 4th and 7th marker as follows: Work until 1 st remains before st with marker, 1 YO, K 1, 1 YO (= 8 sts inc on back and front piece). ROW 6: As 2nd row. ROW 8: As 4th row. ROW 10: As 2nd row. ROW 12: As 2nd row. DECREASE TIP (applies to mid under sleeve): Dec on each side of marker as follows: Beg 4 sts before marker and K 2 tog, K 4 (marker is between these 4 sts), slip 1 st as if to K, K 1, psso (= 2 sts dec). BUTTONHOLES: Dec for buttonholes on right band. K tog fourth and fifth st from edge and make 1 YO. Dec for buttonholes when piece measures along front band stitches: SIZE S: 2, 8, 14, 20, 26 and 32 cm SIZE M: 2, 8, 14, 20, 26, 32 and 38 cm SIZE L: 2, 8, 14, 20, 26, 32, 38 and 44 cm SIZE XL: 2, 8, 14, 20, 26, 33, 40 and 47 cm SIZE XXL: 2, 8, 14, 20, 26, 33, 40 and 47 cm SIZE XXXL: 2, 8, 14, 20, 26, 32, 38, 44 and 50 cm. MEASURING TIP: All measurements on sleeves are done when piece is held up, sleeves will be somewhat longer when used and it is therefore important not to make them too long. ---------------------------------------------------------- JACKET: Work top down, back and forth in STRIPES - see explanation above. YOKE: Cast on 7 sts on circular needle size 3.5 mm with Fabel - see explanation above. Work 1 ridge in GARTER ST - see explanation above. Work as follows from RS: 2 sts in garter st, 1 YO, 1 st in garter st (insert 1 marker in this st), 1 YO, 1 st in garter st (= mid st, insert 1 marker in this st), 1 YO, 1 st in garter st (insert 1 marker in this st), 1 YO, 2 sts in garter st (= 4 sts inc). Repeat inc on each side of mid st and inside 2 edge sts in garter st in each side of piece from RS 6-8-8-9-9-10 times in total = 31-39-39-43-43-47 sts (= 13-17-17-19-19-21 sts between mid st and markers in each side). REMEMBER THE KNITTING TENSION K 1 row from WS. Cut the yarn. Next stripe is with rose mist and from RS. Cast on 42-46-46-49-49-51 loose sts on circular needle size 3.5 mm (= left sleeve and front piece), work in garter st until mid st AT THE SAME TIME inc 0-0-0-1-1-1 st, 1 YO, 1 st in garter st (= mid st), 1 YO, work in garter st the rest of row AT THE SAME TIME inc 0-0-0-1-1-1 st, cast on 42-46-46-49-49-51 loose sts (= right sleeve and front piece) at the end of row (= 2-2-2-4-4-4 sts inc) = 117-133-133-145-145-153 sts. K 1 row from WS. Work next row as follows from RS: Work 5 band sts in garter st, insert 1st marker in next st (= band), 1 YO, work 14-18-18-21-21-23 sts in garter st and inc 0-0-4-0-2-7 sts evenly (= left front piece), 1 YO, insert 2nd marker in next st, work 22 sts in garter st and inc 0-0-2-2-0-0 sts evenly, insert 3rd marker in next st (= sleeve), 1 YO, work 14-18-18-21-21-23 sts in garter st and inc 0-0-4-0-2-7 sts evenly, 1 YO, insert 4th marker in next st (= mid back), 1 YO, work 14-18-18-21-21-23 sts in garter st and inc 0-0-4-0-2-7 sts evenly (= back piece), 1 YO, insert 5th marker in next st, work 22 sts in garter st and inc 0-0-2-2-0-0 sts evenly, insert 6th marker in next st, 1 YO (= sleeve), work 14-18-18-21-21-23 sts in garter st and inc 0-0-4-0-2-7 sts evenly, 1 YO, insert 7th marker in next st, work 5 band sts in garter st (= right front piece) = 125-141-161-157-161-189 sts. Work DOMINO SQUARE – see explanation above, beg to work 3rd row (i.e. first row is from WS). NOTE: Work first row in domino square in the same colour as previous row. Remember BUTTONHOLES - see explanation above. First row in every colour is always from RS. Work 3rd to 10th-10th-10th-10th-12th-12th row 1 time, then repeat 1st to 10th-10th-10th-10th-12th-12th row 7-7-8-8-7-7 times in total. Then work the first 0-6-0-4-4-8 rows 1 more times = 62-70-76-78-90-100 sts between 1st and 2nd marker/3rd and 4th marker/4th and 5th marker/6th and 7th marker (= front/back piece), 1 st with each of markers (= 7 sts), 70-74-76-78-88-90 sts between 2nd and 3rd marker/5th and 6th marker (= sleeves) and 5 band sts in each side of piece = 405-445-473-485-553-597 sts in total. Piece now measures approx. 18-19-20-21-22-23 cm measured along the shoulder. K 1 row from WS. Work next row as follows from RS: Continue with garter st and stripes as before. Work 6 band sts in garter st (incl st with marker), 1 YO (= 1 st inc), work until 2 sts remain before 2nd marker, K 2 tog (= 1 st dec), slip the next 72-76-78-80-90-92 sts (incl sts with 2nd and 3rd marker) on a stitch holder for sleeve, cast on 8-8-8-12-12-12 sts under sleeve (insert 1 marker in the middle of the new sts), K 2 tog (= 1 st dec), work until 4th marker, 1 YO (= 1 st inc), K 1 (= st with marker), 1 YO (= 1 st inc), work until 2 sts remain before 5th marker, K 2 tog (= 1 st dec), slip the next 72-76-78-80-90-92 sts (incl st with 5th and 6th marker) on a stitch holder for sleeve, cast on 8-8-8-12-12-12 sts under sleeve (insert 1 marker in the middle of the new st), K 2 tog (= 1 st dec), work until 7th marker, 1 YO (= 1 st inc), 6 band sts in garter st (incl st with marker) = 277-309-333-349-397-437 sts. SIZE S-M-L: ROW 1 (= all rows from WS): K from WS, do not work YOs twisted; they should make holes. Row 2 (= RS): Continue with stripes and in garter st as before, work 6 band sts, 1 YO (= 1 st inc), work until 4 sts remain before marker under sleeve, K the next 2 tog (= 1 st dec), work 4 sts (marker is in the middle of these sts), K the next 2 tog (= 1 st dec), work until 4th marker (= mid back), 1 YO (= 1 st inc), K 1 (= st with marker), 1 YO (= 1 st inc), work until 4 sts remain before marker under sleeve, K the next 2 tog (= 1 st dec), work 4 sts (marker is in the middle of these sts), K the next 2 tog (= 1 st dec), work until 7th marker, 1 YO (= 1 st inc), finish with 6 band sts. ROW 4: As 2nd row. ROW 6: Continue with stripes and in garter st as before, work 6 band sts, 1 YO (= 1 st inc), work until 6 sts remain before marker under sleeve, * K the next 2 tog *, repeat from *-* 1 more time (= 2 sts dec), work 4 sts (marker is in the middle of these sts), * K the next 2 tog *, repeat from *-* (= 2 sts dec), work until 4th marker (= mid back), 1 YO (= 1 st inc), K 1 (= st with marker), 1 YO (= 1 st inc), work until 6 sts remain before marker under sleeve, * K the next 2 tog *, repeat from *-* 1 more times (= 2 sts dec), work 4 sts (marker is in the middle of these sts), * K the next 2 tog *, repeat from *-* 1 more time (= 2 sts dec), work until 7th marker, 1 YO (= 1 st inc), finish with 6 band sts (= 4 sts dec in total on row). Repeat 1st-6th row 4 times in total = 261-293-317 sts. SIZE XL-XXL-XXXL: K 1 row from WS. ALL SIZES: = 261-293-317-349-397-437 sts. Leave sts on needle. They should be worked tog with an edge worked from side to side. KNIT TOGETHER: Now work from right front piece, to right back piece, to left back piece, to left front piece. Cast on 34-28-20-20-20-20 sts on circular needle size 3.5 mm with off white. RIGHT FRONT PIECE (bottom edge): Piece should now be worked tog with sts from needle (i.e. yoke), from mid front on tip of domino to the side. ROW 1 (= RS): K 1, 1 YO and K rest of row (= 1 st inc). ROW 2 (= WS): K until 1 st remains on row, do not work YOs twisted on this row, they should make holes, slip the first 2 sts from yoke back on needle, K 3 tog. Switch to rose mist. ROW 3 (= RS): K 1, 1 YO and K rest of row (= 1 st inc). ROW 4 (= WS): K until 6 sts remain on row, turn piece. ROW 5 (= RS): K all sts. ROW 6 (= WS): K until 4 sts remain on row, turn piece. ROW 7 (= RS): K all sts. ROW 8 (= WS): K until 1 st remains on row, slip the first 2 sts from yoke back on needle, K 3 tog. Switch to off white. Repeat 1st-8th row until all sts before marker in the side (= from right front piece) is worked tog with edge. RIGHT BACK PIECE (bottom edge): Piece is worked tog with sts from back piece, i.e. from the side and down to tip of domino mid back. ROW 1 (= RS): K 1, 1 YO, K 2 twisted tog, K 2 twisted tog, K the rest of row (= 1 st dec). ROW 2 (= WS): K until 1 st remains on row, do not work YOs twisted on this row, they should make holes, slip the first 2 sts from yoke back on needle, K 3 tog. Switch to rose mist. ROW 3 (= RS): As 1st row. ROW 4 (= WS): K until 6 sts remain on row, turn piece. ROW 5 (= RS): K all sts. ROW 6 (= WS): K until 4 sts remain on row, turn piece. ROW 7 (= RS): K all sts. ROW 8 (= WS): K until 1 st remains on row, slip the first 2 sts from yoke back on needle, K 3 tog. Switch to off white. Repeat 1st-8th row down to tip mid back, on last repetition of 8th or 2nd row slip the first 3 sts from stitch holder back on needle, K 4 tog. LEFT BACK PIECE (bottom edge): Piece is worked tog with sts from mid back from tip of domino and to the side. Work left back piece as right front piece (i.e. until marker). LEFT FRONT PIECE (bottom edge): Piece is worked tog with sts from the side and down to tip of domino mid front. Work as right back piece. Cast off when all sts from yoke have been worked tog with edge. SLEEVE: Worked in the round on double pointed needles in GARTER ST - see explanation above and stripes. Slip sts from stitch holder in one side of piece on double pointed needles size 3.5 mm = 72-76-78-80-90-92 sts. Cast on 8-8-8-12-12-12 sts at the end of first round = 80-84-86-92-102-104 sts. Then work stripes. Insert 1 marker in the middle of the new sts (= mid under sleeve) – NOW MEASURE PIECE FROM HERE - READ MEASURING TIP. When piece measures 2 cm, dec 1 st on each side of marker (= 2 sts dec) - READ DECREASE TIP, repeat dec every 1 cm 6-6-9-11-17-17 times, then every 2 cm 4-5-2-2-0-0 times = 60-62-64-66-68-70 sts. Cast off when piece measures 23 cm. Work the other sleeve the same way. ASSEMBLY: Sew the opening under the sleeves. Sew the buttons on to the left band. Sew cast-on edge tog (i.e. the first 7 sts). |
|||||||
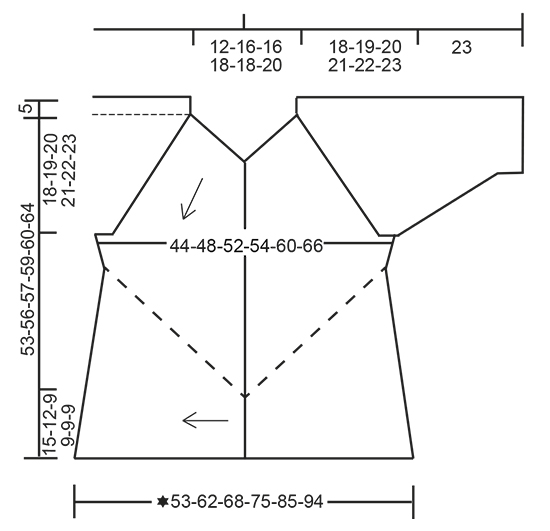
Diagram explanations |
|||||||
|
|||||||
 |
|||||||
Have you finished this pattern?Tag your pictures with #dropspattern #crayonscardigan or submit them to the #dropsfan gallery. Do you need help with this pattern?You'll find 22 tutorial videos, a Comments/Questions area and more by visiting the pattern on garnstudio.com. © 1982-2026 DROPS Design A/S. We reserve all rights. This document, including all its sub-sections, has copyrights. Read more about what you can do with our patterns at the bottom of each pattern on our site. |
|||||||


With over 40 years in knitting and crochet design, DROPS Design offers one of the most extensive collections of free patterns on the internet - translated to 17 languages. As of today we count 324 catalogues and 12290 patterns translated into English (UK/cm). 12290
We work hard to bring you the best knitting and crochet have to offer, inspiration and advice as well as great quality yarns at incredible prices! Would you like to use our patterns for other than personal use? You can read what you are allowed to do in the Copyright text at the bottom of all our patterns. Happy crafting!
Post a comment to pattern DROPS 167-35
We would love to hear what you have to say about this pattern!
If you want to leave a question, please make sure you select the correct category in the form below, to speed up the answering process. Required fields are marked *.