
Popular categories
Looking for a yarn?


Comments / Questions (20)
![]() Boulanger Jacqueline wrote:
Boulanger Jacqueline wrote:
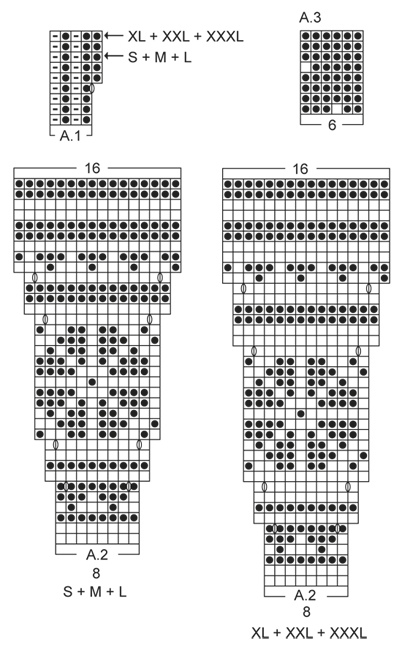
Bonjour, lors du rang 10 du jacquard A2, dois je augmenter toutes les 8 mailles ou alors alterner 1m, 1augm, 8 m, 1augm, 2 m, 1 augm, 8m, 1 augm, 2m etc Merci!
28.10.2025 - 19:44DROPS Design answered:
Bonjour Mme Boulanger, le diagramme se répète tel quel tout le tour, autrement dit, au 10ème rang (taille S, M et L), tricotez ainsi: *1 m endroit, 1 jeté, 8 m endroit, 1 jeté, 1 m end*, répétez de *à* jusqu'à la fin du tour, ainsi vous aurez alternativement 8 et 2 m entre les jetés. Vous pouvez mettre un marqueur entre chaque diagramme tout le tour, vous pourrez ainsi vérifier à chaque tour que vous avez bien le bon motif/nombre de mailles. Bon tricot!
30.10.2025 - 18:25
![]() Sarah Thiessen wrote:
Sarah Thiessen wrote:
Das kraus gestrickte Bündchen unten klappt sich immer nach außen. Was habe ich da falsch gemacht?
23.02.2022 - 21:21DROPS Design answered:
Liebe Frau Thiessen, Sie können den Pullover mit Stecknadeln auf einer geeigneten Unterlage spannen, anfeuchten (z.B. mit einer Sprühflasche für Blumen) und trocknen lassen, danach entfernen Sie die Stecknadeln, dann sollte sich der Rand nicht mehr rollen. Viel Spaß beim stricken!
24.02.2022 - 10:23
![]() Ela wrote:
Ela wrote:
A ja zrobilam rok temu sweter, czapkę, rękawice i skarpety w tym wzorze dla córki jest zachwycona. Dziękuję Ci jesteś wspaniała!
11.08.2021 - 14:38
![]() Marian wrote:
Marian wrote:
No entiendo cuando hay que hacer los aumentos o cada cuantos puntos, en la vuelta 6 y siguientes
15.07.2021 - 18:09DROPS Design answered:
Hola Marian, los aumentos están incluidos en el diagrama A.2. En la vuelta 6, el diagrama empieza con 1d, lazada, 6d y otra lazada... En la siguiente vuelta, las lazadas se trabajan retorcidas para evitar que se formen agujeros. Después, se vuelve a aumentar en la 10ª vuelta.
19.07.2021 - 20:23
![]() Miriam Glass wrote:
Miriam Glass wrote:
Beautiful
31.12.2020 - 14:11
![]() Birthe Nielsen wrote:
Birthe Nielsen wrote:
Mangler der ikke udtagning på række 6 i mønster 2A
24.06.2019 - 19:31DROPS Design answered:
Hei Birthe. Det er 2 kast på omgang 6 i A.2: 1 etter første maske og 1 før siste maske. De er litt vanskelig å se innimmellom tegnene for "koksgrå", men de er der. God fornøyelse
26.06.2019 - 08:04
![]() Else Marit BERG wrote:
Else Marit BERG wrote:
Maskeantallet stemmer ikke da a 2 er ferdig hva er galt??
13.02.2018 - 09:05DROPS Design answered:
Hej Else Marie, det er svært at se hvor det er gået galt. Du skal have 16 masker i hver rapport når du har afsluttet A.2. Sæt gerne et mærke mellem hver rapport, så du er sikker på at få alle udtagninger med. God fornøjelse!
21.02.2018 - 15:38
![]() Hanne Gunnertoft wrote:
Hanne Gunnertoft wrote:
Overvejer at bruge hue mønstret på nederste 2/3 af blusen. Kan man det?
31.01.2017 - 01:09DROPS Design answered:
Hej Hanne. Det lyder som det kunne blive rigtig flot, saa det tror jeg sagtens du kan. Du skal sörge for at faa placeret mönstret saa det er paent (centreret) og strik eventuelt en pröve med mönster saa du har en strikkefasthed - mönsterstrik kan nogen gange traekke lidt mere sammen end ren glat.
31.01.2017 - 15:29
![]() Anita Kastrup østerberg wrote:
Anita Kastrup østerberg wrote:
Når der tages ud (første gang i A2) er det så: 1r slå om 6 r slå om 2 r slå om 6 r osv pinden rundt?
19.01.2016 - 17:15DROPS Design answered:
Hej. Ja det är riktigt. Lycka till!
26.01.2016 - 14:35
![]() Ritva Piili wrote:
Ritva Piili wrote:
Neuloin kyseisen mallin, ohje ihan ok! mutta lankojen menekissä huomauttaisin ettei vaaleaa helmiäisharmaata sävyä kulu koossa "S" kuin vajaa 100gr. Terveisin Ritva Piili
05.01.2016 - 11:54
|
|||||||||||||
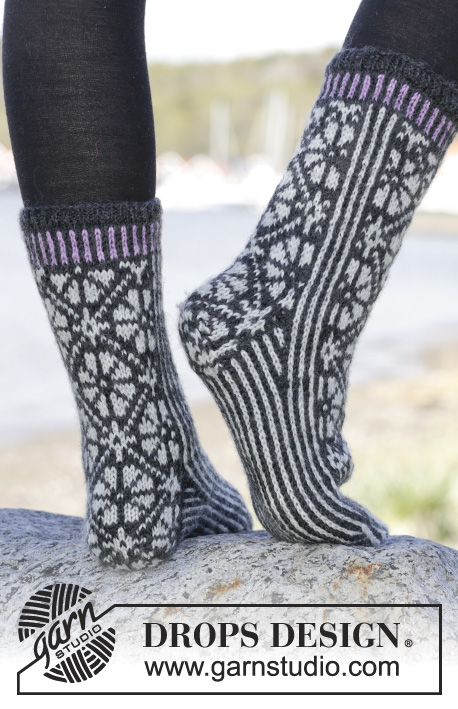
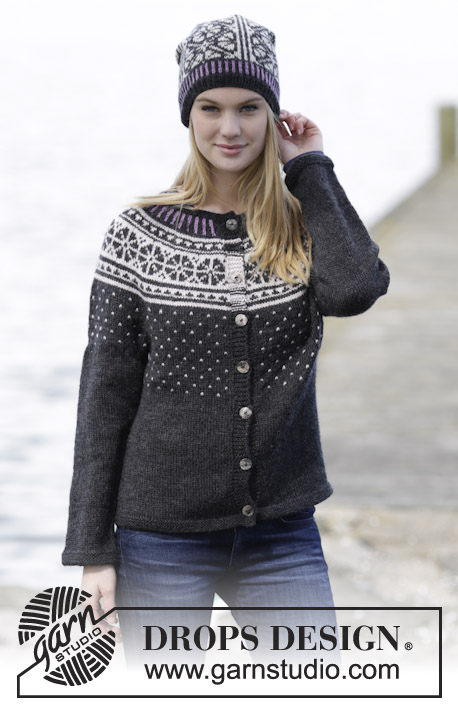
Starry Night Jumper#starrynightjumper |
|||||||||||||
|
|
|||||||||||||
Knitted DROPS jumper with round yoke and Nordic pattern, worked top down in ”Karisma”. Size: S - XXXL.
DROPS 166-23 |
|||||||||||||
|
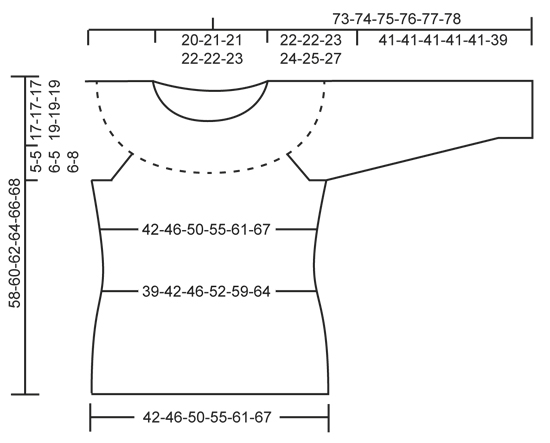
GARTER ST (worked in the round): * K 1 round and P 1 round *, repeat from *-*. 1 ridge = 2 rounds. PATTERN: See diagrams A.1 to A.3 – choose diagram for correct size. Work entire pattern in stocking st. KNITTING TIP: To avoid the knitting tension to tighten when working pattern, it is important not to tighten the strands on back side of piece. Switch to a higher needle no when working pattern if the pattern is somewhat tight. INCREASE TIP-1: Inc 1 st by making 1 YO. On next round K YO twisted to avoid holes. INCREASE TIP-2: Inc on each side of marker as follows: Work until 2 sts remain before marker: Make 1 YO, K 4 (marker is in the middle of these 4 sts), make 1 YO (= 2 sts inc). On next round K YO twisted to avoid holes. RAGLAN: Inc for raglan on each side of marker in every transition between sleeves and body as follows: Work until 1 sts remain before marker: Make 1 YO, K 2 sts (marker is in the middle of these 2 sts), make 1 YO (= 2 sts inc). On next round K YOs twisted to avoid holes. DECREASE TIP (applies to sides on body and mid under sleeve): Dec on each side of marker as follows: Beg 4 sts before marker and K 2 tog, K 4 (marker is between these 4 sts), slip 1 st as if to K, K 1, psso (= 2 sts dec). ---------------------------------------------------------- JUMPER: Worked in the round on circular needle from top down. YOKE: Cast on 98-104-104-106-110-112 sts on circular needle size 3 mm with anthracite. Work 2 ridges in GARTER ST - see explanation above. K 1 round with anthracite while inc 2-8-8-18-22-32 sts evenly - READ INCREASE TIP-1 = 100-112-112-124-132-144 sts. Switch to circular needle size 4 mm and work pattern in the round according to diagram A.1 - READ KNITTING TIP. Inc on 4th round as shown in diagram (= 25-28-28-31-33-36 sts inc and 125-140-140-155-165-180 sts on needle). REMEMBER THE KNITTING TENSION When A.1 has been worked (finish after a round marked with arrow for correct size), K 2 rounds with anthracite while inc 3-4-4-5-3-4 sts evenly on 1st round = 128-144-144-160-168-184 sts. Then work pattern according to diagram A.2 (choose diagram for correct size = 16-18-18-20-21-23 repetitions of 8 sts). Continue pattern like this and inc as shown in diagram. When diagram A.2 has been worked, there are 256-288-288-320-336-368 sts on needle and piece measures approx. 17-17-17-19-19-19 cm from cast-on edge. K 1 round with anthracite while inc 8-6-6-10-12-4 sts evenly = 264-294-294-330-348-372 sts. Work next round as follows (with anthracite): Work 75-83-87-99-109-119 sts (= back piece), insert a marker, work the next 57-64-60-66-65-67 sts (= sleeve), insert a marker, work the next 75-83-87-99-109-119 sts (= front piece), insert a marker, work the next 57-64-60-66-65-67 sts (= sleeve), insert a marker. READ ALL OF THE FOLLOWING SECTION BEFORE CONTINUING! Then continue pattern in the round according to diagram A.3. After 1 round with pattern in A.3 inc for RAGLAN – see explanation above (= 8 sts inc). Repeat inc for raglan every 4th round 3-3-4-3-4-5 times in total - NOTE: Work the inc sts in pattern but always work 1 st on each side of each marker with anthracite. After inc for raglan there are 288-318-326-354-380-412 sts on round and piece measures approx. 22-22-23-24-25-27 cm from shoulder. Work next round as follows (continue pattern as before): Work the first 81-89-95-105-117-129 sts (= back piece), slip the next 63-70-68-72-73-77 sts on a stitch holder (= sleeve), cast on 8-8-10-10-12-12 new sts (= under sleeve), work the next 81-89-95-105-117-129 sts (= front piece), slip the next 63-70-68-72-73-77 sts on a stitch holder (= sleeve), cast on 8-8-10-10-12-12 sts (= under sleeve). BODY: = 178-194-210-230-258-282 sts. Insert 1 marker in the middle of the 8-8-10-10-12-12 new sts cast on in each side (= 89-97-105-115-129-141 sts between markers on front and back piece). NOW MEASURE PIECE FROM HERE! Work in stocking st in the round with pattern according to diagram A.3 - NOTE: Continue pattern from yoke - work the sts that do not fit the pattern in the sides of body in anthracite. AT THE SAME TIME when piece measures 4-4-4-5-5-5 cm, dec on each side of both markers – READ DECREASE TIP (= 4 sts dec). Repeat dec in each side every 3-3-3-5-6-6 cm a total of 4-4-4-3-3-3 times = 162-178-194-218-246-270 sts - NOTE: Work sts that do not fit the pattern in anthracite when dec. AT THE SAME TIME when piece measures 8-9-10-11-12-13 cm, finish A.3 and work with anthracite until finished measurements. When piece measures 18-18-19-21-23-23 cm (piece measures approx. 40-40-42-45-48-50 cm from shoulder), inc on each side of both markers - READ INCREASE TIP-2 (= 4 sts inc). Repeat inc every 4-4-4-5-5-5 cm a total of 4-4-4-3-3-3 times = 178-194-210-230-258-282 sts. When piece measures 34-36-37-38-39-39 cm (2 cm remain before finished measurements, try the jumper and work to desired length), switch to circular needle size 3 mm. Work 4 ridges and LOOSELY cast off. Jumper measures approx. 58-60-62-64-66-68 cm from shoulder. SLEEVE: Worked in the round on double pointed needles. Slip sts from stitch holder in one side of piece on double pointed needles size 4 mm. Work in stocking st in the round with pattern according to diagram A.3 (continue pattern from yoke and work sts that do not fit the pattern mid under sleeve in anthracite). In addition cast on 8-8-10-10-12-12 new sts at the end of first round = 71-78-78-82-85-89 sts. Insert 1 marker in the middle of the 8-8-10-10-12-12 new sts (= mid under sleeve) – NOW MEASURE PIECE FROM HERE. When piece measures 2-3-3-3-3-4 cm, dec on each side of marker – REMEMBER DECREASE TIP (= 2 sts dec). Repeat dec every 3-2-2-2-2-1½ cm a total of 11-14-14-15-16-17 times = 49-50-50-52-53-55 sts. AT THE SAME TIME when piece measures 4-4-4-6-6-6 cm, finish A.3 and work with anthracite until finished measurements. When piece measures 39-39-39-39-39-37 cm (2 cm remain before finished measurements, try the jumper and work to desired length), switch to double pointed needles size 3 mm. Work 4 ridges and LOOSELY cast off, sleeve measures approx. 41-41-41-41-41-39 cm. Work the other sleeve the same way. ASSEMBLY: Sew the openings under the sleeves. |
|||||||||||||
Diagram explanations |
|||||||||||||
|
|||||||||||||
 |
|||||||||||||
 |
|||||||||||||
Have you finished this pattern?Tag your pictures with #dropspattern #starrynightjumper or submit them to the #dropsfan gallery. Do you need help with this pattern?You'll find 23 tutorial videos, a Comments/Questions area and more by visiting the pattern on garnstudio.com. © 1982-2026 DROPS Design A/S. We reserve all rights. This document, including all its sub-sections, has copyrights. Read more about what you can do with our patterns at the bottom of each pattern on our site. |
|||||||||||||


With over 40 years in knitting and crochet design, DROPS Design offers one of the most extensive collections of free patterns on the internet - translated to 17 languages. As of today we count 324 catalogues and 12290 patterns translated into English (UK/cm). 12290
We work hard to bring you the best knitting and crochet have to offer, inspiration and advice as well as great quality yarns at incredible prices! Would you like to use our patterns for other than personal use? You can read what you are allowed to do in the Copyright text at the bottom of all our patterns. Happy crafting!
Post a comment to pattern DROPS 166-23
We would love to hear what you have to say about this pattern!
If you want to leave a question, please make sure you select the correct category in the form below, to speed up the answering process. Required fields are marked *.