
Popular categories
Looking for a yarn?


Comments / Questions (64)
![]() Anna wrote:
Anna wrote:
Buon pomeriggio Avendo fatto lo sprone m4 mi risultano 47 maglie non 44 Erano 91 esatte prima che facesse m4 Grazie
01.05.2019 - 14:57DROPS Design answered:
Buongiorno Anna, chiederemo alla casa madre di fare una verifica sul numero delle maglie. Se ci dovessero essere delle correzioni il testo verrà corretto nei prossimi giorni. Buon lavoro!
01.05.2019 - 16:33
![]() Anna wrote:
Anna wrote:
Buongiorno Sto lavorando la prima misura Sono arrivata allo sprone ,già fatto le diminuzione nel gruppo di 4 maglie a rovescio,ma non sono arrivata a 7 cm cosa debbo fare? Grazie
01.05.2019 - 08:33DROPS Design answered:
Buongiorno Anna. Quando le rimane 1 m rovescio, prosegue finché il lavoro non misura 7 cm. Buon lavoro!
01.05.2019 - 09:18
![]() Annamaria wrote:
Annamaria wrote:
Buongiorno Leggendo il modello :quando si inseriscono i segni ,spostare i segni verso l'alto?.Forse sarebbe spostare dal ferro sinistro al ferro destro? Grazie
13.04.2019 - 10:07DROPS Design answered:
Buongiorno Annamaria. Sì, passa il segno dal ferro di sinistra a quello di destra e in questo modo il segno segue il lavoro mano mano che procede. Buon lavoro!
13.04.2019 - 10:41
![]() Anna wrote:
Anna wrote:
Buongiorno Non vedo il motivo A5 Grazie
13.04.2019 - 09:31DROPS Design answered:
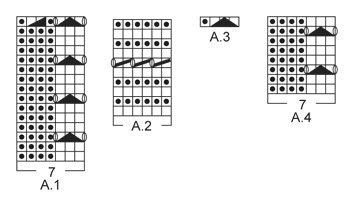
Buongiorno Anna. Abbiamo corretto il testo. I diagrammi sono da A.1 a A.4. La ringraziamo per la segnalazione. Buon lavoro!
13.04.2019 - 09:48Connie wrote:
I am in love with this pattern but I don\\\'t understand which direction the diagrams are supposed to be knit. Is there a video tutorial that I can watch?
20.12.2018 - 01:56DROPS Design answered:
Dear Connie, start reading diagram from the bottom conrer on the right side towards the left on every round since diagrams are worked in the round, they will always be worked from RS. Happy knitting!
20.12.2018 - 08:16Sara wrote:
I have two questions 1.) Which way am I supposed to read the diagrams (I'm having trouble working out which row is right and wrong) 2.) Is there any way that I can download the pattern, or can I get the pattern in an easier to read format
20.12.2018 - 00:07DROPS Design answered:
Dear Sara, start reading diagram from the bottom corner on the right side, and as all diagrams will be worked in the round, you will read all rows from the right towards the left, eg, row 1 and 2 in A.1 = K 3, P4. You can only print the pattern, but choosing a virtual printer may allow you to save it as a .PDF file. Happy knitting!
20.12.2018 - 08:14Abe wrote:
Hi, I'm up to knitting the lace pattern (A1 diagram) towards the bottom of the dress, but I'm having a tad bit of trouble understanding the chart. And is the A1 pattern repeated all the way around or just at certain bits? Thanks in advance
19.12.2018 - 09:47DROPS Design answered:
Dear Abe, you repeat A.1 in width all around the bottom of the dress (A.1 is worked over all stitches) - you will work a total of 4 eyelet rows/smalll lace cable and on the last row in A.1 you will decrease 1 stitch in each A.1 (in the purl section). Happy knitting!
19.12.2018 - 09:57
![]() Joelle wrote:
Joelle wrote:
Bonjour , moi j'ai adopté les aiguilles circulaires depuis quelques années , et j'en suis très contente, beaucoup moins mal aux épaules ,j'ai fais beaucoup de modèle de votre site , je ne m'en lasse pas je vais refaire cette petite robe pour une autre petite fille , bravo pour vos modèles
08.08.2018 - 13:51
![]() Kaspara Vabo wrote:
Kaspara Vabo wrote:
Herlig kjole som var gøy å strikke! Jeg får det bare ikke til å stemme at det skal være 52 masker igjen på pinnen til slutt i str 12-18 mnd. Før siste felling har man 107 masker, og så skal tre og tre masker slås sammen til ei maske. Da sitter man igjen med et odde antall masker til slutt. Eller? Det er også logisk at det er oddetall da hver runde slutter med bare halve diagrammet, nemlig hullborden (innafor kantmaskene). Eller er det noe jeg ikke skjønner?
03.08.2018 - 10:54
![]() Veronika Skotheim Ørjansen wrote:
Veronika Skotheim Ørjansen wrote:
Og så står det: strikk mønster etter diagram A4 til det gjenstår 5 m på p, avslutt med de 3 første m i A4, og 2 kant-m i rille. Gjelder dette for hver runde, eller kun den siste?
25.04.2018 - 21:07DROPS Design answered:
Hej igen :) det gør du for at mønsteret skal blive ene i hver side. Det vil sige du slutter med de 3 første masker i A.4 og når du vender arbejdet begynder du også med dem (efter kantmaskerne). God fornøjelse!
26.04.2018 - 09:50
|
|||||||||||||||||||
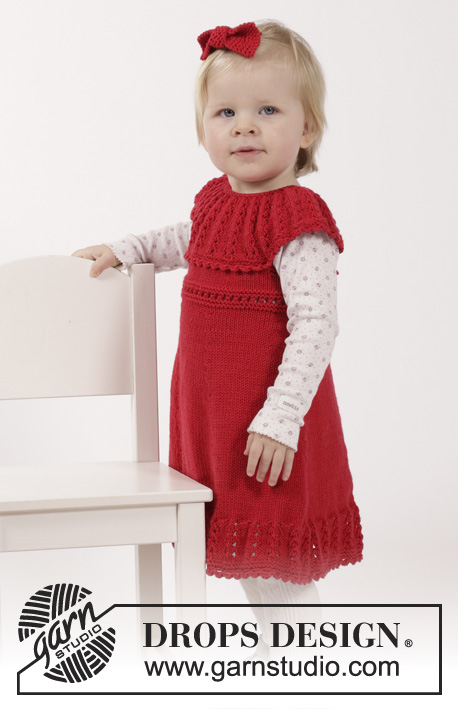
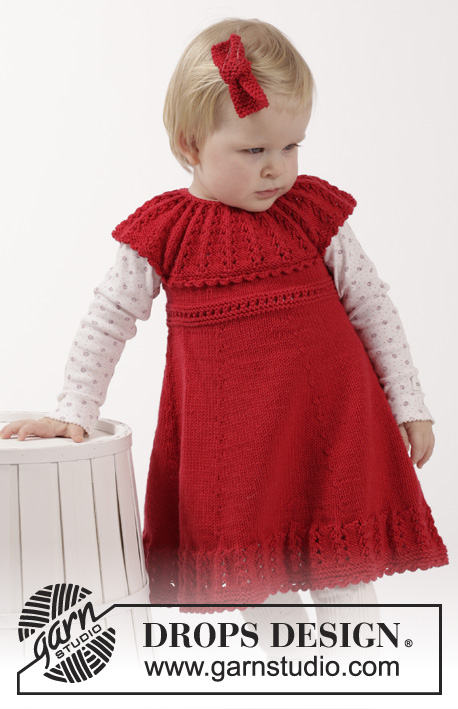
Little Hedda#littleheddadress |
|||||||||||||||||||
 |
 |
||||||||||||||||||
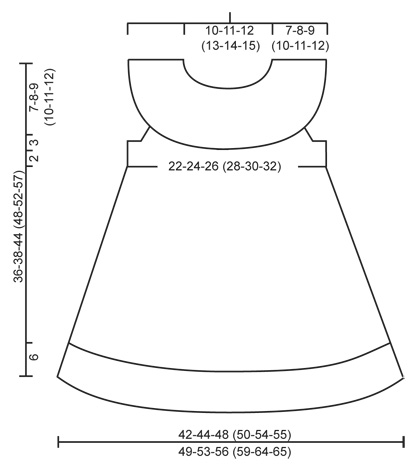
Knitted dress with lace edge and round yoke plus hair bow in garter st in DROPS Cotton Merino. For baby and children in sizes 1 month - 6 years.
DROPS Children 26-14 |
|||||||||||||||||||
|
GARTER ST (worked in the round): * K 1 round and P 1 round *, repeat from *-*. 1 ridge = 2 rounds. GARTER ST (back and forth): K all rows. 1 ridge = 2 rows K. PATTERN: See diagrams A.1 to A.4. The diagrams show all rows in pattern seen from RS. DECREASE TIP: Dec as follows after 1st, 2nd, 4th and 5th marker: Slip 1 st as if to K, K 1, psso (= 1 st dec). Dec as follows before 3rd, 4th, 6th and 1st marker: Beg 2 sts before marker, K 2 sts tog (= 1 st dec). ---------------------------------------------------------- DRESS: Worked in the round on circular needle from bottom up. Cast on 217-231-245 (259-280-287) sts on circular needle size 3.5 mm with Cotton Merino. Work 2 ridges in GARTER ST in the round - see explanation above. K 1 round, then continue pattern in the round according to diagram A.1. When A.1 has been worked 1 time vertically, 186-198-210 (222-240-246) sts remain on needle and piece measures approx. 6 cm. K 1 round while AT THE SAME TIME dec 2-4-0 (2-4-2) sts evenly = 184-194-210 (220-236-244) sts. Now insert 6 markers in the piece as follows: Insert 1st marker at beg of round (= side), 2nd marker after 27-29-32 (33-35-37) sts, 3rd marker after another 38-39-41 (44-48-48) sts, 4th marker after another 27-29-32 (33-35-37) sts (= side), 5th marker after another 27-29-32 (33-35-37) sts, 6th marker after another 38-39-41 (44-48-48) sts (27-29-32 (33-35-37) sts remain on round after last marker). Work in stocking st and move the markers upwards when working. REMEMBER THE KNITTING TENSION When piece measures 8 cm, dec 1 st on each side of 1st and 4th marker, dec 1 st after 2nd and 5th marker and 1 st before 3rd and 6th marker – READ DECREASE TIP (= 8 sts dec). Repeat dec every 1½-1½-2 (2-2-2½) cm 11-11-12 (12-13-13) times in total = 96-106-114 (124-132-140) sts. Remove the 6 markers and insert 1 new marker at beg of round and 1 marker after 48-53-57 (62-66-70) sts (= sides). When piece measures 24-25-30 (33-36-40) cm (dec should now be done), work pattern in the round according to diagram A.2. When A.2 has been worked 1 time vertically, work in stocking st. When piece measures 28-29-34 (37-40-44) cm, work 2 ridges in garter st over the middle 10-10-12 (12-14-14) sts in each side (i.e. over 5-5-6 (6-7-7) sts on each side of both markers – NOTE: Work the other sts in stocking st as before). On next round after the 2 ridges, cast off the middle 6-6-8 (8-10-10) sts in each side for armholes (i.e. 3-3-4 (4-5-5) sts on each side of both markers) = 42-47-49 (54-56-60) sts remain on front and back piece. Cut the yarn. YOKE: Insert 1 marker – NOW MEASURE PIECE FROM HERE. Beg mid back and K over sts on half back piece, cast on 36-38-44 (46-50-56) sts over one armhole, K over front piece, cast on 36-38-44 (46-50-56) sts over the other armhole and K until mid back again = 156-170-186 (200-212-232) sts. Now work piece back and forth on circular needle from mid back as follows: K 3 rows while AT THE SAME TIME on 1st row (= WS) dec 2-2-4 (4-2-8) sts evenly = 154-168-182 (196-210-224) sts. Work next row as follows from RS: 2 edge sts in garter st, work pattern according to diagram A.4 until 5 sts remain, finish with the first 3 sts in A.4 and 2 edge sts in garter st. Continue pattern like this. AT THE SAME TIME when piece measures 3-4-5 (6-7-8) cm from marker, dec all 4 P to 3 P by P the first 2 sts in every P-section tog. Repeat dec in every P-section when piece measures 5-6-7 (8-9-10) and 6-7-8 (9-10-11) cm = 91-99-107 (115-123-131) sts remain and there is only 1 P between every eyelet row. When piece measures approx. 7-8-9 (10-11-12) cm – adjust so that next row is a row with holes, work A.3 from RS over all sts (continue 2 edge sts in garter st as before) = 47-51-55 (59-63-67) sts remain. NECK EDGE: Work 2 ridges back and forth over all sts and then LOOSELY cast off. ASSEMBLY: Crochet 2 buttonhole straps along left side on opening at the back. 1 buttonhole strap = work with hook size 3.5 mm and Cotton Merino as follows: 1 dc in edge st at the top by neck, 4 ch and then 1 sl st in same st as dc was worked, fasten off. Work another strap in the middle along opening. Sew buttons on to the right side of opening. CROCHET EDGE: Work a finishing edge around the bottom of dress on hook size 3.5 mm as follows: 1 ch in first st, * 3 ch, 1 tr in 1st ch worked, skip 2-3 sts, 1 dc in next st *, repeat from *-* the entire round and finish with 1 sl st in 1st dc from beg of round. Fasten off. Work a similar edge at the bottom around yoke - i.e. work along bottom ridge on yoke and then along both sleeve edges. ---------------------------------------------------------- HAIR BOW: Numbers in ( ) applies to large bow. Cast on 10 (20) sts on needle size 3.5 mm with Cotton Merino. Work in GARTER ST – see explanation above – back and forth until piece measures 8 (12) cm, cast off. MIDDLE BAND: Cast on 10 (15) sts on needle size 3.5 mm and work 4 (5) ridges. Cast off. Sew the short ends tog to form a ring. Pull the bow through the ring and fasten the two parts tog with a couple of stitches. Fasten bow with a silk ribbon or a hair pin with a couple of stitches. |
|||||||||||||||||||
Diagram explanations |
|||||||||||||||||||
|
|||||||||||||||||||
 |
|||||||||||||||||||
 |
|||||||||||||||||||
Have you finished this pattern?Tag your pictures with #dropspattern #littleheddadress or submit them to the #dropsfan gallery. Do you need help with this pattern?You'll find 28 tutorial videos, a Comments/Questions area and more by visiting the pattern on garnstudio.com. © 1982-2026 DROPS Design A/S. We reserve all rights. This document, including all its sub-sections, has copyrights. Read more about what you can do with our patterns at the bottom of each pattern on our site. |
|||||||||||||||||||


With over 40 years in knitting and crochet design, DROPS Design offers one of the most extensive collections of free patterns on the internet - translated to 17 languages. As of today we count 324 catalogues and 12290 patterns translated into English (UK/cm). 12290
We work hard to bring you the best knitting and crochet have to offer, inspiration and advice as well as great quality yarns at incredible prices! Would you like to use our patterns for other than personal use? You can read what you are allowed to do in the Copyright text at the bottom of all our patterns. Happy crafting!
Post a comment to pattern DROPS Children 26-14
We would love to hear what you have to say about this pattern!
If you want to leave a question, please make sure you select the correct category in the form below, to speed up the answering process. Required fields are marked *.