
Popular categories
Looking for a yarn?


Comments / Questions (64)
![]() Tornio-Haaparanta wrote:
Tornio-Haaparanta wrote:
Ihana malli! Olen tehnyt kolme mekkoa joulunpunaisesta kaksi ja yhden valkoisen. Mallin otin täältä. Lankana käytin tee tee Helmi/ 100%merinovilla. Minulla oli vain sitä omasta takaa. Joten en tilannut. Mutta malli on upea. Ei virheitä. Pojan tyttäret ovat pitäneet niitä Joulu mekkoina, kolmin kappalein. Olen ylpeä kun kudoin heille joulumekot. Koot 98-140.. hyvää joulua....
02.12.2019 - 23:17
![]() Christiane wrote:
Christiane wrote:
Als erstes vielen dank für die schnelle Antwort Aber so bekomm ich doch nicht die 50 maschen für die Größe 98/104 hin oder
09.10.2019 - 09:50DROPS Design answered:
Liebe Christiane, es wird bei dieser Anleitung etwas unterschiedlich sein (Video zeigt beim "top down") - bei der letzte Runde am Rumpfteil ketten Sie 5 Maschen beidseitig der beiden Markierungen, 56 Maschen bleiben für je Vorder- und Rückenteil. Bei nächster Runde beginnen Sie die Runde in der Mitte Rückenteil und stricken 28 M, dann 50 neuen Maschen über die 10 abgekettenen Maschen anschlagen, die 56 M vom Vorderteil stricken, 50 neuen Maschen über die 10 abgekettenen Maschen anschlagne, und die letzte 28 M der Runde stricken = 212 Maschen. Viel Spaß beim stricken!
09.10.2019 - 10:48
![]() Christiane wrote:
Christiane wrote:
Wo setze ich den 1. Markierer bei der Passe und wie schlage ich die maschen für den Armauschnitt an
08.10.2019 - 12:35DROPS Design answered:
Liebe Christiane, den Markierer setzen Sie auf die Maschen/Runde, so können Sie die Arbeit von diesem Markierer messen. So werden die neuen Maschen angeschlagen. Dieses Video zeigt (Raglanpull von oben nach unten - ab ca 07:00) wie man die Maschen unter den Ärmeln anschlägt. Viel Spaß beim stricken!
08.10.2019 - 13:10
![]() Christiane wrote:
Christiane wrote:
Ich stricke gerade die Gr. 98/104 und habe gerade die 6 Markierer entfernt . muss ich nun alle 66m einen neuen Markierer setzen oder nur einmal? denn wie bekomme ich sonst an beiden seiten krausripphin Vielen Dank für die Antwort
22.09.2019 - 10:07DROPS Design answered:
Liebe Christiane, wenn 132 Maschen übrig sein, setzen Sie 2 neuen Markierungen für die Seiten, dh die 1. Markierung am Anfang der Runde und die 2. Markierng nach 66 Maschen (= nach der Hälfte der Maschen). Viel Spaß beim stricken!
23.09.2019 - 09:25
![]() Rochet wrote:
Rochet wrote:
Dommage que la photo sois sur les explication
18.09.2019 - 17:22DROPS Design answered:
Bonjour Mme Rochet, je ne comprends pas ce que vous voulez dire, nous avons imprimé ce modèle pour tester et la photo apparaît bien sur la 1ère page, les explications sur les suivantes. Bon tricot!
19.09.2019 - 08:59
![]() Ros-Marie wrote:
Ros-Marie wrote:
Hej jag undrar om jag har 280 maskor från början, sista varvet på A1, ska jag minska 1 maska på aviga, hur kan det bli 240, efter det varvet?
15.06.2019 - 13:26DROPS Design answered:
Hei Ros-Marie. Du har 280 masker, så strikker du A.1 over alle maskene (= 40 ganger i bredden). På siste omgang felles 1 maske i hver A.1 = 40 masker felt totalt. 280-40 = 240 masker på pinnen. God fornøyelse
17.06.2019 - 08:30
![]() Silvia wrote:
Silvia wrote:
Quindi per sprone si legge la legenda convertendo dritto e rovescio, mentre per l'A1 del bordo in circolare nessuna conversione è sempre dritto. Corretto?
08.05.2019 - 05:24DROPS Design answered:
Buongiorno Silvia. Sì è corretto. Quando lavora avanti e indietro deve guardare anche a come si lavora sul rovescio del lavoro; in tondo lavora sempre sul diritto del lavoro. Buon lavoro!
08.05.2019 - 06:42
![]() Silvia wrote:
Silvia wrote:
Quindi la legenda per il diagramma si riferisce quando si lavora lo sprone in piano, mentre per l'A1 del bordo in fondo si legge tutto dritto, corretto?
08.05.2019 - 05:22
![]() Silvia wrote:
Silvia wrote:
Non chiaro il diagramma. Lavorando in circolare si è sempre sul dritto quindi i quadrati vuoti non dovrebbero essere sempre lavorati a dritto indipendentemente? Perché è scritto anche “rovescio sul rovescio”?
07.05.2019 - 23:45DROPS Design answered:
Buonasera Silvia, lo sprone è lavorato in piano, per cui la legenda è corretta. Buon lavoro!
07.05.2019 - 23:49
![]() Anna wrote:
Anna wrote:
Buon pomeriggio Ho sbagliato sopra a scrivere era m3 risultano 47 maglie non 44 Quando ho terminato m4 erano 91 Grazie
01.05.2019 - 15:01DROPS Design answered:
Buongiorno Anna, chiederemo alla casa madre di fare una verifica sul numero delle maglie. Se ci dovessero essere delle correzioni il testo verrà corretto nei prossimi giorni. Buon lavoro!
01.05.2019 - 16:33
|
|||||||||||||||||||
Little Hedda#littleheddadress |
|||||||||||||||||||
 |
 |
||||||||||||||||||
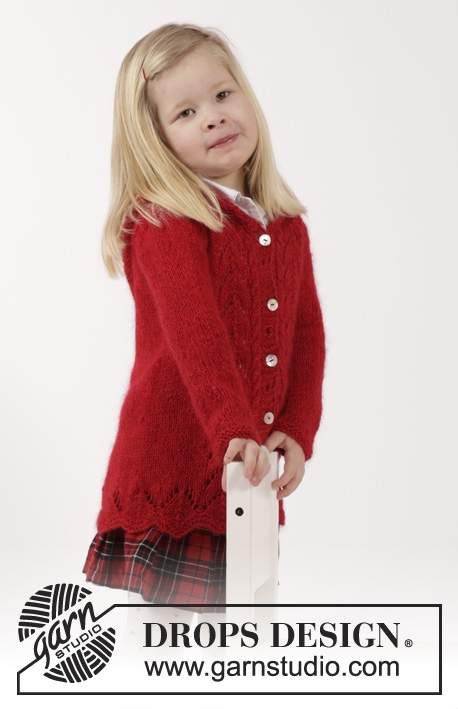
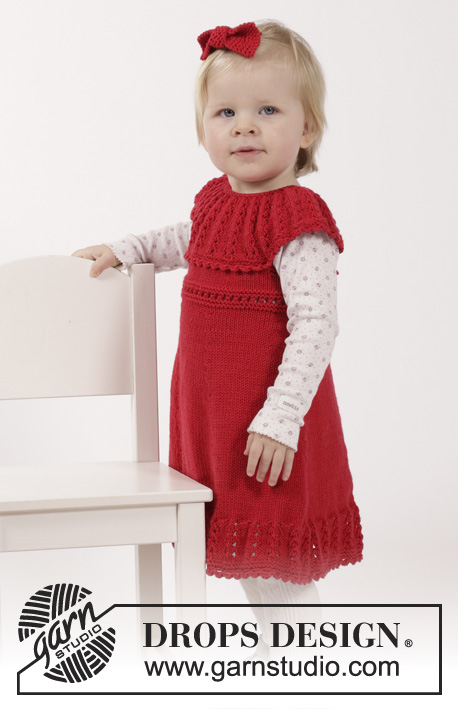
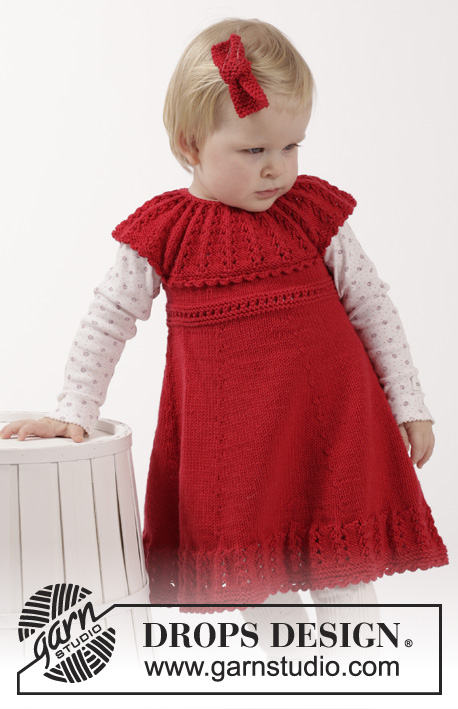
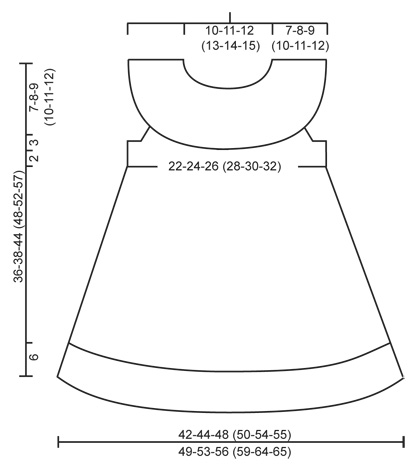
Knitted dress with lace edge and round yoke plus hair bow in garter st in DROPS Cotton Merino. For baby and children in sizes 1 month - 6 years.
DROPS Children 26-14 |
|||||||||||||||||||
|
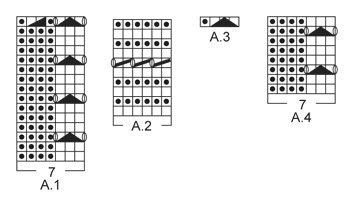
GARTER ST (worked in the round): * K 1 round and P 1 round *, repeat from *-*. 1 ridge = 2 rounds. GARTER ST (back and forth): K all rows. 1 ridge = 2 rows K. PATTERN: See diagrams A.1 to A.4. The diagrams show all rows in pattern seen from RS. DECREASE TIP: Dec as follows after 1st, 2nd, 4th and 5th marker: Slip 1 st as if to K, K 1, psso (= 1 st dec). Dec as follows before 3rd, 4th, 6th and 1st marker: Beg 2 sts before marker, K 2 sts tog (= 1 st dec). ---------------------------------------------------------- DRESS: Worked in the round on circular needle from bottom up. Cast on 217-231-245 (259-280-287) sts on circular needle size 3.5 mm with Cotton Merino. Work 2 ridges in GARTER ST in the round - see explanation above. K 1 round, then continue pattern in the round according to diagram A.1. When A.1 has been worked 1 time vertically, 186-198-210 (222-240-246) sts remain on needle and piece measures approx. 6 cm. K 1 round while AT THE SAME TIME dec 2-4-0 (2-4-2) sts evenly = 184-194-210 (220-236-244) sts. Now insert 6 markers in the piece as follows: Insert 1st marker at beg of round (= side), 2nd marker after 27-29-32 (33-35-37) sts, 3rd marker after another 38-39-41 (44-48-48) sts, 4th marker after another 27-29-32 (33-35-37) sts (= side), 5th marker after another 27-29-32 (33-35-37) sts, 6th marker after another 38-39-41 (44-48-48) sts (27-29-32 (33-35-37) sts remain on round after last marker). Work in stocking st and move the markers upwards when working. REMEMBER THE KNITTING TENSION When piece measures 8 cm, dec 1 st on each side of 1st and 4th marker, dec 1 st after 2nd and 5th marker and 1 st before 3rd and 6th marker – READ DECREASE TIP (= 8 sts dec). Repeat dec every 1½-1½-2 (2-2-2½) cm 11-11-12 (12-13-13) times in total = 96-106-114 (124-132-140) sts. Remove the 6 markers and insert 1 new marker at beg of round and 1 marker after 48-53-57 (62-66-70) sts (= sides). When piece measures 24-25-30 (33-36-40) cm (dec should now be done), work pattern in the round according to diagram A.2. When A.2 has been worked 1 time vertically, work in stocking st. When piece measures 28-29-34 (37-40-44) cm, work 2 ridges in garter st over the middle 10-10-12 (12-14-14) sts in each side (i.e. over 5-5-6 (6-7-7) sts on each side of both markers – NOTE: Work the other sts in stocking st as before). On next round after the 2 ridges, cast off the middle 6-6-8 (8-10-10) sts in each side for armholes (i.e. 3-3-4 (4-5-5) sts on each side of both markers) = 42-47-49 (54-56-60) sts remain on front and back piece. Cut the yarn. YOKE: Insert 1 marker – NOW MEASURE PIECE FROM HERE. Beg mid back and K over sts on half back piece, cast on 36-38-44 (46-50-56) sts over one armhole, K over front piece, cast on 36-38-44 (46-50-56) sts over the other armhole and K until mid back again = 156-170-186 (200-212-232) sts. Now work piece back and forth on circular needle from mid back as follows: K 3 rows while AT THE SAME TIME on 1st row (= WS) dec 2-2-4 (4-2-8) sts evenly = 154-168-182 (196-210-224) sts. Work next row as follows from RS: 2 edge sts in garter st, work pattern according to diagram A.4 until 5 sts remain, finish with the first 3 sts in A.4 and 2 edge sts in garter st. Continue pattern like this. AT THE SAME TIME when piece measures 3-4-5 (6-7-8) cm from marker, dec all 4 P to 3 P by P the first 2 sts in every P-section tog. Repeat dec in every P-section when piece measures 5-6-7 (8-9-10) and 6-7-8 (9-10-11) cm = 91-99-107 (115-123-131) sts remain and there is only 1 P between every eyelet row. When piece measures approx. 7-8-9 (10-11-12) cm – adjust so that next row is a row with holes, work A.3 from RS over all sts (continue 2 edge sts in garter st as before) = 47-51-55 (59-63-67) sts remain. NECK EDGE: Work 2 ridges back and forth over all sts and then LOOSELY cast off. ASSEMBLY: Crochet 2 buttonhole straps along left side on opening at the back. 1 buttonhole strap = work with hook size 3.5 mm and Cotton Merino as follows: 1 dc in edge st at the top by neck, 4 ch and then 1 sl st in same st as dc was worked, fasten off. Work another strap in the middle along opening. Sew buttons on to the right side of opening. CROCHET EDGE: Work a finishing edge around the bottom of dress on hook size 3.5 mm as follows: 1 ch in first st, * 3 ch, 1 tr in 1st ch worked, skip 2-3 sts, 1 dc in next st *, repeat from *-* the entire round and finish with 1 sl st in 1st dc from beg of round. Fasten off. Work a similar edge at the bottom around yoke - i.e. work along bottom ridge on yoke and then along both sleeve edges. ---------------------------------------------------------- HAIR BOW: Numbers in ( ) applies to large bow. Cast on 10 (20) sts on needle size 3.5 mm with Cotton Merino. Work in GARTER ST – see explanation above – back and forth until piece measures 8 (12) cm, cast off. MIDDLE BAND: Cast on 10 (15) sts on needle size 3.5 mm and work 4 (5) ridges. Cast off. Sew the short ends tog to form a ring. Pull the bow through the ring and fasten the two parts tog with a couple of stitches. Fasten bow with a silk ribbon or a hair pin with a couple of stitches. |
|||||||||||||||||||
Diagram explanations |
|||||||||||||||||||
|
|||||||||||||||||||
 |
|||||||||||||||||||
 |
|||||||||||||||||||
Have you finished this pattern?Tag your pictures with #dropspattern #littleheddadress or submit them to the #dropsfan gallery. Do you need help with this pattern?You'll find 28 tutorial videos, a Comments/Questions area and more by visiting the pattern on garnstudio.com. © 1982-2026 DROPS Design A/S. We reserve all rights. This document, including all its sub-sections, has copyrights. Read more about what you can do with our patterns at the bottom of each pattern on our site. |
|||||||||||||||||||


With over 40 years in knitting and crochet design, DROPS Design offers one of the most extensive collections of free patterns on the internet - translated to 17 languages. As of today we count 324 catalogues and 12290 patterns translated into English (UK/cm). 12290
We work hard to bring you the best knitting and crochet have to offer, inspiration and advice as well as great quality yarns at incredible prices! Would you like to use our patterns for other than personal use? You can read what you are allowed to do in the Copyright text at the bottom of all our patterns. Happy crafting!
Post a comment to pattern DROPS Children 26-14
We would love to hear what you have to say about this pattern!
If you want to leave a question, please make sure you select the correct category in the form below, to speed up the answering process. Required fields are marked *.