
Popular categories
Looking for a yarn?


Comments / Questions (65)
![]() Svetlana wrote:
Svetlana wrote:
Jaaa.. soweit ist es Klar aber: WIE mache ich aus der rechten und linken Teilen (Ärmeln) ein Einzelstück? Nähe ich diese zusammen? Oder Stricke ich die zusammen? und wann? an welcher Stelle?
07.12.2011 - 19:25
![]() DROPS Deutsch wrote:
DROPS Deutsch wrote:
Am Schluss jeder Runde von der Vorderseite werden die Maschen wieder auf die Hauptnadel gestrickt.
06.12.2011 - 09:21
![]() Svetlana wrote:
Svetlana wrote:
Danke. Die letzten 8-9-10-11-11 M. werden auf der Hauptnadel 1.R glatt gestrickt. Aber die letzte Frage bleibt leider noch offen: Wann und wie werden die linke und rechte Seite zusammen geführt?
05.12.2011 - 18:09
![]() DROPS Deutsch wrote:
DROPS Deutsch wrote:
Nur über die M. auf der Hauptnadel.
05.12.2011 - 12:16
![]() Svetlana wrote:
Svetlana wrote:
Ok. Danke. Mit den 7 Maschen habe ich verstanden. Aber wie geht's weiter? "Nachdem die letzten 8-9-10-11-11 M. auf die Hilfsnadel gelegt wurden wird 1 R. glatt gestrickt". Auf die Haupt- oder auf die Hilfsnadel? Und wann und wie werden die linke und rechte Seiten zusammengeführt?
05.12.2011 - 11:32
![]() DROPS Deutsch wrote:
DROPS Deutsch wrote:
Das soll "Nachdem die letzten 8-9-10-11-11 M. auf die Hilfsnadel gelegt.." heissen. Die M. werden nach und nach wieder auf die Nadel gestrickt.
05.12.2011 - 09:52
![]() Svetlana wrote:
Svetlana wrote:
Hallo. Ich stricke die Variante für 122/128. Ich habe 3 mal 9 Maschen auf die Hilfsnadel gelegt (jeweils für den linken und rechten Teil). Ich habe jetzt 9 Mashen auf der Hauptnadel (je Teil). Es steht aber was über die letzten 7 Maschen auf der Hilfsnadel. Woher 7? Wie werden die linke und rechte Seite zusammen geführt? Werden sie zusammen gestrickt oder genäht?
03.12.2011 - 21:43
![]() DROPS Deutsch wrote:
DROPS Deutsch wrote:
Die Maschen zuerst stricken und dann auf die Hilfsnadel legen. Damit es keine Löcher gibt bei zurücklegenin den Übergängen eine M. aufnehme um mit der ersten M. zusammenstricken.
17.11.2011 - 08:11
![]() Dany wrote:
Dany wrote:
Hallo, habe ein Problem mit dem Ablegen auf die Hilfsnadel, werden die Maschen nur abgenommen oder auf die Hilfsnadel getrickt, komme damit gar nicht klar und habe beim zusammen führen auf eine Nadel immer Löcher. Bitte helft mir, bin schon ganz verzweifelt
16.11.2011 - 14:15
![]() Catmouse wrote:
Catmouse wrote:
Danke, dann weiss ich, dass ich weiterstricken kann : ))
19.05.2011 - 06:54
|
|
Mom and Me |
|
 |
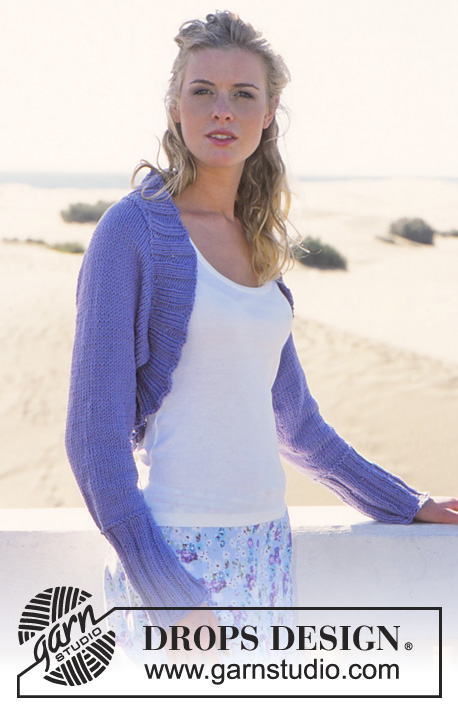 |
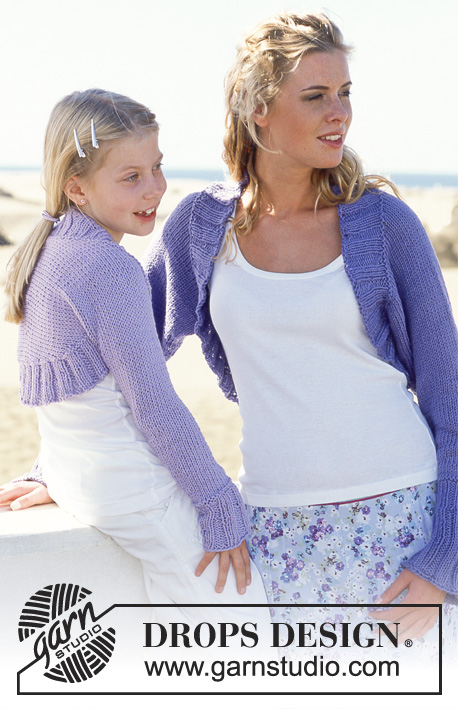
DROPS Shrug in Paris for Women and Girls
DROPS 89-13 |
|
|
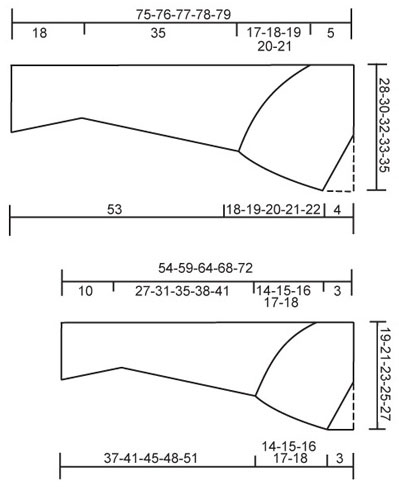
WOMEN’S SIZES: Gauge: 17 sts x 22 rows on larger needles in stockinette st = 10 x 10 cm. Rib: * K 3, P 3 *, repeat * - *. Note on the diagram: The shrug is knit from cuff to cuff. The diagram shows the shrug after assembly – that is, with the sleeve seam sewn. The dotted line indicates the center back – the sloping line indicates the front edge. Right side: Loosely cast on 50-50-56-56-56 sts on larger needles. P 1 row (wrong side), then knit rib, keeping 1 edge st at each side in garter st. When the piece measures 12 cm dec all P 3 to P 2 = 42-42-47-47-47 sts. Continue the rib with K 3/P 2. When the piece measures 18 cm K 1 row (right side row), then K 1 row (wrong side), adjusting (inc/dec as needed) to 42-42-46-48-48 sts, then continue in stockinette st. When the piece measures 20-20-20-25-21 cm inc 1 st at each side every 3-2.5-2.5-2-2 cm a total of 12-14-14-15-17 times = 66-70-74-78-82 sts. After last inc the piece measures 53 cm, put 1 marker at each side – measure the piece from here. Now dec at one side of piece (= front) at the same time cast on new sts at the other side of piece (= back) as follows: At front edge: on 1st row bind off 3 sts, then bind off every other row: 3 sts 3 times and 2 sts 9-10-11-12-13 times, then every 4 rows: 1 st 3 times. At back edge: inc every other row: 2 sts 3 times and 1 st 5-6-7-6-9 times, then every 4 rows: 1 st 4-4-4-5-4 times. After all incs and decs there are 48-51-54-56-60 sts. When the piece measures 18-19-20-21-22 cm put 10 sts on a st holder from lower edge of back up toward the neck every other row 4 times = 8-11-14-16-20 sts remain on needles. The shrug is now knit to the center back (halfway). Place a new marker at center back of neck. Knit 1 row stockinette st over all sts on needles, then knit the other half, reversing shaping as follows: put 10 sts back on needles every other row 4 times = 48-51-54-56-60 sts. When sts are put back on needles pick up 1 st between the last st on needles the first st on st holder, K tog this st with the first st on st holder. This prevents a hole where the sts are returned to the needles. When the piece measures 5 cm from the marker in back of the neck inc/cast on for front (= the side of piece you previously bound off) every 4 rows: 1 st 3 times, then every other row: 2 sts 9-10-11-12-13 times and 3 sts 4 times. At the same time, when the piece measures 8 cm from the marker in back of the neck dec for back (= the side you previously increased) every 4 rows: 1 st 4-4-4-5-4 times, then every other row: 1 st 5-6-7-6-9 times and 2 sts 3 times. After all incs and decs are complete there are 66-70-74-78-82 sts. Put a marker at each side – measure the work from here. Now dec 1 st at each side every 3-2.5-2.5-2-2 cm a total of 12-14-14-15-17 times = 42-42-46-48-48 sts. When the piece measures 34 cm P 1 row (right side) and P 1 row (wrong side), adjusting (inc/dec as needed) to 42-42-47-47-47 sts. Now knit rib (= K 3/P 2) keeping 1 edge st at each side in garter st. When cuff measures 6 cm from the P rows inc all P 2 to P 3 = 50-50-56-56-56 sts. When cuff measures 18 cm from the P rows K 1 row (right side) and then bind off loosely. Assembly: Sew sleeve seams using edge sts as seam allowance, up to markers. Pick up sts around opening = 180-195-210-225-225 sts (divisible by 15) on smaller circular needles. If you pick up more or less sts, adjust on the 2nd row evenly distributed. Join and knit in the round as follows (seen from the right side): P 1 row and K 1 row, then knit rib (= K 3/P 2). When edge measures 2 cm inc every 3rd P 2 to P 3 = 192-208-224-240-240 sts. Repeat inc when edge measures 5 and 8 cm, so that each P 2 is now P 3 = 216-234-252-270-270 sts. Bind off loosely in rib. GIRLS’ SIZES: Sizes: 5/6 years - 7/8 years - 9/10 years - 11/12 years -13/14 years Finished measurements: Wrist to center back: 54-59-64-68-72 cm Underarm to center back: 17-18-19-20-21 cm Materials: DROPS PARIS from Garnstudio 250-250-250-300-300 gr nr 05, light lilac DROPS 5 mm needles, or sizes needed to obtain correct gauge. DROPS 4.5 mm circular needles (for rib edge), or sizes needed to obtain correct gauge. Gauge: 17 sts x 22 rows on larger needles in stockinette st = 10 x 10 cm. Rib: * K 3, P 3 *, repeat * - *. Note on the diagram: The shrug is knit from cuff to cuff. The diagram shows the shrug after assembly – that is, with the sleeve seam sewn. The dotted line indicates the center back – the sloping line indicates the front edge. Right side: Loosely cast on 38-44-44-50-50 sts on larger needles. P 1 row (wrong side), then continue in rib, keeping 1 edge st at each side in garter st. When the piece measures 6 cm dec all P 3 to P 2 = 32-37-37-42-42 sts. Continue the rib with K 3/P 2. When the piece measures 10 cm K 1 row (right side) and K 1 row (wrong side), decreasing evenly distributed to 28-30-32-32-34 sts, then continue in stockinette st. When the piece measures 13-14-13-15-15 cm inc 1 st at each side every 3-3-3.5-3-3 cm a total of 9-10-10-12-13 times = 46-50-52-56-60 sts. After last inc the piece measures approx. 37-41-45-48-51 cm, put 1 marker at each side – measure the piece from here. Now dec at one side of piece (= front) at the same time cast on new sts at the other side of piece (= back) as follows: At front edge: on 1st row bind off 3 sts, then bind off every other row: 2 sts 5-6-6-7-8 times and 1 st 10-10-11-11-11 times. At back edge: inc every other row: 2 sts 2-3-4-5-5 times and then every 4 rows: 1 st 5-5-5-5-6 times. After all decs and incs are complete there are 32-36-39-43-46 sts. When the piece measures 14-15-16-17-18 cm put sts onto a st holder from lower edge of back up toward the neck every other row: 8-9-10-11-11 sts 3 times = 8-9-9-10-13 sts remain on needles. The shrug is now knit to the center back (halfway). Place a new marker at center back of neck. Knit 1 row stockinette st over all sts on needles, then knit the other half, reversing shaping as follows: Put 8-9-10-11-11 sts back on needles every other row 3 times = 32-36-39-43-46 sts. When sts are put back on needles pick up 1 st between the last st on needles the first st on st holder, K tog this st with the first st on st holder. This prevents a hole where the sts are returned to the needles. When the piece measures 3 cm from the marker in back of the neck inc for front (= the side you previously bound off) every other row: 1 st 10-10-11-11-11 times, 2 sts 5-6-6-7-8 times and 3 sts 1 time. At the same time when the piece measures 6 cm from the marker in back of the neck dec for back (= the side you previously increased) every 4 rows: 1 st 5-5-5-5-6 times and then every other row: 2 sts 2-3-4-5-5 times. After all incs and decs are complete 46-50-52-56-60 sts. Put 1 marker at each side – measure the piece from here. Now dec 1 st at each side every 3-3-3.5-3-3 cm a total of 9-10-10-12-13 times = 28-30-32-32-34 sts. When the piece measures 26-30-34-37-40 cm, P 1 row (right side), then P 1 row (wrong side), increasing to 32-37-37-42-42 sts. Now knit rib (= K 3/ P 2), keeping 1 edge st at each side in garter st. When cuff measures 4 cm from the P rows inc all P 2 to P 3 = 38-44-44-50-50 sts. When cuff measures 10 cm from the P rows P 1 row (wrong side) and then bind off loosely. Assembly: Sew sleeve seams using edge sts as seam allowance, up to markers. Pick up sts around opening = 135-150-165-180-180 sts (divisible by 15) on smaller circular needles. If you pick up more or less sts, adjust on the 2nd row evenly distributed. Join and knit in the round as follows (seen from the right side): P 1 row and K 1 row, then knit rib (= K 3/P 2). When edge measures 2 cm inc every 3rd P 2 to P 3 = 144-160-176-192-192 sts. Repeat inc when edge measures 5 and 8 cm, so that each P 2 is now P 3 = 162-180-198-216-216 sts. Bind off loosely in rib. |
|
 |
|
Have you finished this pattern?Tag your pictures with #dropspattern or submit them to the #dropsfan gallery. Do you need help with this pattern?You'll find 22 tutorial videos, a Comments/Questions area and more by visiting the pattern on garnstudio.com. © 1982-2026 DROPS Design A/S. We reserve all rights. This document, including all its sub-sections, has copyrights. Read more about what you can do with our patterns at the bottom of each pattern on our site. |
|


With over 40 years in knitting and crochet design, DROPS Design offers one of the most extensive collections of free patterns on the internet - translated to 17 languages. As of today we count 324 catalogues and 12290 patterns translated into English (UK/cm). 12290
We work hard to bring you the best knitting and crochet have to offer, inspiration and advice as well as great quality yarns at incredible prices! Would you like to use our patterns for other than personal use? You can read what you are allowed to do in the Copyright text at the bottom of all our patterns. Happy crafting!
Post a comment to pattern DROPS 89-13
We would love to hear what you have to say about this pattern!
If you want to leave a question, please make sure you select the correct category in the form below, to speed up the answering process. Required fields are marked *.