
Popular categories
Looking for a yarn?


Comments / Questions (65)
![]() Kristine wrote:
Kristine wrote:
I also do not understand the instructions to put stitches onto a stitch holder from lower edge of back,, I watched the 2 videos short row WS & RS... there was NO stitch holder in the video,, I am confused but don't want to give up on it when I am this far,, How do I do this step?
06.12.2019 - 04:24DROPS Design answered:
Dear Kristine, when you work short rows, you can slip the stitches on a thread or on a stitch holder, or keep them on the needle, as you rather (your preferences) - most important is simply to work the short rows as explained, ie do not work the 10 sts towards bottom of back piece on every other row a total of 4 times. Happy knitting!
06.12.2019 - 08:57
![]() Truus Van Den Heuvel wrote:
Truus Van Den Heuvel wrote:
Ik heb nu beide helften gebreid, tot en met het op de hulpnaald zetten, maar er staat nergens dat de rugzijde aan elkaar moet worden genaaid. Uit het patroon begrijp ik dat de helften apart verder worden gebreid?? Volgens mij klopt het dan niet meer
14.10.2019 - 11:50DROPS Design answered:
Dag Truus,
Je breit het hele truitje in een stuk van van de ene mouw naar de andere mouw. Dus als je midden achter bent, ben je op de helft. Je breit dan verder over de steken waarbij je in spiegelbeeld breit. Dus waar je eerst moest minderen moet je nu meerderen en vice versa. Er komt dus geen naad midden achter.
15.10.2019 - 15:52Ann Hutt wrote:
I hope this pattern gets rewritten one day in far more detail when it comes to the short row shaping. Not only did I struggle with it but so did other experienced knitters when I asked for help in my 2 knitting groups. The last person advised me simply to avoid doing the shaping.
15.05.2018 - 08:05
![]() Shirley Mortensen wrote:
Shirley Mortensen wrote:
I have knit t for over 50 years & cannot figure out the part of the pattern on the back that has me put every other stitch on a holder, 9 stitches 3 times. Makes no sense to me. Is there a video that shows this process? I am knitting the girls size 7-8. Thank you.
23.12.2014 - 03:57DROPS Design answered:
Dear Mrs Mortensen, to shape back piece, you will work some short rows, leave unworked 9 sts a total of 3 times towards neck (you will work more rows on the bottom of back piece - see triangle in chart) - you will find different videos showing how to work short rows under the tab "videos" at the right side of the picture. Happy knitting!
23.12.2014 - 19:05
![]() Michelle wrote:
Michelle wrote:
I'm making Girls size 9/10 years. The pattern says "When the piece measures 13-14-13-15-15 cm inc 1 st at each side. Can someone confirm that this measurement should be smaller for 9/10 years than for 7/8 years? This doesn't seem right. Thank you!
22.05.2014 - 16:44DROPS Design answered:
Dear Michelle, pattern is correct, you start inc earlier than in size 7/8 since there are same number of inc but longer sleeve. You can check final measurements in the chart at the bottom of the page. Happy knitting!
23.05.2014 - 08:48
![]() Janice wrote:
Janice wrote:
What is the point of moving the stitches onto the stitch holder? I don't see that it does anything except make holes or a funky spot. It doesn't change the shape of the neck or back. Are the English instructions worded wrong?
10.04.2014 - 03:48DROPS Design answered:
Dear Janice, these will form the small triangle in chart (short rows, ie more rows on the bottom back) - you can also work short rows, see tab "videos" at the right side of the picture, they may help you to avoid holes. Happy knitting!
10.04.2014 - 09:23
![]() Ille wrote:
Ille wrote:
I made this for my girl. The sleeves are extremly narrow. Would advise others to make size bigger or even more sts.
06.03.2013 - 12:17
![]() Heike Starke wrote:
Heike Starke wrote:
Ich hab jetzt probleme damit wann ich die Maschen auf die Hilfsnadel nehme und wann werden diese dann wieder zurück gestrickt? und wie viel werden auf die Hilfnadel genommen nach den auf und abnahmen hab ich 36 maschen auf der Nadel. Ich hoffe, Sie können mir schnell weiter helfen
17.02.2013 - 14:05DROPS Design answered:
Hallo Heike, stricken Sie da Kindermodell? Dann finden Sie die Information hier in der Anleitung: Nach 14-15-16-17-18 cm werden, wie folgt, auf der Hinterseite unten, bei jeder 2. R., Maschen auf eine Hilfsnadel gelegt: 8-9-10-11-11 M. 3 Mal = 8-9-9-10-13 M. auf der Hauptnadel. Danach werden die stillgelegten M wieder - gegengleich - auf die Hauptnadel genommen.
18.02.2013 - 09:12
![]() Jetta K. Junk wrote:
Jetta K. Junk wrote:
Gütern Morgen, Nach der Ablage auf die Hilfsnadel werden dann die beiden Teile weiterhin separat gestrickt? Mir fehlt der Verbindungszeitraum zwischen beiden Teilen. Gut wäre auch hier auch eine Zeichnung wie die Teile zusammengehören. Viele Grüße Jetta K. Junk
16.02.2013 - 08:20DROPS Design answered:
Liebe Jetta, der Bolero wird in einem Stück gestrickt.
18.02.2013 - 09:06
![]() Heike Starke wrote:
Heike Starke wrote:
Guten tag. ich versteh leider etwas in ihrer Anleitung nicht ganz.. das steht jetzt werden auf der einen Seite GEGEN VORNE Maschen aufgenommen und GEGEN HINTEN abgenommen.. was bedeutet das genau??? Ich hoffe, Sie können mir schnell weiter helfen
15.02.2013 - 11:41DROPS Design answered:
Liebe Heike, Sie stricken ja die Arbeit vom Ärmel aus, dieser geht über in den Rumpfteil des Boleros d.h. eine Seite ist später das „Vorderteil“ (nach vorne) und die andere Seite am Rücken (nach hinten). Wir werden bei Gelegenheit die deutsche Anleitung neu übersetzen.
15.02.2013 - 13:31
|
|
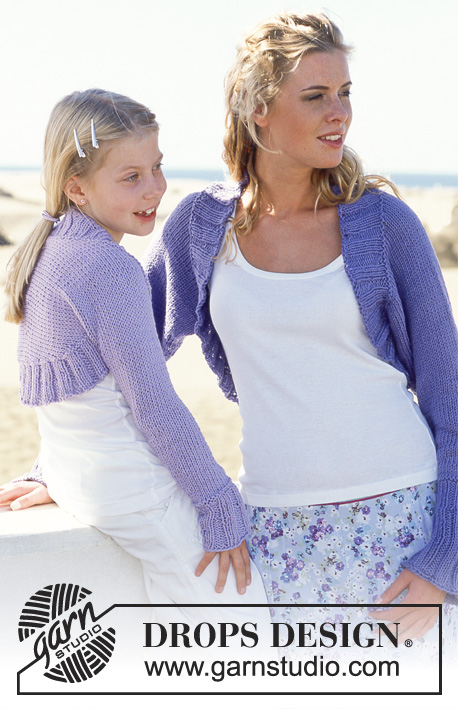
Mom and Me |
|
 |
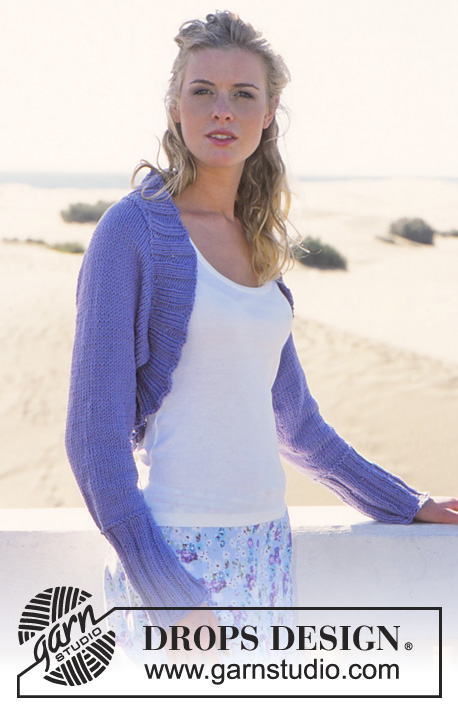 |
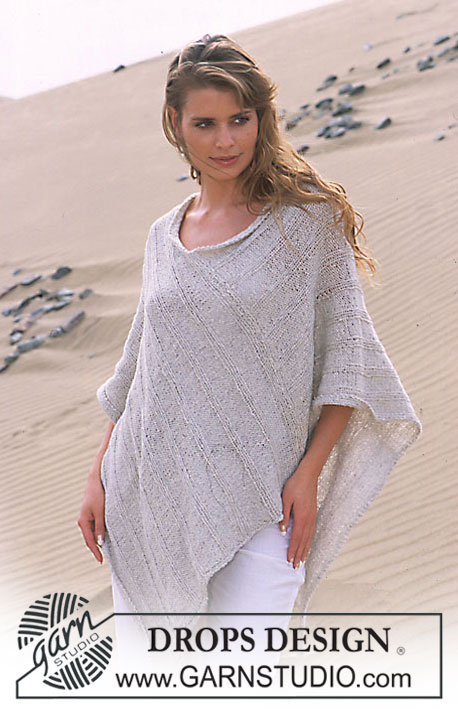
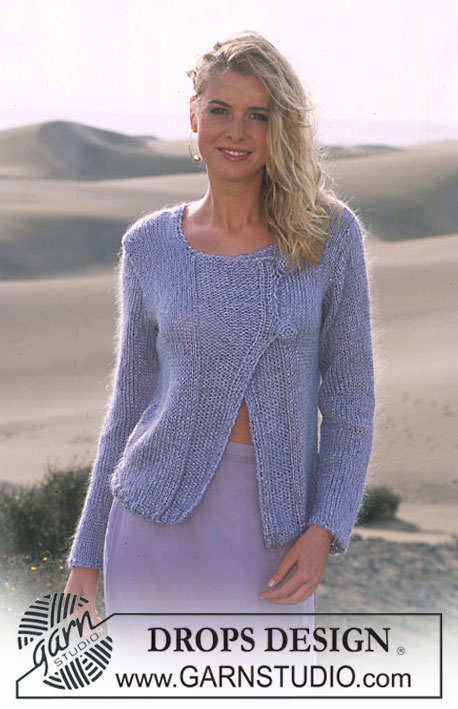
DROPS Shrug in Paris for Women and Girls
DROPS 89-13 |
|
|
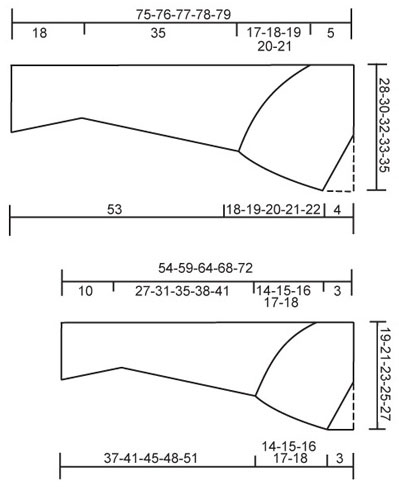
WOMEN’S SIZES: Gauge: 17 sts x 22 rows on larger needles in stockinette st = 10 x 10 cm. Rib: * K 3, P 3 *, repeat * - *. Note on the diagram: The shrug is knit from cuff to cuff. The diagram shows the shrug after assembly – that is, with the sleeve seam sewn. The dotted line indicates the center back – the sloping line indicates the front edge. Right side: Loosely cast on 50-50-56-56-56 sts on larger needles. P 1 row (wrong side), then knit rib, keeping 1 edge st at each side in garter st. When the piece measures 12 cm dec all P 3 to P 2 = 42-42-47-47-47 sts. Continue the rib with K 3/P 2. When the piece measures 18 cm K 1 row (right side row), then K 1 row (wrong side), adjusting (inc/dec as needed) to 42-42-46-48-48 sts, then continue in stockinette st. When the piece measures 20-20-20-25-21 cm inc 1 st at each side every 3-2.5-2.5-2-2 cm a total of 12-14-14-15-17 times = 66-70-74-78-82 sts. After last inc the piece measures 53 cm, put 1 marker at each side – measure the piece from here. Now dec at one side of piece (= front) at the same time cast on new sts at the other side of piece (= back) as follows: At front edge: on 1st row bind off 3 sts, then bind off every other row: 3 sts 3 times and 2 sts 9-10-11-12-13 times, then every 4 rows: 1 st 3 times. At back edge: inc every other row: 2 sts 3 times and 1 st 5-6-7-6-9 times, then every 4 rows: 1 st 4-4-4-5-4 times. After all incs and decs there are 48-51-54-56-60 sts. When the piece measures 18-19-20-21-22 cm put 10 sts on a st holder from lower edge of back up toward the neck every other row 4 times = 8-11-14-16-20 sts remain on needles. The shrug is now knit to the center back (halfway). Place a new marker at center back of neck. Knit 1 row stockinette st over all sts on needles, then knit the other half, reversing shaping as follows: put 10 sts back on needles every other row 4 times = 48-51-54-56-60 sts. When sts are put back on needles pick up 1 st between the last st on needles the first st on st holder, K tog this st with the first st on st holder. This prevents a hole where the sts are returned to the needles. When the piece measures 5 cm from the marker in back of the neck inc/cast on for front (= the side of piece you previously bound off) every 4 rows: 1 st 3 times, then every other row: 2 sts 9-10-11-12-13 times and 3 sts 4 times. At the same time, when the piece measures 8 cm from the marker in back of the neck dec for back (= the side you previously increased) every 4 rows: 1 st 4-4-4-5-4 times, then every other row: 1 st 5-6-7-6-9 times and 2 sts 3 times. After all incs and decs are complete there are 66-70-74-78-82 sts. Put a marker at each side – measure the work from here. Now dec 1 st at each side every 3-2.5-2.5-2-2 cm a total of 12-14-14-15-17 times = 42-42-46-48-48 sts. When the piece measures 34 cm P 1 row (right side) and P 1 row (wrong side), adjusting (inc/dec as needed) to 42-42-47-47-47 sts. Now knit rib (= K 3/P 2) keeping 1 edge st at each side in garter st. When cuff measures 6 cm from the P rows inc all P 2 to P 3 = 50-50-56-56-56 sts. When cuff measures 18 cm from the P rows K 1 row (right side) and then bind off loosely. Assembly: Sew sleeve seams using edge sts as seam allowance, up to markers. Pick up sts around opening = 180-195-210-225-225 sts (divisible by 15) on smaller circular needles. If you pick up more or less sts, adjust on the 2nd row evenly distributed. Join and knit in the round as follows (seen from the right side): P 1 row and K 1 row, then knit rib (= K 3/P 2). When edge measures 2 cm inc every 3rd P 2 to P 3 = 192-208-224-240-240 sts. Repeat inc when edge measures 5 and 8 cm, so that each P 2 is now P 3 = 216-234-252-270-270 sts. Bind off loosely in rib. GIRLS’ SIZES: Sizes: 5/6 years - 7/8 years - 9/10 years - 11/12 years -13/14 years Finished measurements: Wrist to center back: 54-59-64-68-72 cm Underarm to center back: 17-18-19-20-21 cm Materials: DROPS PARIS from Garnstudio 250-250-250-300-300 gr nr 05, light lilac DROPS 5 mm needles, or sizes needed to obtain correct gauge. DROPS 4.5 mm circular needles (for rib edge), or sizes needed to obtain correct gauge. Gauge: 17 sts x 22 rows on larger needles in stockinette st = 10 x 10 cm. Rib: * K 3, P 3 *, repeat * - *. Note on the diagram: The shrug is knit from cuff to cuff. The diagram shows the shrug after assembly – that is, with the sleeve seam sewn. The dotted line indicates the center back – the sloping line indicates the front edge. Right side: Loosely cast on 38-44-44-50-50 sts on larger needles. P 1 row (wrong side), then continue in rib, keeping 1 edge st at each side in garter st. When the piece measures 6 cm dec all P 3 to P 2 = 32-37-37-42-42 sts. Continue the rib with K 3/P 2. When the piece measures 10 cm K 1 row (right side) and K 1 row (wrong side), decreasing evenly distributed to 28-30-32-32-34 sts, then continue in stockinette st. When the piece measures 13-14-13-15-15 cm inc 1 st at each side every 3-3-3.5-3-3 cm a total of 9-10-10-12-13 times = 46-50-52-56-60 sts. After last inc the piece measures approx. 37-41-45-48-51 cm, put 1 marker at each side – measure the piece from here. Now dec at one side of piece (= front) at the same time cast on new sts at the other side of piece (= back) as follows: At front edge: on 1st row bind off 3 sts, then bind off every other row: 2 sts 5-6-6-7-8 times and 1 st 10-10-11-11-11 times. At back edge: inc every other row: 2 sts 2-3-4-5-5 times and then every 4 rows: 1 st 5-5-5-5-6 times. After all decs and incs are complete there are 32-36-39-43-46 sts. When the piece measures 14-15-16-17-18 cm put sts onto a st holder from lower edge of back up toward the neck every other row: 8-9-10-11-11 sts 3 times = 8-9-9-10-13 sts remain on needles. The shrug is now knit to the center back (halfway). Place a new marker at center back of neck. Knit 1 row stockinette st over all sts on needles, then knit the other half, reversing shaping as follows: Put 8-9-10-11-11 sts back on needles every other row 3 times = 32-36-39-43-46 sts. When sts are put back on needles pick up 1 st between the last st on needles the first st on st holder, K tog this st with the first st on st holder. This prevents a hole where the sts are returned to the needles. When the piece measures 3 cm from the marker in back of the neck inc for front (= the side you previously bound off) every other row: 1 st 10-10-11-11-11 times, 2 sts 5-6-6-7-8 times and 3 sts 1 time. At the same time when the piece measures 6 cm from the marker in back of the neck dec for back (= the side you previously increased) every 4 rows: 1 st 5-5-5-5-6 times and then every other row: 2 sts 2-3-4-5-5 times. After all incs and decs are complete 46-50-52-56-60 sts. Put 1 marker at each side – measure the piece from here. Now dec 1 st at each side every 3-3-3.5-3-3 cm a total of 9-10-10-12-13 times = 28-30-32-32-34 sts. When the piece measures 26-30-34-37-40 cm, P 1 row (right side), then P 1 row (wrong side), increasing to 32-37-37-42-42 sts. Now knit rib (= K 3/ P 2), keeping 1 edge st at each side in garter st. When cuff measures 4 cm from the P rows inc all P 2 to P 3 = 38-44-44-50-50 sts. When cuff measures 10 cm from the P rows P 1 row (wrong side) and then bind off loosely. Assembly: Sew sleeve seams using edge sts as seam allowance, up to markers. Pick up sts around opening = 135-150-165-180-180 sts (divisible by 15) on smaller circular needles. If you pick up more or less sts, adjust on the 2nd row evenly distributed. Join and knit in the round as follows (seen from the right side): P 1 row and K 1 row, then knit rib (= K 3/P 2). When edge measures 2 cm inc every 3rd P 2 to P 3 = 144-160-176-192-192 sts. Repeat inc when edge measures 5 and 8 cm, so that each P 2 is now P 3 = 162-180-198-216-216 sts. Bind off loosely in rib. |
|
 |
|
Have you finished this pattern?Tag your pictures with #dropspattern or submit them to the #dropsfan gallery. Do you need help with this pattern?You'll find 22 tutorial videos, a Comments/Questions area and more by visiting the pattern on garnstudio.com. © 1982-2026 DROPS Design A/S. We reserve all rights. This document, including all its sub-sections, has copyrights. Read more about what you can do with our patterns at the bottom of each pattern on our site. |
|


With over 40 years in knitting and crochet design, DROPS Design offers one of the most extensive collections of free patterns on the internet - translated to 17 languages. As of today we count 324 catalogues and 12290 patterns translated into English (UK/cm). 12290
We work hard to bring you the best knitting and crochet have to offer, inspiration and advice as well as great quality yarns at incredible prices! Would you like to use our patterns for other than personal use? You can read what you are allowed to do in the Copyright text at the bottom of all our patterns. Happy crafting!
Post a comment to pattern DROPS 89-13
We would love to hear what you have to say about this pattern!
If you want to leave a question, please make sure you select the correct category in the form below, to speed up the answering process. Required fields are marked *.