
Popular categories
Looking for a yarn?


Comments / Questions (46)
![]() Sandrine Grekov wrote:
Sandrine Grekov wrote:
À 51-52-53-54-55-56 cm de hauteur totale – ajuster au 10e ou au dernier rang de A.1, placer 1 marqueur de chaque côté (les marqueurs sont utilisés pour ajuster le motif et lors de l'assemblage) 1) Qu'est-ce que je dois ajuster ? (Je tricote la taille M en aig 7 et à 52 cm j'arrive au 7ème rang du motif A1) 2) De chaque coté de quoi je dois placer les marqueurs ? Merci.
04.04.2019 - 21:22DROPS Design answered:
Bonjour Mme Grekov, si vous en êtes au 7ème rang, vous pouvez continuer pour que le rang suivant soit le 10ème (c'est ce qu'on entend par ajuster la longueur) ou bien pour une veste un peu plus courte, défaire jusqu'au dernier rang de A.1. Vous placez un marqueur de chaque côté de l'ouvrage= à droite et à gauche (= en début et en fin de rang). Bon tricot!
05.04.2019 - 09:48
![]() Jennifer Clarke wrote:
Jennifer Clarke wrote:
Hi, I have so far done 2 swatches and there is no way that 14 stitches is 10 cms I have done 1 in 6 mm and one in 6.5 mm needles. Is there a mistake in the pattern? Thank you. I did ask this question last year but got no reply.
05.12.2018 - 14:17DROPS Design answered:
Dear Mrs Clarke, there is no mistake in the pattern, tension should be 14 sts x 16 rows in stocking stitch with 1 strand Alpaca + 1 strand Brushed Alpaca Silk worked together = 10 x 10 cm - Needle size is only a suggestion! If you have too many stitches on 10 cm switch to larger needles. If you have too few stitches on 10 cm switch to smaller needles. Do not hesitate to contact your DROPS store - even per mai or telephone - they may have tips for you. Happy knitting!
05.12.2018 - 15:13Kathryn wrote:
I'm looking for a one strand alternative to the 2 strands you suggest?
28.03.2018 - 20:49DROPS Design answered:
Dear Kathryn, if you want to knit this with only one strand, you might try DROPS Air, or if you like the halo effect, then the DROPS Melody yarn. Please make sure you knit and wash a swatch and check the gauge before you start the whole piece and change needle sizes and/or stitch count accordingly, if necessary. Happy Knitting!
29.03.2018 - 02:03
![]() Jennifer Clarke wrote:
Jennifer Clarke wrote:
Hi, I have so far done 2 swatches and there is no way that 14 stitches is 10 cms I have done 1 in 6mm and one in 6.5 mm. Is there a mistake in the pattern? Thank you.
11.11.2017 - 13:30
![]() Tove Zilliacus wrote:
Tove Zilliacus wrote:
Hei. Sopiiko Drops Muskat tähän työhön, yksinkertaisena lankana? Pitääkö silmukkamäärät paikkaansa, minulla on löysä käsiala. Puikoilla 4 - 4,5.
29.08.2017 - 06:22DROPS Design answered:
Hei! En suosittelisi Muskat-langan käyttöä tähän malliin. Käytä mieluummin joku toinen lanka lankaryhmästä C + joku toinen lanka lankaryhmästä A. Tärkeintä kuitenkin on, että neuletiheys täsmää, eli neulo mallitilkku ja tarkista että työhön tulee 14 silmukkaa ja 16 kerrosta per 10 x 10 cm.
29.08.2017 - 14:26Claudia Alarcon wrote:
Hola antes quiero comentarles que el patrón es hermoso!. Como se tejen las hebras en la vuelta de revés? Estoy un poco confundida si debo tejer con la hebra retorcida o no. Saludos!
06.01.2017 - 04:06DROPS Design answered:
Hola Claudia. Las lazadas (hebras) en las filas de revés del patrón se trabajan como pts no retorcidos para que se formen los agujeros. En elcaso de hacer las lazadas para realizar aumentos, las hebras se trabajan como pts retorcidos.
06.01.2017 - 18:15
![]() Petra wrote:
Petra wrote:
Ik heb alle onderdelen van het vest nu gebreid. Is het aan te raden om het nu eerst op te spannen/blocken voordat ik het in elkaar zet vanwege het kantpatroon? In het patroon staat hier niks over beschreven.
18.11.2016 - 11:02DROPS Design answered:
Hoi Petra. Het is niet verplicht om te blokken, maar je kan het doen als je dat fijner vindt.
18.11.2016 - 12:11
![]() Soulie wrote:
Soulie wrote:
Bonjour, superbe veste que je fais actuellement , Quand vus dites EN MÊME TEMPS, quand l'ouvrage mesure 7 cm, diminuer 1 m à 1 m du bord sur le côté, c'est sur le coté emmanchure? OUPS Je fais le devant gauche je vous remercie d'avance
16.09.2016 - 09:27DROPS Design answered:
Bonjour Mme Soulie, tout à fait, vous diminuez côté couture au dos (= le côté où sera l'emmanchure ensuite). Bon tricot!
16.09.2016 - 09:31
![]() Monika wrote:
Monika wrote:
Meine Frage hat sich erledigt hab das Video gefunden und verstanden.
28.07.2016 - 16:54DROPS Design answered:
Liebe Monika, das freut mich, viel Spass beim Stricken!
01.08.2016 - 08:11
![]() Monika wrote:
Monika wrote:
Können Sie mir helfen bei dem Schalkragen? ich habe die maschen für die schulter abgekettet. es verbleiben die 12 Blenmaschen. Nun sollen 2reihen rechts gestrickt werden und verkürzte Reihen. dann ist danach die rede von 8 maschen und 8 cm. wie kann ich in zwei reihen 4 maschen verkürzt stricken? verstehe ich nicht. Dank im voraus.
26.07.2016 - 18:48DROPS Design answered:
Liebe Monika, ich verstehe nicht ganz, was Sie mit "in zwei reihen 4 maschen verkürzt stricken" meinen. Haben Sie sich unsere Tutorials zum Thema verkürzte Reihen angeschaut? Vielleicht wird dann klar, was gemeint ist - sonst fragen Sie bitte nochmals nach.
28.07.2016 - 15:41
|
|||||||||||||||||||
Water Diamonds#waterdiamondsjacket |
|||||||||||||||||||
 |
 |
||||||||||||||||||
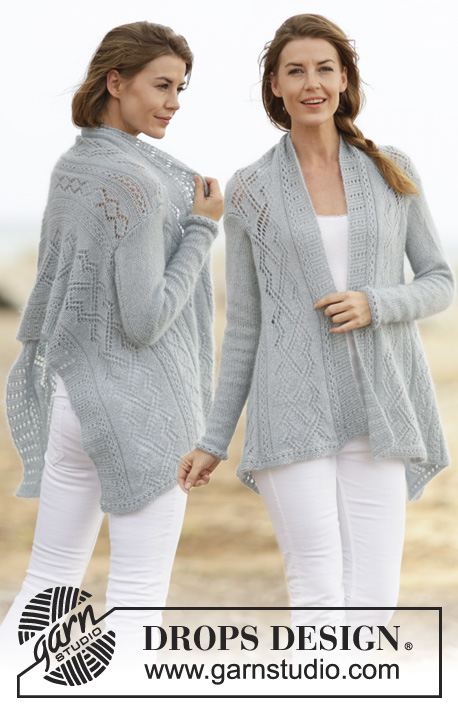
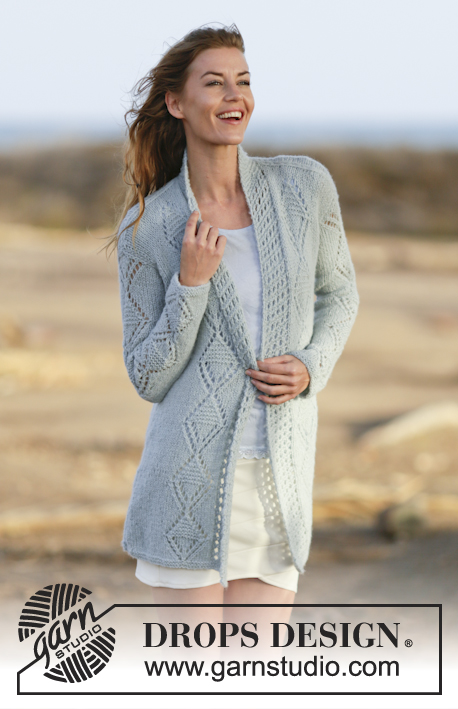
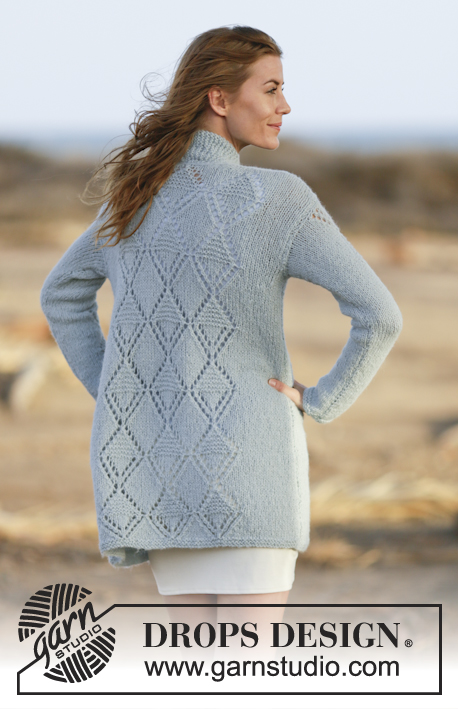
Knitted DROPS jacket with lace pattern and shawl collar in "Brushed Alpaca Silk" and "Alpaca". Size: S - XXXL
DROPS 161-13 |
|||||||||||||||||||
|
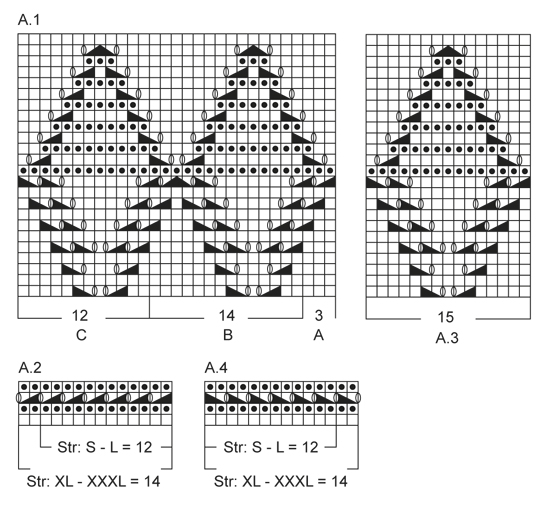
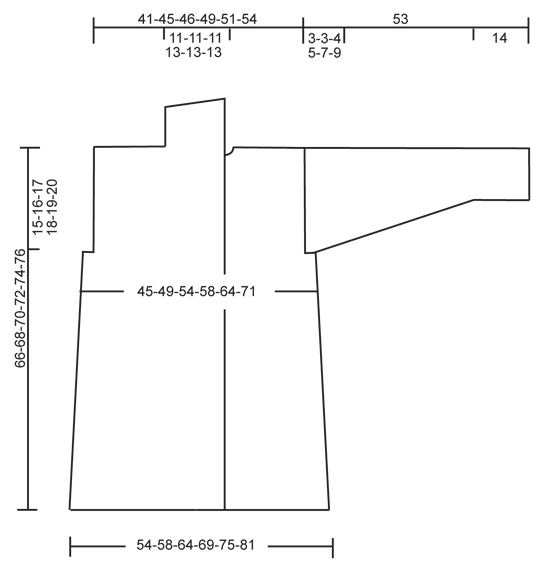
GARTER ST (back and forth): K all rows. 1 ridge = 2 rows K. PATTERN: See diagrams A.1 to A.4. The diagrams show all rows in pattern seen from RS. NOTE: Finish 3rd row in A.2 with YO, and beg 3rd row in A.4 with YO. DECREASE TIP: All dec are done from RS. Dec 1 st at beg of row as follows: 1 edge st in garter st, slip next st as if to K, K 1, psso. Dec 1 st at end of row as follows: Work until 3 sts remain on needle, K the next 2 sts tog, 1 edge st in garter st. INCREASE TIP: Inc 1 st by making 1 YO, on next row work YO twisted to avoid holes. ---------------------------------------------------------- BACK PIECE: Worked back and forth on circular needle. Cast on 77-83-91-99-107-115 sts (incl 1 edge st in each side) on circular needle size 5 mm with 1 strand Brushed Alpaca Silk + 1 strand Alpaca (= 2 strands). Work 2 ridges in GARTER ST - see explanation above. Switch to circular needle size 6 mm. Work as follows from RS: 1 edge st in garter st, 16-19-23-27-31-35 sts in stocking st, A.1A (= 3 sts), A.1B over the next 28 sts, A.1C (= 12 sts), 16-19-23-27-31-35 sts in stocking st, 1 edge st in garter st. REMEMBER THE KNITTING TENSION Continue the pattern like this - AT THE SAME TIME when piece measures 7 cm, dec 1 st inside 1 edge st in each side - READ DECREASE TIP. Repeat dec in each side every 8-8½-7-6-6½-6½ cm 5-5-6-7-7-6 more times = 65-71-77-83-91-101 sts. When piece measures 51-52-53-54-55-56 cm – adjust according to 10th or last row in A.1 insert 1 marker in each side (markers are needed for adjustment of pattern and for assembly). Cast off 4-4-6-7-10-13 sts for armholes at beg of the next 2 rows = 57-63-65-69-71-75 sts. When 24 rows have been worked from marker, continue in stocking st over all sts – AT THE SAME TIME when piece measures 13-14-15-16-17-18 cm from marker (piece measures approx. 64-66-68-70-72-74 cm), cast off the middle 13-13-13-15-15-15 sts for neck and finish each shoulder separately. Cast off 1 st on next row towards the neck = 21-24-25-26-27-29 sts remain on each shoulder. Cast off when piece measures 15-16-17-18-19-20 cm from marker (piece measures approx. 66-68-70-72-74-76 cm). RIGHT FRONT PIECE: Worked back and forth on circular needle. Cast on 43-46-50-55-59-63 sts (incl 12-12-12-14-14-14 band sts and 1 edge st) on circular needle size 5 mm with 1 strand Brushed Alpaca Silk + 1 strand Alpaca (= 2 strands). Work 2 ridges. Switch to circular needle size 6 mm. Work as follows from RS: A.2 (= 12-12-12-14-14-14 band sts), 1 st in stocking st, A.3 (= 15 sts), 14-17-21-24-28-32 sts in stocking st, 1 edge st in garter st. Continue the pattern like this - AT THE SAME TIME when piece measures 7 cm, dec 1 st inside 1 edge st in the side. Repeat dec in the side every 8-8½-7-6-6½-6½ cm 5-5-6-7-7-6 more times = 37-40-43-47-51-56 sts. When piece measures 51-52-53-54-55-56 cm – adjust according to back piece – insert a marker in the side (marker is needed for adjustment of pattern and for assembly). Cast off 4-4-6-7-10-13 sts for armhole at beg of next row from WS = 33-36-37-40-41-43 sts. When 24 rows have been worked from marker, continue in stocking st over A.3. When piece measures 15-16-17-18-19-20 cm from marker - adjust according to back piece and so that next row is from WS, cast off the first 21-24-25-26-27-29 sts (= shoulder), work the rest of row = 12-12-12-14-14-14 sts. Work in garter st over these sts for shawl collar - AT THE SAME TIME work short rows, beg from the neck (1st row = RS) as follows: * Work 1 ridge over all sts. On next row from RS K 8-8-8-10-10-10, turn and K back *, repeat from *-* until piece measures approx. 8-8-8-9-9-9 cm from cast off for shoulder (short side). Loosely cast off all sts. LEFT FRONT PIECE: Cast on and work the same way as on right front piece but reversed - work A.4 (= 12-12-12-14-14-14 band sts) instead of A.2. Beg short rows on shawl collar from WS. SLEEVE: Worked back and forth on circular needle. Cast on 33-35-35-37-39-39 sts (incl 1 edge st in each side) on circular needle size 5 mm with 1 strand Brushed Alpaca Silk + 1 strand Alpaca (= 2 strands). Work 2 ridges. Switch to circular needle size 6 mm and work next row from RS as follows: 1 edge st in garter st, 8-9-9-10-11-11 sts in stocking st, A.3 (= 15 sts), 8-9-9-10-11-11 sts in stocking st, 1 edge st in garter st. Continue the pattern like this - AT THE SAME TIME when piece measures 14 cm, inc 1 st inside 1 edge st in each side - READ INCREASE TIP. Repeat inc in each side every 7-7-5½-4½-4½-3 cm 5-5-6-7-7-9 more times = 45-47-49-53-55-59 sts. When piece measures 50-50-49-48-46-44 cm, insert 1 marker in each side (these markers are needed for assembly). Cast off when piece measures approx. 53 cm. ASSEMBLY: Sew shoulder seams and sew in sleeves in outer loops of edge sts (make sure that markers on sleeve meet markers on front and back piece). Sew sleeve and side seams in one inside 1 edge st. Sew band tog mid back for collar. Sew collar to neck line. |
|||||||||||||||||||
Diagram explanations |
|||||||||||||||||||
|
|||||||||||||||||||
 |
|||||||||||||||||||
 |
|||||||||||||||||||
Have you finished this pattern?Tag your pictures with #dropspattern #waterdiamondsjacket or submit them to the #dropsfan gallery. Do you need help with this pattern?You'll find 24 tutorial videos, a Comments/Questions area and more by visiting the pattern on garnstudio.com. © 1982-2026 DROPS Design A/S. We reserve all rights. This document, including all its sub-sections, has copyrights. Read more about what you can do with our patterns at the bottom of each pattern on our site. |
|||||||||||||||||||


With over 40 years in knitting and crochet design, DROPS Design offers one of the most extensive collections of free patterns on the internet - translated to 17 languages. As of today we count 324 catalogues and 12290 patterns translated into English (UK/cm). 12290
We work hard to bring you the best knitting and crochet have to offer, inspiration and advice as well as great quality yarns at incredible prices! Would you like to use our patterns for other than personal use? You can read what you are allowed to do in the Copyright text at the bottom of all our patterns. Happy crafting!
Post a comment to pattern DROPS 161-13
We would love to hear what you have to say about this pattern!
If you want to leave a question, please make sure you select the correct category in the form below, to speed up the answering process. Required fields are marked *.