
Popular categories
Looking for a yarn?


Comments / Questions (102)
![]() Agneta wrote:
Agneta wrote:
Förstår inte det här med förkortat varv för kragen på framstyckena. När maskar jag av de 6 maskorna som inte ingår i det förkortade varvet.
17.03.2026 - 16:51DROPS Design answered:
Hej Agneta, vilka 6 maskor? Du maskar av till ärmhål under varje ärm. Sedan maskar du av till axeln och maskorna du har kvar stickas fram och tillbaka med förkortade varv :)
08.04.2026 - 13:30
![]() Josée wrote:
Josée wrote:
Est-ce que vous pouvez m'expliquer comment faire les rangs raccourcis. Merci
02.06.2025 - 11:46DROPS Design answered:
Bonjour Josée, volontiers, pour tricoter les rangs raccourcis du devant gauche (1er devant indiqué), vous allez tricoter ainsi, en commençant sur l'envers: *tricotez 21 à 25 mailles (cf taille) - laissez les autres mailles non tricotées sur l'aiguille gauche, tournez et tricotez ces mailles sur l'endroit, tournez, tricotez toutes les mailles sur l'envers, tournez et tricotez toutes les mailles sur l'endroit*, répétez ces 4 rangs jusqu'à ce que le col mesure 9 à 11 cm côté le plus court. Retrouvez ici en vidéo un exemple de rangs raccourcis au point mousse. Bon tricot!
02.06.2025 - 13:13
![]() Sommer Claudia wrote:
Sommer Claudia wrote:
Nun habe ich es verstanden
01.06.2025 - 18:01
![]() Sommer Claudia wrote:
Sommer Claudia wrote:
Li. u. re. Vorderteil 27 M für den Kragen. Bei dem Diagramm sieht es aus als müsste man die ersten R gerade hoch str. Und dann erst mit den verkürzten R anfangen.....Übersehe ich etwas......Bitte um Hilfe
01.06.2025 - 15:28DROPS Design answered:
Liebe Frau Sommer, wenn die Maschen für die Schulter abgekettet sind, dann strickt man nur noch die Maschen für den Kragen, und zwar mit verkürzten Reihen, damit die Äusserste Seite länger als die innere Seite (die am Halsausschnitt hinten genäht wird) ist. Viel Spaß beim Stricken!
02.06.2025 - 08:22
![]() Josée wrote:
Josée wrote:
Bonjour je suis rendue à faire les rangs raccourcis malheureusement je ne comprends pas comment les faire. Pouvez-vous m’expliquer comment procéder pour la grandeur (xxl) Merci
31.05.2025 - 23:34DROPS Design answered:
Bonjour Josée, les rangs raccourcis sont tricotés pour le col pour que la partie extérieure du col soit plus large que le côté intérieur (qui sera ensuite cousu le long de l'encolure), autrement dit, pour le devant droit, commencez les rangs raccourcis sur l'endroit et pour le devant gauche. Bon tricot!
02.06.2025 - 08:11
![]() Jannette Selig wrote:
Jannette Selig wrote:
Ich habe meinen Fehler gefunden. Ich wollte A1A auch immer wieder stricken. Es wird ja nur A1B immer wiederholt.
06.05.2025 - 05:58
![]() Jannette Selig wrote:
Jannette Selig wrote:
Ich stricke in Größe M und soll 201 Maschen aufnehmen. Zu Anfang dann 28 M glatt rechts + 2 M rechts + 1 M links = 31 Maschen.Am Ende nochmals das gleiche.Ich soll aber auch 22 mal das Diagram A1A und A1B stricken.Das wären ja nochmals 220 Maschen.Am Ende kommt A1C nur einmal?Dann bleiben davor 6 Maschen übrig.Was mache ich falsch?Also 31 Maschen zu beginn,dann 22 mal die Diagramme A1A und A1B und am Ende 34 Maschen = 3 Maschen A1C und dann die 28 glatt rechts plus 1 Masche links, 2 rechts.
05.05.2025 - 19:59DROPS Design answered:
Liebe Frau Selig, so sollen Sie stricken: 2 M glattrechts, 1 M glattlinks, 28 M Glattrechts, dann stricken Sie die 4 Maschen A.1A, dann wiederholen Sie 22 Mal die 6 Maschen A.1B, dann stricken Sie die 3 Maschen A.1C und endlich 28 M glattrechts, 1 M glattlinks, 2 M Glattrechts = 2+1+28+4+(22x6)+3+28+1+2=201 M. Viel Spaß beim Stricken!
06.05.2025 - 09:32
![]() Gristel wrote:
Gristel wrote:
Tere, kas oleks võimalik veidike rohkem lahti seletada juhendit? Sooviks teha kehaosa, kuid ei saa aru kas algus on alt või kaela osa juurest? Lugupidamisega
19.07.2024 - 18:25DROPS Design answered:
Tere Gristel! Jakk kootakse alt üles. Lisasin selgituse juhendi algusesse. Head kudumist!
08.08.2024 - 19:02
![]() Angela wrote:
Angela wrote:
Según el patrón de la Manga, hay que repetir los aum cada 4½-4-3½-3-2½-2½ cm 8-9-10-11-12-13-13 vcs más = 53-56-59-63-67-69 pts No coinciden los puntos resultantes tras los aumentos y debe haber un número repetido en lo referente al número de veces que hay que hacer los aumentos. Hay alguna corrección del patrón?
25.06.2024 - 21:44
![]() Loronda wrote:
Loronda wrote:
Where is the link to the video that shows how to work row 7?
25.06.2024 - 02:20DROPS Design answered:
Dear Loronda, see video below - on 7th round, the last 2 sts in A is worked with the first stitch B, the yarn over is then the new first stitch of B; work be until 2 sts remain, make the yarn over, and work these 2 sts together with the first stitch next B / C, the yarn over is now the first stitch in next repeat B / in C. Happy knitting!
25.06.2024 - 09:09
|
||||||||||||||||
Lace Affair#laceaffairjacket |
||||||||||||||||
 |
 |
|||||||||||||||
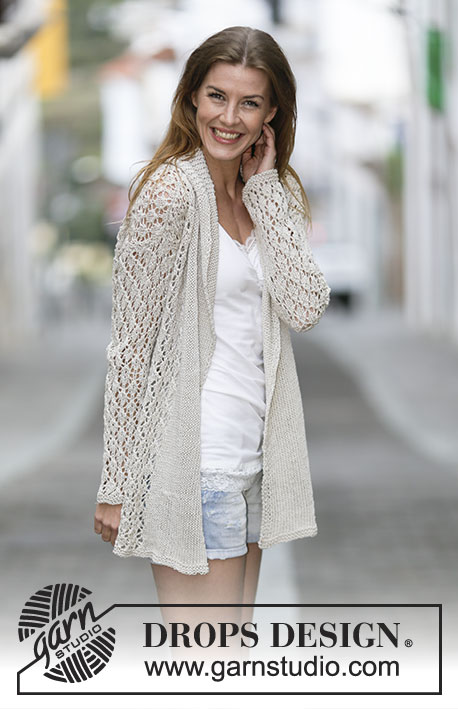
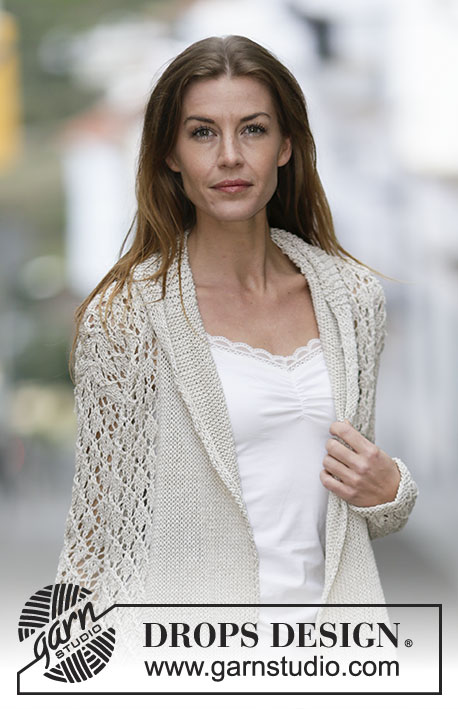
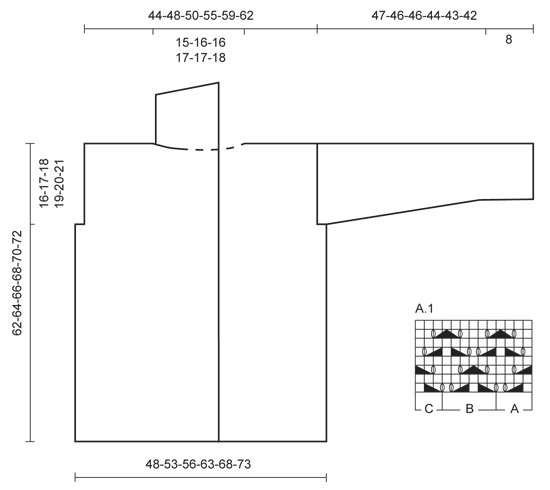
Knitted DROPS jacket with lace pattern and shawl collar in "Bomull-Lin" or "Paris". Size: S - XXXL.
DROPS 159-2 |
||||||||||||||||
|
GARTER ST (back and forth): K all rows. 1 ridge = 2 rows K. PATTERN: See diagram A.1. The diagram show all rows in pattern seen from RS. KNITTING TIP: Band sts will wrinkle inwards when working but lay flat after assembly. INCREASE TIP: Inc 1 st by making 1 YO, on next row work YO twisted (i.e. work in the back loop of st instead front) to avoid holes. ---------------------------------------------------------- BODY: Worked back and forth on circular needle from mid front. Loosely cast on 185-201-211-235-251-265 sts on circular needle size 4.5 mm with Bomull-Lin or Paris. Work 2 ridges in GARTER ST - see explanation above. Switch to circular needle size 5.5 mm, work next row (= RS) as follows: 2 sts in stocking st, P 1, and stocking st over the next 26-28-27-27-26-24 sts (= band), work A.1A (= 4 sts), A.1B (= 6 sts) 20-22-24-28-31-34 times in total, A.1C (= 3 sts), work in stocking st over the next 26-28-27-27-26-24 sts, P 1 and 2 sts in stocking st (= band). Continue like this - READ KNITTING TIP AND REMEMBER THE KNITTING TENSION. When piece measures approx. 46-47-48-49-50-51 cm, insert 2 markers; 54-58-60-67-71-75 sts in from each side (= 77-85-91-101-109-115 sts between markers on back piece). On next row cast off 3-4-5-6-7-8 sts for armholes on each side of both markers (= 6-8-10-12-14-16 cast off sts in each side). Now divide the piece and finish each part separately. BACK PIECE: = 71-77-81-89-95-99 sts. Continue pattern as before with 1 edge st in garter st in each side until piece measures 60-62-64-66-68-70 cm. Then cast off the middle 21-23-23-25-25-27 sts for neck and finish each shoulder separately. Continue to dec 1 st on next row from neck = 24-26-28-31-34-35 sts remain on the shoulder. Cast off when piece measures 62-64-66-68-70-72 cm. LEFT FRONT PIECE: = 51-54-55-61-64-67 sts. Work 1 edge st in garter st towards the armhole and continue with pattern as before, and finish with 26-27-27-27-27-24 sts in stocking st, P 1 and 2 sts in stocking st (= band sts) towards mid front until piece measures 62-64-66-68-70-72 cm. At beg of next row from RS cast off the first 24-26-28-31-34-36 sts for shoulder = 27-28-27-30-30-31 sts remain for collar. Work in garter st over these sts - AT THE SAME TIME work short rows, beg from WS as follows: * Work 1 ridge over all sts. On next row from WS K 21-22-21-24-24-25, turn and K back *, repeat from *-* until piece measures approx. 9-10-10-10½-10½-11 cm from cast off for shoulder (short side). Loosely cast off all sts. RIGHT FRONT PIECE: Work as left front piece but reversed. Beg short rows on collar from RS. SLEEVE: Worked back and forth on needle. Loosely cast on 35-37-39-39-41-43 sts (incl 1 edge st each side) on circular needle size 4.5 mm with Bomull-Lin or Paris. Work 2 ridges. Switch to circular needle size 5.5 mm, work next row (= RS) as follows: 1 edge st in garter st, 1-2-0-0-1-2 sts in stocking st, work A.1A (= 4 sts), A.1B over the next 24-24-30-30-30-30 sts (= 4-4-5-5-5-5 times), A.1C (= 3 sts), 1-2-0-0-1-2 sts in stocking st, finish with 1 edge st in garter st. When piece measures 8 cm, inc 1 st inside 1 edge st in each side - READ INCREASE TIP above, work the inc sts in pattern. Repeat inc every 4½-4-3½-3-2½-2½ cm 8-9-10-11-12-13 more times = 53-57-61-63-67-71 sts. When piece measures 45-44-43-40-39-37 cm, insert 1 marker in each side of sleeve (for assembly). When piece measures 47-46-46-44-43-42 cm (shorter measurements in the larger sizes because of wider shoulders), cast off all sts. ASSEMBLY: Sew shoulder seams and sew in sleeves in outer loops of edge sts. Sew the sleeve seams in one inside 1 edge st - NOTE: Section worked after marker at the top of sleeve should fit the cast off for armhole. Sew band tog mid back and sew band to the neck egde - NOTE! Seam should be at the back so that is is not visible when collar is folded down. Lightly steam the band with iron, it will then be flat. |
||||||||||||||||
Diagram explanations |
||||||||||||||||
|
||||||||||||||||
 |
||||||||||||||||
Have you finished this pattern?Tag your pictures with #dropspattern #laceaffairjacket or submit them to the #dropsfan gallery. Do you need help with this pattern?You'll find 21 tutorial videos, a Comments/Questions area and more by visiting the pattern on garnstudio.com. © 1982-2026 DROPS Design A/S. We reserve all rights. This document, including all its sub-sections, has copyrights. Read more about what you can do with our patterns at the bottom of each pattern on our site. |
||||||||||||||||


With over 40 years in knitting and crochet design, DROPS Design offers one of the most extensive collections of free patterns on the internet - translated to 17 languages. As of today we count 324 catalogues and 12290 patterns translated into English (UK/cm). 12290
We work hard to bring you the best knitting and crochet have to offer, inspiration and advice as well as great quality yarns at incredible prices! Would you like to use our patterns for other than personal use? You can read what you are allowed to do in the Copyright text at the bottom of all our patterns. Happy crafting!
Post a comment to pattern DROPS 159-2
We would love to hear what you have to say about this pattern!
If you want to leave a question, please make sure you select the correct category in the form below, to speed up the answering process. Required fields are marked *.