
Popular categories
Looking for a yarn?


Comments / Questions (92)
![]() Marina wrote:
Marina wrote:
I am very impressed with the designs and the yarn. I am accustomed to the European yarns through my family in Europe, and was very excited with the selection you carry for the different projects. I am just about finished the summer hat, and very excited to wear and show it off. Thank you for providing me the joy in creating such great projects
02.06.2019 - 03:24
![]() Alexandra wrote:
Alexandra wrote:
Dobrý den, mám 2 otázky: 1) tu dekorativní část mám opravdu háčkovat ze dvou vláken? Jaké to bude z jednoho vlákna? A 2) chci to háčkovat pro tříletou neteř, kde mám nejlépe ubrat na hloubce? Děkuji!
24.04.2019 - 16:52DROPS Design answered:
Dobrý den, Alexandro! Ad 1) ano, opravdu háčkujeme krempu dvojitou přízí - vzor pak bude pevnější a bude lépe držet. Ad 2) nejjednodušší řešení je použít slabší přízi i háček (např. DROPS Safran a háček č.2,5 nebo 3) - i bez toho, že byste musela měnit vzor a počty, bude klobouček proporčně menší. Jinak je možné např. vynechat 7. a 8. řadu vzoru na krempě. Příjemné tvoření! Hana
24.04.2019 - 21:26
![]() Saskia wrote:
Saskia wrote:
Prosím Vás čo znamená *? Ďakujem
24.07.2018 - 07:59DROPS Design answered:
Milá Saskie, tento symbol (*) označuje úsek vzoru, tzv. sekvenci, kterou budeme stále opakovat - buď až do konce dané řady, nebo tolikrát, kolíkrát je psáno v návodu (např. *-* opakujeme celkem 5x - tento zápis znamená, že postup uvedený mezi hvězdičkami uháčkujeme/upleteme 5x). Příjemné tvoření! Hana
24.07.2018 - 15:59
![]() Gitte wrote:
Gitte wrote:
Jeg forstår heller ikke helt 2.omgang i “skyggen”. Kan den ikke vises i en video?
08.06.2018 - 22:08Consuelo wrote:
Beautiful design, I do not live in USA and I can´t find this yarn in Amazon. Could I use the Lion brand 24/7 cotton yarn for this project, that is a #4 yarn
26.05.2018 - 05:57DROPS Design answered:
Dear Mrs Consuelo, We are able to provide free patterns thanks to our yarns sold throughout the world. You will therefore understand that we can only recomand you to contact your DROPS Store for any further help & assistance. Thank you for your comprehension.
28.05.2018 - 08:32
![]() Marion wrote:
Marion wrote:
Beklager, jeg som forklarer dårlig. Jeg er kommet til omg 2 på bremmen. I om 2 står det lag 1 kjm om første lm. Hvilken lm er dette? På toppen av første vifte? Første maske?
24.05.2018 - 08:39DROPS Design answered:
Hei Marion. Det er den samme lm som du hekler den første staven i, altså den første lm etter første fm på forrige omgang. Du hekler slik: 1 kjm om første lm fra forrige omgang, 5 lm, 1 st i den samme luftmasken som kjm. God fornøyelse videre
24.05.2018 - 10:11
![]() Marion wrote:
Marion wrote:
Tusen takk for svar. Det som forvirrer meg mest er faktisk hvor jeg skal starte.. 1 kjm om første lm - hvilken LM?
23.05.2018 - 21:53DROPS Design answered:
Hei Marion, De 5 lm som du hekler til å begynne med skal settes i en ring ved å hekle en kjm i den første lm heklet (lengst fra nålen). Dette blir toppen av hatten og du fortsetter med å hekle rundt den ringen og deretter nedover hatten. Håper dette hjelper og god fornøyelse!
24.05.2018 - 08:13
![]() Marion wrote:
Marion wrote:
Skjønner ikke denne OMG og det blir bare feil...kan noen forklare eller gi noen tips? 2.OMG: 1 kjm om første lm, 5 lm (= 1 st + 2 lm), 1 st om samme lm, * 3 lm, 1 fm om lm midt i st-gruppen, 3 lm **, om lm mellom 2 fm hekles det 1 st + 2 lm + 1 st *, gjenta fra *-* omg rundt, men siste repetisjon avsluttes etter **, deretter hekles det 1 kjm i 3.lm på beg av omg.
17.05.2018 - 22:29DROPS Design answered:
Hei Marion. Jeg går ut i fra at det som forvirrer deg er 5 lm (= 1 st + 2 lm)? I hver luftmaskebue som sitter mellom 2 fastmasker fra forrige runde skal det hekles 2 staver slik: 1 st, 2lm,1st. Men i den aller første luftemaskebuen, på begynnelsen av omgangen, hekler du isteden 5lm (isteden for 1st, 2lm) og så 1st før du fortsetter mønster etter diagram. Du fortsetter mønster etter diagram ut runden, men den siste gangen avslutter du etter * 3 lm, 1 fm om lm midt i st-gruppen, 3 lm**, før du hekler en kjm i den 3 lm du lagde på starten av omgangen. God fornøyelse.
23.05.2018 - 14:40
![]() Michèle wrote:
Michèle wrote:
Très bien
14.05.2018 - 20:15
![]() Ellie B wrote:
Ellie B wrote:
Please tell me what to do to get this pattern to download. Thank you!
04.04.2018 - 21:37DROPS Design answered:
Dear Ellie, you can only print our pattern, but then can choose to print them with a virtual printer to save them as a PDF. Happy crocheting!
05.04.2018 - 08:34
|
||||||||||
Dune hat#dunehat |
||||||||||
 |
 |
|||||||||
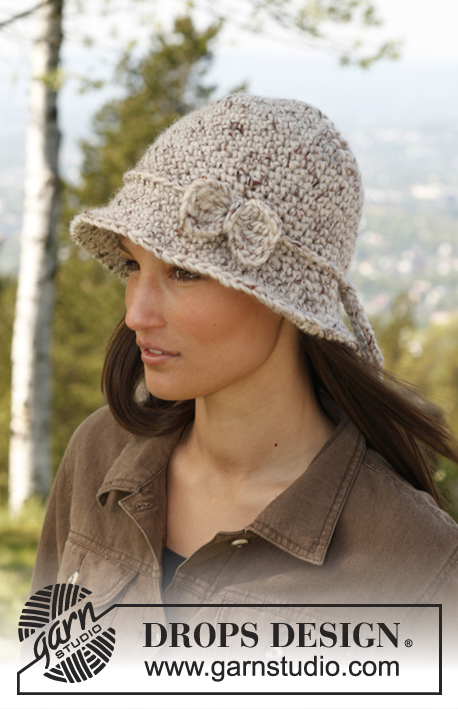
Crochet DROPS hat with fan pattern in ”Muskat”.
DROPS 146-34 |
||||||||||
|
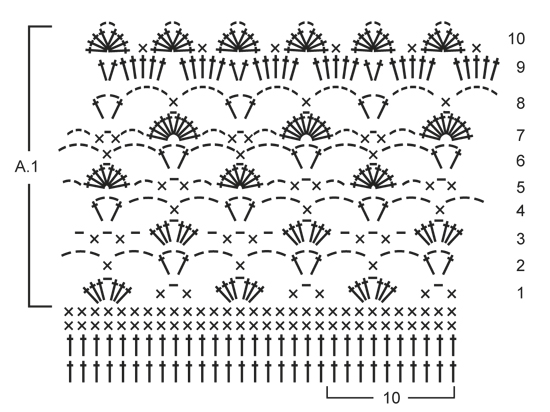
CROCHET INFO: Replace first tr on beg of a round with tr with 3 ch. Finish every round with tr with 1 sl st in 3rd ch from beg of round (= in first tr). Replace first dc on beg of round with dc with 1 ch. Finish every dc round with 1 sl st in ch from beg of round. INCREASE TIP: Inc 1 tr or 1 dc by working 2 tr/dc in same st. -------------------------------------------------------- HAT: Crochet 5 ch on hook size 4 mm with 1 thread Muskat and form a ring with 1 sl st in first ch. READ CROCHET INFO! ROUND 1: Work 10 (10) tr in ch-ring. ROUND 2: Work 2 tr in every tr = 20 (20) tr. ROUND 3: * 1 tr in first tr, 2 tr in next tr *, repeat from *-* = 30 (30) tr. ROUND 4: * 1 tr in each of the first 2 tr, 2 tr in next tr *, repeat from *-* = 40 (40) tr. ROUND 5- 8 (5- 9): Continue inc the same way, i.e. inc 10 tr on every round, inc the same place as on previous round, i.e. 1 tr more between every inc on every round. Inc as before by working 2 tr in 1 tr = 80 (90) tr. ROUND 9 (10): Work 1 tr in every tr while AT THE SAME TIME inc 6 (4) tr evenly - READ INCREASE TIP = 86-94 tr. ROUND 10- 11 (11- 12): Work 1 tr in every tr = 86 (94) tr. ROUND 12 (13): Work 1 dc in every tr = 86 (94) dc. ROUND 13 (14): Work 1 dc in every dc while AT THE SAME TIME inc 4 (6) dc evenly = 90 (100) dc. BRIM: Now work fan pattern with 2 threads Muskat as follows (also see diagram A.1). ROUND 1: 1 dc in first st, 1 ch, skip 1 dc, 1 dc in next dc, * skip 3 sts, in next dc work 3 tr + 1 ch + 3 tr, skip 3 dc **, 1 dc in next dc, 1 ch, skip 1 dc, 1 dc in next dc*, repeat from *-* but finish last repetition on round after **, then work 1 sl st in first dc from beg of round. ROUND 2: 1 sl st in first ch, 5 ch (= 1 tr + 2 ch), 1 tr in same ch, * 3 ch, 1 dc in ch in the middle of tr-group, 3 ch **, in ch between 2 dc work 1 tr + 2 ch + 1 tr *, repeat from *-* the entire round but finish last repetition after **, then work 1 sl st in 3rd ch from beg of round. ROUND 3: 1 sl st in ch-loop between 2 tr, 3 ch (= 1 tr), 2 tr in same ch-loop, 1 ch, 3 tr in same ch-loop, * 1 ch, 1 dc in next ch-loop, 1 ch, 1 dc in next ch-loop, 1 ch **, in next ch-loop (between the 2 tr) work 3 tr + 1 ch + 3 tr *, repeat from *-* the entire round but finish last repetition after **, then work 1 sl st in 3rd ch from beg of round. ROUND 4: Work sl sts until ch in the middle of tr-group, 1 dc in ch in the middle of tr-group, * 3 ch, in ch between 2 dc work 1 tr + 2 ch + 1 tr, 3 ch **, 1 dc in ch in the middle of tr-group *, repeat from *-* but finish last repetition after **, then work 1 sl st in dc from beg of round. ROUND 5: 1 sl st in first ch-loop, 2 ch, * in next ch-loop (the 2 ch between 2 tr) work 4 tr + 1 ch + 4 tr, 2 ch, 1 dc in next ch-loop, 1 ch **, 1 dc in next ch-loop, 2 ch, repeat from *-* but finish last repetition after **, then work 1 sl st in sl st from beg of round. ROUND 6: Work sl sts until ch in the middle of tr-group, 1 dc in ch in the middle of tr-group, * 4 ch, in ch between 2 dc work 1 tr + 2 ch + 1 tr, 4 ch **, 1 dc in ch in the middle of tr-group *, repeat from *-* but finish last repetition after **, then work 1 sl st in dc from beg of round. ROUND 7: 1 dc in first ch-loop, 3 ch, * in next ch-loop (the 2 ch between 2 tr) work 5 tr + 1 ch + 5 tr, 3 ch, 1 dc in next ch-loop, 1 ch **, 1 dc in next ch-loop, 3 ch, repeat from *-* but finish last repetition after **, then work 1 sl st in dc from beg of round. ROUND 8: Work sl sts until ch in the middle of tr-group, 1 dc in ch in the middle of tr-group, * 5 ch, in ch between 2 dc work 1 tr + 2 ch + 1 tr, 5 ch **, 1 dc in ch in the middle of tr-group *, repeat from *-* but finish last repetition after **, then work 1 sl st in dc from beg of round. ROUND 9: 1 sl st in first ch-loop, 3 ch (= 1 tr), 4 tr in same ch-loop, * 2 tr in next ch-loop (ch-loop between 2 tr), 5 tr in next ch-loop (= 1 tr-group with 5 tr) **, 5 tr in next ch-loop (= 1 tr-group with 5 tr) *, repeat from *-* the entire round but finish last repetition after **, then work 1 sl st in 3rd ch from beg of round. ROUND 10: Work sl sts until third tr in tr-group with 5 tr, 1 dc in this tr, * skip until the 2 tr standing alone, between these 2 tr work 4 tr + 2 ch + 4 tr, skip until third tr in first tr-group with 5 tr, 1 dc in this tr, between the 2 tr-groups with 5 tr work 4 tr + 2 ch + 4 tr **, skip until third tr in tr-group with 5 tr, 1 dc in this tr *, repeat from *-* the entire round but finish last repetition after **, then work 1 sl st in dc from beg of round. Cut and fasten the threads. |
||||||||||
Diagram explanations |
||||||||||
|
||||||||||
 |
||||||||||
Have you finished this pattern?Tag your pictures with #dropspattern #dunehat or submit them to the #dropsfan gallery. Do you need help with this pattern?You'll find 9 tutorial videos, a Comments/Questions area and more by visiting the pattern on garnstudio.com. © 1982-2026 DROPS Design A/S. We reserve all rights. This document, including all its sub-sections, has copyrights. Read more about what you can do with our patterns at the bottom of each pattern on our site. |
||||||||||


With over 40 years in knitting and crochet design, DROPS Design offers one of the most extensive collections of free patterns on the internet - translated to 17 languages. As of today we count 324 catalogues and 12290 patterns translated into English (UK/cm). 12290
We work hard to bring you the best knitting and crochet have to offer, inspiration and advice as well as great quality yarns at incredible prices! Would you like to use our patterns for other than personal use? You can read what you are allowed to do in the Copyright text at the bottom of all our patterns. Happy crafting!
Post a comment to pattern DROPS 146-34
We would love to hear what you have to say about this pattern!
If you want to leave a question, please make sure you select the correct category in the form below, to speed up the answering process. Required fields are marked *.