
Popular categories
Looking for a yarn?


Comments / Questions (54)
![]() Atiaen wrote:
Atiaen wrote:
Hallo, ich wollte fragen, wo die Größe 41 bleibt? Eigentlich sollte es heißen 41/43 oder nicht?
19.11.2025 - 20:23
![]() Paula María wrote:
Paula María wrote:
Cuando hago el calculo para las disminuciones la aplicación está mal me da : tejer 11 puntos disminuir 2, tejer 10 pts disminuir 2, tejer 11 puntos disminuir 2 ... Cuando debería de ser : tejer 8 pts disminuir 2, tejer 7 pts disminuir 2 y tejer 8 pts disminuir 2 así tendrías los 23 pts
20.10.2025 - 16:10
![]() Ellen wrote:
Ellen wrote:
Skal man på høyre sokk starte med stolpesiden?
01.02.2025 - 09:27DROPS Design answered:
Hej Ellen, ja det stemmer du strikker stolpesiden på højre side :)
12.02.2025 - 07:48
![]() Galya wrote:
Galya wrote:
I absolutely love this pattern! The slippers are so comfy, and so gorgeous, yet very quick and easy to make. Made size 38-40 that fitted my 12 year old perfectly. Just started working on another pair for me. Thank you so much!
13.09.2022 - 20:44
![]() Claudia Standke wrote:
Claudia Standke wrote:
Hallo! Ich habe leider große Probleme beim Zusammennähen der Hausschuhe: "der Beginn der Hin-R ist die hintere Mitte des Schuhs"...wo ist die hintere und wo die vordere Mitte? Wie genau wird die Knopfleiste angenäht? Eine Zeichnung wäre hier echt hilfreich. Danke für Ihre Hilfe!
01.02.2022 - 20:18DROPS Design answered:
Liebe Frau Standke, die Hausschuhen sind zuerst von oben nach unten gestrickt, dann wieder nach oben und bei der 2. Hälfte legen Sie Maschen still für die Knopfleiste (die werden danach mit der anderen Farbe gestrickt). Falten Sie die Arbeit zusammen so daß die Krausrippen mit Dunkelbraun oben sind und nähen Sie zusammen beide Seite: von oben nach unten = Rückenseite; und von oben nach unten entlang den neuen Maschen bis unten. Die Knopfleiste wird auf der eine Seite, Knöpfe nähen Sie durch beide Teilen. Viel Spaß beim fertigstellen!
02.02.2022 - 08:29
![]() Manuela Schütte wrote:
Manuela Schütte wrote:
Frage zu modell nr. 142-37 ,ich hätte gerne eine zeichnung dazu.danke
12.10.2021 - 18:26DROPS Design answered:
Liebe Frau Schütte, wir haben zu diesem Modell keine Zeichnung, prüfen Sie Ihre Maschenprobe und folgen Sie die Anleitug Schritt für Schritt, die Hausschuhen werden dann genauso aussehen. Viel Spaß beim stricken!
13.10.2021 - 08:00
![]() Daniel wrote:
Daniel wrote:
Hur stickar man höger toffel motsatt? Exakt vilka ställen stickas annorlunda?
11.09.2021 - 14:38DROPS Design answered:
Hej Daniel. Du gör då tvärtom på instruktionerna, t.ex. ökningar på höger sida görs nu på vänster sida osv. Om du har svårt att förstå hur vi menar så kan du alltid kontakta din återförsäljare för hjälp. Mvh DROPS Design
22.09.2021 - 07:50
![]() Jo wrote:
Jo wrote:
I know how to swap yarns and do the math for different gauges, but how do I know how to do the math for different felt #s? Is there a measurement of how the gauge listed in the pattern shrinks down and measures after felting? Then I'd be able to do a test swatch, felt it, and do the ratio math to get it to match up.
10.06.2021 - 07:32DROPS Design answered:
Hi Jo, If you have the correct guage when working the piece, the number of stitches given for each size will felt down to the corresponding foot size. Hope this helps and happy knitting!
10.06.2021 - 08:11
![]() Birgitta Schuberth wrote:
Birgitta Schuberth wrote:
Hur mycket kommer tofflorna att krympa efter tovningen? Jag tycker skaftet ser väldigt smalt ut, ca 22 cm brett i stl 38/40. Tacksam för svar Birgitta
10.11.2020 - 23:32DROPS Design answered:
Hej Birgitta. Vi har dessvärre ingen uppgift om det, men om du bara följer mönstret och ser till att ha den stickfasthet som uppges så ska tofflorna bli som på bilden. Mvh DROPS Design
18.11.2020 - 12:16
![]() Tove Halvorsen wrote:
Tove Halvorsen wrote:
Hvordan strikke høyre tøffel motsatt?
03.03.2020 - 15:30
|
|
Elize#elizeslippers |
|
|
|
|
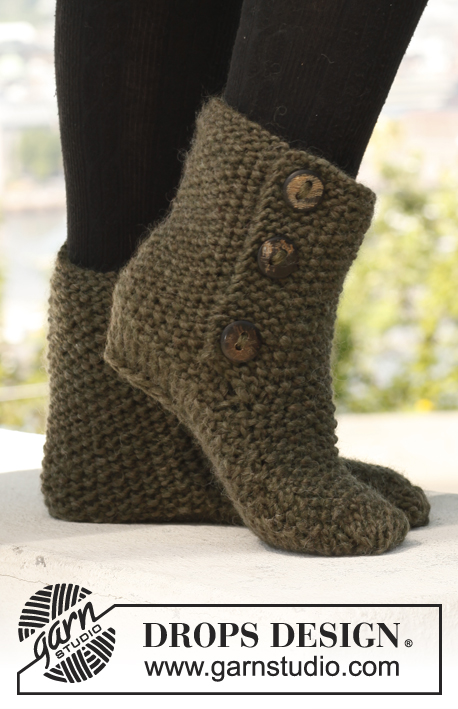
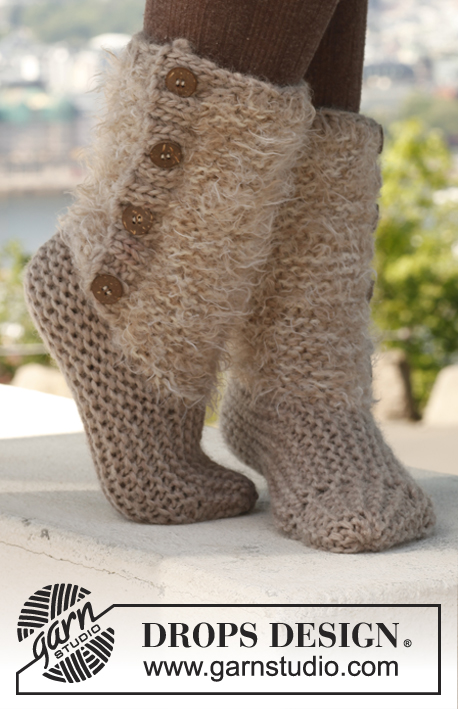
Felted DROPS slippers in "Snow".
DROPS 142-37 |
|
|
COLOUR CHANGE: Change colour on same row as follows: Work the first 4 sts on row with dark brown, work next st with light plum - but twine the threads first at the back so that the two parts are linked tog. --------------------------------------------------------- LEFT SLIPPER: Worked in one, beg at the top of leg. Loosely cast on 24-25-26 sts on needles size 8 mm with dark brown. K 5 rows (1st row = RS, beg of row seen from RS = mid back, end of row seen from RS = mid front). REMEMBER THE KNITTING TENSION! Switch to light plum. Then work in stocking st. AT THE SAME TIME on 1st row with light plum, dec 2 sts (by P 2 tog) evenly = 22-23-24 sts. When piece measures 17-17-19 cm, cast on new sts for foot at the end of every row from RS as follows: Cast on 2 sts 3-4-6 times, 1 st 3-3-2 times = 31-34-38 sts. When piece measures 50-53-56 cm, cast off for leg at beg of every row from WS as follows: Cast off 1 st 3-3-2 times, 2 sts 3-4-6 times = 22-23-24 sts. On next row from RS work as follows: Work 13-13-14 sts, turn and work back from WS (= 9-10-10 sts remain in the left side, slip the sts on a stitch holder). Continue in stocking st over the 13-13-14 sts until piece measures 72-76-82 cm. P 1 row from WS while AT THE SAME TIME inc 1 st = 14-14-15 sts. Switch to dark brown and K 5 rows. Loosely cast off. Now work band over the remaining sts in the left side as follows: With dark brown cast on 4 sts on row (= band), then switch to light plum - READ COLOUR CHANGE - and work from RS the 9-10-10 sts on stitch holder with light plum = 13-14-14 sts in total on needle. Continue with dark brown over the first 4 sts (= band sts) and light plum over the other sts until piece measures 72-76-82 cm. P 1 row from WS while AT THE SAME TIME inc 1 st over sts in light plum = 14-15-15 sts. Switch to dark brown and K with dark brown over all sts on next row. K 4 more rows (= 5 rows K). Loosely cast off. ASSEMBLY: Fold the slipper double RS against RS and sew tog mid back in front loop of outermost sts. Sew the same way at the front over the foot and up along leg mid front. Turn the slipper with RS out. Place band in dark brown over the other side of slipper and fasten it as follows: Beg from short side of band and continue along the entire long side of band. Sew long side on the other side of slipper to the back of band. Sew on 3 buttons on band through all layers. RIGHT SLIPPER: Cast on and work as left slipper but reversed. FELTING: The piece can be felted either in the washing machine or the tumble dryer – read description below. Remember: Subsequent washes are as for a normal wool garment. IN WASHING MACHINE: Washing machines will vary when felting. If the piece is not felted enough, it can be felted again. If it is felted too much, it can be stretched to the correct size while still wet. DO THE FOLLOWING: Lay the piece in the washing machine, using a programme of approx. 40 minutes (not a wool programme). Wash at 40 degrees without pre-wash, detergent is optional. After washing, shape the piece while it is still wet. IN TUMBLE DRYER: Felting in a tumble dryer gives good control over the degree of felting. The tumble dryer can be opened during drying to check the size of the piece. If it is not felted enough it can be thoroughly wetted and felted again. If it is felted too much it can be stretched to the correct size while still wet. DO THE FOLLOWING: Lay the piece in water so it becomes completely wet, then place it in the tumble dryer and begin the drying process. Dry to the desired size, checking regularly. |
|
Have you finished this pattern?Tag your pictures with #dropspattern #elizeslippers or submit them to the #dropsfan gallery. Do you need help with this pattern?You'll find 20 tutorial videos, a Comments/Questions area and more by visiting the pattern on garnstudio.com. © 1982-2026 DROPS Design A/S. We reserve all rights. This document, including all its sub-sections, has copyrights. Read more about what you can do with our patterns at the bottom of each pattern on our site. |


With over 40 years in knitting and crochet design, DROPS Design offers one of the most extensive collections of free patterns on the internet - translated to 17 languages. As of today we count 324 catalogues and 12290 patterns translated into English (UK/cm). 12290
We work hard to bring you the best knitting and crochet have to offer, inspiration and advice as well as great quality yarns at incredible prices! Would you like to use our patterns for other than personal use? You can read what you are allowed to do in the Copyright text at the bottom of all our patterns. Happy crafting!
Post a comment to pattern DROPS 142-37
We would love to hear what you have to say about this pattern!
If you want to leave a question, please make sure you select the correct category in the form below, to speed up the answering process. Required fields are marked *.