
Popular categories
Looking for a yarn?


Comments / Questions (45)
![]() Anneke Janssen wrote:
Anneke Janssen wrote:
Ik heb het patroon Drops 141-16 voor iemand gebreid, daarvoor kreeg ik het tijdschrift waar het patroon in stond. Nu blijkt dat de dame in kwestie het tijdschrift geleend had, en, ai ai, ik ben het kwijt. Kunt u me nog een dat tijdschrift helpen? Tegen betaling? Ik hoop het.
26.04.2022 - 19:31DROPS Design answered:
Dag Anneke,
De tijdschriften worden via de verkooppunten verdeeld, dus je zou het beste even bij een van onze verkooppunten kunnen vragen of ze daar toevallig nog eentje hebben liggen.
28.04.2022 - 10:17
![]() Mary wrote:
Mary wrote:
I can't figure out how many stitches to knit before each decrease in the last row of rib which requires decreasing 37 stitches evenly over 217 sts to give 180stitches left. Would you be able to let me know how many stitches I should knit between each decrease?
20.12.2021 - 23:32DROPS Design answered:
Dear Mary, this lesson explains how to decrease/increase evenly and will help you to calculate how many stitches you will have to work between each decrease. Happy knitting!
21.12.2021 - 07:27
![]() Mary wrote:
Mary wrote:
Thank you for your answer. Please confirm that I understand your answer correctly. The size on the pattern is the person's size. This implies that the knitted garment will be bigger when finished. So, for example, bust size 34 5/8" on the pattern means that the knitted garment will be bigger when completed. How much bigger will the garment be?
18.12.2021 - 23:57DROPS Design answered:
Dear Mary, no, the measurements are that of the garnment. Not of the bust to fit. So the garnment' bust will measure 34 5/8", which means the bust to fit should be smaller. Happy knitting!
19.12.2021 - 18:21
![]() Mary wrote:
Mary wrote:
Hi, I have a question about size. Is the size quoted at Bust size the actual size of the finished garment? Or is it to fit the bust size and the actual finished size is bigger? e.g. Bust: 80-88-96-106-118-130 cm. Does this mean that the actual size of finished garment is 80-88-96-106-118-130 cm ? Thank you.
18.12.2021 - 20:38DROPS Design answered:
Dear Mary, the cm in the sketch of the garnment are the measurements of the garnment. In this case, it would be the actual bust size and not the size to fit. Happy knitting!
18.12.2021 - 23:03
![]() LEONOR SKEWES wrote:
LEONOR SKEWES wrote:
Hi I have a question: ¿what does it means "tube knitting" ? which part of the sweater is? Thanks Leonor
08.09.2021 - 02:50DROPS Design answered:
Dear Leonor, We always suggest that before starting a pattern read though it carefully. Tube knitting is basically an Icord, that is braided into a cable pattern. Happy Stitching!
08.09.2021 - 03:00
![]() Diane Dahl wrote:
Diane Dahl wrote:
Jag förstår inte hur jag ska göra nu. ”När arb mäter 38cm delad arb vid markörerna och varje del stickas färdig för sig =74m. Osv hela det stycket och ner till HÖGER FRAMST.
02.03.2021 - 09:13DROPS Design answered:
Hei Diane. Du har tidligere satt 2 merketråder i arbeidet (i sidene), du skal nå dele arbeidet og strikke hvert forstykke og bakstykke for seg selv. Sett f.eks maskene til venstre forstykket på høyre pinne eller bruke en annen pinne. Start ved bakstykket (ny tråd) og fell på begynnelsen av pinnen 3 masker (til ermhull), strikk 71 masker, du er nå ved det andre merket (siden), snu og fell 3 masker. Følg oppskriften på hvor mange masker og hvor mange ganger det skal felles til ermhull. Fortsett i glattstrikk med 1 kantmaske i rille i hver side. mvh DROPS design
10.03.2021 - 12:54
![]() Xenia wrote:
Xenia wrote:
Ich habe diese Jacke in Größe S gestrickt und die angegebene Menge an Garn bestellt. Leider reichte diese Menge nur um die Jacke gerade so fertig zu stellen. Jetzt fehlt mir noch Garn für die Kordeln und die Taschen. Vielleicht lieber ein Knäuel pro Farbe mehr bestellen.
20.02.2015 - 12:44
![]() Anja wrote:
Anja wrote:
Ist es auch bei der linken Blende notwendig, die Maschenaufnahmen von unten zu beginnen? Das macht sich nämlich wirklich schlecht, weil ich das Strickstück nicht so gut greifen kann. LG Anja
19.01.2015 - 13:38DROPS Design answered:
Nein, die linke Blende arbeiten Sie von oben nach unten, sonst geht das wirklich schlecht. Sie müssen die M auf jeden Fall in der Hi-R auffassen und das geht nur, wenn Sie oben am Halsrand beginnen. Gutes Gelingen beim Beenden dieser schönen Jacke und viel Spaß beim Tragen!
19.01.2015 - 14:46
![]() Pauline wrote:
Pauline wrote:
Hello, I'm casting off the back pieces now. Do I cast off on the right side? It says cast of 3 stitches one time at the start of each row? Do I do this first on the right side and then on the wrong side? Or should I cast off 3 stitches at the start and then 3 stitches at the end of the row? Thanks
15.01.2015 - 10:05DROPS Design answered:
Dear Pauline, you will dec at the beg of the next 2 rows, ie cast off 3 sts at the beg of the next RS row, then cast off 3 sts at the beg of the next WS row (= you have cast off 3 sts each side). Happy knitting!
15.01.2015 - 14:25
![]() Chiti wrote:
Chiti wrote:
¿Dónde puedo encontrar las agujas circulares cortas que me indicas?
10.10.2014 - 11:56DROPS Design answered:
Hola Chiti, puedes encontrarlas en las tiendas DROPS. Están indicadas en la pagina principal, pestaña: "Tiendas DROPS".
13.10.2014 - 13:16
|
|
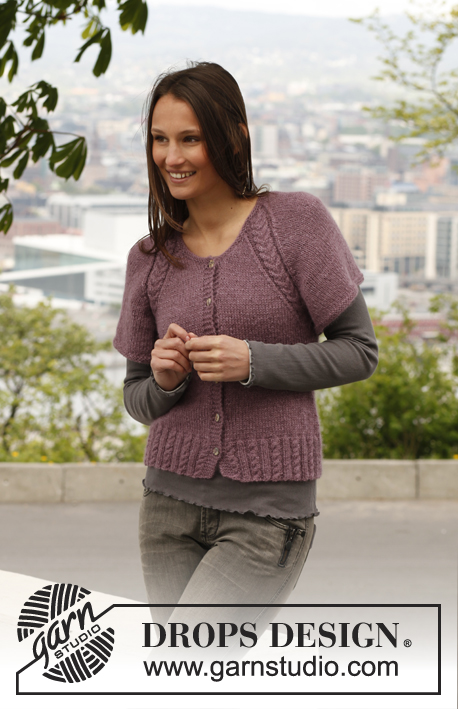
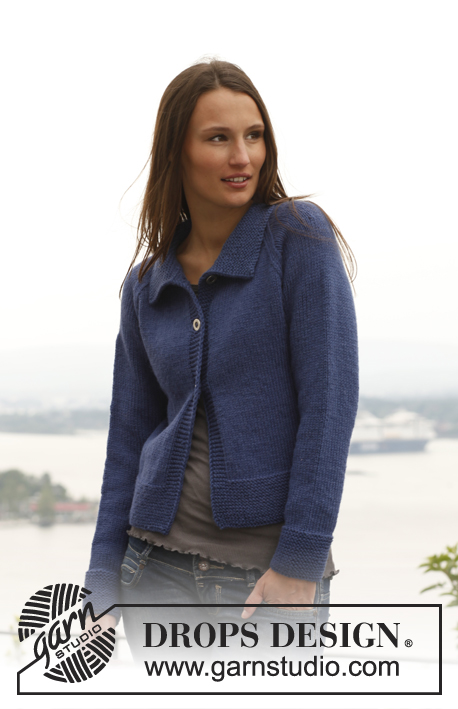
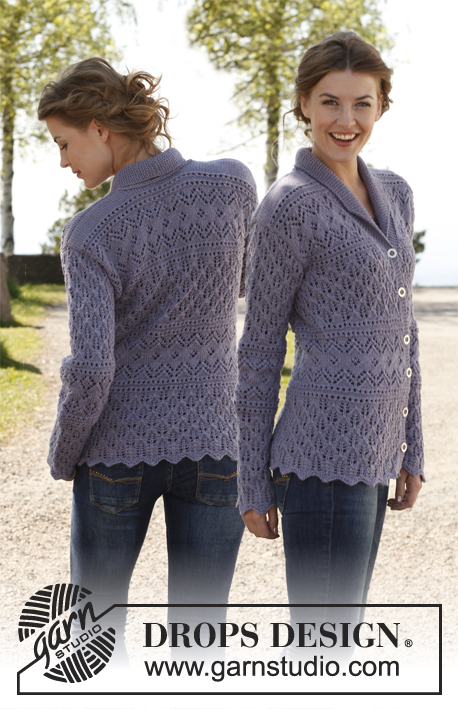
Woodland#woodlandcardigan |
|
|
|
|
Knitted DROPS jacket in 2 threads "Alpaca". Size: S - XXXL.
DROPS 141-16 |
|
|
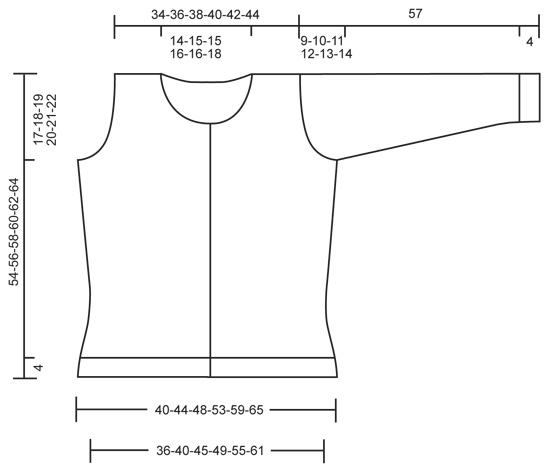
DECREASE TIP: All dec are done from RS. Dec 1 st on each side of marker as follows: Work until 2 sts remain before marker, slip 1 st as if to K, K 1, psso, (marker), K the next 2 tog. INCREASE TIP: Inc 1 st on each side of marker as follows: Work until 1 st remains before marker, make 1 YO, work 2 sts (marker is between these 2 sts), make 1 YO. On next row work YO twisted to avoid holes. GARTER ST (back and forth on needle): K all rows. 1 ridge = 2 rows K. TUBE KNITTING: Work a tube with 4 sts on double pointed needles as follows: Knit up 1 st, turn and K in back and front loop of this st = 2 sts, turn and K in back and front loops of these 2 sts = 4 sts. Then work as follows: * Slide all sts to the right side of double pointed needle without turning the piece, tighten thread and K over the 4 sts *, repeat from *-*. When tube has been worked, do not cast off but cut the threads and pull thread ends through all sts, fasten the threads. -------------------------------------------------------- BODY: Worked back and forth on circular needle from mid front. Cast on 165-177-197-217-241-265 sts (incl 1 edge st in each side) on circular needle size 4.5 mm with 1 thread in each colour Alpaca. Work next row from RS as follows: 1 edge st in GARTER ST - see explanation above - * K 1, P 1 *, repeat from *-* until 2 sts remain and finish with K 1 and 1 edge st in garter st. Continue rib until piece measures 4 cm. On last row from WS, P while AT THE SAME TIME dec 29-29-33-37-41-45 sts evenly on row = 136-148-164-180-200-220 sts. On next row from RS switch to circular needle size 5 mm and continue in stocking st with 1 edge st in garter st in each side. Insert a marker 34-37-41-45-50-55 sts in from each side (= 68-74-82-90-100-110 sts between markers on back piece). Move the markers upwards when working. REMEMBER THE KNITTING TENSION! When piece measures 5 cm, dec on next row from RS 1 st on each side of every marker - READ DECREASE TIP = 4 sts dec on needle. Repeat dec every 3½-4-4-4½-4½-5 cm 2 more times (a total of 3 times) = 124-136-152-168-188-208 sts. Continue until piece measures 16-17-18-19-20-21 cm. On next row from RS, inc 1 st on each side of every marker - READ INCREASE TIP = 4 sts inc on needle. Repeat inc every 7 cm a total of 3 times = 136-148-164-180-200-220 sts. When piece measures 37-38-39-40-41-42 cm, divide the piece at the markers and finish each part separately. BACK PIECE: = 68-74-82-90-100-110 sts. Continue in stocking st - AT THE SAME TIME cast off for armholes at beg of every row in each side as follows: 3 sts 0-1-1-1-2-3 times, 2 sts 1-1-1-2-2-3 times and 1 st 3-1-4-4-4-3 times = 58-62-64-68-72-74 sts remain on needle. Continue in stocking st with 1 edge st in garter st in each side. When piece measures 52-54-56-58-60-62 cm, cast off the middle 20-22-22-24-24-26 sts for neck. Now finish each shoulder separately. Continue to cast off 2 sts on next row from neck = 17-18-19-20-22-22 sts remain on the shoulder. Cast off when piece measures 54-56-58-60-62-64 cm. RIGHT FRONT PIECE: = 34-37-41-45-50-55 sts. Cast off for armhole in the side as on back piece. AT THE SAME TIME when piece measures 44-46-47-49-50-52 cm, cast off for neck from RS as follows: Cast off the first 5 sts on needle. Then cast off at beg of every row from RS as follows: 3 sts 0-1-1-1-1-1 time, 2 sts 1 time and 1 st 5-3-3-4-4-5 times. After all cast offs are done, 17-18-19-20-22-22 sts remain on shoulder. Cast off when piece measures 54-56-58-60-62-64 cm. LEFT FRONT PIECE: Work as right front piece but reversed. SLEEVE: Worked in the round on double pointed needles. Cast on 44-46-48-50-52-52 sts on double pointed needles size 4.5 mm. Work 1st round as follows: * K 1, P 1 *, repeat from *-*. Continue rib until piece measures 4 cm. K next round while AT THE SAME TIME dec 8 sts evenly on round = 36-38-40-42-44-44 sts. Insert a marker at beg of round (= mid under sleeve). Switch to double pointed needles size 5 mm and then work in stocking st. When piece measures 7 cm, inc 1 st on each side of marker mid under sleeve. Repeat inc 6-7-8-9-10-11 more times (= a total of 7-8-9-10-11-12 times) every 6-5-4½-3½-3-3 cm = 50-54-58-62-66-68 sts. When piece measures 48-47-46-45-44-43 cm (shorter measurements in the larger sizes because of longer sleeve cap), cast off 3 sts on each side of marker (= 6 sts cast off mid under sleeve). Then work back and forth on needle until finished measurements - AT THE SAME TIME cast off for sleeve cap at the beg of every row in each side as follows: 2 sts 1-1-1-2-2-2 times and 1 st 3-3-3-4-4-4 times. Then cast off 2 sts in each side until piece measures approx. 56 cm, then cast off 3 sts 1 time in each side. Cast off the remaining sts, the piece measures approx. 57 cm. ASSEMBLY: Sew shoulder seams and sew in sleeves. RIGHT BAND: Worked back and forth on needle. Knit up from RS on circular needle size 4.5 mm inside 1 edge st along right front piece as follow: Beg from bottom edge, knit up approx. 90 to 110 sts. P 1 row from WS while AT THE SAME TIME adjusting the no of sts to 93-99-99-105-109-109. Continue to work rib as follows: * K 1, P 1 *, repeat from *-* and finish with K 1. Work 1 row rib from WS. On next row from RS, cast off for buttonholes as follows: Work 4 sts, * work the next 2 sts tog and make one YO, work 13-14-14-15-13-13 sts *, repeat from *-* a total of 5-5-5-5-6-6 times, work the next 2 sts tog and make one YO, work the remaining 12-13-13-14-13-13 sts on needle = 6-6-6-6-7-7 buttonholes. Continue rib until band measures approx. 2½ cm, loosely cast off all sts with K over K and P and P. LEFT BAND: Work as right band but without buttonholes. NECK EDGE: Worked back and forth on needle. Knit up from RS on circular needle size 4.5 mm as follows: Knit up approx. 110 to 130 sts inside 1 edge st along the entire neck edge (incl bands). P 1 row from WS while AT THE SAME TIME adjusting the no of sts to 107-111-115-121-125-129. Continue to work rib as follows: * K 1, P 1 *, repeat from *-* and finish with K 1. Work 1 row rib from WS. On next row from RS, cast off for the last buttonhole as follows: Work 4 sts, work the next 2 sts tog and make one YO, work rest of row. Continue rib until edge measures approx. 2½ cm, loosely cast off all sts with K over K and P and P. CABLE: Knit up 1 st in the middle st on sleeve cap at the top of one sleeve, work TUBE KNITTING - read explanation - for approx. 13-14-14-15-16-16 cm. Knit up 1 st the same way on each side of the middle st and work 2 tubes the same way = 3 tubes. Braid the tubes into a cable (approx. 10-11-11-12-13-13 cm), sew ends tog and fasten them on the shoulder where neck edge was knit up. Knit up 3 tubes the same way on the other shoulder. POCKET: Worked back and forth on needle. Cast on 21-21-23-23-25-25 sts on double pointed needles size 4.5 mm. Work rib = K 1/P 1. Loosely cast off all sts when pocket measures 8-8-8-9-9-9 cm. Make another pocket the same way. ASSEMBLY: Sew the buttons on to left band. Sew pockets on to front piece, approx. 7-7-8-8-9-9 cm from edge mid front and approx. 2 cm above rib edge at the bottom edge. |
|
 |
|
Have you finished this pattern?Tag your pictures with #dropspattern #woodlandcardigan or submit them to the #dropsfan gallery. Do you need help with this pattern?You'll find 12 tutorial videos, a Comments/Questions area and more by visiting the pattern on garnstudio.com. © 1982-2026 DROPS Design A/S. We reserve all rights. This document, including all its sub-sections, has copyrights. Read more about what you can do with our patterns at the bottom of each pattern on our site. |


With over 40 years in knitting and crochet design, DROPS Design offers one of the most extensive collections of free patterns on the internet - translated to 17 languages. As of today we count 324 catalogues and 12290 patterns translated into English (UK/cm). 12290
We work hard to bring you the best knitting and crochet have to offer, inspiration and advice as well as great quality yarns at incredible prices! Would you like to use our patterns for other than personal use? You can read what you are allowed to do in the Copyright text at the bottom of all our patterns. Happy crafting!
Post a comment to pattern DROPS 141-16
We would love to hear what you have to say about this pattern!
If you want to leave a question, please make sure you select the correct category in the form below, to speed up the answering process. Required fields are marked *.