
Popular categories
Looking for a yarn?


Comments / Questions (235)
![]() Anna wrote:
Anna wrote:
Hei, hvordan anbefaler dere å strikke ermene for å forlenge de? Jeg vil gjerne at de skal bli ganske lange. Tusen takk i forvei ₊˚⊹♡
06.01.2026 - 21:59DROPS Design answered:
Hei Anna, Det er best å forlenge ermet etter at du er ferdig med å øke men før du begynner på ermtoppen, slik at du får fasongen riktig på nedre delen. Hilsen Drops Team.
07.01.2026 - 06:45
![]() Marjon wrote:
Marjon wrote:
Ik wil beginnen met het linker voorpand. Ik snap niet waarom ik 10st op een hulpdraad moet zetten? Brei ik die niet mee? Terwijl er staat dat je afkant voor de hals bij het begin van iedere naald. Is dat dan de buitenste steek, dus dus op de hulpdraad? Of de eerste steek die op de naald staat? Als ik ze niet meebrei, wat doe ik er dan wel mee?
25.08.2023 - 08:47DROPS Design answered:
Dag Marjon,
Deze steken brei je niet mee en laat je gewoon op een hulpnaald (grote veiligheidsspeld) staan. Als je moet afkanten voor de hals zijn dat de steken ernaast. Op het eind zet je de steken van de hulpdraad weer op een naald en neem je daarnaast steken op rondom de hals om een rand rondom de hals te breien (zie 'afwerking').
28.08.2023 - 07:24
![]() Marjon wrote:
Marjon wrote:
Ik heb 308 steken opgezet. Als ik patroon volg, dan herhaal ik het patroon voor het lijf 10x (2x6st+10x17st+9x14st=308). In patroon staat 9x, maar dan kom ik op een totaal van 277st. Dit zou me wel goed uitkomen, want ik wil eigenlijk een M/L breien. Kan ik de 9x aanhouden en dus het aantal steken wijzigen en daarmee een tussenmaat breien? (En er lijkt dus een fout in het patroon te staan)
04.06.2023 - 13:27DROPS Design answered:
Dag Marjon,
Je breit 6 voorbiessteken, dan herhaal je (M1 (17 st) en 14 averecht) = 31 st in totaal 9 keer, dan nog een keer M1 (17 st) en nog 6 voorbiessteken. In totaal kom je dan op 308 steken. Een tussenmaat zou je kunnen breien door in plaats van steeds 14 averecht, minder averechte steken te breien. Maar kijk dan ook even heel goed hoe dit uitkomt bij bijvoorbeeld de schouders en de armsgaten.
07.06.2023 - 11:41
![]() Marion wrote:
Marion wrote:
Als ik het vest als trui wil breien op een rondbreinaald, is het dan voldoende om middenvoor over de gehele lengte 6 steken averrecht te breien (dus de helft van de voorbies aanhouden)?
05.04.2023 - 17:38DROPS Design answered:
Dag Marion,
Ja, je kunt inderdaad de helft van de voorbies weglaten, want dat is de overlap voor de knoopbies.
12.04.2023 - 20:37
![]() Shubhangi Kundu wrote:
Shubhangi Kundu wrote:
Hello! Could you kindly explain how we go from 56 sts to 33 sts after binding off for neck and armhole for size L/XL? I'm probably not understanding how the binding off works. I understood that [(2×2sts)×2 + (2×1st)×5] = 18 sts are bound off for the armhole and [(2×2sts)×1 + (2×1st)×2] = 8 sts are bound off for the neckline, but I think that is somehow wrong. Please correct me. Thank you!
14.11.2022 - 05:59DROPS Design answered:
Hi Shubhangi, On the left front piece you start off with 56 stitches, as you say. On each row from the side you bind off 2 stitches x 2, the 1 stitch x 5 for the armhole (9 stitches bound off). For the neck, you place the 10 stitches towards mid-front on a thread and then bind off on each row from the neck, 2 stitches x 1 and 1 stitch x 2 (10 + 4 stitches). You have a total of 23 stitches either bound off or on a thread. 56 - 23 =33 stitches left. Hope this helps and happy knitting!
14.11.2022 - 06:53
![]() Shubhangi Kundu wrote:
Shubhangi Kundu wrote:
"Then bind off for armhole at beg of every row from the side: 2 sts 2-2-4 times and 1 st 4-5-6 times." Could you kindly explain this line to me?
08.11.2022 - 04:49DROPS Design answered:
Hi Shubhangi, You are shaping the armholes by binding off at the beginning of each row. Start by binding off 2 stitches at the beginning of the row from both the right and wrong side (4 stitches in total) and then repeat this the correct number of times for your size (e.g. 1 more time in size S/M = 8 stitches bound off). Then bind off 1 stitch at the beginning of both the right side and wrong side and, using size S/M, this will be repeated 4 times = another 8 stitches bound off. Hope this helps and happy knitting!
08.11.2022 - 07:36
![]() Pam Dale wrote:
Pam Dale wrote:
How many stitches are left on the sleeves when you cast off? I’ve modified the sleeves so they are full length and I’ve worked them in the round but a bit unclear when I get to the cap of the sleeve and how many stitches cast off before final cast off
09.07.2021 - 23:10DROPS Design answered:
Dear Pam Dale, the number of stitches at the end of the sleeve will depend on your tension, most important is here that you cast off the number of sts stated for the size + 2 stitches on each side until sleeve measures 40 cm (make sure you have cast off 2 sts the same number of times on each side), adjusting after a whole repeat of M.1 and cast off. Happy knitting!
12.07.2021 - 07:13
![]() Mirja wrote:
Mirja wrote:
Ich habe ein sehr großes Problem. Ich habe die schöne Jacke fast fertig gestrickt und nun reicht die angegebene Wollmenge bei mir nicht aus.( stricke S/M und hatte 500g gekauft, da die Mengenangabe bisher immer bei mir passte). Ich habe daraufhin in dem Shop ( Mondolana) nachbestellt unter Angabe der Dyelot Nr. Die gab es aber nicht mehr und die mir zugeschickte Wolle ist farblich etwas anders. Wo bekomme ich nun noch die Farbe 40 mit Dyelot Nr 839?? Ich kann sonst leider nicht fertig werden.
12.06.2021 - 18:56DROPS Design answered:
Liebe Mirja, gerne können Sie einen anderen Laden fragen, oder vielleicht auch in der DROPS Workshop-Gruppe können Sie andere Strickerinnen fragen.
14.06.2021 - 08:44
![]() Marie POUPON wrote:
Marie POUPON wrote:
Bonjour ! J'ai ENFIN terminé ce gilet ! Reste à bloquer à la vapeur ! Merci pour tout ! ;-)
14.02.2021 - 07:33
![]() Nicole wrote:
Nicole wrote:
Ich bin bezüglich der Oberweite und Hüfte bei 50 cm und Taille 44 cm. Kann ich mich während des hochstrickens zunächst an Gr. L, zur Taille hin an Gr S/M und bei der Oberweite wieder an Gr. L orientieren hinsichtlich der Zu- und Abnahmen? Ausserdem kommt mir die Umfangsangabe zu Beginn ( z.B. 59 bei Gr.S/M) recht groß vor, obwohl die Jacke dort doch eng anliegen soll.
10.02.2021 - 20:48DROPS Design answered:
Liebe Nicole, am besten messen Sie eine ähnliche Jacke, die Sie gerne haben und vergleichen Sie diese Maßen mit der Skizze - hier lesen Sie mehr - Sicher kann Ihnen noch Ihr DROPS Laden damit weiterhelfen, auch telefonisch oder per E-Mail. Viel Spaß beim stricken!
11.02.2021 - 06:43
|
||||||||||||||||||||||||||||
Grace#gracecardigan |
||||||||||||||||||||||||||||
 |
 |
|||||||||||||||||||||||||||
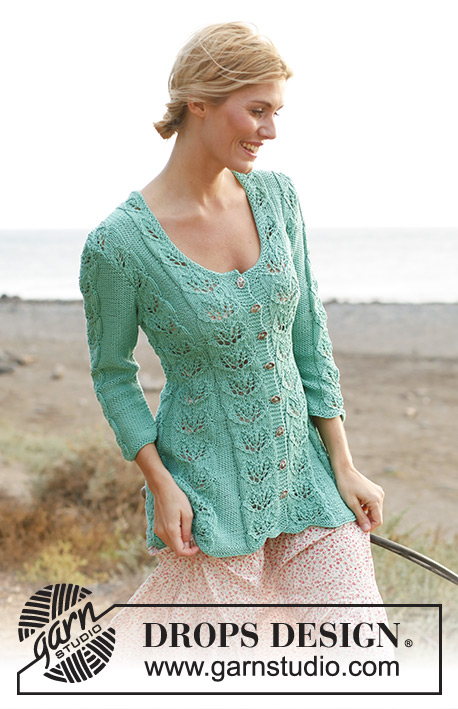
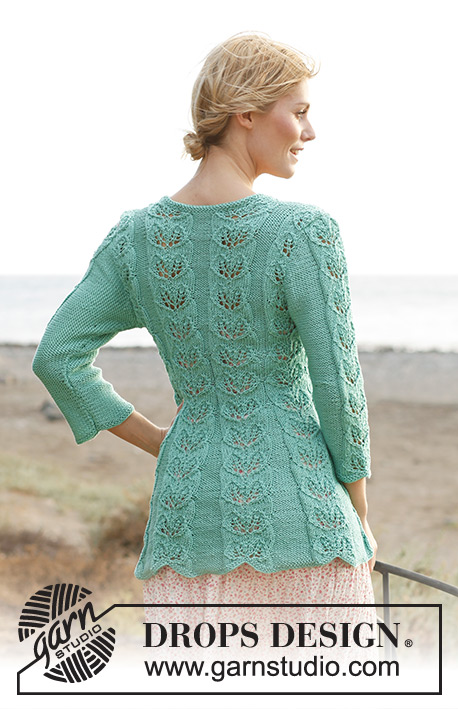
Knitted DROPS waisted jacket with lace pattern and ¾ sleeves in ”Muskat” or ”Cotton Light”. Size: S - XXXL.
DROPS 138-5 |
||||||||||||||||||||||||||||
|
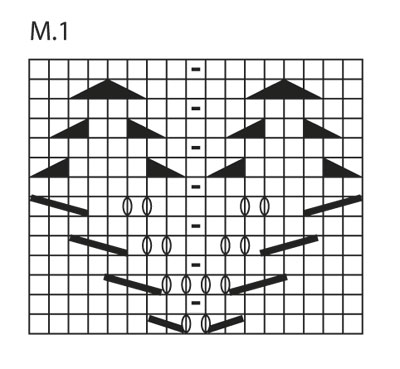
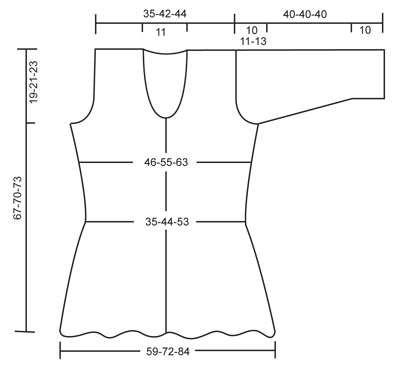
GARTER ST (back and forth on needle): K all rows. PATTERN: See diagram M.1, diagram shows pattern from RS. BUTTON HOLES: Cast off for button holes on right band. 1 button hole = K 3rd and 4th st from mid front tog and make 1 YO. Cast off for button holes when piece measures: SIZE S/M: 8, 14, 20, 26, 32, 38, 44 and 50 cm SIZE L/XL: 8, 14, 21, 27, 33, 40, 46 and 52 cm SIZE XXL/XXXL: 8, 15, 21, 28, 34, 41, 48 and 54 cm NOTE: Cast off for last button hole when only 2 rows remain before neck dec. -------------------------------------------------------- BODY: Worked back and forth on circular needle from mid front. Cast on 253-308-359 sts (incl 6 band sts in each side towards mid front) on circular needle size 4 mm with Muskat. K 3 rows (1st row = WS). Then work as follows (seen from RS): 6 band sts in GARTER ST - see explanation above - * diagram M.1 (= 17 sts), P 15-14-13 *, repeat from *-* a total of 7-9-11 times, diagram M.1 and 6 band sts in garter st. Continue like this. REMEMBER THE KNITTING TENSION! When piece measures approx. 3-5-7 cm (adjust so that next row is worked from RS), dec 1 st in every P-section by P the first 2 sts tog. Repeat dec every 6th row a total of 14-13-12 times – NOTE: Dec alternately at the end and beg of every P-section. AT THE SAME TIME when piece measures 8 cm, beg to cast off for BUTTON HOLES – see explanation above! After all dec in P-sections, 155-191-227 sts remain on needle and only 1 P st between every M.1-section (piece now measures approx. 31 cm). Continue until piece measures approx. 34-35-36 cm (adjust so that next row is worked from RS), now inc 1 st in every P-section by making 1 YO after all P sts, on next row (from WS) K YOs twisted (i.e. work in back loop of st instead of front) to avoid holes. Repeat inc every 6th row a total of 6-5-4 times – NOTE: Inc alternately before and after all P sts by making 1 YO. When all inc are done, there are 7-6-5 P sts in every P-section and 197-236-271 sts in total on needle. When piece measures approx. 48-49-50 cm (adjust so that next row is worked from RS), work next row as follows: Work 47-56-64 sts as before (= right front piece), cast off 7-9-11 sts for armhole, work 89-106-121 sts as before (= back piece), cast off 7-9-11 sts for armhole, work the last 47-56-64 sts as before (= left front piece). Finish each part separately. LEFT FRONT PIECE: = 47-56-64 sts. Then cast off for armhole at beg of every row from the side: 2 sts 2-2-4 times and 1 st 4-5-6 times. AT THE SAME TIME when piece measures 51-53-55 cm, slip the outermost 10 sts towards mid front on a stitch holder for neck. Then cast off at beg of every row from neck: 2 sts 1 time and 1 st 2 times. After all cast offs for armhole and neck, 25-33-36 sts remain on shoulder. There is now ½ repetition of diagram M.1 towards the neck in all sizes, there is also ½ repetition towards the armhole in the smallest size. Continue pattern as before with 1 st in garter st in each side. When piece measures approx. 67-70-73 cm - adjust after 1 whole repetition of diagram M.1 - cast off. RIGHT FRONT PIECE: Slip sts from stitch holder back on needle and work as left front piece but reversed. BACK PIECE: = 89-106-121 sts. Continue to cast off for armholes at beg of every row in each side as on front piece = 73-88-93 sts. When piece measures approx. 65-68-72 cm (finish after 1 row from WS when 4 rows remain in diagram M.1), cast off the middle 23-22-21 sts for neck and finish each shoulder (= 25-33-36 sts) separately. Cast off when the last repetition has been worked. SLEEVE: Worked back and forth on circular needle. Cast on 53-57-61 sts (incl 1 edge st in each side) on circular needle size 4 mm with Muskat. K 3 rows (1st row = WS). Work next row as follows (from RS): 1 edge st in garter st, P 17-19-21 sts, diagram M.1, P 17-19-21 sts and 1 edge st in garter st. When piece measures 10 cm, inc 1 st in each side. Repeat inc every 2-1½-1 cm a total of 10-12-15 times = 73-81-91 sts (P the inc sts seen from RS). READ ALL OF THE FOLLOWING SECTION BEFORE CONTINUING! When piece measures 30-29-27 cm (shorter measurements in the larger sizes because of longer sleeve cap and broader shoulder width), cast off for sleeve cap at beg of every row in each side: 4 sts 1 time, 2 sts 3 times and 1 st 6-7-10 times, then cast off 2 sts in each side until piece measures approx. 40 cm – adjust after 1 whole repetition of diagram M.1. Cast off the remaining sts. ASSEMBLY: Sew the shoulder seams. NECK EDGE: Knit up approx. 100 to 110 sts around the neck (incl sts on stitch holders at the front) on circular needle size 4 mm. K 3 rows and cast off. Sew sleeve seams inside 1 edge st and sew in the sleeves. Sew on buttons. Steam the garment to make it hang nicely. |
||||||||||||||||||||||||||||
Diagram explanations |
||||||||||||||||||||||||||||
|
||||||||||||||||||||||||||||
 |
||||||||||||||||||||||||||||
 |
||||||||||||||||||||||||||||
Have you finished this pattern?Tag your pictures with #dropspattern #gracecardigan or submit them to the #dropsfan gallery. Do you need help with this pattern?You'll find 23 tutorial videos, a Comments/Questions area and more by visiting the pattern on garnstudio.com. © 1982-2026 DROPS Design A/S. We reserve all rights. This document, including all its sub-sections, has copyrights. Read more about what you can do with our patterns at the bottom of each pattern on our site. |
||||||||||||||||||||||||||||


With over 40 years in knitting and crochet design, DROPS Design offers one of the most extensive collections of free patterns on the internet - translated to 17 languages. As of today we count 324 catalogues and 12290 patterns translated into English (UK/cm). 12290
We work hard to bring you the best knitting and crochet have to offer, inspiration and advice as well as great quality yarns at incredible prices! Would you like to use our patterns for other than personal use? You can read what you are allowed to do in the Copyright text at the bottom of all our patterns. Happy crafting!
Post a comment to pattern DROPS 138-5
We would love to hear what you have to say about this pattern!
If you want to leave a question, please make sure you select the correct category in the form below, to speed up the answering process. Required fields are marked *.