
Popular categories
Looking for a yarn?


Comments / Questions (218)
![]() Loredana wrote:
Loredana wrote:
Très joli modèle . Je l'ai fait en noir et mon bébé va être canon avec ,j'en suis sûre ! Ce n'était pas tjr facile a comprendre mais grace aux explications ,les msg ou vidéo drops c'est devenu réalisable. Drops design je te remercie .
18.01.2014 - 22:30
![]() Susanne wrote:
Susanne wrote:
Minder 1 st om de nld (dus iedere nld aan de goede kant) in totaal 12-13-16 (16-16) keer. Ik snap dit even niet. Ik ben nu aan 1 kant aan het minderen van het werk. Dit zorgt er toch voor dat het werk scheef word en de armsgaten niet op gelijke breedte komen te zitten?
12.12.2013 - 13:17DROPS Design answered:
Hoi Susanne. Je mindert volgens de beschrijving onder MINDER ALS VOLGT VOOR EN NA DE VOORBIES/MOUWRAND. Dan komen de minderingen op een gelijke hoogte aan beide kanten. Omdat je in de rondte breit tot aan het delen van de panden, komen ook de ribbelst en het afkanten voor de armsgaten in dezelfde nld, dus ook aan een gelijke hoogte.
13.12.2013 - 10:22
![]() Julien wrote:
Julien wrote:
Bonjour, suite a une erreur dans mes diminutions en point riz j'ai du recommencer: pour plus faire la même erreur je voudrais savoir pour diminuer c'est je tricote deux rang normalement et je diminue au suivants a l'endroit, car moi j'ai fait 1diminution endroit un rang envers 1 diminution endroit, 1 rang envers?
13.11.2013 - 15:34DROPS Design answered:
Bonjour Julien, si vous pensez aux diminutions de l'encolure, vous diminuez sur 1 rang sur l'endroit, tricotez 1 rang sans diminuer (sur l'envers) et répétez toujours ces 2 rangs. Bon tricot!
13.11.2013 - 15:41
![]() Julien wrote:
Julien wrote:
Bonjour j'ai une petite questions je suis arriver a 17 cm ou je dois tricoter en rang raccourcis ensuite je dois faire mes dimminutions 13 fois 1 mailles tous les deux rang: donc si je comprend bien je diminue de 1 maille tous les deux rang et je le fais 13 fois ??? et en même temps a 17 cm de hauteur totale tricoter 4 rang de point mousse au dessus des 20 maille centrales sur les côtés... merci pour votre aide
08.11.2013 - 11:56DROPS Design answered:
Bonjour Julien, c'est tout à fait ça,à 17 cm, vous tricotez 2 rangs sur les mailles de bordure de chaque côté (rangs raccourcis), et, sur le même rang pour la taille 6/9 mois. En même temps, vous commencez les diminutions de l'encolure : 13 fois 1 m tous les 2 rangs de chaque côté (cf § DIMINUTIONS ENCOLURE) et en même temps, vous commencez les 4 rangs point mousse sur les 20 m des côtés (bordures d'emmanchures). Bon tricot!
08.11.2013 - 14:21
![]() Julien wrote:
Julien wrote:
Bonsoir!! j 'aurais une petite questions dans l'explication il dise : Continuer avec l'aiguille circulaire 3 en jersey avec 5 m point mousse de chaque côté. EN MÊME TEMPS, répartir des diminutions au 1er rang pour ajuster à 32-36-40 (44-52) m (ne pas diminuer au-dessus des bordures devant) = 116-132-144 (160-172) m. ou dois je diminuer?? comment diminuer comme c'est en côte? ou commencer les diminutions? merci pour votre aide
04.11.2013 - 19:24DROPS Design answered:
Bonjour Julien, la phrase a été modifiée, on doit en fait répartir 32-36-40 (44-52) diminutions au 1er rang (sans dim. dans les bordures des devants). Tricotez 2 m ens à l'end pour diminuer et répétez à intervalles réguliers sur le 1er rang jersey (au rang suivant, tricotez à l'env sur l'env). Bon tricot!
05.11.2013 - 08:56
![]() S_belay wrote:
S_belay wrote:
Im having dificulty understanding the last part of the body pattern Please explain to me the v neck decrease total of 16 times? but my piece is already 19cm long after 3 only decreases? is that correct? Also the 4 rows of garter stitches of 20 is that total of 40 stitches? " Thanks
01.08.2013 - 00:25DROPS Design answered:
Dear Mrs S_Belay, the dec for V neck has to be done a total of 16 times (3rd size), but then, when pieces measures 19 cm you prepare armhole, while continuing dec for neck. You will work 4 rows in garter st over the 10 sts before markers + 10 sts after markers on the sides, so you then cast of 20 sts 2 times for the 2 armholes. Happy knitting!
01.08.2013 - 10:17
![]() Marilyne wrote:
Marilyne wrote:
Re-bonjour, je continue mon tricot et j'ai encore une question. Lorsque l'on lit : "A 15-17-18 (20-21) cm de hauteur totale, tricoter 2 rangs point mousse au-dessus des 5 premières mailles (ne pas tricoter les autres mailles)... Continuer ainsi en diminuant pour l'encolure." ; doit-on reproduire ce doublement des 5 premières et dernières mailles à tous les rangs ou est-ce une seule fois à cet endroit ? Merci de votre aide.
25.07.2013 - 21:57DROPS Design answered:
Bonjour Marilyne, on tricote ces rangs raccourcis uniquement à ce niveau, ils permettent que l'encolure soit plus jolie. Bon tricot !
26.07.2013 - 09:52
![]() Virginie wrote:
Virginie wrote:
Je voudrais faire le modèle pour mon bébé de 9 mois. Taille 68/74 cm. Qu'elles explications dois je suivre pour monter mes mailles ? Merci de votre reponse
18.04.2013 - 22:04DROPS Design answered:
Bonjour Virginie, la taille 6/9 mois = 68/74 cm est la 2ème taille dans les explications. Vous suivez ainsi le 2ème nombre de chaque série : montez 168 m, etc... Bon tricot !
19.04.2013 - 08:45
![]() Barbara wrote:
Barbara wrote:
Habe schon 5 dieser Jäckchen gestrickt, sehr zur Freude der Babymama, wunderschön, ein richtiger Bauchwärmer
26.03.2013 - 17:46
![]() Liz wrote:
Liz wrote:
What ply is Drops baby merino?
07.03.2013 - 12:30
|
|
Junior#juniorvest |
|
 |
 |
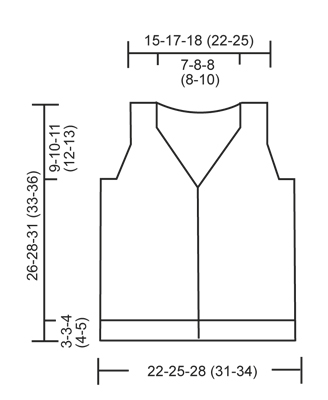
Knitted vest with V-neck and textured pattern for baby and children in DROPS BabyMerino or DROPS BabyAlpaca Silk
DROPS Baby 21-8 |
|
|
GARTER ST (back and forth on needle): K all rows. DOUBLE MOSS ST: Row 1: * K 2, P 2 *, repeat from *-*. Row 2: K over K and P over P. Row 3: P over K and K over P. Row 4: As row 2. Repeat row 1 to 4. BUTTON HOLES: Cast off for button holes on right band. 1 button hole = K tog 2nd and 3rd st from edge and make 1 YO. Cast off for button holes when piece measures: SIZE 1/3 MONTHS: 2, 6, 10 and 14 cm. SIZE 6/9 MONTHS: 2, 7, 11 and 16 cm. SIZE 12/18 MONTHS: 2, 7, 12 and 17 cm. SIZE 2 YEARS: 2, 8, 13 and 19 cm. SIZE 3/4 YEARS: 2, 8, 14 and 20 cm. DEC FOR V-NECK AND ARMHOLES IN DOUBLE MOSS ST: All dec are done from RS! DEC AS FOLLOWS BEFORE BAND/SLEEVE EDGE: When last st should be K: K 2 tog. When last st should be P: P 2 tog. DEC AS FOLLOWS AFTER BAND/SLEEVE EDGE: When first st should be K: Slip 1 st as if to K, K 1, psso. When first st should be P: P 2 twisted tog (i.e. work in back loop of st instead of front). -------------------------------------------------------- -------------------------------------------------------- BODY: Worked back and forth on circular needle from mid front. Cast on 148-168-184 (204-224) sts on circular needle size 2.5 mm with Baby Merino. Work first row as follows from RS: 5 sts in GARTER ST (= band) - see explanation above, * K 2, P 2 *, repeat from *-* until 7 sts remain, finish with K 2 and 5 sts in GARTER ST (= band). Continue rib like this with 5 sts in garter st in each side until piece measures 3-3-4 (4-5) cm - REMEMBER BUTTON HOLES on band - see explanation above. Switch to circular needle size 3 mm and work in stocking st but continue bands in garter st as before. AT THE SAME TIME on first row after rib, dec 32-36-40 (44-52) sts evenly (do not dec over bands) = 116-132-144 (160-172) sts. Insert a marker 31-35-39 (43-45) sts in from each side (= 54-62-66 (74-82) sts between markers on back piece). REMEMBER THE KNITTING TENSION! When piece measures 7-7½-8 (9-10) cm, work next row as follows from RS: 5 sts in garter st, 21-21-27 (27-31) sts in stocking st, slip the last 16-16-20 (20-24) sts that were worked on a stitch holder for pocket slit, work until 10-10-12 (12-12) sts remain on needle, slip the last 16-16-20 (20-24) sts that were worked on a stitch holder for pocket slit, work 5-5-7 (7-7) sts in stocking st and finish with 5 sts in garter st. On next row cast on 16-16-20 (20-24) new sts over each of the 2 stitch holders with sts = 116-132-144 (160-172) sts. Continue in stocking st and in garter st until piece measures 13-14-16 (16-18) cm. Now K 4 rows over all sts (= 2 ridges). Then work DOUBLE MOSS ST - see explanation above (continue bands in garter st as before). READ ALL OF THE FOLLOWING SECTION BEFORE CONTINUING! When piece measures 15-17-18 (20-21) cm, work 2 rows in garter st over the first 5 sts on needle (do not work the other sts on needle), then work 1 row over all sts before working 2 rows in garter st over the first 5 sts on needle in the other side of piece (this is done so that the V-neck looks nice). Then dec for V-neck - see explanation above: Dec 1 st every other row (i.e. every row from RS) a total of 12-13-16 (16-16) times. AT THE SAME TIME when piece measures 16-17-19 (20-22) cm, work 4 rows in garter st over the middle 18-20-20 (20-20) sts in each side (i.e. over 9-10-10 (10-10) sts on each side of both markers) – work the other sts as before. On next row, cast off the middle 8-10-10 (10-10) sts in each side for armhole and finish front and back piece separately. BACK PIECE: = 46-52-56 (64-72) sts. Work double moss st with 5 sts in garter st in each side (= sleeve edges). AT THE SAME TIME dec for armholes - see explanation above: Dec 1 st every other row (i.e. on every row from RS) a total of 5-6-6 (6-6) times = 36-40-44 (52-60) sts. Continue in double moss st and in garter st until piece measures 24-26-29 (31-34) cm. Now work in garter st over all sts until finished measurements. AT THE SAME TIME when piece measures 25-27-30 (32-35) cm, cast off the middle 16-18-20 (20-24) sts for neck = 10-11-12 (16-18) sts remain on each shoulder. Now finish each shoulder separately. Continue with garter st until piece measures 26-28-31 (33-36) cm, cast off. LEFT FRONT PIECE: Continue with double moss st and in garter st while AT THE SAME TIME dec for armhole in the side as on back piece and continue dec for V-neck as before. After last dec, 10-11-12 (16-18) sts remain on needle. Work garter st over all sts until piece measures 26-28-31 (33-36) cm and cast off. RIGHT FRONT PIECE: Work as left front piece but reversed. POCKET SLIT: Slip the 16-16-20 (20-24) sts from stitch holder on one front piece back on needle size 2.5 mm. Work rib K2/P2 with 1 st in garter st and K 2 in each side (seen from RS). When pocket slit measures 2½-2½-3 (3-3) cm, loosely cast off with K over K and P over P. Sew pocket slit to front piece with duplicate sts in each side. Sew pocket opening to bottom of pocket slit (where sts were put on a stitch holder) on the back of piece. Work another pocket slit the same way on the other front piece. ASSEMBLY: Sew the shoulder seams. Sew on buttons. |
|
 |
|
Have you finished this pattern?Tag your pictures with #dropspattern #juniorvest or submit them to the #dropsfan gallery. Do you need help with this pattern?You'll find 13 tutorial videos, a Comments/Questions area and more by visiting the pattern on garnstudio.com. © 1982-2026 DROPS Design A/S. We reserve all rights. This document, including all its sub-sections, has copyrights. Read more about what you can do with our patterns at the bottom of each pattern on our site. |
|


With over 40 years in knitting and crochet design, DROPS Design offers one of the most extensive collections of free patterns on the internet - translated to 17 languages. As of today we count 324 catalogues and 12239 patterns translated into English (UK/cm). 12239
We work hard to bring you the best knitting and crochet have to offer, inspiration and advice as well as great quality yarns at incredible prices! Would you like to use our patterns for other than personal use? You can read what you are allowed to do in the Copyright text at the bottom of all our patterns. Happy crafting!
Post a comment to pattern DROPS Baby 21-8
We would love to hear what you have to say about this pattern!
If you want to leave a question, please make sure you select the correct category in the form below, to speed up the answering process. Required fields are marked *.