
Popular categories
Looking for a yarn?


Comments / Questions (82)
![]() Manu wrote:
Manu wrote:
Hallo, könnten Sie mir bitte bei Passe genau sagen wo die Markierer platziert werden? Bin Anfängerin und verstehe nicht wo die 9 Markierer hinkommen bei der größten Größe, da steht ja nur 1. Markierung 20 .Masche , dann 18 Masche und dann ? Vielen Dank schonmal im voraus
01.10.2025 - 08:14DROPS Design answered:
Liebe Manu, Sie setzen den ersten Markierungsfaden nach 20 Maschen, dann zählen Sie 18 Maschen ab und setzen den nächsten Markierungsfaden, dann zählen Sie wieder 18 Maschen ab und setzen den nächsten Markierungsfaden usw. immer nach 18 Maschen ein Markierungsfaden, bis Sie 9 Markierungsfäden gesetzt haben, nach dem 9. Markierungsfaden sind noch 20 Maschen übrig. Gutes Gelingen!
23.10.2025 - 01:30
![]() Iris Draeger wrote:
Iris Draeger wrote:
Liebes Drops-Team, wo finde ich die Angaben für die Knopflöcher?
16.02.2025 - 19:41DROPS Design answered:
Liebe Frau Draeger, die Knöpfe werden einfach zwischen Maschen der rechten Blende geknöpft, so es sind keine extra Löcher dazu. Viel Spaß beim Stricken!
17.02.2025 - 10:03
![]() Judith wrote:
Judith wrote:
Vorder- und Rückenteil: Wie folgt Markierung einziehen. Bei Größe M nach 21M, 4M, 36M, 4M. Für was sind diese Markierungen und warum nur auf einer Seite des Strickstückes, da insgesamt 86 M angeschlagen wurden?
05.10.2024 - 13:21DROPS Design answered:
Liebe Judith, nach der letzen Markierungen haben Sie 21 Maschen übrig, so sind diese 4 Maschen mit je einer Markierung beidseitig an beiden Seiten der Jacke. Es wird dann beidseitig von diesen 4 Maschen an jeder Seite abgenommen, dann später zugenommen. Viel Spaß beim Stricken!
09.10.2024 - 09:00
![]() Coline wrote:
Coline wrote:
After casting on for the body, the next row will be the WS so do I start with a row of purl as my first row?
10.02.2022 - 19:07DROPS Design answered:
Hi Coline, You can work a row of purl to start with if you wish or start the rib straight away, in which case this first row will be the right side. Happy knitting!
11.02.2022 - 08:00
![]() Gitta wrote:
Gitta wrote:
Very disappointed ☹️
12.01.2022 - 21:18
![]() Gitta wrote:
Gitta wrote:
I just finished the Drops 134-17 in a Medium and I usually take a small . It is a way to small. I can’t even close it
12.01.2022 - 21:16DROPS Design answered:
Dear Gitta, we feel so sorry, did you get and keep the correct tension all the way? You should have 9 sts x 12 rows in stocking stitch = 10 x 10 cm and with that tension, you should get the same measurements as shown in the chart. This lesson explains how to choose a size if it can help. Happy knitting!
13.01.2022 - 09:12
![]() Kirsten Sofie Sebulonsen wrote:
Kirsten Sofie Sebulonsen wrote:
Hej, det ser ud til, I har glemt knaphullerne I opskriften.
11.12.2021 - 10:34
![]() Sando wrote:
Sando wrote:
Bonjour, je ne sais pas comment contacter le webmaster et si c'est un problème de site ou d'ordinateur personnel mais aucune image ne s'affiche sur beaucoup des modèles proposés. De ce fait, je n'ai pas non plus les diagrammes pour les points fantaisies. Que puis-je faire?
04.10.2021 - 16:35DROPS Design answered:
Bonjour Mme Sando, nous avons effectivement eu quelques soucis d'affichage des images ces derniers temps, mais tout devrait être revenu en ordre, merci pour votre compréhension. Bon tricot!
06.10.2021 - 07:02
![]() Ann wrote:
Ann wrote:
Ska ärmen sys ihop innan man sätter den på samma rundsticka som fram- och bakstycket?
06.05.2021 - 18:33DROPS Design answered:
Hej Ann, det kan du godt, men gør det du synes er lettest :)
07.05.2021 - 08:48
![]() Britta wrote:
Britta wrote:
Funderar kring första minskningen, ska den göras på samma sätt på båda sidorna? Blir inte de minskade maskorna då att luta åt vänster på båda sidorna? Tänker att det borde luta åt olika håll för att få symmetri?
12.03.2021 - 21:18DROPS Design answered:
Hei Britta. På denne modellen er "fletten" lik både på høyre og venstre side og da med samme felling. Om du ønsker at de skal vend hver sin vei, kan du fint gjøre det. mvh DROPS design
15.03.2021 - 14:36
|
||||||||||||||||
Mist#mistcardigan |
||||||||||||||||
|
|
||||||||||||||||
Knitted DROPS jacket in stocking st with cables and round yoke in ”Andes” or “Snow”. Size: S - XXXL.
DROPS 134-17 |
||||||||||||||||
|
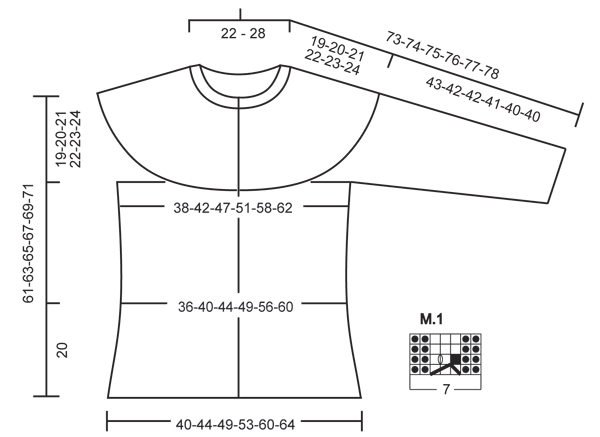
GARTER ST (back and forth on needle): K all rows. DECREASE TIP 1: All dec are done from RS. Dec as follows before 4 sts in the side: Work until 2 sts remain before marker, K tog the next 2 sts. Dec as follows after 4 sts in the side: Slip 1 st as if to K, K 1, psso. DECREASE TIP 2: Dec 1 st on each side of marker as follows: Work until 2 sts remain before marker, slip 1 st as if to K, K 1, psso, (marker), K tog the next 2 sts. INCREASE TIP: All inc are done from RS. Inc 1 st by making 1 YO. On next row P YO twisted (i.e. work in back loop of YO instead of front) to avoid holes. PATTERN: See diagram M.1 (the diagram shows the pattern from RS) -------------------------------------------------------- BODY: Worked back and forth on circular needle from mid front. Cast on 78-86-94-102-114-122 sts (incl 3 band sts in each side towards mid front) on circular needle size 10 mm with Andes. Work 1st row (= from RS) as follows: 3 band sts in garter st - See explanation above - work diagram M.1 (= 7 sts), * K 2, P 2 *, repeat from *-* until 10 sts remain on needle, work diagram M.1 and finish with 3 band sts in garter st. NOTE: Work band sts in garter st until finished measurements. Work like this for 4 rows, work next row (= RS) as follows: 3 band sts, work diagram M.1, work in stocking st until 10 sts remain on needle, work diagram M.1, finish with 3 band sts. Continue in stocking st with diagram M.1 and 3 band sts in each side. Insert 4 markers in the piece as follows: Work 19-21-23-25-28-30 sts, 1 marker, work 4 sts, 1 marker, work 32-36-40-44-50-54 sts, 1 marker, work 4 sts, 1 marker, work remaining sts (= 4 sts between each marker in each side). REMEMBER THE KNITTING TENSION! When piece measures 10 cm from cast on edge, dec 1 st on each side of 4 sts in each side - see decrease tip 1 above. Repeat dec when piece measures 20 cm = 70-78-86-94-106-114 sts. Continue in stocking st with diagram M.1 and 3 band sts in each side. When piece measures 31-32-32-33-33-34 cm, inc 1 st on each side of 4 sts in the sides - Read increase tip above = 74-82-90-98-110-118 sts. Continue to work until piece measures 42-43-44-45-46-47 cm. Work next row from WS as follows: Work 18-20-22-24-27-29 sts, cast off the next 4 sts, work 30-34-38-42-48-52 sts, cast off the next 4 sts and work the last 18-20-22-24-27-29 sts. Put piece aside = 66-74-82-90-102-110 sts remain on needle. SLEEVE: The sleeve is worked back and forth on circular needle. Cast on 22-22-22-26-26-26 sts (incl 1 edge st in each side) on circular needle size 10 mm. Work 1st row (= RS) in rib as follows: 1 edge st in garter st, * K 2, P 2 *, repeat from *-* and finish with 1 edge st in garter st. Continue like this until rib measures approx. 4 cm. Now continue in stocking st with 1 edge st in each side - At the same time on 1st row from RS, adjust no of sts to 22-23-23-25-27-27. When piece measures 8 cm, inc 1 st in each side inside 1 edge st. Repeat inc every 6-6-5-5-5-4 cm a total of 6-6-7-7-7-8 times = 34-35-37-39-41-43 sts. When piece measures approx. 43-42-42-41-40-40 cm (NOTE! Shorter measurements in the larger sizes because of broader shoulder width) cast off 3 sts at beg of the next 2 rows = 28-29-31-33-35-37 sts. Put piece aside and knit another sleeve. ASSEMBLY: Sew the sleeves tog inside 1 edge st. YOKE: Slip sleeves on to same circular needle as body where armholes were cast off = 122-132-144-156-172-184 sts. Insert 1 marker after 19-17-16-18-18-20 sts, then insert another 7-7-7-8-8-8 markers with 12-14-16-15-17-18 sts between each = 19-17-16-18-18-20 sts remain after last marker (= 8-8-8-9-9-9 markers). Now measure the piece from here. Continue in stocking st with diagram M.1 and 3 band sts in each side as before. When piece measures 2 cm, dec 1 st on each side of every marker (= 16-16-16-18-18-18 sts dec) - Read decrease tip 2. Repeat dec every 4½-5-5-5½-4½-4½ cm a total of 4-4-4-4-5-5 times = 58-68-80-84-82-94 sts. Continue to work until piece measures 18-19-20-21-22-23 cm. NOTE: Adjust so that last row is the 4th row in diagram M.1. Continue to work an elevation in the neck with short rows as follows: 1st row (= RS): 3 band sts, work 1st row in diagram M.1, work in stocking st while AT THE SAME TIME dec 12-18-30-30-28-36 sts evenly (do not dec over diagram M.1 and band sts), work 1st row in diagram M.1 and finish with 3 band sts = 46-50-50-54-54-58 sts, turn piece. 2nd row (= WS): 3 band sts, work 2nd row in diagram M.1, work in P sts - but turn piece when 10 sts remain on needle. 3rd row: Tighten the thread and K from RS until 10 sts remain in the other side. Turn piece and tighten thread. 4th row: P 1 row from WS until 10 sts remain towards mid front, work 2nd row in diagram M.1 over the next 7 sts and finish with 3 band sts. Work next row (= from RS) as follows: 3 band sts, diagram M.1, * K 2, P 2 *, repeat from *-* until 10 sts remain, work diagram M.1 and finish with 3 band sts. Continue like this until rib measures 3 cm, then loosely cast off with K over K and P over P. ASSEMBLY: Sew the openings under the sleeves. Sew 7 buttons evenly distributed on left front band, use the holes between sts on right front band as button holes. |
||||||||||||||||
Diagram explanations |
||||||||||||||||
|
||||||||||||||||
 |
||||||||||||||||
Have you finished this pattern?Tag your pictures with #dropspattern #mistcardigan or submit them to the #dropsfan gallery. Do you need help with this pattern?You'll find 12 tutorial videos, a Comments/Questions area and more by visiting the pattern on garnstudio.com. © 1982-2026 DROPS Design A/S. We reserve all rights. This document, including all its sub-sections, has copyrights. Read more about what you can do with our patterns at the bottom of each pattern on our site. |
||||||||||||||||


With over 40 years in knitting and crochet design, DROPS Design offers one of the most extensive collections of free patterns on the internet - translated to 17 languages. As of today we count 324 catalogues and 12290 patterns translated into English (UK/cm). 12290
We work hard to bring you the best knitting and crochet have to offer, inspiration and advice as well as great quality yarns at incredible prices! Would you like to use our patterns for other than personal use? You can read what you are allowed to do in the Copyright text at the bottom of all our patterns. Happy crafting!
Post a comment to pattern DROPS 134-17
We would love to hear what you have to say about this pattern!
If you want to leave a question, please make sure you select the correct category in the form below, to speed up the answering process. Required fields are marked *.