
Popular categories
Looking for a yarn?


Comments / Questions (33)
![]() Petra wrote:
Petra wrote:
Liebes Drops Design könnte ich Sie auch anrufen komme mit der Anleitung in der Passe gar nicht klar - wann stricke ich M2A und wann M2B. Ich kann dies nicht erkennen. Möchte diese Garnitur nächste Woche verschenken. Liebe Grüße
01.11.2015 - 18:52DROPS Design answered:
An dieser Stelle steht, wie Sie die beiden Muster verteilen: "4 Blendenm, M2A über die nächsten 144-160-184 (200-224) M., M2B (= 4 M.) und mit 4 Blendenm abschliessen." Sie stricken also nach den Blenden-M fortlaufend M2A, bis Sie noch 8 M übrig haben, dann stricken Sie M2B und 4 Blenden-M. Sie stricken M.2 1x in der Höhe und nehmen dabei wie im Diagramm gezeigt ab.
19.11.2015 - 09:46
![]() Pia Dahl Petersen wrote:
Pia Dahl Petersen wrote:
Kan ikke finde ud af om kraven skal lægges dobbelt og syes. Eller om det er en høj krave.
16.02.2014 - 10:58DROPS Design answered:
Hej Pia. Det er bare en almindelig rib krave, den er ikke höj eller dobbelt. Kraven bliver 6-7-7 (8-8) cm afhaengig af hvilken str du strikker. Du kan selvfölgelig altid tilpasse efter behov.
18.02.2014 - 15:51
![]() Renate wrote:
Renate wrote:
Hab vergessen, mich im voraus schon zu bedanken. Hol ich hiermit gerne nach und gehe erneut an mein Strickwerk. Danke.
16.11.2013 - 16:14
![]() Renate wrote:
Renate wrote:
Komme mit der Passe nicht klar. Gehen die Abnahmen in M.2A von der Blende weg. Ist M.2A re.Vorderteil und M.2B linkes. Habe von Anfang an die Blende mit 1 RM plus 4 Blendmaschen gestrickt.
14.11.2013 - 17:35DROPS Design answered:
Liebe Renate, die Abnahmen sind im Musterdiagramm enthalten, das geht aber nicht über die Blendenmaschen. Und nein, M2B ist nur ein kurzer Mustersatz zum Abschluss, nicht beim ganzen linken Vorderteil. Es ist in der Anleitung genau beschrieben, über wie viele Maschen Sie M2A stricken müssen
15.11.2013 - 16:31
![]() Miriam Walchshäusl wrote:
Miriam Walchshäusl wrote:
Ich stricke das Modell in Größe 50/56. Die Maschenprobe stimmt, aber nach Beendigung der Jacke ist die Schulterpartie viel zu ausladend. Meiner Meinung nach müsste etwas vom Muster M2A und B weggelassen werden, da die cm-Angaben sonst nicht eingehalten werden können und das ganze Modell einen zu hohen Schulterbereich bekommt, der dann am Baby unschön absteht. Kann das sein? Und wenn ja, wo kann ich reduzieren, damit die Jacke passgenau wird? Vielen Dank. :)
28.10.2013 - 09:02DROPS Design answered:
Liebe Miriam, bitte kontrollieren Sie, ob Sie sich genau an die Anleitung gehalten haben. Diese Jacke wurde schon sehr oft nachgestrickt und hat eine gute Passform. In der kleinsten Grösse misst die Passe lediglich 11 cm.
29.10.2013 - 09:22
![]() Claudia wrote:
Claudia wrote:
Hallo, ich stricke gerade die Mütze und mit ist das mit dem Abnehmen vor den Fäden nicht ganz klar. Soll ich immer 1 Runde abnehmen + 1 Runde glatt rechts mal 3, also ingesamt 6 Runden lang? Oder wie ist das zu verstehen? Danke :)
01.10.2013 - 17:26DROPS Design answered:
Liebe Claudia, es wird in jeder 2. R re neben den Markierungen abgenommen. Also eine Abnahmerunde und eine Runde ohne Abnahmen im Wechsel - so oft wdh wie in der Anleitung angegeben.
02.10.2013 - 09:10
![]() Katti wrote:
Katti wrote:
Hallo, ich habe eine Frage zum Norwegermuster. Bei mir ist es direkt nach dem Bündchen unsichtbar geworden, d.h. man sieht von rechts die dunkelbraunen Maschen gar nicht. Ich habe eine Hin-und eine Rückreihe mit zwei Fäden gestrickt. War das richtig oder kommt das Muster immer nur in der Hinreihe? Vielen Dank schon mal und viele Grüße Katti
26.06.2013 - 10:05DROPS Design answered:
Liebe Katti, ich vermute, Ihre Frage bezieht sich auf die Mütze, denn dort kommt das Muster gleich nach dem Bündchen - allerdings wird in Runden gestrickt: Sie stricken ja zunächt 1 Rd re (in der die Maschenzahl angepasst wird), das verhindert, dass das Muster in das Bündchen "rutscht".
28.06.2013 - 08:25
![]() Anna-Sophie wrote:
Anna-Sophie wrote:
Ich meine natürlich die 4 Blendenmaschen... Ich hatte sie zu den 160 Maschen gezählt.. Daher meine Probleme... Danke für den Hinweis! :-)
04.06.2013 - 15:14
![]() Anna-Sophie wrote:
Anna-Sophie wrote:
Ich meine natürlich die 4 Blendenmaschen... :-) Ich hatte sie zu den 160 gezählt... Daher meine Probleme..
04.06.2013 - 15:12
![]() Anna-Sophie wrote:
Anna-Sophie wrote:
Oh.... Ich sehe gerade ich habe die 4 Maschen zwischen Blende und M2A überlesen. Kein Wunder, dass es bei mir nicht aufgehen wollte. Vielen Dank für den Hinweis! :-)
04.06.2013 - 15:09
|
||||||||||||||||
First Snow Hat#firstsnowhat |
||||||||||||||||
 |
 |
|||||||||||||||
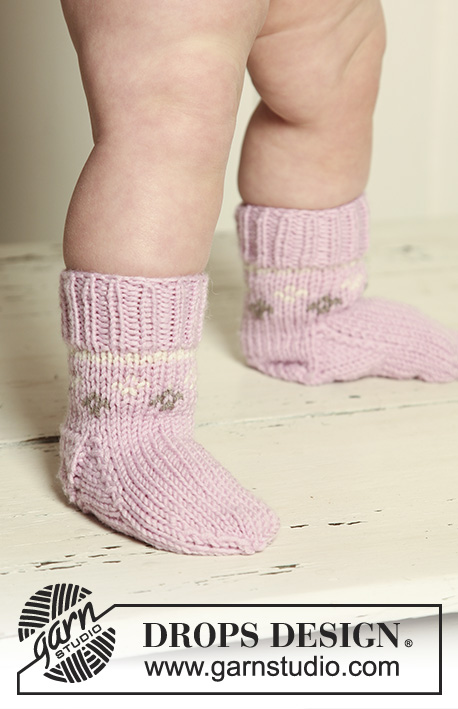
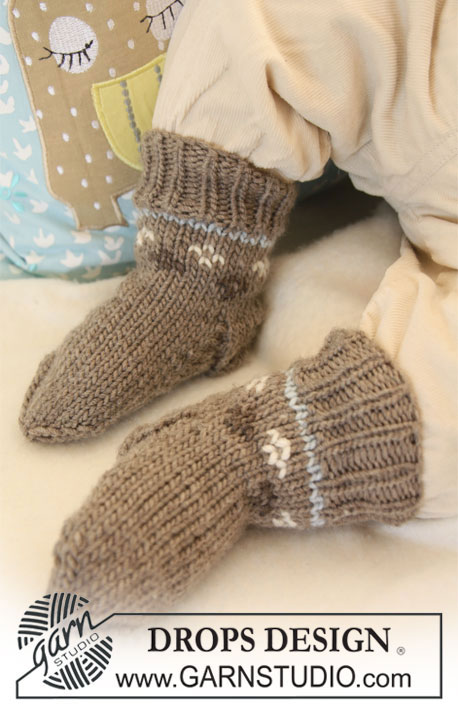
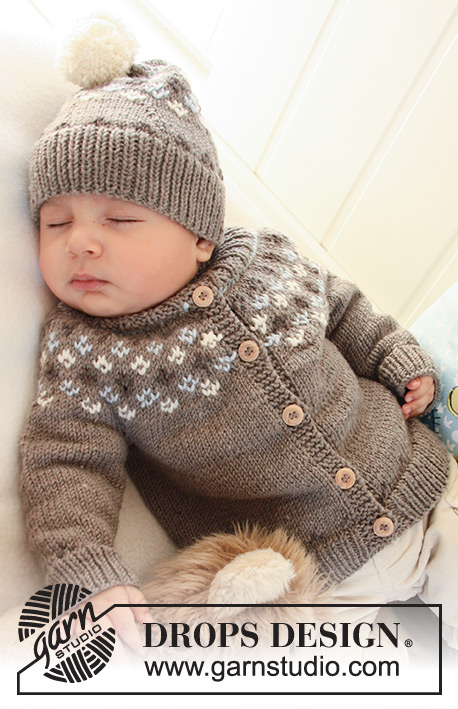
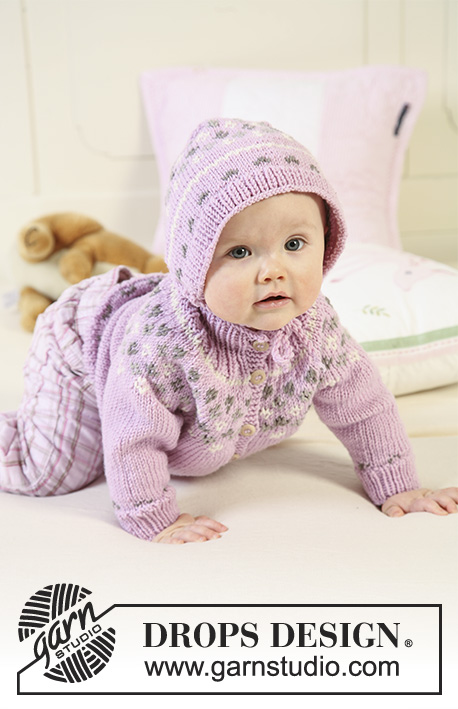
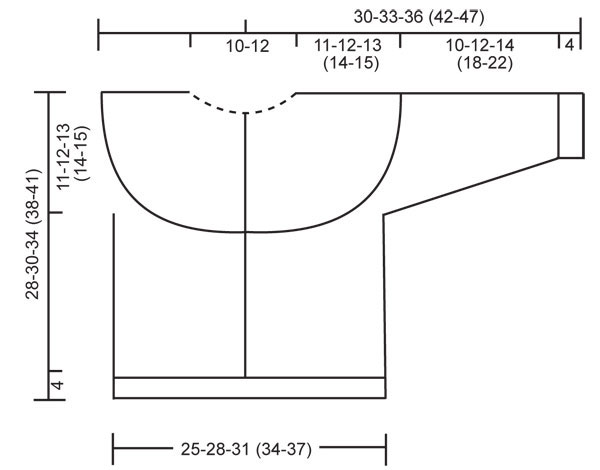
Set of knitted jacket with raglan sleeves and turtle neck, hat and socks with Nordic pattern for baby and children in DROPS Merino Extra Fine
DROPS Baby 19-33 |
||||||||||||||||
|
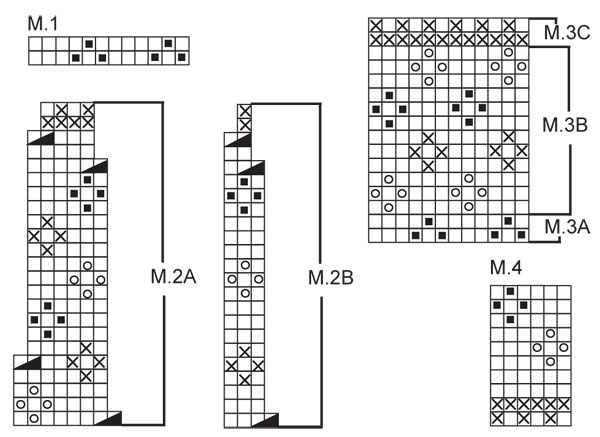
JACKET: GARTER ST (back and forth on needle): K all rows. PATTERN: See diagrams M.1 and M.2. Pattern is worked in stocking st. BUTTONHOLES: Make buttonholes on right front band. 1 BUTTONHOLE = K tog 2nd and 3rd st from mid front and make 1 YO. Make buttonholes when piece measures: SIZE 1/3 months: 2, 8, 14, 20 and 26 cm SIZE 6/9 months: 2, 8, 15, 21 and 28 cm SIZE 12/18 months: 2, 8, 14, 20, 26 and 32 cm SIZE 2 years: 2, 9, 16, 23, 30 and 36 cm SIZE 3/4 years: 2, 10, 17, 25, 32 and 39 cm The last buttonhole is made on neckline. --------------------------------------------------------- --------------------------------------------------------- BODY PIECE: Worked back and forth on circular needle from mid front. Cast on 119-133-145 (159-171) sts (includes 4 front band sts each side towards mid front) on circular needle size 3.5 mm with light brown mix. P 1 row from WS with 4 GARTER STS – see above – each side (front bands). Continue in rib as follows from RS: 4 front band sts in garter st, * K1/P1 *, repeat from *-* and finish with K1 and 4 front band sts in garter st – remember BUTTONHOLES on right front band. When rib measures 4 cm change to circular needle size 4.5 mm. Work 1 row stocking st (with front bands in garter st as before), AT THE SAME TIME dec 12-14-14 (16-16) sts evenly (do not dec on front bands) = 107-119-131 (143-155) sts. Now continue in M.1 with 4 front band sts in garter st each side. After M.1 continue in stocking st and light brown mix with front bands in garter st as before. REMEMBER THE KNITTING TENSION! When piece measures 17-18-21 (24-26) cm - adjust so that next row is from RS - work next row as follows: 26-29-32 (35-38) sts (= front piece), cast off 6 sts for armhole, 43-49-55 (61-67) sts (= back piece), cast off 6 sts for armhole, 26-29-32 (35-38) sts (= front piece). Put piece aside and knit the sleeves. SLEEVE: Worked in the round on double pointed needles. Cast on 34-36-38 (38-38) sts on double pointed needles size 3.5 mm with light brown mix. K 1 round and continue in rib, K1/P1. When rib measures 4 cm change to double pointed needles size 4.5 mm. K 1 round, AT THE SAME TIME dec 4-6-2 (2-2) sts evenly = 30-30-36 (36-36) sts. Now work M.1. After M.1 continue in stocking st and light brown mix. AT THE SAME TIME when piece measures 5 cm inc 2 sts mid under sleeve. Repeat the inc on every 4-4-6 (6-6) round a total of 5-7-6 (8-10) times = 40-44-48 (52-56) sts. When piece measures 14-16-18 (22-26) cm (inc are now complete) cast off 6 sts mid under sleeve = 34-38-42 (46-50) sts left on needle. Put piece aside and knit the other sleeve. YOKE: Slip sleeves on the same circular needle as body piece where cast off for armholes = 163-183-203 (223-243) sts. Continue back and forth on needle as follows: P 1 row from WS, AT THE SAME TIME dec 7-11-7 (11-7) sts evenly (do not dec on front bands) = 156-172-196 (212-236) sts. Work 0-1-2 (3-4) cm stocking st with light brown mix and work next row as follows from RS: 4 front band sts in garter st, M.2A on the next 144-160-184 (200-224) sts, M.2B (= 4 sts) and finish with 4 front band sts in garter st. Continue in pattern like this, AT THE SAME TIME dec sts in M.2 as per pattern diagram. After M.2 there are 81-89-101 (109-121) sts left on needle. P 1 row from WS with front band sts as before. Change to circular needle size 3.5 and work next row as follows from RS: 4 front band sts, * K1/P3 *, repeat from *-* and finish with K1 and 4 front band sts. When rib measures 1 cm dec all P3 to P2 and when rib measures 2 cm dec all P2 to P1 = 45-49-55 (59-65) sts on needle. Jacket now measures 28-30-34 (38-41) cm from cast on row to shoulder. Continue in rib K1/P1 for turtle neck (front bands as before). When rib measures 5-6-6 (7-7) cm from beg of rib make 1 buttonhole in line with the others on front band. When rib measures 6-7-7 (8-8) cm cast off with K over K and P over P. ASSEMBLY: Sew openings under sleeves. Sew on buttons. ---------------------------------------------------------------- HAT: PATTERN: See diagram M.3. Pattern is worked in stocking st. --------------------------------------------------------- --------------------------------------------------------- HAT: Worked in the round on needle from bottom up. Cast on 88-94-98 (104-106) sts on circular needle size 3.5 mm with light brown mix. Work rib, K1/P1, until piece measures 4-5-5 (6-6) cm. K 1 round, AT THE SAME TIME dec 10-10-14 (14-16) sts evenly = 78-84-84 (90-90) sts. Change to circular needle size 4.5 mm. Insert 6 markers in piece with 13-14-14 (15-15) sts between each marker. Work M.3A and then continue in stocking st and light brown mix - AT THE SAME TIME dec 1 st to the right of all markers by K2 tog (= 6 dec sts per round). Repeat the dec (with 1 less st between each dec each time) on every other round another 3 times = 54-60-60 (66-66) sts. After the last round with dec work M.3B and then continue in stocking st and light brown mix, AT THE SAME TIME dec 1 st to the right of all markers (= 6 dec sts). K 1 round and work another round with dec as before = 42-48-48 (54-54) sts. Work M.3C and then continue in stocking st and light brown mix until finished measurements, AT THE SAME TIME dec 1 st to the right off all markers as before. Repeat the dec on every other round a total of 3-3-4 (4-5) times = 24-30-24 (30-24) sts on needle. K2 tog all the way round, cut the thread, pull it through remaining sts, tighten and fasten. POMPOM: Make 1 pompom in off-white with a diameter of approx 4 cm. Attach it to the top of hat. ------------------------------------------------------------------- SOCK: PATTERN: See diagram M.4. The pattern is worked in stocking st. HEEL DECREASES: ROW 1 (= RS): work row until 5-5-5 (6-6) sts remain, slip next st as if to K, K1, psso, turn piece. ROW 2 (= WS): work row until 5-5-5 (6-6) sts remain, slip next st as if to P, P1, psso, turn piece. ROW 3 (= RS): work until 4-4-4 (5-5) sts remain, slip next st as if to K, K1, psso, turn piece. ROW 4 (= WS): work row until 4-4-4 (5-5) sts remain, slip next st as if to P, P1, psso, turn piece. Continue dec like this with 1 less st between each dec until there are 7-9-9 (9-9) sts on needle. DECREASING TIP: Dec as follows before marker: K2 tog. Dec as follows after marker: slip 1 st as if to K, K1, psso. --------------------------------------------------------- --------------------------------------------------------- SOCKS: Worked in the round on double pointed needles from top down. Cast on 34-34-40 (40-40) sts on double pointed needles size 3 mm with light brown mix. Work rib, K1/P1, for 4-4-5 (5-6) cm. K 1 round, AT THE SAME TIME dec 4 sts evenly = 30-30-36 (36-36) sts. Continue in M.4. After M.4 work 4 rounds stocking st with light brown mix, AT THE SAME TIME on first round (after M.4) dec 2-0-4 (2-0) sts evenly = 28-30-32 (34-36) sts. After the 4 rounds stocking st keep the first 15-17-17 (19-19) sts on needle for heel, and slip the remaining 13-13-15 (15-17) sts on a stitch holder (= mid upper foot). Work stocking st back and forth on heel sts for 3-3.5-4 (4-4.5) cm – insert a marker. Now work HEEL DECREASES – SEE ABOVE! After heel dec pick up 7-8-9 (9-10) new sts each side of heel and slip sts from stitch holder back on needle = 34-38-42 (42-46) sts. Continue in stocking st in the round on all sts with light brown mix, AT THE SAME TIME on first round dec as follows: K2 tog into back of loop before the 13-13-15 (15-17) sts mid upper foot and K2 tog after the 13-13-15 (15-17) sts mid upper foot. Repeat the dec on every other round a total of 4-6-6 (6-6) times = 26-26-30 (30-34) sts. When piece measures approx 8-9-9.5 (11.5-12.5) cm from marker on heel (approx 2-2-2.5 (2.5-3.5) cm remain) insert a new marker each side with 13-13-15 (15-17) sts on upper foot and under foot. Now dec for toes on each side of both markers – SEE DECREASING TIP – on every other round 2-2-3 (3-5) times and then on every round 3-3-3 (3-2) times = 6 sts left on needle. Cut the thread, pull it through remaining sts, tighten and fasten. Foot measures approx 10-11-12 (14-16) cm. |
||||||||||||||||
Diagram explanations |
||||||||||||||||
|
||||||||||||||||
 |
||||||||||||||||
 |
||||||||||||||||
Have you finished this pattern?Tag your pictures with #dropspattern #firstsnowhat or submit them to the #dropsfan gallery. Do you need help with this pattern?You'll find 25 tutorial videos, a Comments/Questions area and more by visiting the pattern on garnstudio.com. © 1982-2026 DROPS Design A/S. We reserve all rights. This document, including all its sub-sections, has copyrights. Read more about what you can do with our patterns at the bottom of each pattern on our site. |
||||||||||||||||


With over 40 years in knitting and crochet design, DROPS Design offers one of the most extensive collections of free patterns on the internet - translated to 17 languages. As of today we count 324 catalogues and 12290 patterns translated into English (UK/cm). 12290
We work hard to bring you the best knitting and crochet have to offer, inspiration and advice as well as great quality yarns at incredible prices! Would you like to use our patterns for other than personal use? You can read what you are allowed to do in the Copyright text at the bottom of all our patterns. Happy crafting!
Post a comment to pattern DROPS Baby 19-33
We would love to hear what you have to say about this pattern!
If you want to leave a question, please make sure you select the correct category in the form below, to speed up the answering process. Required fields are marked *.