
Popular categories
Looking for a yarn?


Comments / Questions (158)
![]() Maria wrote:
Maria wrote:
Potrei per favore avere risposta alla mia domanda del 12.03 - 9.25? Grazie
14.03.2025 - 15:46DROPS Design answered:
Buongiorno Maria, le 14 maglie devono essere messe in sospeso per la scollatura, poi si procede modellando la scollatura come indicato. Buon lavoro!
14.03.2025 - 16:33
![]() Maria wrote:
Maria wrote:
Buongiorno. Non riesco a capire la spiegazione per il davanti. "Quando il lavoro misura 60 cm, traferite 14 m su un fermamaglie, ecc. Ecc." Perché? Non devo lavorare le 14 m fino ai 70 cm cioè fino alla fine del davanti? Grazie per la risposta.
12.03.2025 - 09:28DROPS Design answered:
Buongiorno Maria, le 14 maglie devono essere messe in sospeso per la scollatura, poi si procede modellando la scollatura come indicato. Buon lavoro!
14.03.2025 - 16:33
![]() Jay Waggoner wrote:
Jay Waggoner wrote:
Hood: How do I pick up 60 stitches including the stitches on the stitch holder when there are already 28 stitches on the stitch holder? That only leaves 32 stitches for the neck
08.03.2025 - 06:03DROPS Design answered:
Dear Jay, you pick up the 28 stitches on the stitch holders and 32 stitches around the rest of the neckline (including the back neck). The neck is quite small, so that should be enough stitches. Happy knitting!
09.03.2025 - 19:54
![]() Carine Batta wrote:
Carine Batta wrote:
Bonjour. Merci pour votre réponse. Je ne comprends pas bien cette partie: (Continuer ensuite ainsi : Joindre le fil après les 15-17-20-23-26-29 m du 1er marqueur, tricoter 14 m de bordure devant ). On coupe le fil à la fin du tour, le 1er marqueur étant le début du tour suivant comment joindre le fil 15 m après ce marqueur? Ces 15m doivent être glissées?
14.10.2024 - 10:47DROPS Design answered:
Bonjour Mme Batta, on a tricoté le bas du pull en rond, en commençant sur le côté, on va maintenant former l'ouverture de l'encolure devant: coupez le fil à la fin d'un tour puis glissez les 15 -29 (cf taille) premières mailles du début du tour sans les tricoter et tricotez maintenant à partir d'ici (gardez une longueur de fil qui sera rentrée à la fin): 14 m de bordure devant, 74-130 m jersey puis relevez 1 m au dos de chacune des 14 m de la bordure devant (cf vidéo), tournez et tricotez en allers et retours à partir du col d'un côté jusqu'à l'autre côté. Bon tricot!
14.10.2024 - 16:06
![]() Carine Batta wrote:
Carine Batta wrote:
Bonjour. Serait-il possible d'avoir un tuto video de ce modèle qui est très beau. Je n'arrive pas à comprendre les directives en anglais. Merci
14.10.2024 - 00:29DROPS Design answered:
Bonjour Mme Batta, peut-être que les explications en français (ici) pourront vous aider, si toutefois vous avez une question, n'hésitez pas à utiliser cet espace pour la poser - nous essaierons alors de vous aider. Bon tricot!
14.10.2024 - 09:37
![]() Kathryn wrote:
Kathryn wrote:
Vielen Dank, jetzt ist alles klar. Das Abheben hatte ich nicht auf dem Schirm.
30.08.2024 - 15:02
![]() Kathryn wrote:
Kathryn wrote:
Liebes Team, herzlichen Dank für die schnelle Antwort. Das Video hilft, trotzdem weiß ich leider noch nicht, was ich mit den Maschen am Beginn der Reihe vor den Blendenmädchen tun muss. Einfach weiterschieben auf der Nadel und ungestrickt lassen ? Warum braucht es dann den neu angeschlagenen Faden? Danke noch einmal...
29.08.2024 - 14:46DROPS Design answered:
Liebe Kathryn, es wird jetzt in Reihen gestrickt und nicht mehr in Runden, deshalb wird man den Faden zuerst abschneiden dann in der vordren Mitte (also nicht genau in der Mitte da man mit den BlendenMaschen beginnt) die Reihen anfangen; so die ersten 15-17-20-23-26-29 Maschen ab der Markierung abheben (nicht stricken) und die nächsten 14 Maschen für die Blende stricken, dann weiter wie zuvor bis die letzten Maschen (vor den 14 Maschen), und am Ende dieser Reihe 1 M in den 14. ersten Maschen auffassen. Die Blende wie unter Blende stricken. Viel Spaß beim Stricken!
30.08.2024 - 08:02
![]() Kathryn wrote:
Kathryn wrote:
Liebes Team, was tun ich, wenn ich den Faden abgeschnitten habe? Alle Maschen sind ja noch auf der Nadel, muss ich einfach überspringen? Ich finde leider kein passendes Video. Lieben Dank
27.08.2024 - 18:38DROPS Design answered:
Liebe Kathryn, wenn der Faden abgeschnitten wurde; beginnt der 1. Reihe 15-17-20-23-26-29 Maschen nach dem 1. Markierer (ab die Seite), so stricken Sie 14 Maschen für die Blende, dann glatt rechts und fassen Sie 14 M (siehe dieses Video hinter die ersten 14 M dann wenden und in Hin- und Rückreihen stricken. Viel Spaß beim Stricken!
28.08.2024 - 08:59
![]() Yvonne wrote:
Yvonne wrote:
Hei, Jeg er litt forvirret når det kommer til å lage hull til ermene. Dette er første gang jeg strikker genser, så trenger det inn med teskje og har nettopp felt av 6 masker ved hver merketråd… hvordan skal jeg få det til å bli hull dersom alt er på én rundpinne? Dersom jeg skal bruke maskeholder, skal jeg klippe tråden for å fortsette senere?
08.08.2024 - 12:28DROPS Design answered:
Hei Yvonne, Forstykke og bakstykke er strikket ferdig hver for seg, fram og tilbake fra hvert ermehull. Hvis du trenger det, må du klippe tråden. God fornøyelse!
09.08.2024 - 06:35
![]() Annelise Kristensen wrote:
Annelise Kristensen wrote:
Har været kunde hos jer i mange år, forstår ikke jeg ikke får et svar?????????????????
02.11.2023 - 13:57DROPS Design answered:
Hej Annelise, normalt vil vores strikkeeksperter svare i løbet af 5-6 dage, men du kan også altid spørge i din DROPS butik hvor du har købt garnet :)
03.11.2023 - 11:54
|
|
Campfire |
|
 |
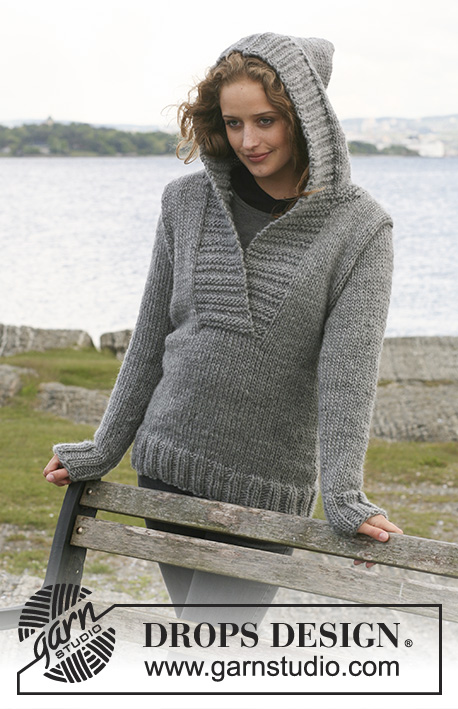 |
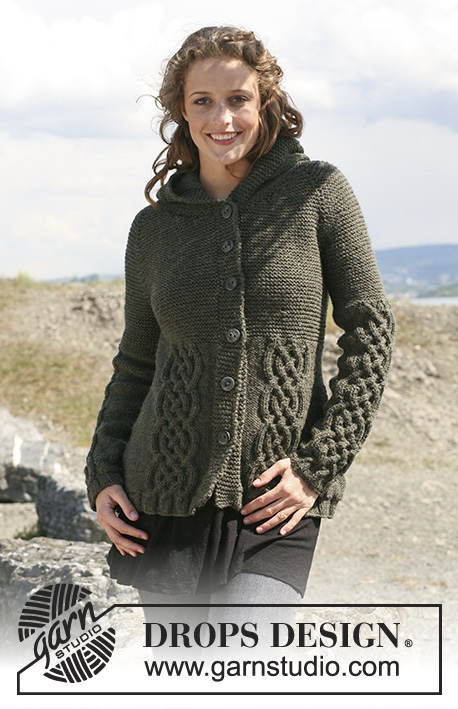
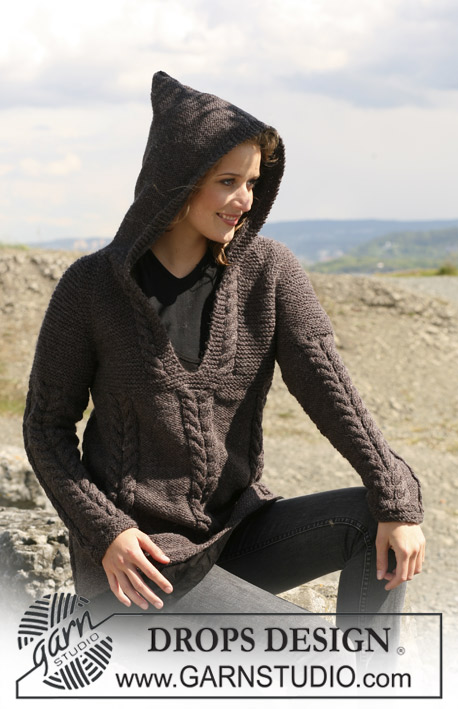
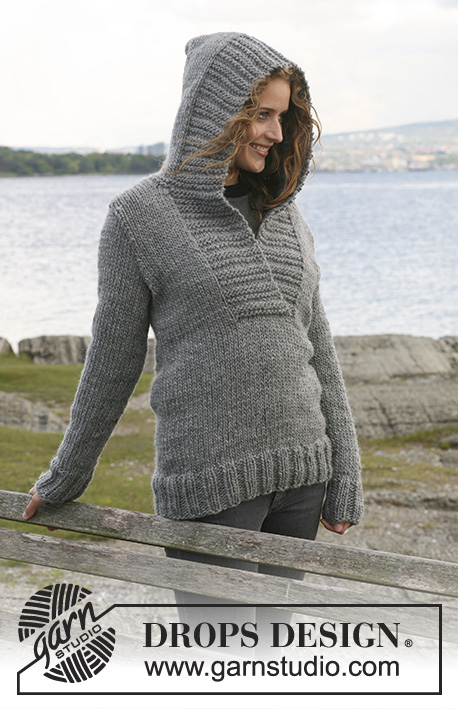
Knitted DROPS Jumper with hood in ”Snow”. Size S - XXXL.
DROPS 109-1 |
|
|
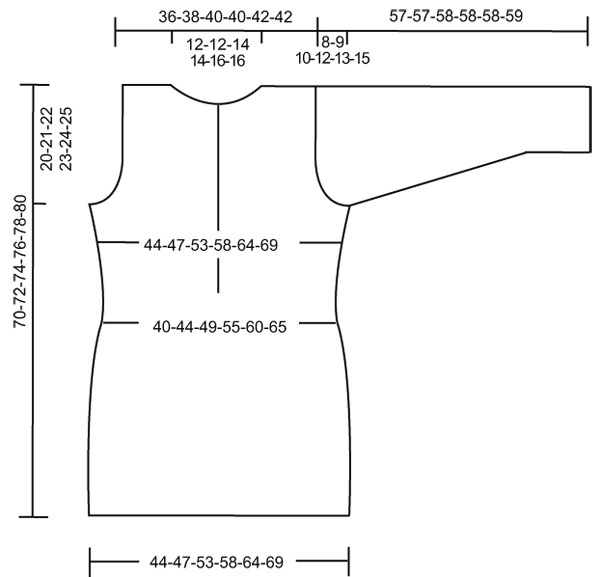
Front bands: Starting from RS: * K 4 rows, P 2 rows *, repeat from *-*. Note! Left front i.e the sts that are picked up behind the right front = pick up row counts as the first K row of the K 4 rows. Body piece: Worked in the round. Cast on 96-104-116-128-140-152 sts on needle size 8 mm with Snow. P 1 round and continue in rib, K2/P2. When piece measures 10 cm continue in stocking st. Insert 1 Marking Thread (MT) at beg of round and 1 MT after 48-52-58-64-70-76 sts (= the sides). Remember the knitting tension! When piece measures 15-16-17-18-19-20 cm dec 1 st on each side of both MT (= 4 dec per round). Repeat the dec when piece measures 30-31-32-33-34-35 cm = 88-96-108-120-132-144 sts (= 44-48-54-60-66-72 sts on back and front piece). When piece measures 33-34-35-36-37-38 cm, cut the thread. Now continue as follows: Beg after the 15-17-20-23-26-29 st from the first MT. Work 14 sts front band – see above – and stocking st on the next 74-82-94-106-118-130 sts. Now pick up 14 new sts behind the front band = 102-110-122-134-146-158 sts. Continue back and forth on needle with 14 front band sts each side. At the same time when piece measures 36-37-38-39-40-41 cm inc 1 st on both sides of each MT (= 4 inc per round). Repeat the inc when piece measures 46-47-48-49-50-51 cm = 110-118-130-142-154-166 sts. When piece measures 50-51-52-53-54-55 cm cast off 6 sts each side (i.e. 3 sts on each side of MT) for armhole = 98-106-118-130-142-154 sts. Now complete back and front pieces separately. Back piece: = 42-46-52-58-64-70 sts. Cast off to shape the armhole each side at the beg of every row: 2 sts 0-0-1-2-3-4 times and 1 st 1-2-2-3-3-4 times = 40-42-44-44-46-46 sts. When piece measures 68-70-72-74-76-78 cm cast off the middle 12-12-14-14-16-16 sts for neck and dec 1 st on neckline on next row = 13-14-14-14-14-14 sts left on each shoulder. Cast off when piece measures 70-72-74-76-78-80 cm. Right front piece: = 28-30-33-36-39-42 sts. Cast off to shape the armhole as described for back piece = 27-28-29-29-30-30 sts. When piece measures 60-62-64-66-68-70 cm slip 14 sts towards mid front on a stitch holder and now dec to shape the neckline on every other row as follows: 1 st 0-0-1-1-2-2 times = 13-14-14-14-14-14 sts left on shoulder. Cast off when piece measures 70-72-74-76-78-80 cm. Left front piece: Like right front piece, but mirrored. Sleeve: Worked in the round on double pointed needles. Cast on 28-28-28-32-32-32 sts on needle size 8 mm. Insert 1 MT at beg of round. P 1 round and continue in rib, K2/P2. When piece measures 8 cm continue in stocking st, at the same time dec 2-2-0-4-2-2 sts evenly on first round = 26-26-28-28-30-30 sts. When piece measures 10 cm inc 1 st on both sides of MT on every 6-5-5-3.5-3.5-2.5 cm a total of 7-8-8-10-10-12 times = 40-42-44-48-50-54 sts. When piece measures 49-48-48-46-45-44 cm - Note! Less on the larger sizes because of longer sleeve cap and wider shoulder – cast off 3 sts on both sides of MT for armhole, and now complete piece back and forth on needle. Cast off to shape the sleeve cap each side at the beg of every row: 2 sts 1 time and 1 st 2-3-4-5-6-7 times, then 2 sts each side until piece measures 56-56-57-57-57-58 cm, cast off 3 sts each side 1 time and cast off remaining sts. Piece measures approx 57-57-58-58-58-59 cm. Hood: Pick up approx 60 to 65 sts round neckline (incl sts on stitch holder) on needle size 8 mm with Snow. Work 4 rows garter st with front bands as before. At the same time inc 5 sts evenly (do not inc on front band sts) on the last row = 65 to 70 sts. Continue in stocking st with 14 front band sts each side as before until hood measures 35-35-36-36-37-37 cm. Cast off. Fold hood double and sew tog at top from RS. Assembly: Set in sleeves. www.garnstudio.com |
|
 |
|
Have you finished this pattern?Tag your pictures with #dropspattern or submit them to the #dropsfan gallery. Do you need help with this pattern?You'll find 21 tutorial videos, a Comments/Questions area and more by visiting the pattern on garnstudio.com. © 1982-2026 DROPS Design A/S. We reserve all rights. This document, including all its sub-sections, has copyrights. Read more about what you can do with our patterns at the bottom of each pattern on our site. |
|


With over 40 years in knitting and crochet design, DROPS Design offers one of the most extensive collections of free patterns on the internet - translated to 17 languages. As of today we count 325 catalogues and 12298 patterns translated into English (UK/cm). 12298
We work hard to bring you the best knitting and crochet have to offer, inspiration and advice as well as great quality yarns at incredible prices! Would you like to use our patterns for other than personal use? You can read what you are allowed to do in the Copyright text at the bottom of all our patterns. Happy crafting!
Post a comment to pattern DROPS 109-1
We would love to hear what you have to say about this pattern!
If you want to leave a question, please make sure you select the correct category in the form below, to speed up the answering process. Required fields are marked *.