
Popular categories
Looking for a yarn?


Comments / Questions (106)
![]() Kitty wrote:
Kitty wrote:
Wat zijn de cm van de panden
06.05.2024 - 08:52
![]() Kitty wrote:
Kitty wrote:
Kunt u het ook in cm beschrijving
06.05.2024 - 08:51DROPS Design answered:
Dag Kitty,
Omdat dit een heel grof haakwerk is, wordt deze in toeren beschreven, omdat je overal maar een paar toeren van hebt. Het heeft dan geen zin om het in cm te beschrijven. Het is dus belangrijk dat de stekenverhouding klopt en dit en dit in de gaten te houden tijdens het haken. (Pas eventueel de naalddikte aan om deze te laten kloppen.)
08.05.2024 - 11:19
![]() Sue wrote:
Sue wrote:
Is there a pattern the same made with 8 ply yarn and a smaller 5 crochet hook. Thanks 😃
05.01.2024 - 13:22DROPS Design answered:
See previous answer - one of the links could help. Happy crocheting!
05.01.2024 - 15:41
![]() Sue wrote:
Sue wrote:
Can this pattern be modified with 8 ply yarn and a smaller 4 or 5 hook. Thanks😃
05.01.2024 - 13:19
![]() Emilie wrote:
Emilie wrote:
Rebonjour, et merci pour votre réponse rapide! Il me semble que dans les vidéos , les rayures sont faites avec 2 rangs de la même couleur. Ici on change de couleur à la fin de chaque rang, si j’ai bien compris: alors les fils doivent traverser l’ouvrage, est-ce que vous voyez ce que je veux dire? Comment puis-je faire pour ne pas les couper dans ce cas là ? Merci beaucoup
19.10.2022 - 17:22DROPS Design answered:
Bonjour Émilie, on peut effectivement couper le fil dans ce cas-là, ou bien utiliser la technique de cette vidéo qui va permettre de ne pas couper, mais de la faire suivre en hauteur, vous crochèterez ainsi alternativement ou successivement sur l'endroit/sur l'envers, du côté où se trouve le fil dont vous avez besoin. Bon crochet!
20.10.2022 - 09:42
![]() Emilie wrote:
Emilie wrote:
Bonjour, J’aimerais savoir s’il faut couper les fils à chaque changement de couleur ou s’il est possible de faire autrement ? Merci beaucoup, je trouve ce modèle superbe !
19.10.2022 - 14:43DROPS Design answered:
Bonjour Émilie et merci :) Vous pouvez faire suivre les fils pour éviter d'avoir à les couper (et d'avoir trop de fils à rentrer) - retrouvez ici quelques astuces supplémentaires. Bon crochet!
19.10.2022 - 16:19
![]() Sheila Eastman wrote:
Sheila Eastman wrote:
I do not understand at all how to do the sleeves. What does it mean to crochet over the back piece?Why are you making 2 separate chains? This is very badly explained!You can see that many are confused about the sleeves. I'll have to make up my own solution.
02.07.2022 - 03:42DROPS Design answered:
Dear Sheila, for the sleeve you cast on and make a chain of 16...28 chain stitches (depending on the size). Now continue working by inserting the hook in the stitch in the back and work according to the pattern. Continue working on the back until finishing the row. When you are at the end of the row, cast on and make a chain of 16...28 stitches (depending on the size). Turn the work and work as explained in the first row on the back. Here is a video on how to cast on the stitches after the back: https://www.garnstudio.com/video.php?id=30&lang=en. Happy crocheting!
02.07.2022 - 16:11
![]() Shikk wrote:
Shikk wrote:
Hi, I made it past the sleevs thanks to reading the comments but I cannot for the life of me work out the left front peace. Anyone want to explain? I feel like I'm having brain block.
23.06.2021 - 00:54DROPS Design answered:
Dear Shikk, can you be more specific, in what exactly you cannot work ut in the front piece ? Happy Crafting.
23.06.2021 - 01:54
![]() Mary wrote:
Mary wrote:
I was confused at first about the stitches but printed the pattern in english and figured it out. Now I finished the back and I am confused about the sleeves. It says cast on new stitches for sleeves? Do I do the sleeves separate and sew them on at the end? Or do I crochet them on to each side of sweater. I have been crocheting a long time and this pattern is very confusing. I have made lots of baby sweaters but the way this pattern is written I just don't get it. Thanks Mary
24.01.2021 - 02:40DROPS Design answered:
Dear Mary, sleeves will be crocheted at each side of the back piece as follows (you should cut the yarn when stated), then crochet new chains for the first sleeve, work the stitches on back piece just as before (as if you wouldn't have cut the yarn and crochet chains before), and crochet new chains at the end of the row for 2nd sleeve. Turn piece and now work as before over all stitches: you have now the new stitches for the sleeves on each side (piece is now looking like a T). Happy crocheting!
25.01.2021 - 09:24
![]() Mary wrote:
Mary wrote:
Does tr mean treble stitch or Double crochet stitch? In the US treble is different for double and is 9mm crochet hook your size or american size. The chart is unclear to me. Thank you Mary
23.01.2021 - 00:48DROPS Design answered:
Dear Mary, make sure you are printed the correct English pattern, ie this jacket is worked with double crochet (US-crochet) / treble crochets (Uk-English) - read more about diagrams here. Happy crocheting!
25.01.2021 - 08:30
|
||||||||||||||||||||||
Cozy Cuddle Jacket#cozycuddlejacket |
||||||||||||||||||||||
 |
 |
|||||||||||||||||||||
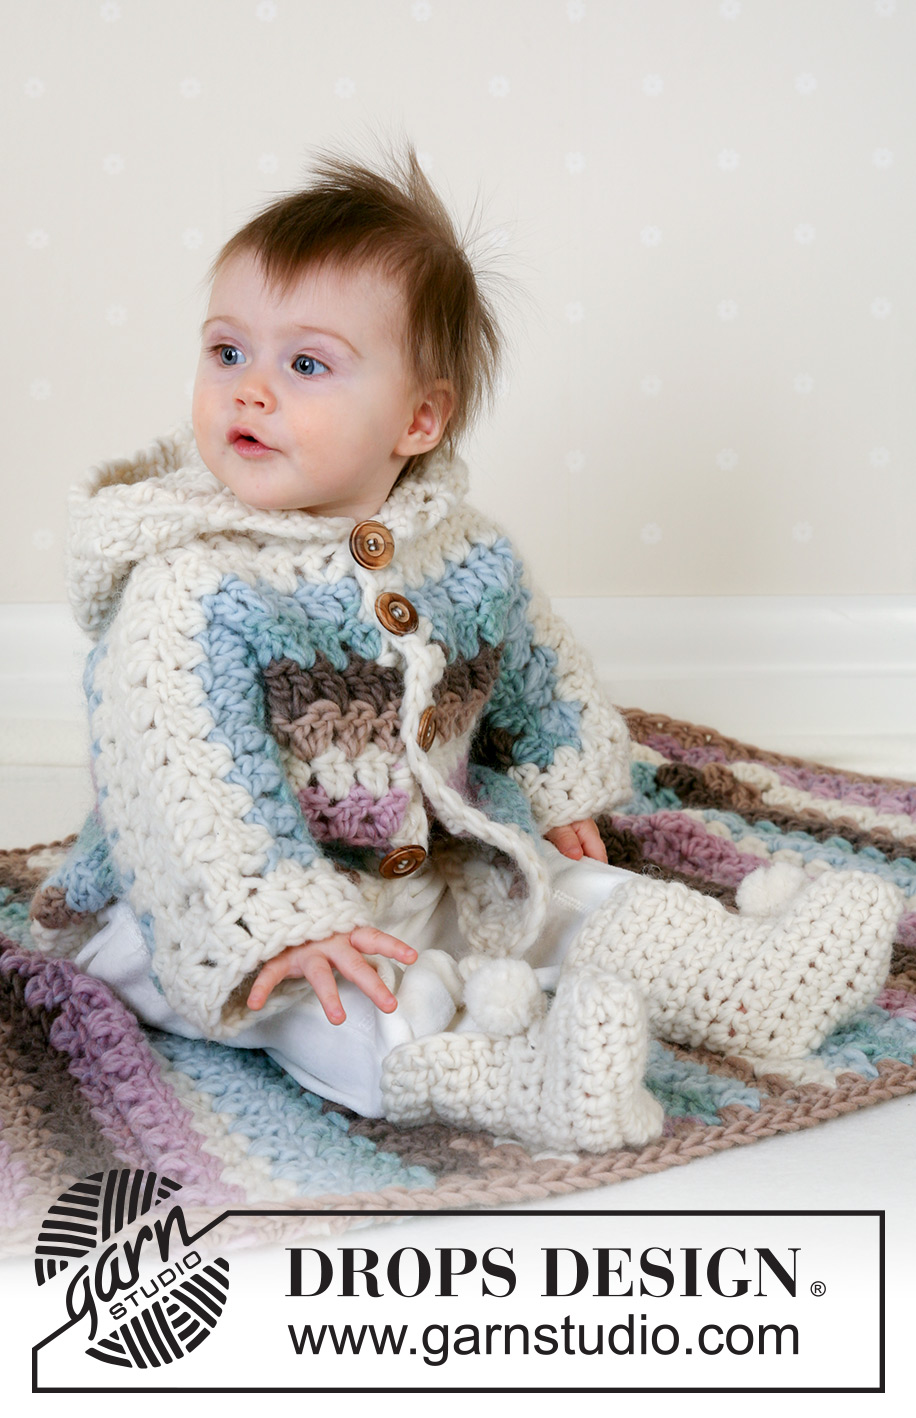
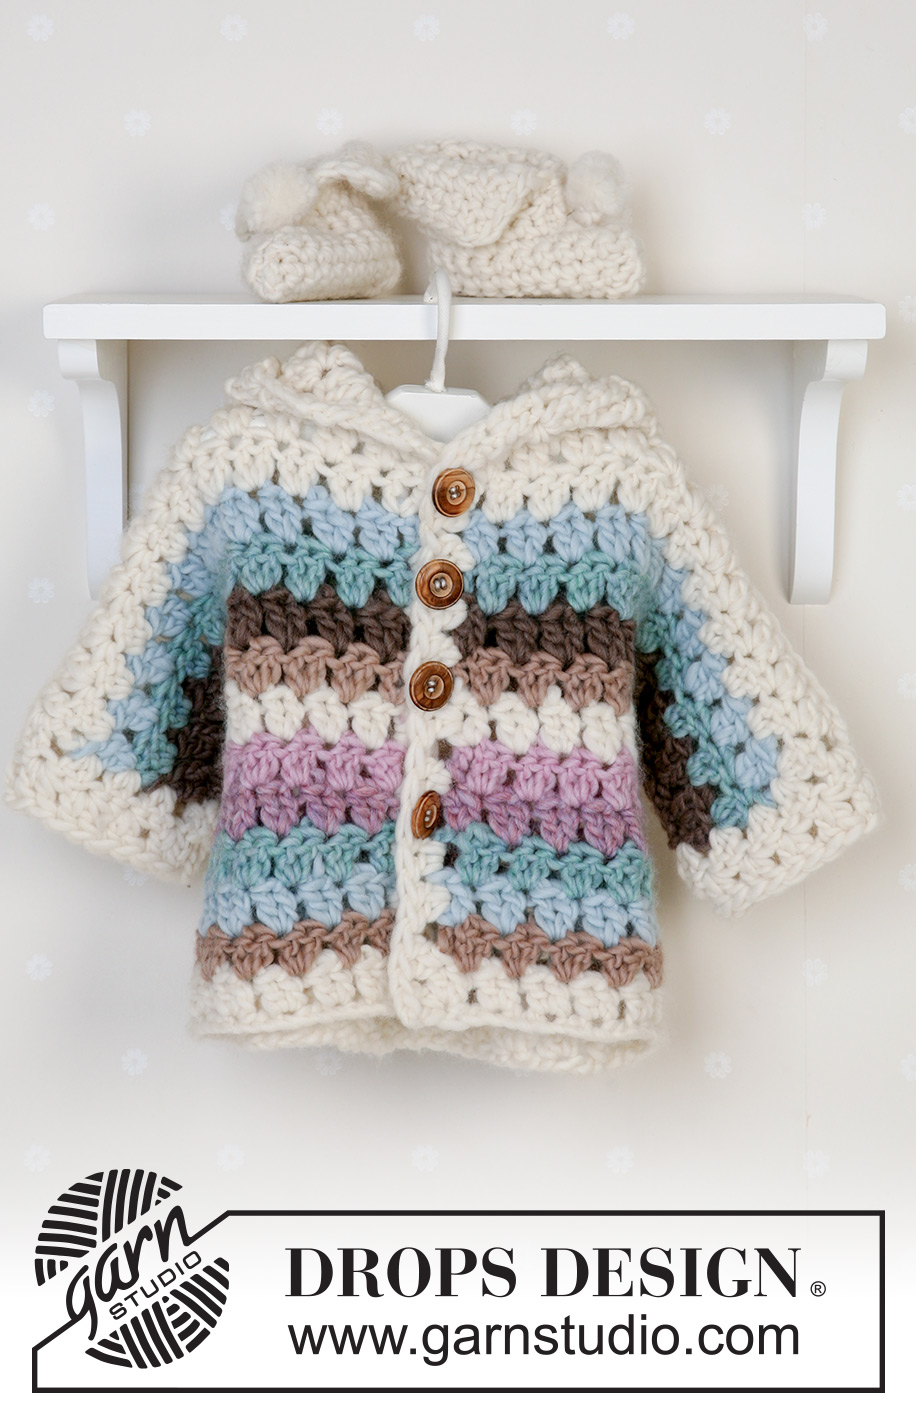
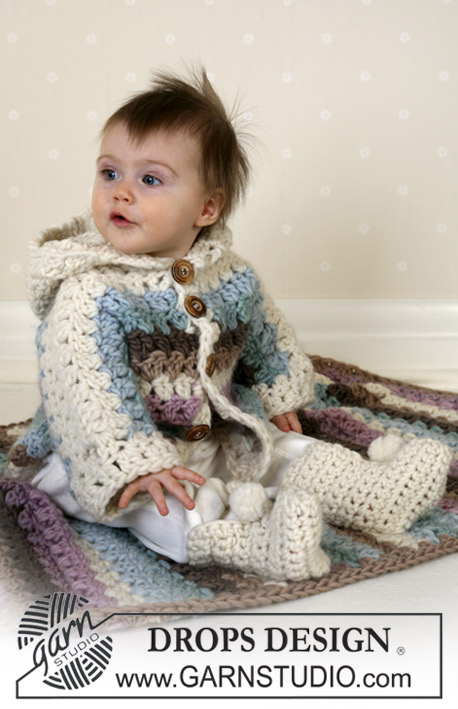
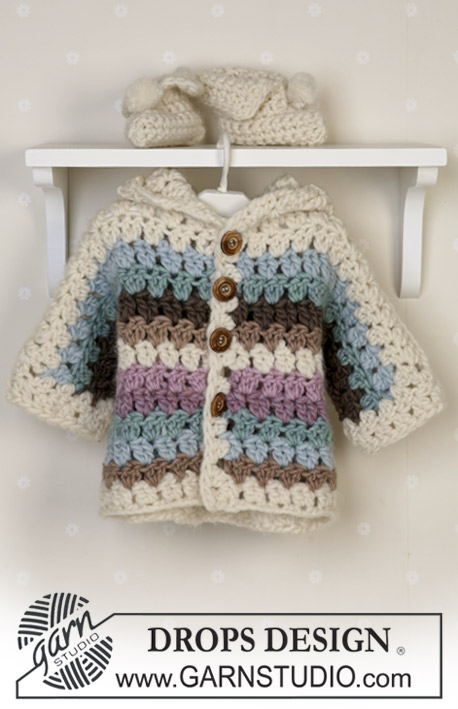
Crochet set of striped jacket and slippers in DROPS Snow. Sizes baby and children from 1 month to 4 years.
DROPS Baby 14-25 |
||||||||||||||||||||||
|
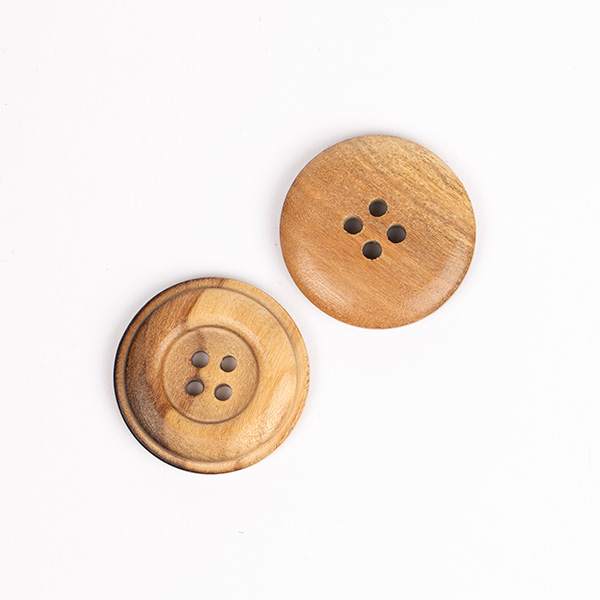
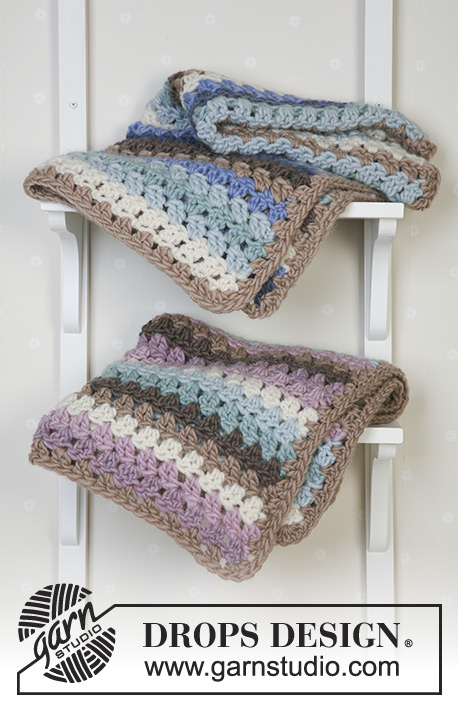
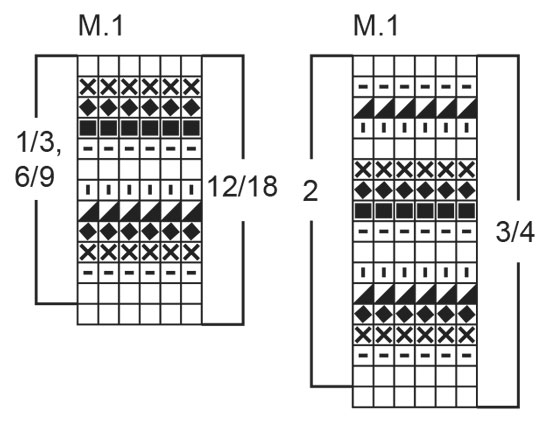
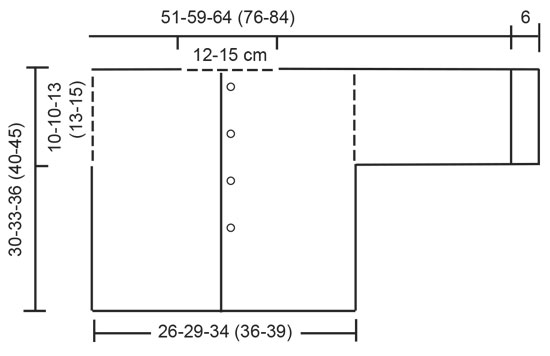
JACKET: Crochet Gauge: Width of 4 tr-groups and 4 rows using crochet hook size 9 mm = 10 x 10 cm Stripes: See diagram M.1. 1 row in diagram = 1 row of tr’s. Crochet info 1: At the beginning of each row of tr’s replace the 1st tr with 3 ch, and finish each row with 1 tr in 3rd ch from beginning of previous row. Crochet info 2: 1 tr-group = 2 tr in same st. ½ tr-group = 3 ch (equals 1 tr) Back piece: Read Crochet info 1. Crochet 31-34-40 (43-46) ch (incl 3 ch to turn with) using Snow 01 and crochet hook size 9 mm. Crochet stripes after M.1 as follows: 1st row: 1 tr in 4th ch from hook, *skip 2 ch, 2 tr in next ch*, repeat from *-* = 10-11-13 (14-15) tr-groups on row, turn the piece 2nd row: 3 ch (= 1 tr), 2 tr between the first 2 tr-groups from previous row (crochet at top of st and not round the whole st), *2 tr between the next 2 tr-groups*, repeat from *-* and finish with 2 tr at the top of the last tr = 1 tr (3 ch) + 10-11-13 (14-15) tr-groups on row – see Crochet info 2. Repeat 2nd row. When piece measures approx 20-23-23 (27-30) cm inc for sleeves each side as follows: Cut the yarn. Crochet 16-19-19 (25-28) ch, crochet as before over the back piece, at the end of row crochet 16-19-19 (25-28) ch. Turn the piece and crochet as explained for 1st row so that the pattern continues as before = 1 tr (3 ch) + 20-23-25 (30-33) tr-groups on row. When piece measures 30-33-36 (40-45) cm cut the thread. Left front piece: Crochet 16-16-19 (22-22) ch (incl 3 ch to turn with) using Snow 01 and crochet hook size 9 mm. Crochet stripes after M.1 and tr-groups as described for back piee = 1 tr (3 ch) +5-5-6 (7-7) tr groups after 2nd row. When piece measures approx 20-23-23 (27-30) cm inc for sleeve at side as described for back piece. Continue pattern as before = 1 tr (3 ch) + 10-11-12 (15-16) tr-groups on row. When piece measures 30-33-36 (40-45) cm cut the thread. Right front piece: Crochet as left front piece, but mirrored. Cuffs: Crochet 2 rows of tr along sleeve edge using Snow 01 = approx 1 tr (3 ch) + 8-8-10 (10-11) tr on row. Front edge: Crochet 1 row of tr-groups along the front edge of both front pieces using Snow 01 = approx 12-13-14 (16-18) tr-groups. Assembly: Sew shoulder/sleeve seams – start at sleeve edge and work towards neckline – leave 5-5 tr-groups mid back for neck opening. Sew underarm and side seams. Hood: Use Snow 01. Crochet 1 dc in 1st st, 3 ch, approx 13-14-15 (16-17) tr-groups round neckline as described for jacket. Continue with tr-groups until hood measures approx 22-24-26 (29-30) cm, cut the thread. Fold hood double and sew top seam with neat sts. Sew on buttons on left front piece – the top one approx 1-2 cm from neckline and the bottom one approx 10-12 cm from lower edge. BOOTIES: To fit foot length: 10-11-12 (14-15) cm Crochet Gauge: Width of 10 dc and 11 rows using crochet hook size 7 mm = 10 x 10 cm. Crochet info 1: At the beginning of each row of dc’s replace the 1st dc with 1 ch, and finish each row with 1 dc in ch from beginning of previous row. Crochet the bootie in one piece and sew seams mid front and mid back. Crochet 7-8-9 (10-11) ch (incl 1 ch to turn with) using crochet hook size 7 mm and Snow 01. Crochet rows – read Crochet Info 1 – start in 2nd ch from hook. = 7-8-9 (10-11) dc on row. When piece measures 7-8-9 (10-10) cm inc at one side for foot by crocheting 3-3-3 (404) new ch and continue with dc in all sts = 10-11-12 (14-15) dc. When piece measures 15-18-21 (24-26) cm cast off the 3-3-3 (4-4) foot sts by turning the piece just before these sts. Continue with dc over the remaining 7-8-9 (10-11) dc until piece measures 22-26-30 (34-36) cm. Assembly: Fold bootie double and sew seam mid back and mid front with neat sts – leave an opening of approx 5-6-7 (8-8) cm at the top mid front. Crochet the other bootie. Pompon: Make 2 small pompons with a diameter of approx 3 cm and attach to top of each bootie. BLANKET: see pattern 14-21 |
||||||||||||||||||||||
Diagram explanations |
||||||||||||||||||||||
|
||||||||||||||||||||||
 |
||||||||||||||||||||||
 |
||||||||||||||||||||||
Have you finished this pattern?Tag your pictures with #dropspattern #cozycuddlejacket or submit them to the #dropsfan gallery. Do you need help with this pattern?You'll find 7 tutorial videos, a Comments/Questions area and more by visiting the pattern on garnstudio.com. © 1982-2026 DROPS Design A/S. We reserve all rights. This document, including all its sub-sections, has copyrights. Read more about what you can do with our patterns at the bottom of each pattern on our site. |
||||||||||||||||||||||


With over 40 years in knitting and crochet design, DROPS Design offers one of the most extensive collections of free patterns on the internet - translated to 17 languages. As of today we count 324 catalogues and 12290 patterns translated into English (UK/cm). 12290
We work hard to bring you the best knitting and crochet have to offer, inspiration and advice as well as great quality yarns at incredible prices! Would you like to use our patterns for other than personal use? You can read what you are allowed to do in the Copyright text at the bottom of all our patterns. Happy crafting!
Post a comment to pattern DROPS Baby 14-25
We would love to hear what you have to say about this pattern!
If you want to leave a question, please make sure you select the correct category in the form below, to speed up the answering process. Required fields are marked *.