
Popular categories
Looking for a yarn?


Comments / Questions (36)
![]() Denise wrote:
Denise wrote:
Lorsqu’on augmente 1maille sur chaque devant et 4 mailles sur le dos, où fait-on ces augmentations ? Et le rang suivant où prenez vous le 108+40. Le 40 doit être 5 fois 8 mais je ne comprend pas le 108.
12.03.2026 - 13:53DROPS Design answered:
Bonjour Denise, peut-être ai-je regardé la mauvaise taille - quelle taille tricotez-vous? S ou M? Ou bien L? (j'avais fait les calculs pour la taille L soit 96 m après le col, 118 m après le 1er rang de l'empiècement et donc 5 x 8 augmentations ensuite = 158 mailles). Pensez à entourer la taille tricotée tout en haut pour bien retrouver les indications pour cette taille, et le nombre d'augmentations à faire. Bon tricot!
12.03.2026 - 16:06
![]() Denise wrote:
Denise wrote:
Avez vous une vidéo pour le raglan. J’ai 96 mailles et après le premier rang j’en ai 104 et le patron dit que je devrais en avoir 118.
12.03.2026 - 03:14DROPS Design answered:
Bonjour Denise, après le dernier rang de A.1 vous devez effectivement avoir 104 mailles, puis vous tricotez le 1er rang de A.2 en augmentant pour le raglan (8 mailles = 1 de chaque côté des mailles des raglans) et en même temps, vous augmentez 1 m sur chaque devant et 4 mailles sur le dos = 104+8+2+4=118 mailles. Vous tricotez 1 rang sur l'envers puis vous continuez à augmenter pour le raglan encore 5 fois 8 mailles= 108+40=158 mailles. Bon tricot!
12.03.2026 - 10:20
![]() Val Av Garn/färg wrote:
Val Av Garn/färg wrote:
Vilket garn/ färg kan jag kombinera med Brushed Alpacka Silk stålblå om jag endast vill ha naturligt material, ej polyamid?
06.02.2026 - 22:30DROPS Design answered:
Hei Val. Jakken er strikket i Brushed Alpacka Silk og Alpaca (100% alpaca). Anbefaler deg å ta en titt på garn i garngruppe A (Alpaca, Baby Merino, Flora, Kid-Silk = 100% naturlige material), og så se igjennom garnets fargekart og se om du finner en stålblå farge du liker. mvh DROPS Design
09.02.2026 - 13:42
![]() Karen wrote:
Karen wrote:
Would it be possible to make this smaller? It is such a beautiful sweater I’d love to make it.
25.01.2026 - 18:32DROPS Design answered:
Dear Karen, we don't make custom patterns, but you can calculate the pattern for your measurements using the gauge as indicated in this lesson. Happy knitting!
25.01.2026 - 19:50
![]() Eva Andersson wrote:
Eva Andersson wrote:
Hej! Jag förstår inte hur jag ska göra knapphål. Står att man ska sticka till slutet på räta varvet för att göra knapphål, men då hamnar ju knapphålet på vänster sida. Eller missuppfattar jag det?
09.12.2025 - 22:12DROPS Design answered:
Hej Eva. Tröjan stickas uppifrån och ner så då hamnar knapphålen på höger sida när du stickar till slutet av varvet från rätsidan. Mvh DROPS Design
10.12.2025 - 09:29
![]() Dana Johansson wrote:
Dana Johansson wrote:
Skulle stå i-cord!,
24.11.2025 - 08:47
![]() Dana Johansson wrote:
Dana Johansson wrote:
Måste man sticka kanterna i i-Cordelia?.
24.11.2025 - 08:46DROPS Design answered:
Hei Dana. Neida, om du ønsker en "vanlig" kan, kan du strikke det. Jakken vil bare få et litt annet uttrykk en hva du ser på bilde. mvh DROPS Design
24.11.2025 - 11:01
![]() Line wrote:
Line wrote:
Bonjour, Répartition des mailles: 22/16/20/16/22 le dos est 2 fois plus petit que le devant?? 20 mailles pour le dos et 44 pour le devant??
10.11.2025 - 07:48DROPS Design answered:
Bonjour Line, tout à fait, les devants comportent également la bordure des devants = 7 mailles et les compensations de la largeur des torsades (il faut plus de mailles pour des torsades que pour du jersey). Bon tricot!
11.11.2025 - 15:50
![]() Madeleine wrote:
Madeleine wrote:
"DIVISION DOS/ DEVANTS ET MANCHES: Tricoter 44-46-48-51-54-58 mailles comme avant (= devant), mettre les 42-44-48-52-52-54 mailles suivantes en attente sur un fil pour la manche, monter 6-8-10-12-14-16 mailles (côté, au milieu sous la manche)". Suite aux indications précédentes, voici ma question : je ne comprends pas comment monter les mailles à cette étape "côté, au milieu sous la manche" Merci de votre aide
11.09.2025 - 15:21DROPS Design answered:
Bonjour Madeleine, regardez la video ICI from 07:30. Bon tricot!
11.09.2025 - 21:52
![]() Suzanne wrote:
Suzanne wrote:
Bonjour. J’aimerais faire ce modele en Melody grandeur L, mais environ 12 cm plus long. Combien de pelotes me faut-il? Merci bien et bonne journée
19.08.2025 - 16:05DROPS Design answered:
Bonjour Suzanne, je prendrais 9 pelotes. Bon tricot!
12.09.2025 - 14:01
|
||||||||||||||||||||||
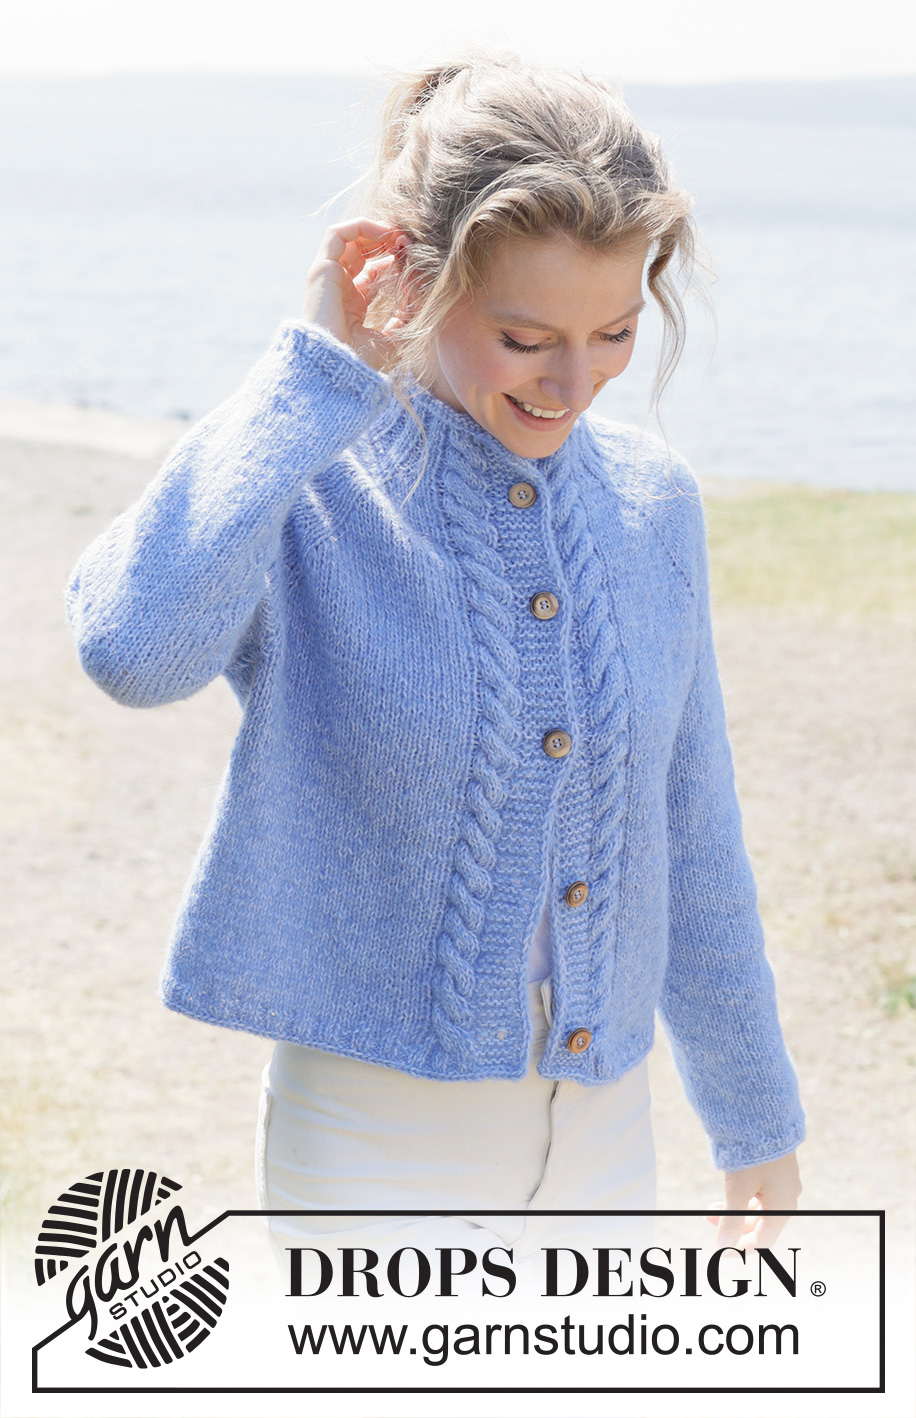
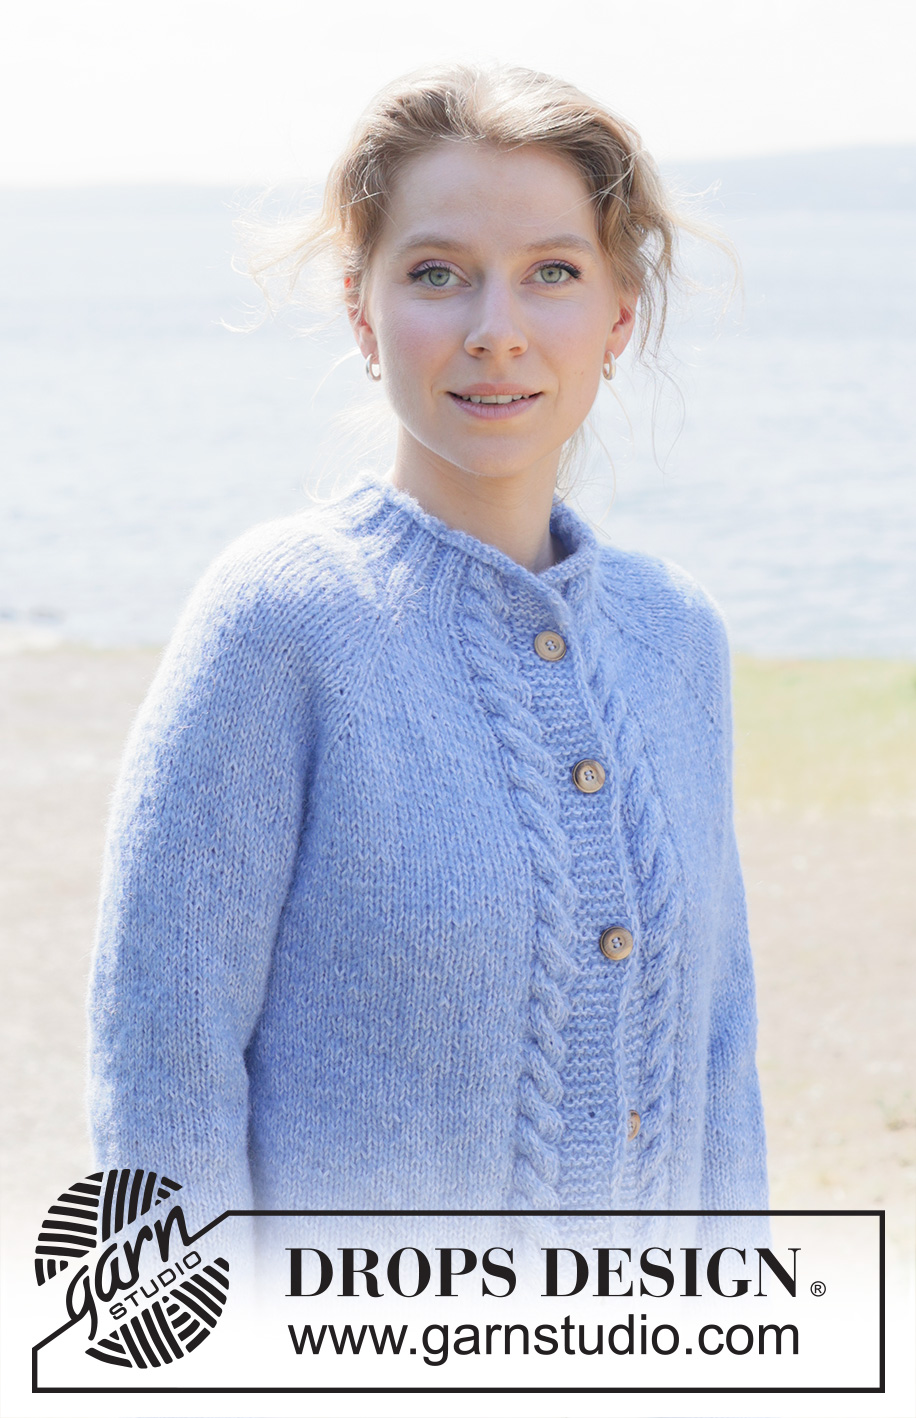
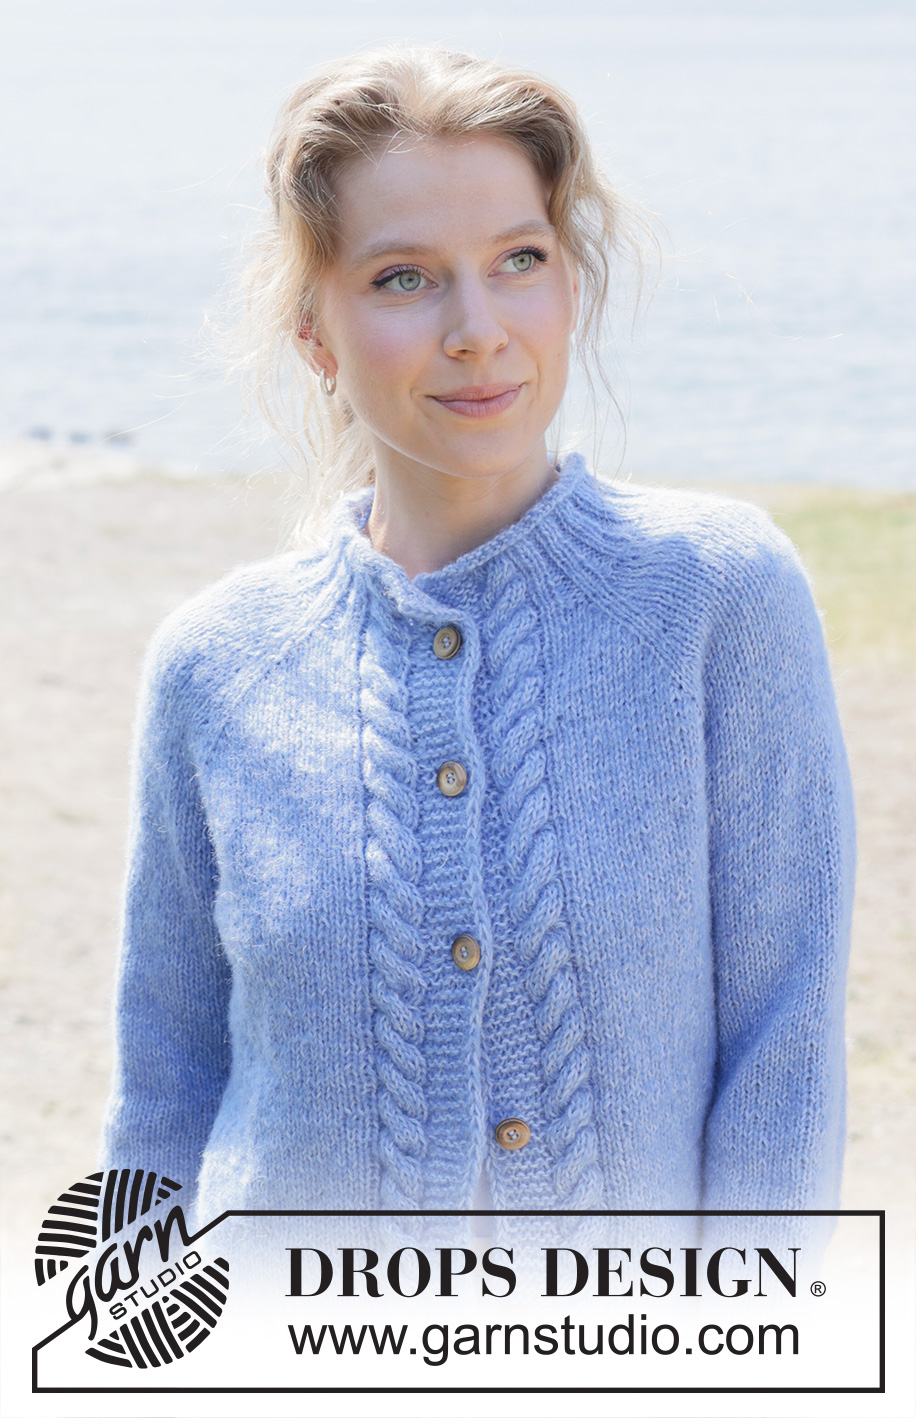
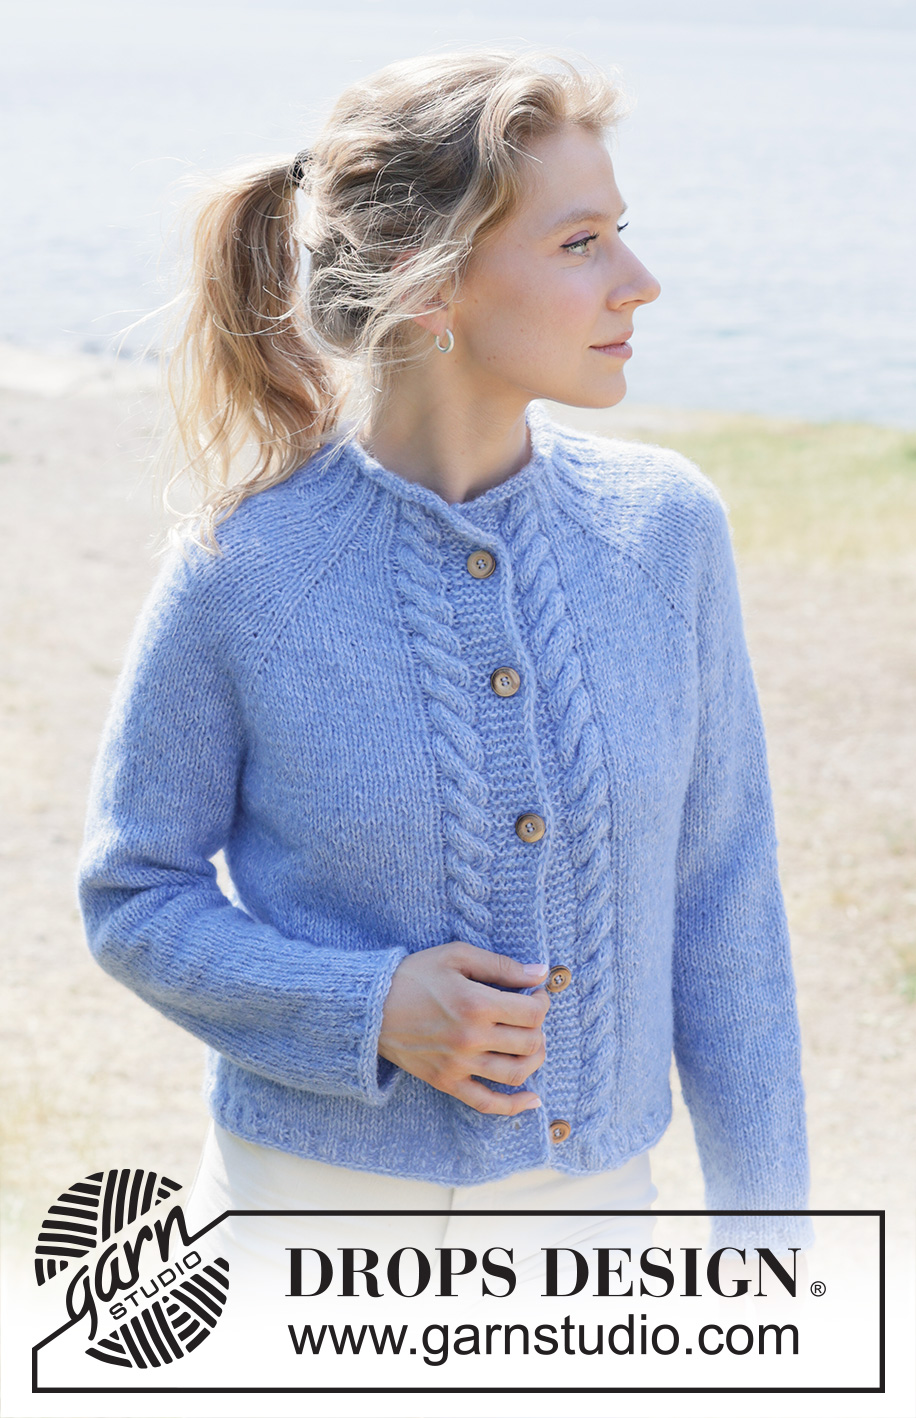
Skyfall Road Cardigan#skyfallroadcardigan |
||||||||||||||||||||||
 |
 |
|||||||||||||||||||||
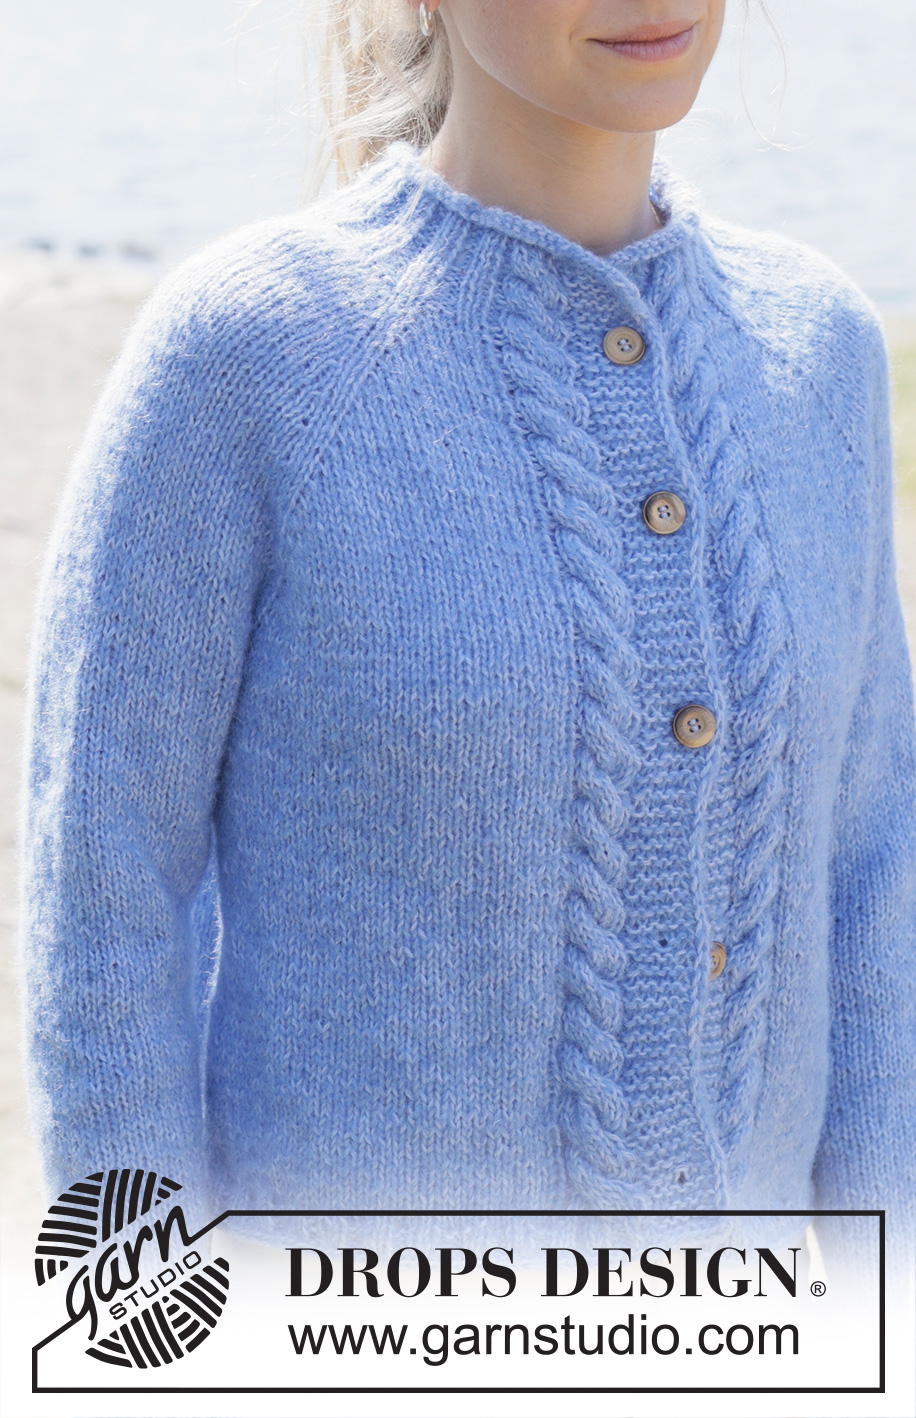
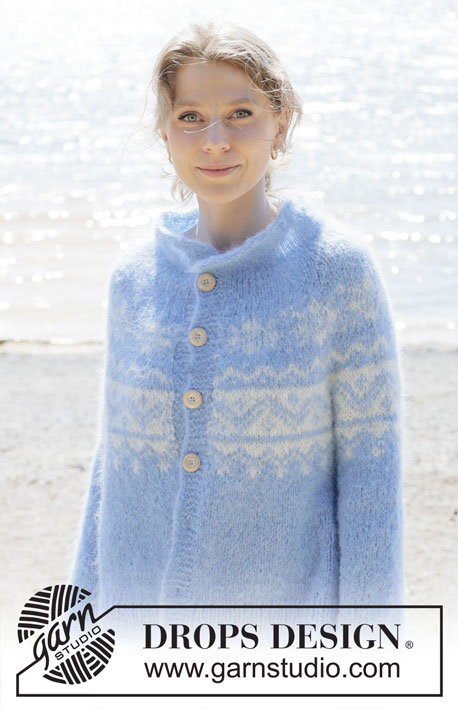
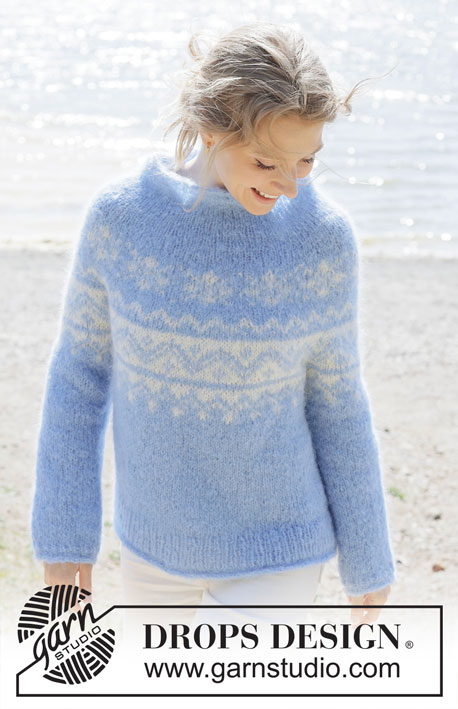
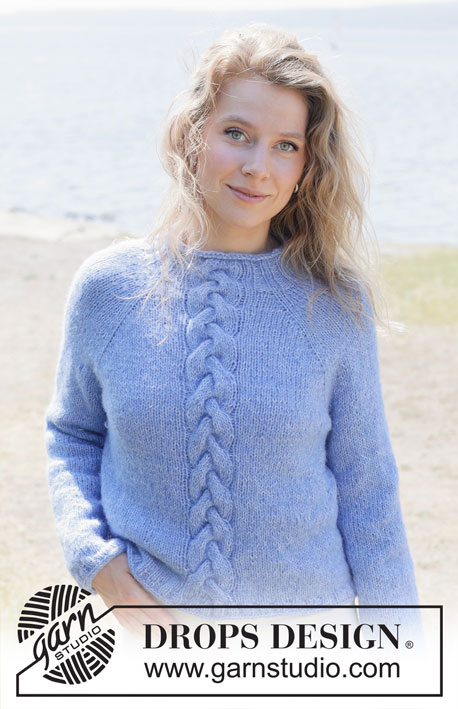
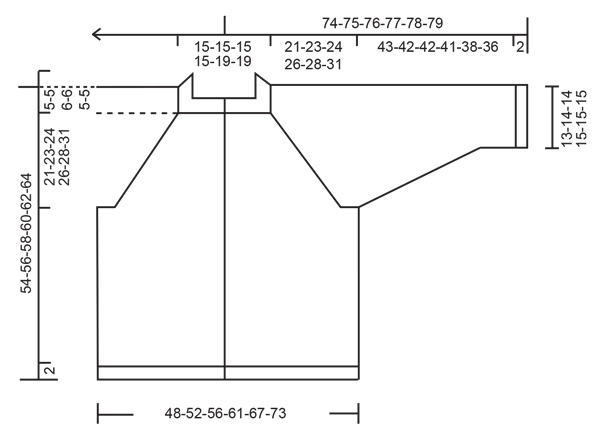
Knitted jacket in DROPS Brushed Alpaca Silk and DROPS Alpaca. The piece is worked top down with raglan, cables, rolled neckline and I-cord. Sizes S - XXXL.
DROPS 254-9 |
||||||||||||||||||||||
|
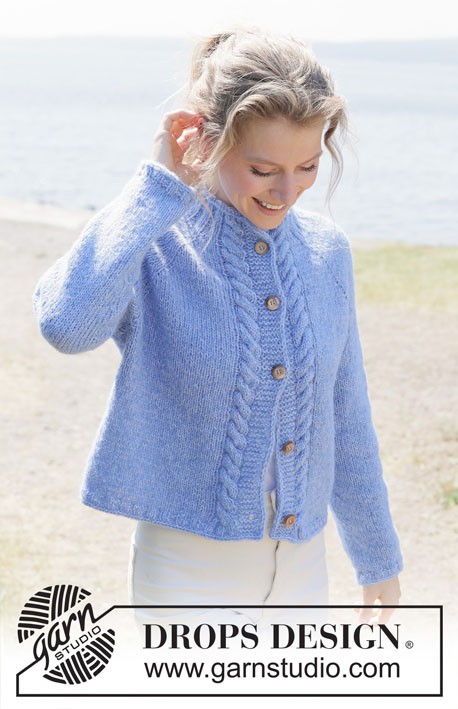
------------------------------------------------------- EXPLANATIONS FOR THE PATTERN: ------------------------------------------------------- GARTER STITCH (worked back and forth): Knit all rows, from both the right and wrong side. 1 ridge in height = knit 2 rows. PATTERN: See diagrams A.1 to A.3. Choose diagram for your size. The diagrams show the pattern from the right side. BANDS WITH I-CORD BEGINNING OF ROW: Slip 1 stitch purl-wise with strand in front, knit 1, work 5 garter stitches. END OF ROW: Work until there are 7 stitches left on the row, work 5 garter stitches, slip 1 stitch purl-wise with strand in front, knit 1. Work like this from both the right and wrong side. RAGLAN: INCREASE ONE STITCH TOWARDS THE RIGHT BEFORE MARKER-THREAD: Make 1 yarn over the right needle by taking the strand from the back and in front of the needle. On the next row purl the front loop of the yarn over. Then work the new stitch in stocking stitch. INCREASE ONE STITCH TOWARDS THE LEFT AFTER MARKER-THREAD: Make 1 yarn over the right needle by taking the strand in front of the needle and backwards. On the next row purl the back loop of the yarn over. Then work the new stitch in stocking stitch. DECREASE TIP: Decrease 1 stitch on each side of the marker-thread as follows: Work until there are 3 stitches left before the marker-thread, knit 2 together, knit 2 (marker-thread sits between these 2 stitches), slip 1 stitch knit-wise, knit 1 and pass the slipped stitch over the knitted stitch (2 stitches decreased). I-CORD CAST-OFF-1 (after rib on body): Cast on 2 stitches on the right needle, slip these stitches onto the left needle with the working strand inside the 2 stitches (when worked the strand tightens the piece into a small tube). ROW 1 (right side): Knit 1, knit 2 twisted together. ROW 2 (right side): Slip the 2 stitches from the right needle onto the left needle, knit 1, knit 2 twisted together. Repeat ROW 2 until there are 2 stitches left on the right needle. Slip these 2 stitches from the right needle onto the left needle. Cast off. Sew a small stitch to close the beginning and end of the I-cord to the garment on each side. I-CORD CAST-OFF-2 (after rib on sleeves): After the last stitch has been worked on the last round: Cast on 3 stitches from the right side on the right needle. Slip these stitches onto the left needle with the working strand inside the 3 stitches (when worked the strand tightens the piece into a small tube). ROW 1 (right side): Knit 2, knit 2 twisted together. ROW 2 (right side): Slip the 3 stitches from the right needle back onto the left needle, knit 2, knit 2 twisted together. Repeat ROW 2 until there are 3 stitches left on the right needle. Slip these 3 stitches from the right needle onto the left needle. Cast off. Sew a small stitch joining the beginning and end of the I-cord. BUTTONHOLES: Work the buttonholes from the right side, when there are 5 stitches left on the row. ROW 1 (right side): Make 1 yarn over, knit 2 together, knit 1, slip 1 purl-wise with strand in front, knit 1. ROW 2 (wrong side): Work the band as before, knit the yarn over to leave a hole. The first buttonhole is worked on the first row from the right side after the neck is finished. Then work the other 4-4-5-5-6-6 buttonholes with 11½-12-10-10-9-9½ cm between each one. The bottom buttonhole is worked in the transition between the stocking stitch and rib. ------------------------------------------------------- START THE PIECE HERE: ------------------------------------------------------- JACKET – SHORT OVERVIEW OF THE PIECE. The pattern uses both long and short needles; start with the length which fits the number of stitches and change when necessary. The neck and yoke are worked back and forth with circular needle, from mid front and top down. When the yoke is finished, it is divided for body and sleeves and the body continued back and forth with circular needle, while the sleeves wait. The sleeves are worked in the round. If there is a «0» in your chosen size, skip the information and go straight to the next instruction. NECK: Cast on 88-88-96-96-100-100 stitches with circular needle size 5.5 mm, 1 strand DROPS Brushed Alpaca Silk and 1 strand DROPS Alpaca (2 strands). Change to circular needle size 4.5 mm. ROW 1 (wrong side): Work 7 stitches according to BANDS WITH I-CORD – read description above, purl until there are 7 stitches left, 7 stitches according to bands with I-cord. ROW 2 (right side): Work 7 band-stitches with I-cord, knit until there are 7 stitches left, 7 band-stitches with I-cord. ROW 3 (wrong side): Work 7 band-stitches with I-cord, purl until there are 7 stitches left, 7 band-stitches with I-cord. ROW 4 (right side): Work 7 band-stitches with I-cord, work A.1, rib (knit 2, purl 2) until there are 13-13-13-13-15-15 stitches left, work A.1 and 7 band-stitches with I-cord. ROWS 5-7: Continue the bands, A.1 and rib until A.1 is completed in height = 96-96-104-104-108-108 stitches. ROW 8 (right side): Work 7 band-stitches with I-cord, work A.2 across the stitches in A.1, continue the rib until there are 17-17-17-17-19-19 stitches left, work A.3 across A.1, 7 band-stitches with I-cord. Continue the bands, A.2/A.3 and rib until A.2/A.3 are completed in height – the neck measures approx. 6-6-6-6-7-7 cm and the next row is from the right side. Insert 1 marker inside one band; the yoke is measured from here. YOKE: Change to circular needle size 5.5 mm. Insert 4 marker-threads without working the stitches, each thread inserted between 2 stitches - these 2 stitches are the raglan-stitches and are worked in stocking stitch (you increase for raglan on each side of these 2 raglan-stitches). Count 22-22-22-22-24-24 stitches (= left front piece), insert 1 marker-thread before the next stitch, count 16-16-20-20-16-16 stitches (= sleeve), insert 1 marker-thread before the next stitch, count 20-20-20-20-28-28 stitches (= back piece), insert 1 marker-thread before the next stitch, count 16-16-20-20-16-16 stitches (= sleeve), insert 1 marker-thread before the next stitch, there are 22-22-22-22-24-24 stitches left after the last marker-thread (= right front piece). Now work PATTERN and increase for RAGLAN – read description above, as follows: ROW 1 (right side): Work 7 band-stitches, A.2, knit 4 and increase 0-0-1-2-1-2 stitches evenly over these stitches (4-4-5-6-5-6 knitted stitches), increase for RAGLAN on each side of the raglan-stitches – (marker-thread sits between these 2 stitches), knit 14-14-18-18-14-14 (sleeve), increase for raglan on each side of the raglan-stitches, knit 18-18-18-18-26-26 and increase 2-2-4-6-0-2 stitches evenly over these stitches (= 20-20-22-24-26-28 knitted stitches), increase for raglan on each side of the raglan-stitches, knit 14-14-18-18-14-14 (sleeve), increase for raglan on each side of the raglan-stitches, knit 4 and increase 0-0-1-2-1-2 stitches evenly over these stitches (= 4-4-5-6-5-6 knitted stitches), work A.3 and 7 band-stitches– remember the BUTTONHOLES – read description above = 106-106-118-122-118-122 stitches. ROW 2 (wrong side): 7 band-stitches, A.3, purl until there are 17-17-17-17-19-19 stitches (remember to work the yarn overs as described under RAGLAN), work A.2 and 7 band-stitches. ROW 3 (right side): Work the bands, A.2/A.3 and stocking stitch and increase for raglan on each side of the raglan-stitches (= 8 increased stitches). Work ROWS 2 and 3 a total of 6-6-5-7-9-8 times (12-12-10-14-18-16 worked rows) = 154-154-158-178-190-186 stitches. Remember to maintain the knitting tension. Continue working and increasing as follows: ROW 1 (wrong side): 7 band-stitches, A.3, purl until there are 17-17-17-17-19-19 stitches left (remember to work the yarn overs as described under raglan), work A.2 and 7 band-stitches. ROW 2 (right side): Work the bands, A.2/A.3 and stocking stitch and increase for raglan on each side of the raglan-stitches (= 8 increased stitches). ROW 3 (wrong side): 7 band-stitches, A.3, purl until there are 17-17-17-17-19-19 stitches left (remember to work the yarn overs as described under raglan), work A.2 and 7 band-stitches. ROW 4 (right side): Work the bands, A.2/A.3 and stocking stitch and increase for raglan BEFORE marker-threads 1 and 3 and AFTER marker-threads 2 and 4 (4 increased stitches). Work ROWS 1 to 4 a total of 7-8-9-9-9-11 times (28-32-36-36-36-44 worked rows). Then work ROW 1 one more time. All increases for raglan are finished (a total of 21-23-24-26-28-31 times on the front and back pieces and 14-15-15-17-19-20 times on the sleeves) = 238-250-266-286-298-318 stitches. The yoke measures approx. 21-23-24-26-28-31 cm from the marker mid-front. Now divide for the body and sleeves. DIVIDE FOR BODY AND SLEEVES: Work 44-46-48-51-54-58 stitches as before (= front piece), place the next 42-44-48-52-52-54 stitches on a thread for the sleeve, cast on 6-8-10-12-14-16 stitches (in side mid-under sleeve), work 66-70-74-80-86-94 stocking stitches (= back piece), place the next 42-44-48-52-52-54 stitches on a thread for the sleeve, cast on 6-8-10-12-14-16 stitches (in side mid-under sleeve), work the last 44-46-48-51-54-58 stitches as before (= front piece). The body and sleeves are finished separately. BODY: = 166-178-190-206-222-242 stitches. Continue the bands, A.2/A.3 and stocking stitch until the piece measures 47-49-50-52-55-57 cm from the marker mid-front – make sure you have worked at least 3 rows after the last cable. On the next row from the right side, work rib AT THE SAME TIME increase 18-22-22-22-26-30 stitches evenly on the first round (do not increase across the bands) = 184-200-212-228-248-272 stitches, as follows: Change to circular needle size 4.5 mm. Work the band-stitches, rib (knit 2, purl 2 – remember to increase) until there are 9 stitches left, knit 2 and work the band-stitches. When the rib measures 2 cm work I-CORD CAST-OFF-1 – read description above. The jacket measures approx. 49-51-52-54-57-59 cm from the marker and 54-56-58-60-62-64 cm from the shoulder. SLEEVES: Place the 42-44-48-52-52-54 sleeve-stitches from the thread on one side of the piece on circular needle size 5.5 mm and knit up 1 stitch in each of the 6-8-10-12-14-16 stitches cast on under the sleeve = 48-52-58-64-66-70 stitches. Insert a marker-thread in the middle of the 6-8-10-12-14-16 stitches under the sleeve. Start at the marker-thread and work stocking stitch in the round. When the sleeve measures 4-4-4-3-3-2 cm, decrease 2 stitches under the sleeve – read DECREASE TIP. Decrease like this every 10-7-4-3-3-2½ cm a total of 4-5-8-10-10-12 times = 40-42-42-44-46-46 stitches. Continue working until the sleeve measures 43-42-42-41-38-36 cm from the division. Change to double pointed needles size 4.5 mm. Work rib (knit 2, purl 2), AT THE SAME TIME increase 4-6-6-4-6-6 stitches evenly on the first round = 44-48-48-48-52-52 stitches. When the rib measures 2 cm, work I-CORD CAST-OFF-2. The sleeve measures approx. 45-44-44-43-40-38 cm. ASSEMBLY: Sew the buttons onto the left band. |
||||||||||||||||||||||
Diagram explanations |
||||||||||||||||||||||
|
||||||||||||||||||||||
 |
||||||||||||||||||||||
 |
||||||||||||||||||||||
Have you finished this pattern?Tag your pictures with #dropspattern #skyfallroadcardigan or submit them to the #dropsfan gallery. Do you need help with this pattern?You'll find 30 tutorial videos, a Comments/Questions area and more by visiting the pattern on garnstudio.com. © 1982-2026 DROPS Design A/S. We reserve all rights. This document, including all its sub-sections, has copyrights. Read more about what you can do with our patterns at the bottom of each pattern on our site. |
||||||||||||||||||||||


With over 40 years in knitting and crochet design, DROPS Design offers one of the most extensive collections of free patterns on the internet - translated to 17 languages. As of today we count 324 catalogues and 12290 patterns translated into English (UK/cm). 12290
We work hard to bring you the best knitting and crochet have to offer, inspiration and advice as well as great quality yarns at incredible prices! Would you like to use our patterns for other than personal use? You can read what you are allowed to do in the Copyright text at the bottom of all our patterns. Happy crafting!
Post a comment to pattern DROPS 254-9
We would love to hear what you have to say about this pattern!
If you want to leave a question, please make sure you select the correct category in the form below, to speed up the answering process. Required fields are marked *.