
Popular categories
Looking for a yarn?


Comments / Questions (17)
![]() Alberte wrote:
Alberte wrote:
Je ne trouve pas le tuto pour le modèle drops255-4 Où puis je le trouver svp
18.03.2026 - 18:37DROPS Design answered:
Bonjour Alberte, vous trouverez les explications de ce modèle ici, en français. faites défiler un peu la page pour trouver un peu plus bas les explications écrites puis les diagrammes et enfin le schéma des mesures. Bon tricot!
19.03.2026 - 08:45
![]() Jacqueline wrote:
Jacqueline wrote:
Bonjour. Ceci est mon premier gilet et j’ai un soucis au niveau des manches. Après avoir repris les 80 mailles en attente, et monté 16 mailles, on me dit de commencer à tricoter a4 en rond à partir du marqueur se trouvant au milieu des mailles montées. Or, je me trouve 8 mailles après le marqueur une fois que j’ai monté mes mailles. Comment je fais pour arriver au marqueur et commencer a4.
25.01.2026 - 19:20DROPS Design answered:
Bonjour Jacqueline, commencez le tour au milieu sous la manche, autrement dit après les 8 premières mailles relevées (si vous avez commencé par relevé les mailles, vous pouvez tricoter le 1er tour de A.4 sur les mailles de la manche, tricotez ensuite les 8 premières des mailles relevées à l'endroit, puis tricotez le 2ème tour à partir de là = au milieu des 16 m relevées) et répétez les 4 mailles de A.4 tout le tour, vous pouvez ainsi tricoter 24 fois les 4 mailes de A.4 tout le tour. Bon tricot!
26.01.2026 - 09:17
![]() Lyne Roberts wrote:
Lyne Roberts wrote:
Could you please advise what bust sizes the sizing is in( I fit into 102cm easily.Love the cardigan but not sure what size to knit
30.10.2025 - 02:11DROPS Design answered:
Hi Lyne, The size chart for the pattern is at the bottom of the page. Regards, Drops Team.
30.10.2025 - 06:40
![]() Ann Lundqvist wrote:
Ann Lundqvist wrote:
Hej! Jag förstår inte hur man gör diagram A1, finns någon film att titta på?
18.09.2025 - 18:15
![]() Carol wrote:
Carol wrote:
Hello, I am confused. The directions for the neck say to use the stockinet stitch for the first 12 rows. When looking at the picture it appears that there are bands at each edge starting with the 1st row. Thank you
01.09.2025 - 06:46DROPS Design answered:
Hi Carol, The stockinette rows are folded to the inside when the piece is assembled, giving the garment a double neck. The bands begin after these rows and will therefore begin on the first visible row in the picture. Hope this helps. Regards Drops team.
02.09.2025 - 11:13
![]() Myrna Laupland wrote:
Myrna Laupland wrote:
Re wicker Island cardigan - I want to thank you for the increase/decrease calculator. This is the first time I have noticed it on a pattern and it is absolutely helpful. I am just doing my second increase and Very much appreciated! So quick and accurate!
14.03.2025 - 03:15
![]() Marianne wrote:
Marianne wrote:
Wie ist das zu verstehen: „Daran denken, dass das Muster in der Hin-Reihe in der Mitte des Diagramms geendet hat, daher in der Rück-Reihe das Diagramm entsprechend in der Mitte beginnen.“ zu Beginn des Rumpfteiles?
10.03.2025 - 18:26DROPS Design answered:
Liebe Marianne, M.4 beginnt mit einer Rückreihe und die 2 letzten Maschen vor der Blenden werden wie die 2 ersten im Diagram (von der Rückseite gesehen) gestrickt werden, so beginnt der nächste Hinreihe mit den 2 letzen Maschen = in der Mitte vom Diagram, dann wiederholt man die 4 Maschen A.4. Viel Spaß beim Stricken!
12.03.2025 - 08:10
![]() Myrna Laupland wrote:
Myrna Laupland wrote:
Wicker Island cardigan - do you think the pattern would show up well if I use the Navy colour? I am trying to decide whether to order the Marzipan or Navy yarn? Thank you.
08.02.2025 - 06:57DROPS Design answered:
Dear Myrna, the darker colour will make it difficult to see the relief pattern so it won't look as detailed; this pattern is better worked on lighter coloured threads, such as marzipan. Happy knitting!
09.02.2025 - 23:16
![]() Valeria Di Stasio wrote:
Valeria Di Stasio wrote:
Salve. Lo schema riporta A.3a ma nelle spiegazioni non trovo riferimento.
24.01.2025 - 14:45DROPS Design answered:
Buongiorno Valeria, grazie per la segnalazione: c'era un errore nella versione inglese: deve ripetere l'ultima parte di A.3. Buon lavoro!
25.01.2025 - 10:07
![]() Birgit wrote:
Birgit wrote:
Trevlig kofta som jag nu ska sticka, men tråkigt att fem foton på modellen är i princip lika. Väldigt vanligt hos Drops. Önskvärt att varje foto visar något nytt: framifrån - från sidan - bakifrån - närbild på mönster och/eller fina detaljer
11.10.2024 - 21:25
|
|||||||||||||||||||||||||
Wicker Island Cardigan#wickerislandcardigan |
|||||||||||||||||||||||||
 |
 |
||||||||||||||||||||||||
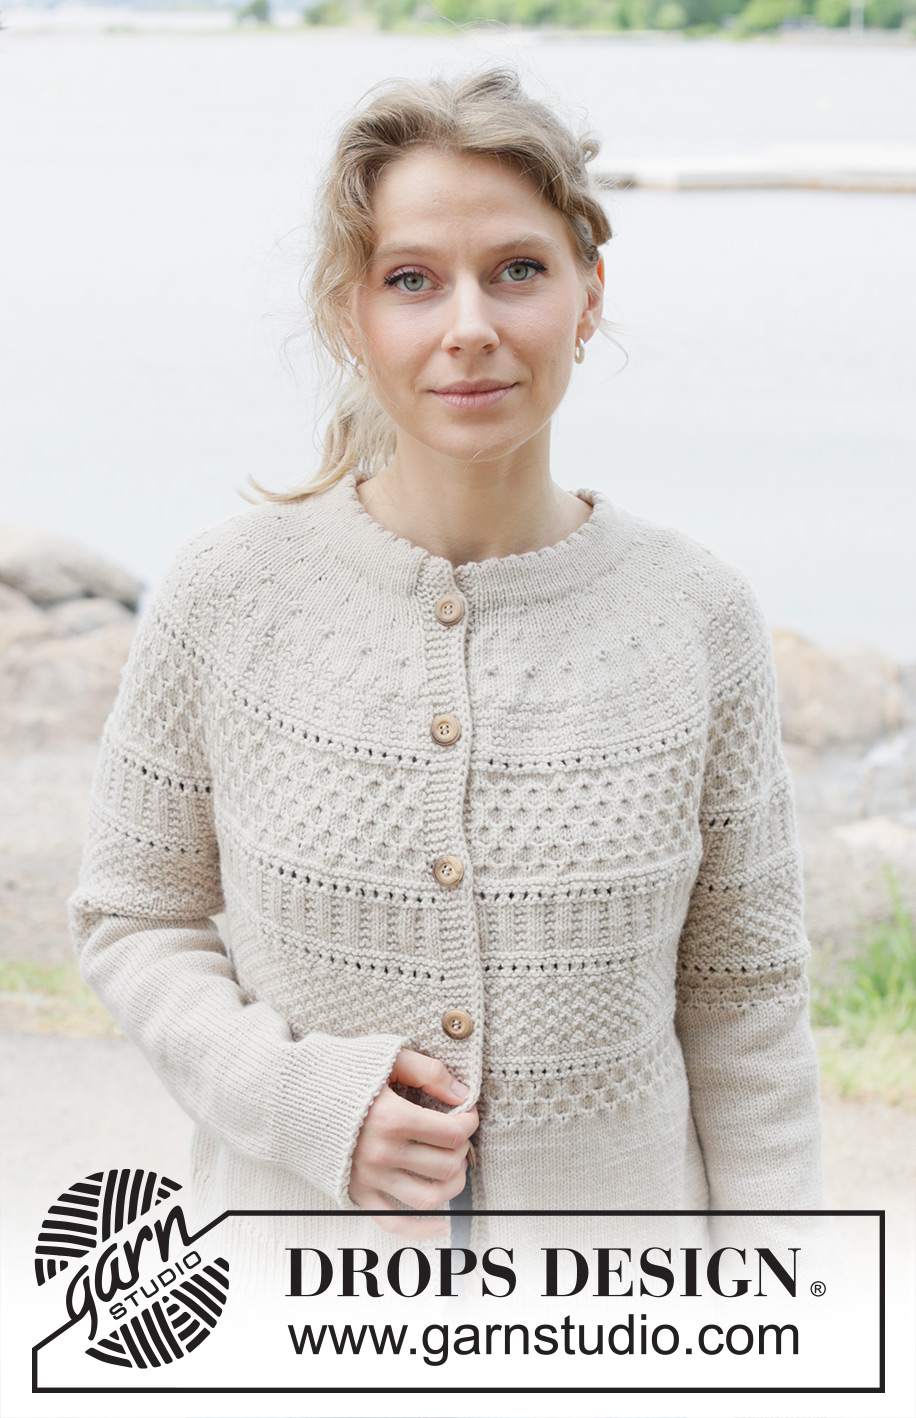
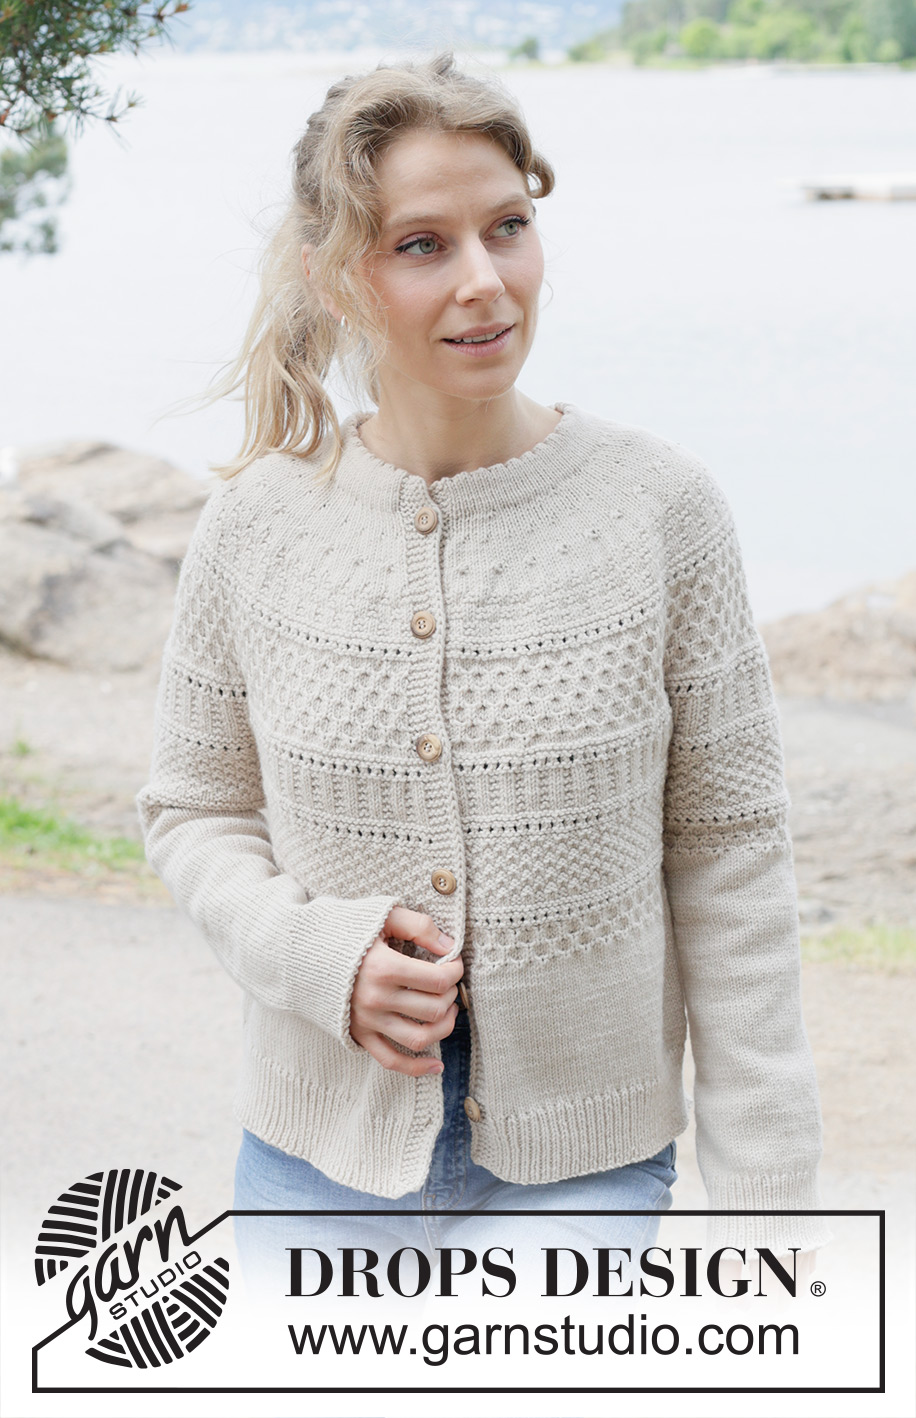
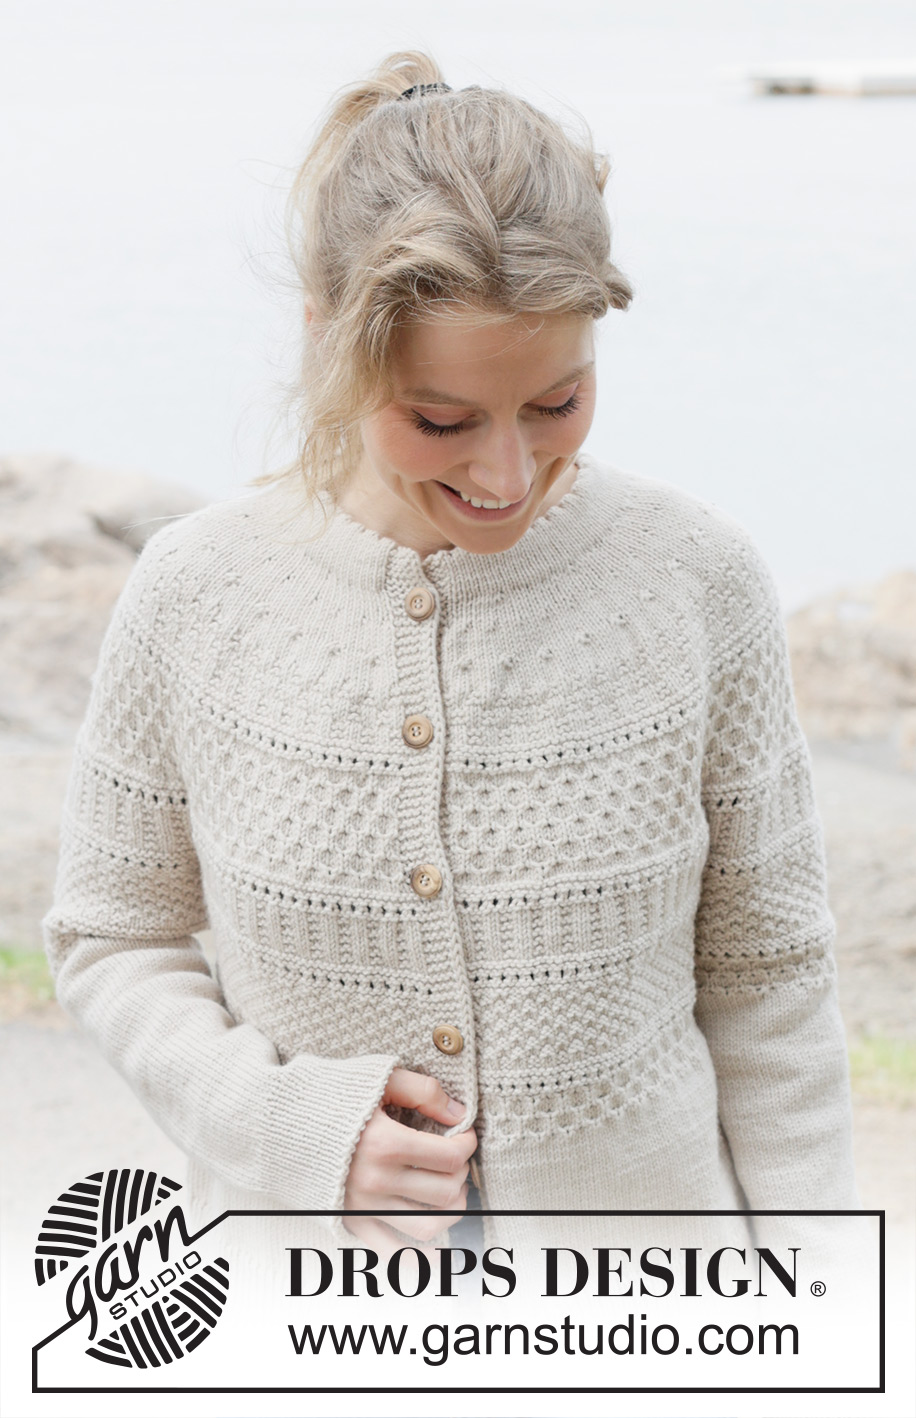
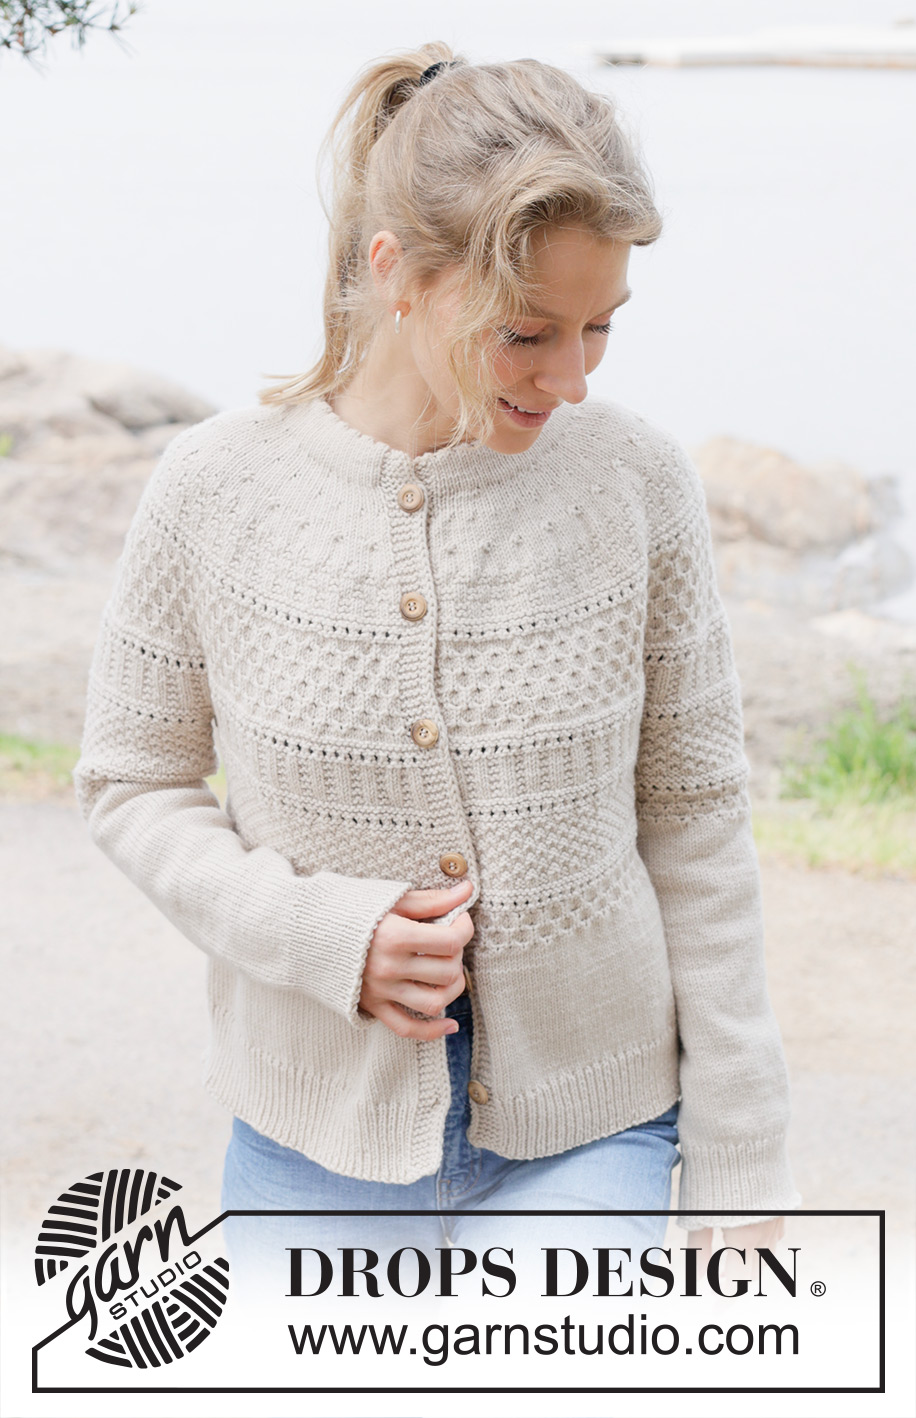
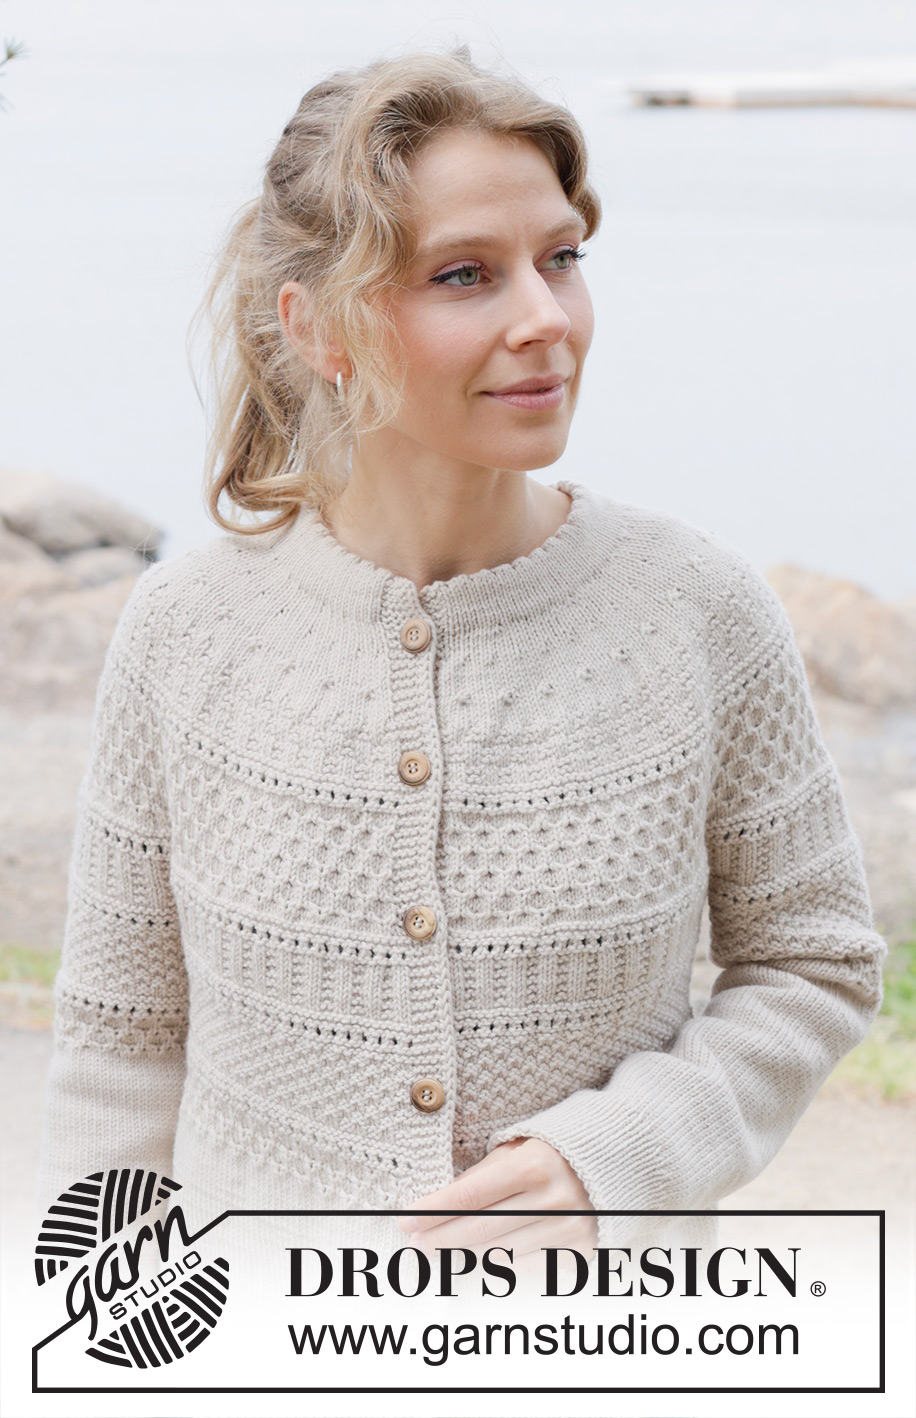
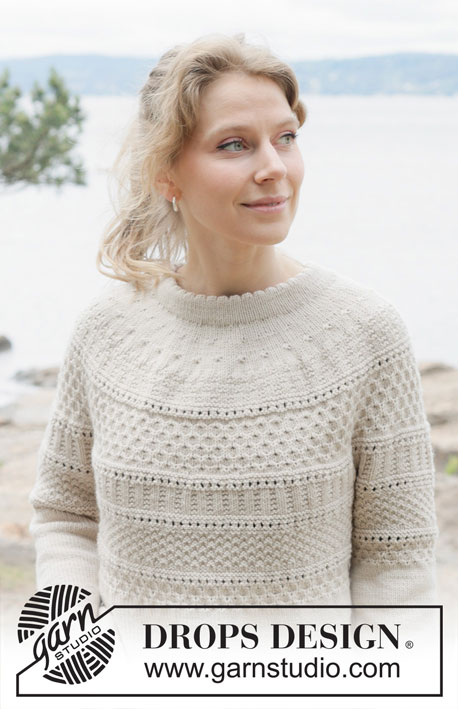
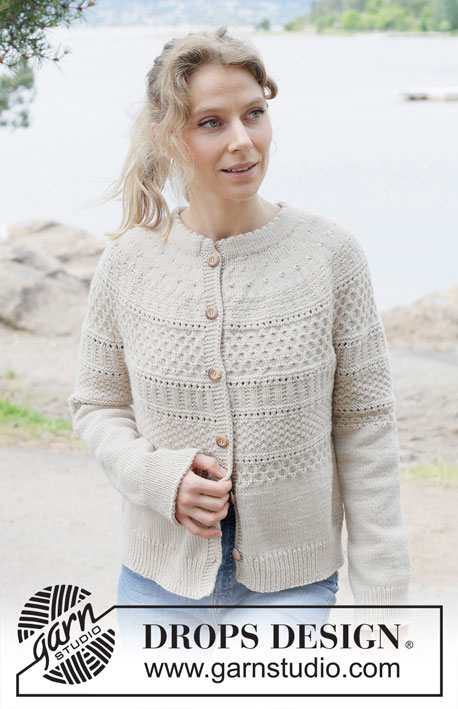
Knitted jacket in DROPS Daisy or DROPS Merino Extra Fine. The piece is worked top down with round yoke, relief pattern, honeycomb pattern and double neck. Sizes S - XXXL.
DROPS 255-4 |
|||||||||||||||||||||||||
|
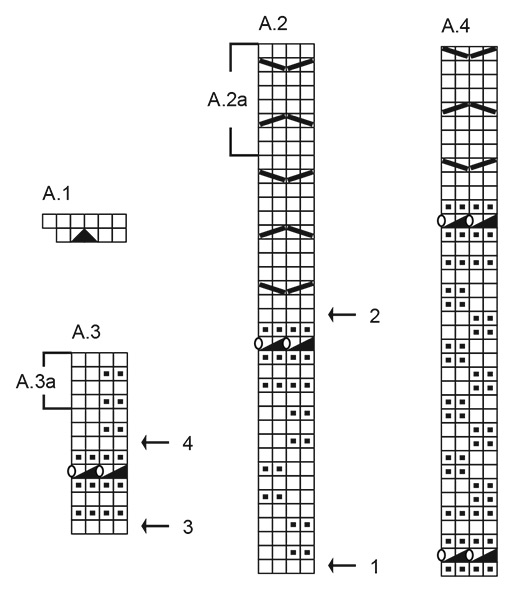
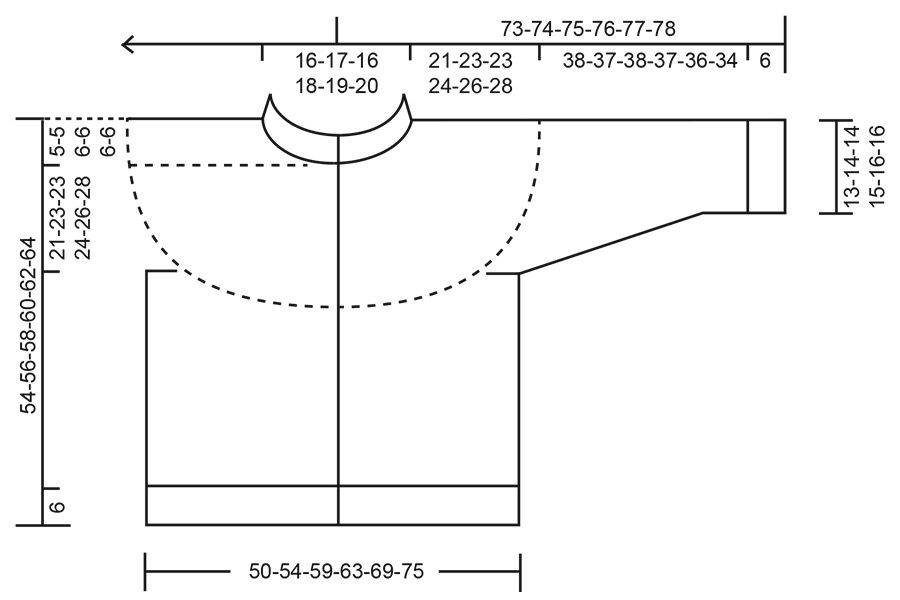
------------------------------------------------------- EXPLANATIONS FOR THE PATTERN: ------------------------------------------------------- BANDS WITH I-CORD BEGINNING OF ROW: Slip 1 stitch purl-wise with strand in front, knit 1, work 4 garter stitches. END OF ROW: Work until there are 6 stitches left on the row, work 4 garter stitches, slip 1 stitch purl-wise with strand in front, knit 1. Work in the same way from both the right and wrong side. BUTTONHOLES: Work the buttonholes on the right front band from the right side, when there are 5 stitches left on the row. ROW 1 (right side): Make 1 yarn over, knit 2 together, knit 1, slip 1 purl-wise with strand in front, knit 1. ROW 2 (wrong side): Work the band as before, knit the yarn over to leave a hole. The first buttonhole is worked on the first row from the right side after the neck is finished. Then work the other 5-5-5-6-6-6 buttonholes with 8½-9-9-8-8½-8½ cm between each one. The bottom buttonhole is worked in the transition between the stocking stitch and rib. INCREASE TIP (evenly spaced): To work out how to increase evenly, count the total number of stitches on the needle (e.g., 122 stitches) minus bands (e.g., 12 stitches) and divide the remaining stitches by the number of increases to be made (e.g., 8) = 13.8. In this example, increase by making 1 yarn over after approx. each 14th stitch. Do not increase on bands. On the next row, work the yarn overs twisted to avoid holes. PATTERN: See diagrams A.1 to A.4. The diagrams show the pattern from the right side. DECREASE TIP: Decrease 1 stitch on each side of the marker-thread as follows: Work until there are 2 stitches left before the marker-thread, knit 2 together (marker-thread here), slip 1 stitch knit-wise, knit 1 and pass the slipped stitch over the knitted stitch (2 stitches decreased). ------------------------------------------------------- START THE PIECE HERE: ------------------------------------------------------- JACKET – SHORT OVERVIEW OF THE PIECE. The pattern uses both long and short needles; start with the length which fits the number of stitches and change when necessary. The neck and yoke are worked back and forth with circular needle, from mid front and top down. When the yoke is finished, it is divided for body and sleeves and the body continued back and forth with circular needle, while the sleeves wait. The sleeves are worked in the round. The neck is folded to the inside and sewn down. If there is a «0» in your chosen size, skip the information and go straight to the next instruction. NECK: Cast on 110-113-119-125-131-134 stitches with circular needle size 4 mm and DROPS Daisy or DROPS Merino Extra Fine. Change to circular needle size 3 mm (casting on with a larger needle size makes the cast-on edge elastic). Starting from the wrong side, work 11-11-11-13-13-13 rows of stocking stitch back and forth. On the last row cast on 6 stitches at the end of the row (band) = 116-119-125-131-137-140 stitches. Work the next row from the right side as follows: Work according to BANDS WITH I-CORD, read description above, * knit 1, knit 2 together, make 1 yarn over *, work from *-* until there are 2 stitches left, knit 2, then cast on 6 stitches (band) = 122-125-131-137-143-146 stitches. Work 12-12-12-14-14-14 rows as follows: Band with I-cord, stocking stitch until there are 6 stitches left, band with I-cord. The last row is from the right side. Insert a marker inside one band; the yoke is measured from here. YOKE: Change to circular needle size 4 mm. Start from mid-front and work as follows from the wrong side: Work the band as before, 110-113-119-125-131-134 stocking stitches, AT THE SAME TIME increase 8-10-9-11-13-16 stitches evenly over these stitches – read INCREASE TIP, work the band as before = 130-135-140-148-156-162 stitches. Continue the bands and stocking stitch– remember the BUTTONHOLES – read description above. Remember to maintain the knitting tension. When the yoke measures 1½-2-2-2-2-2 cm from the marker, increase 38-38-38-40-42-46 stitches evenly spaced – remember INCREASE TIP (do not increase across the bands) = 168-173-178-188-198-208 stitches. Continue the bands and stocking stitch until the yoke measures 3-4-4-4-4-5 cm from the marker. Now begin the pattern and increase as follows – read PATTERN in explanations above. A.1: Work the band, A.1 a total of 31-32-33-35-37-39 times on the row, knit 1, work the band = 199-205-211-223-235-247 stitches. Continue with stocking stitch and the bands until the yoke measures 5-6-6-6-6-7 cm from the marker. A.2: Work the band, A.2 until there are 6 stitches left (increasing at each arrow as described below), work the band. Arrow 1: Increase 31-37-43-47-55-59 stitches evenly spaced = 230-242-254-270-290-306 stitches. Arrow 2: Increase 56-60-68-76-80-84 stitches evenly spaced = 286-302-322-346-370-390 stitches. When A.2 is finished in height, work A.2a 0-0-0-0-1-1 more time. A.3: Work the band, A.3 until there are 6 stitches left (increasing at each arrow as described below), work the band. Arrow 3: Increase 24-24-28-32-32-32 stitches evenly spaced = 310-326-350-378-402-422 stitches. Arrow 4: Increase 16-16-20-28-28-24 stitches evenly spaced = 326-342-370-406-430-446 stitches. Repeat A.3a in height until the yoke measures 21-23-23-24-26-28 cm from the marker – with the last row from the right side. Work the last row from the wrong side as follows: work the band, knit until there are 6 stitches left, work the band. Now divide for the body and sleeves. DIVIDE FOR BODY AND SLEEVES: AT THE SAME TIME as working the next row (right side), divide yoke for body and sleeves as follows: work the band, knit 48-52-56-60-64-68 (= front piece), place the next 60-62-68-78-80-80 stitches on a thread for the sleeve, cast on 8-10-12-14-16-20 stitches (in side mid-under sleeve), knit 98-102-110-118-130-138 (= back piece), place the next 60-62-68-78-80-80 stitches on a thread for the sleeve, cast on 8-10-12-14-16-20 stitches (in side mid-under sleeve), knit 48-52-56-60-64-68 (= front piece), work the band. The body and sleeves are finished separately. BODY: = 222-238-258-278-302-326 stitches. Work the bands and A.4, with the first row from the wrong side. Note that the pattern ends in the middle of the diagram from the right side, so be sure to start in the middle of the diagram from the wrong side so that the pattern matches. Then work stocking stitch and the bands as before until the piece measures 43-45-46-48-50-52 cm from the marker. On the next row work as follows from the right side, beginning the rib AT THE SAME TIME as increasing 43-47-51-53-59-65 stitches evenly on this row (do not increase across the bands) = 265-285-309-331-361-391 stitches,: Change to circular needle size 3 mm, work the band, rib (knit 1, purl 1 – remember to increase) until there are 7 stitches left, knit 1 and work the band. When the rib measures 6 cm, cast off with knit over knit and purl over purl. The jacket measures approx. 49-51-52-54-56-58 cm from the marker and 54-56-58-60-62-64 cm from top of shoulder. SLEEVES: Place the 60-62-68-78-80-80 sleeve-stitches from the thread on one side of the piece on circular needle size 4 mm and knit up 1 stitch in each of the 8-10-12-14-16-20 stitches cast on under the sleeve = 68-72-80-92-96-100 stitches. Insert a marker-thread in the middle of the 8-10-12-14-16-20 stitches under the sleeve. Start at the marker-thread and work A.4 in the round, then finish the sleeve with stocking stitch. AT THE SAME TIME, when the sleeve measures 5-5-5-3-5-2 cm, decrease 2 stitches under the sleeve – read DECREASE TIP. Decrease like this every 6-4½-3-2½-2-2 cm a total of 6-7-10-14-15-16 times = 56-58-60-64-66-68 stitches. A.4 does not always fit under the sleeve; adjust the pattern as you decrease. Continue working until the sleeve measures 38-37-38-37-36-34 cm from the division. Change to double pointed needles size 3 mm. Work rib (knit 1, purl 1), AT THE SAME TIME increase 12-12-12-12-12-12 stitches evenly on the first round = 68-70-72-76-78-80 stitches. When the rib measures 6 cm, cast off with rib. The sleeve measures approx. 44-43-44-43-42-40 cm. ASSEMBLY: Fold the neck double to the inside and sew down. To avoid the neck being tight and rolling outwards, it is important that the seam is elastic. Sew the buttons onto the left band. |
|||||||||||||||||||||||||
Diagram explanations |
|||||||||||||||||||||||||
|
|||||||||||||||||||||||||
 |
|||||||||||||||||||||||||
 |
|||||||||||||||||||||||||
Have you finished this pattern?Tag your pictures with #dropspattern #wickerislandcardigan or submit them to the #dropsfan gallery. Do you need help with this pattern?You'll find 35 tutorial videos, a Comments/Questions area and more by visiting the pattern on garnstudio.com. © 1982-2026 DROPS Design A/S. We reserve all rights. This document, including all its sub-sections, has copyrights. Read more about what you can do with our patterns at the bottom of each pattern on our site. |
|||||||||||||||||||||||||


With over 40 years in knitting and crochet design, DROPS Design offers one of the most extensive collections of free patterns on the internet - translated to 17 languages. As of today we count 324 catalogues and 12290 patterns translated into English (UK/cm). 12290
We work hard to bring you the best knitting and crochet have to offer, inspiration and advice as well as great quality yarns at incredible prices! Would you like to use our patterns for other than personal use? You can read what you are allowed to do in the Copyright text at the bottom of all our patterns. Happy crafting!
Post a comment to pattern DROPS 255-4
We would love to hear what you have to say about this pattern!
If you want to leave a question, please make sure you select the correct category in the form below, to speed up the answering process. Required fields are marked *.