
Popular categories
Looking for a yarn?


Comments / Questions (68)
![]() Catherine wrote:
Catherine wrote:
Je ne comprends pas comment augmenter une maille de chaque côté du raglan et en même temps faire le point fantaisie A1 Ça ne vas jamais tomber juste…
06.04.2026 - 17:15DROPS Design answered:
Bonjour Catherine, effectivement, en augmentant 1 maille, le motif ne sera pas "complet", mais il faut simplement intégrer les nouvelles mailles au point fantaisie; après les mailles du raglan, tricotez la nouvelle maille comme la maille qui précède celles qui sont sur l'aiguille gauche (lisez le motif de gauche à droite) et avant les mailles du raglan, tricotez les nouvelles mailles comme un nouveau motif (lisez le motif de droite à gauche). Ainsi, le point fantaisie va s'élargir de chaque côté. Bon tricot!
08.04.2026 - 12:21
![]() Kate wrote:
Kate wrote:
I am a bit mystified by this pattern. Everything was going well on the neck ribbing. However, as I begin the yarn over increases, the video tutorial suggests this creates a hole. The instructions further suggest that continuing the A1 pattern will somehow twist the hole to close it, however the closure has not materialized for me. What am I missing? How do you close the hole created by the yarn over method, or are there supposed to be holes?
10.03.2026 - 00:53DROPS Design answered:
Hi Kate, The yarn overs are worked twisted on the next round (by working through the back stitch-loop of the yarn over). There should not be holes. Here is a link to our video showing you how to knit through the back loop: https://www.garnstudio.com/video.php?id=1886&lang=us Regards, Drops Team.
10.03.2026 - 06:49
![]() OUDIN wrote:
OUDIN wrote:
Bonjour, combien de pelotes de drops merino extra fine faut-il commander pour un pull taille 3/4 et la référence exacte ? je ne trouve pas l'information. merci pour votre réponse
21.02.2026 - 13:50DROPS Design answered:
Bonjour Mme Oudin, vous trouverez la quantité nécessaire pour chaque taille dans l'onglet "Explications" en haut de page, en taille 3/4 ans par exemple, il vous faudra 300 g DROPS Merino Extra Fine / 50 g la pelote = 6 pelotes. Bon tricot!
23.02.2026 - 08:07
![]() Isabelle wrote:
Isabelle wrote:
Moet ik de raglan lijn aan houden als ik klaar ben met meerderen? ik moet nu gewoon verder met het lijf, maar dit is mij net niet helemaal duidelijk
11.02.2026 - 21:30DROPS Design answered:
Dag Isabelle,
Als het goed is heb je aan het begin van de naald een markeerdraad geplaatst en als je klaar bent met de meerderingen voor de raglan en het werk moet verdelen voor het lijf en de mouwen, verdeel je de steken zoals aangegeven in het patroon. Ik weet niet uit mijn hoofd of de raglanlijnen dan bij het lijf komen of bij de mouwen, maar als je het aantal aangegeven steken aanhoudt, dan komt het goed.
12.02.2026 - 19:25
![]() Siv wrote:
Siv wrote:
Nei, for maske tall til str 5/6 år (88m) er uten om de 2 rette maskene x4 i raglanmønsteret. 14 m til ermene, 2 raglan masker x 4, 30 m til for og bakstykke inkl økning av 4 masker før raglan. 14x2 + 30 x2 =88 m. Pluss 2 x 4 raglan masker = 94 m. Etter første raglan er det 168 m på pinnen + 8 raglan masker. Etter siste raglan økning ( 12 på for og bakstykket 48 m, og 6 på skulder/ermer 24 m ) er maskeantallet 240 + 8 raglan masker.
06.02.2026 - 12:03
![]() Siv wrote:
Siv wrote:
Jeg er ferdig med raglan og skal dele arbeidet i ermer og for- og bakstykke. Men de to x 4 rett-maskene til raglan er ikke med i tellingen på total antall masker før delingen til ermer. Hva gjør man med de 8 maskene? Jeg har 248 masker på pinnen ikke 240. Så delingen blir ikke riktig på antall masker.
05.02.2026 - 11:22DROPS Design answered:
Hei Siv, Det høres ut som om du har økt 1 gang for mange til raglan. Hvis du ikke har lyst til å strikke opp, kan du bare dele til bol og ermer med 1 ekstra maske på begynnelsen og slutten av hvert erme og begynnelsen og slutten av både for- og bakstykket. Hilsen Drops Team.
06.02.2026 - 07:10
![]() Linda wrote:
Linda wrote:
When continuing to increase every 2nd round on front/back and 4th on sleeves, I am confused which markers I should be using and if it is only 1 side of specific markers when it's an increase of only 4.
20.01.2026 - 19:22DROPS Design answered:
Hi Linda, Yes, when only increasing on the front and back pieces you increase AFTER the 2 knitted stitches with markers 2 and 4 (at the beginning of the front and back pieces) and BEFORE the 2 knitted stitches with markers 3 and 1 (the end of the front and back pieces). When increasing on both the body and sleeves you increase before and after all sets of 2 knitted stitches. Regards, Drops Team.
21.01.2026 - 08:05
![]() Francoise Bezencon Nguyen wrote:
Francoise Bezencon Nguyen wrote:
Bonjour j ai terminé le pull 3 ans ,je veux faire le modèle 2 ans, je ne suis pas satisfaite des diminutions sous les manches. Ma question : est ce que je dois garder les 2 mailles endroits tout au long de la manche de chaque côté du fil marqueur, et cela fait une bande, comme pour le raglan? Merci
24.12.2025 - 10:02DROPS Design answered:
Bonjour Mme Bezencon Nguyen, tout à fait, sous la manche, on va avoir 2 mailles endroit et on diminue de chaque côté de ces 2 mailles endroit; vous pouvez - si vous le préférez, tricoter ces mailles en point fantaisie et adapter les diminutions en conséquence. Bon tricot!
02.01.2026 - 12:09
![]() Pernilla wrote:
Pernilla wrote:
Ska mönstret vara dubbel mosstickning eller blir den förskjuten? Får inte till det, har repat upp massa gånger.
22.12.2025 - 08:28DROPS Design answered:
Hei Pernilla. Ja, genseren strikkes i typ dubbel mosstickning, men med 1 omgang med rettmasker mellom (se diagram A.1). mvh DROPS Design
22.12.2025 - 11:37
![]() Kulic Snjezana wrote:
Kulic Snjezana wrote:
Sind die zwei re.Maschen die Raglanlienie oder muss ich zwischen den 2 re. Ma eine Raglan Ma schtricken
13.12.2025 - 15:15DROPS Design answered:
Liebe Frau Kulik, die 2 rechten Maschen sind die Raglanlinien. Viel Spaß beim Stricken!
15.12.2025 - 11:53
|
|||||||
Winter Weekend#winterweekendsweater |
|||||||
 |
 |
||||||
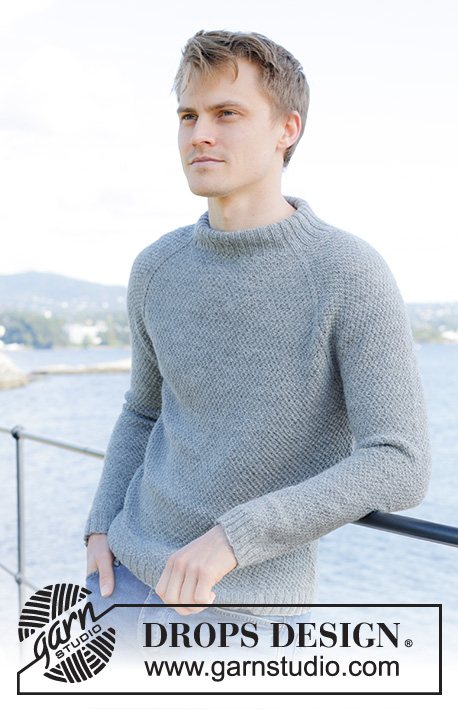
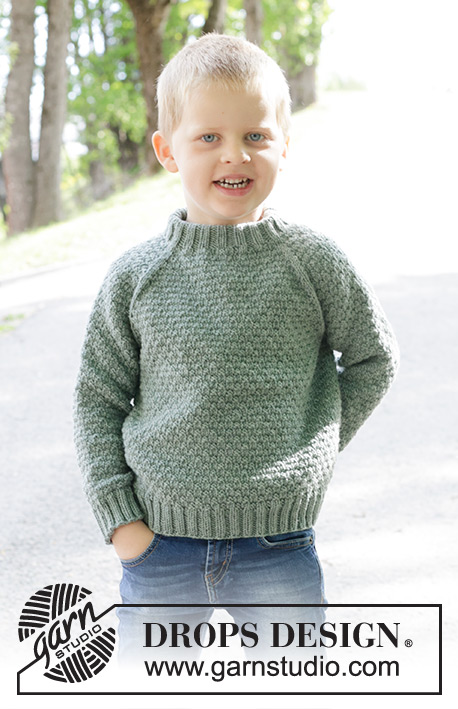
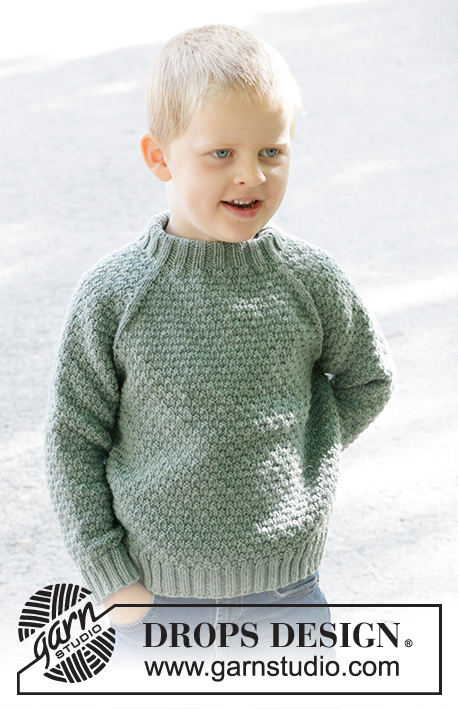
Knitted jumper for children in DROPS Merino Extra Fine or DROPS Fiesta. The piece is worked top down with relief-pattern, double neck and raglan. Sizes 2 - 12 years.
DROPS Children 47-33 |
|||||||
|
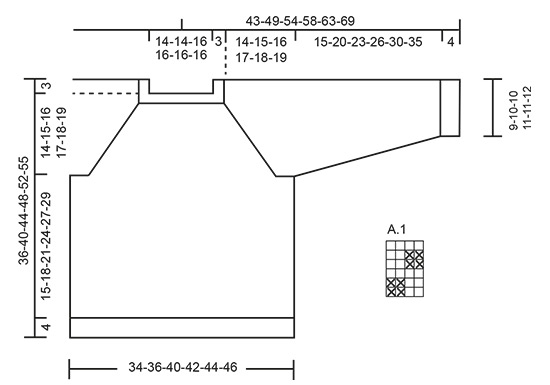
------------------------------------------------------- EXPLANATIONS FOR THE PATTERN: ------------------------------------------------------- INCREASE TIP (evenly spaced): Increase 1 stitch by making 1 yarn over, which is worked twisted on the next round to avoid a hole. PATTERN: See diagram A.1. RAGLAN: Increase 1 stitch before/after 2 knitted stitches in each transition between the body and sleeves, the marker-threads sit between these 2 stitches (8 increased stitches on the round). Increase 1 stitch by making 1 yarn over, which is knitted/purled twisted in A.1 on the next round to avoid a hole. DECREASE TIP (for sleeves): Decrease 1 stitch on each side of the marker-thread as follows: Work until there are 3 stitches left before the marker-thread, knit 2 together, knit 2 (marker-thread sits between these 2 stitches), slip 1 stitch knit-wise, knit 1 and pass the slipped stitch over the knitted stitch. ------------------------------------------------------- START THE PIECE HERE: ------------------------------------------------------- JUMPER – SHORT OVERVIEW OF THE PIECE: The neck and yoke are worked in the round with circular needle, top down. The yoke is divided for the body and sleeves and the body is continued in the round with circular needle. The sleeves are worked in the round with short circular needle/double pointed needles. DOUBLE NECK: Cast on 80-80-88-88-88-88 stitches with DROPS Merino Extra Fine or DROPS Fiesta, using short circular needles sizes 4 and 3 mm held together. Remove the needle size 4 mm (this gives you an elastic cast-on edge). Work rib in the round as follows: Knit 1, * purl 2, knit 2*, work from *-* until there are 3 stitches left, purl 2, knit 1. Work this rib for 6 cm. YOKE: Change to circular needle size 4 mm. Insert 4 marker-threads and increase evenly as follows: NOTE: Each marker-thread is inserted between 2 knitted stitches and mark the raglan-lines. The beginning of the round is between the back piece and the right sleeve. Insert marker-thread 1 at the beginning of the round, knit 1, knit 14 (right sleeve), knit 2 and insert marker-thread 2 between these 2 stitches, knit 22-22-26-26-26-26 and increase 4-4-4-4-8-8 stitches evenly over these stitches - read INCREASE TIP (= 26-26-30-30-34-34 stitches on the front piece), knit 2 and insert marker-thread 3 between these 2 stitches, knit 14 (left sleeve), knit 2 and insert marker-thread 4 between these 2 stitches, knit 22-22-26-26-26-26 stitches and increase 4-4-4-4-8-8 stitches evenly over these stitches (= 26-26-30-30-34-34 stitches on the back piece), knit 1 = 88-88-96-96-104-104 stitches. Work A.1 in the round with 2 knitted stitches in each raglan-line and increase for raglan. REMEMBER THE KNITTING TENSION! Increase for RAGLAN on each side of all 4 marker-threads – read description above, every 2nd round 9-9-9-9-9-7 times = 160-160-168-168-176-160 stitches. Continue to increase every 2nd round but every 2nd increase in only on the front and back pieces (4 increased stitches), i.e., increase on the front and back pieces every 2nd round and on the sleeves every 4th round. Increase like this 10-12-12-14-14-18 times on the front and back pieces (5-6-6-7-7-9 times on the sleeves) = a total of 19-21-21-23-23-25 times on the front and back pieces and 14-15-15-16-16-16 times on the sleeves. After the final increase, there are 220-232-240-252-260-268 stitches. Continue the pattern but without further increases until the yoke measures 14-15-16-17-18-19 cm from the neck. On the next round divide for the body and sleeves Place the first 44-46-46-48-48-48 stitches on a thread without working them (sleeve), cast on 6-6-10-10-10-10 stitches under the sleeve, work 66-70-74-78-82-86 stitches as before (front piece), place the next 44-46-46-48-48-48 stitches on a thread without working them (sleeve), cast on 6-6-10-10-10-10 stitches under the sleeve, work the last 66-70-74-78-82-86 stitches as before (back piece). The body and sleeves are finished separately. The piece is now measured from here! BODY: = 144-152-168-176-184-192 stitches. Continue the pattern in the round for a further 15-18-21-24-27-29 cm. Knit 1 round and increase 20-24-24-28-28-28 stitches evenly spaced - remember INCREASE TIP = 164-176-192-204-212-220 stitches. Change to circular needle size 3 mm. Work rib (knit 2, purl 2) for 4 cm. Cast off a little loosely. The jumper measures approx. 36-40-44-48-52-55 cm from the shoulder. SLEEVES: Place the 44-46-46-48-48-48 stitches from the thread on the one side of the piece on double pointed needles size 4 mm and knit up 1 stitch in each of the 6-6-10-10-10-10 stitches cast on under the sleeve = 50-52-56-58-58-58 stitches. Insert a marker-thread in the middle of the new stitches and allow it to follow your work onwards. Start at the marker-thread and continue the pattern in the round. When the sleeve measures 2-2-2-3-3-3 cm, decrease 1 stitch on each side of the marker-thread – read DECREASE TIP. Decrease like this every 2-3-3½-4-6-9 cm a total of 6-6-6-6-5-4 times = 38-40-44-46-48-50 stitches. Work until the sleeve measures 15-20-23-26-30-35 cm from the division (or to desired length. There is approx. 4 cm left). Knit 1 round and increase 10-8-8-6-8-6 stitches evenly spaced = 48-48-52-52-56-56 stitches. Change to double pointed needles size 3 mm and work rib (knit 2, purl 2) for 4 cm. Loosely cast off. The sleeve measures approx. 19-24-27-30-34-39 cm from the division. Work the other sleeve in the same way. ASSEMBLY: Fold the neck double to the inside and sew down with a couple of stitches. |
|||||||
Diagram explanations |
|||||||
|
|||||||
 |
|||||||
Have you finished this pattern?Tag your pictures with #dropspattern #winterweekendsweater or submit them to the #dropsfan gallery. Do you need help with this pattern?You'll find 29 tutorial videos, a Comments/Questions area and more by visiting the pattern on garnstudio.com. © 1982-2026 DROPS Design A/S. We reserve all rights. This document, including all its sub-sections, has copyrights. Read more about what you can do with our patterns at the bottom of each pattern on our site. |
|||||||


With over 40 years in knitting and crochet design, DROPS Design offers one of the most extensive collections of free patterns on the internet - translated to 17 languages. As of today we count 324 catalogues and 12290 patterns translated into English (UK/cm). 12290
We work hard to bring you the best knitting and crochet have to offer, inspiration and advice as well as great quality yarns at incredible prices! Would you like to use our patterns for other than personal use? You can read what you are allowed to do in the Copyright text at the bottom of all our patterns. Happy crafting!
Post a comment to pattern DROPS Children 47-33
We would love to hear what you have to say about this pattern!
If you want to leave a question, please make sure you select the correct category in the form below, to speed up the answering process. Required fields are marked *.