
Popular categories
Looking for a yarn?


Comments / Questions (39)
![]() Margot wrote:
Margot wrote:
Bonjour, Je ne comprends pas comment commencer les manches. Je suis sur la taille M. Et quand j'augmente 27 et 15m comme demandé dans le patron, il me manque beaucoup de mailles pour "fermer" la manche. Je ne comprends pas l'histoire de la couture à la fin pour fermer le "trou". Pouvez vous m'expliquer ou me dire où est ce que je peux trouver un exemple vidéo? Merci d'avance
24.04.2026 - 21:25DROPS Design answered:
Bonjour Margot, on relève ici les mailles des manches le long des emmanchures mais pas dans les mailles qui ont été montées lorsque l'on a réuni le dos et les devants, ainsi vous aurez 40 m pour la manche en taille M, et les 2 premiers cm de la manche que l'on tricote en allers et retours seront ensuite assemblés aux 4 mailles montées sur les côtés, retrouvez cette technique ici, en vidéo (même si l'exemple est avec des manches montées, la technique sera la même). Bon tricot!
27.04.2026 - 07:56
![]() Liv wrote:
Liv wrote:
Ser nå at dere har svart meg på norsk . Jeg så ikke første svaret . Er denne oppskriften vanskelig? Jeg skjønner nemlig ikke hva jeg skal gjøre med 9 stolpemasker på første pinne fra retten på arbeidet. Tror jeg må ha dette inn med teskjeer. Og de 3 masker etter 9 stolpemasker før merket på slutten av pinnen.
11.03.2026 - 08:15
![]() Liv Sagmoen wrote:
Liv Sagmoen wrote:
Drops 244 21. Starten av arbeidet. Hva betyr det at jeg skal øke 9 stolpemasker? Skal jeg øke 1 m i 9 masker etterhverandre?
10.03.2026 - 19:00DROPS Design answered:
Hei Liv, Du legger opp 9 nye masker på pinnen til kraven, før du strikker opp masker til resten av venstre forstykket langs venstre skulder på bakstykket. Vennlig hilsen, Drops Team.
11.03.2026 - 07:02
![]() Kethnaly wrote:
Kethnaly wrote:
Bonjour Pour le dos & devant, il faut continuer à augmenter pour l’encolure. Tous les 4 rangs ou tous les 6 rangs? Merci
22.02.2026 - 20:01DROPS Design answered:
Bonjour Mme Kethnaly, vous devez continuer les augmentations de l'encolure commencées sous chaque devant, autrement dit: 6 à 8 x (cf. taille) tous les 4 rangs, puis 2 x 1 m tous les 6 rangs. Donc en fonction de votre tension en hauteur continuez simplement ces augmentations en fonction de la dernière faite avant de reprendre le dos/les devants ensemble jusqu'à ce que vous ayez augmenté le bon nombre de mailles. Bon tricot!
23.02.2026 - 09:00
![]() Petra wrote:
Petra wrote:
Hallo liebes Drops-Team. Ich habe eine Frage zum rechten Vorderteil. In der Anleitung steht für die Blende: wie linkes, jedoch gegengleich. Die 1. Reihe ist links eine Hinreihe mit Zunahmen. Rechts beginnt mit einer Rückreihe. Werden hier keine Zunahmen benötigt? Vielen Dank für eure Antwort Petra
23.01.2026 - 16:35DROPS Design answered:
Liebe Petra, die erste Hin-Reihe stricken Sie mit den Zunahmen wie beim linken Vorderteil. Erst dann kommt die Rück-Reihe, die Sie wie beschrieben stricken. Sie fangen also auch am rechten Vorderteil mit einer Hin-Reihe an. Viel Spaß beim Weiterstricken!
25.01.2026 - 21:32
![]() Claire wrote:
Claire wrote:
Will it be possible to knit this jacket with drop Andes (1 thread-group E) instead of the two threads of Alpaca Bouclé and Alpaca Silk and if so what weight do I need to knit a size S? Thanks
02.01.2026 - 23:56DROPS Design answered:
Hi Claire, it is possible, however the cardigan will be quite heavy, for the size S you will need about 1100 g of DROPS Andes. Happy knitting!
03.01.2026 - 09:00
![]() Adeline wrote:
Adeline wrote:
En fait je viens de comprendre, les deux sortes de laine sont tricotés ensemble afin de faire un fil plus épais ..... je crois que je suis un peu bécasse !!!!! merci tout de même
09.10.2025 - 09:33
![]() Adeline wrote:
Adeline wrote:
Bonjour dans ce modèle de veste "Oversized Hug" vous proposez 2 laines différentes mais dans les explications vous ne dites pas ou et quand on change de laine, d'autre part sur les photos on ne voit pas qu'il y a 2 sortes de laine différente sur ce modèle, donc je ne comprends pas bien. Merci de ma donner de plus amples explications. cordialement Adeline
09.10.2025 - 09:25DROPS Design answered:
Bonjour Adeline, ce modèle se tricote avec les 2 laines en même temps = 1 fil de chaque qualité soit 1 fil Alpaca Bouclé + 1 fil Brushed Alpaca Silk, comme s'il n'y en avait qu'un seul. Bon tricot!
09.10.2025 - 16:00
![]() Hannie Lucassen wrote:
Hannie Lucassen wrote:
Ik wil 1 draad brushed alpaca silk wijnrood combineren met 1 draad alpaca boucle, maar weet niet hoe de kleurencombinatie van boucle eruit zien dan. Is daar een voorbeeld van?
13.09.2025 - 14:17DROPS Design answered:
Dag Hannie,
Voor zover ik weet is daar geen voorbeeld van. Misschien is het mogelijk om de bollen in een winkel in de buurt te bekijken of extra bollen te bestellen via een webwinkel en die je niet nodig hebt terug te sturen.
17.09.2025 - 22:00
![]() Cornelia wrote:
Cornelia wrote:
Möchte nicht so grosse Ärmel🤔Wenn ich alle 4cm abnehme geht das dann auf? Oder wie wird das berechnet?
17.08.2025 - 14:43DROPS Design answered:
Liebe Cornella, Sie können sich auch von einem ähnlichen Modell mit dem gewünschten Form für Ärmel - und gleiche Maschenprobe - inspirieren. Viel Spaß beim Stricken!
18.08.2025 - 09:17
|
||||||||||
Oversized Hug#oversizedhugcardigan |
||||||||||
 |
 |
|||||||||
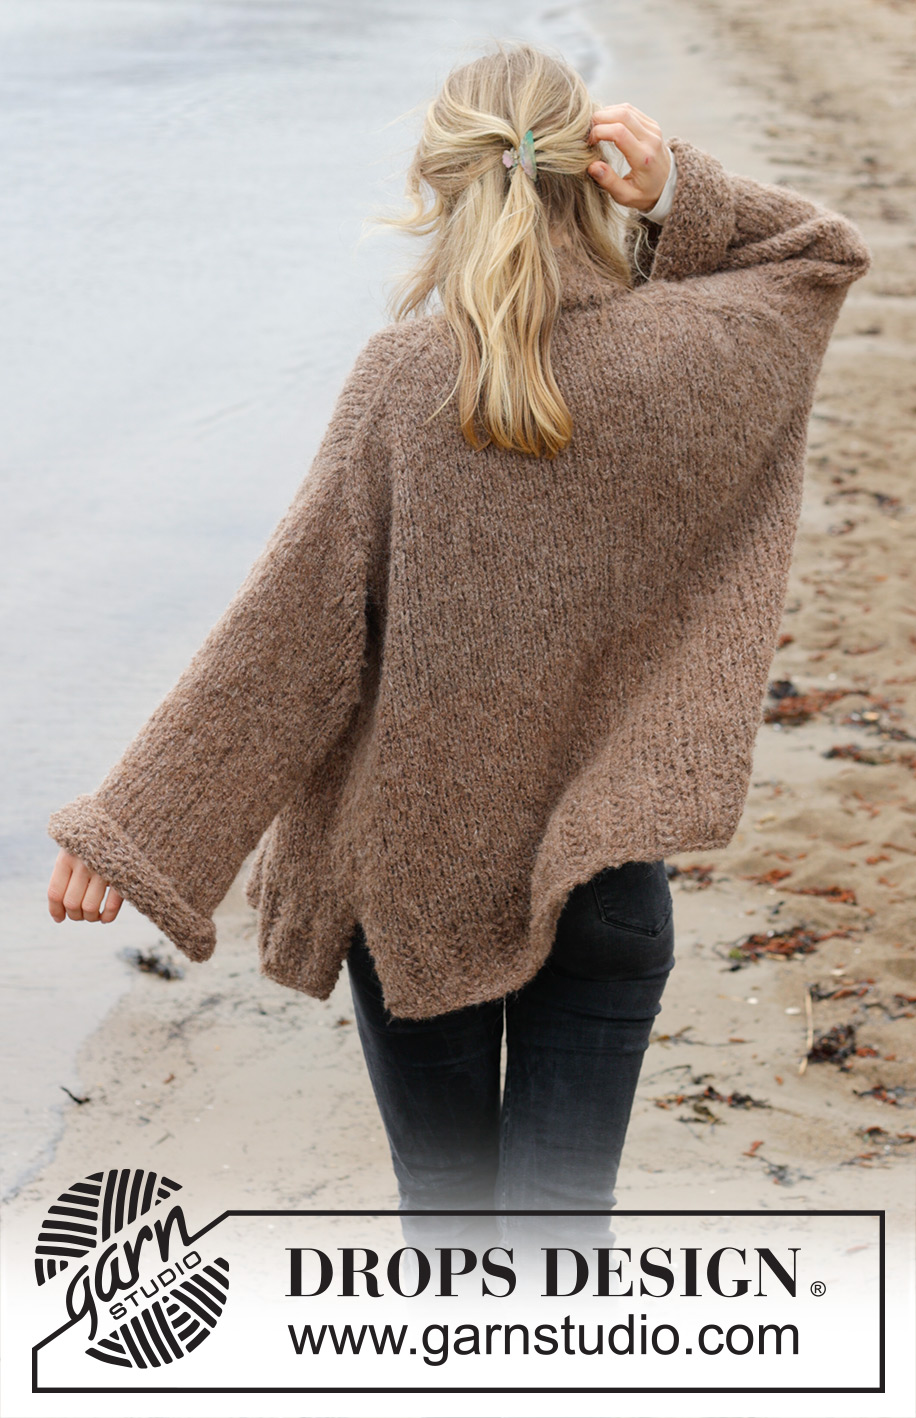
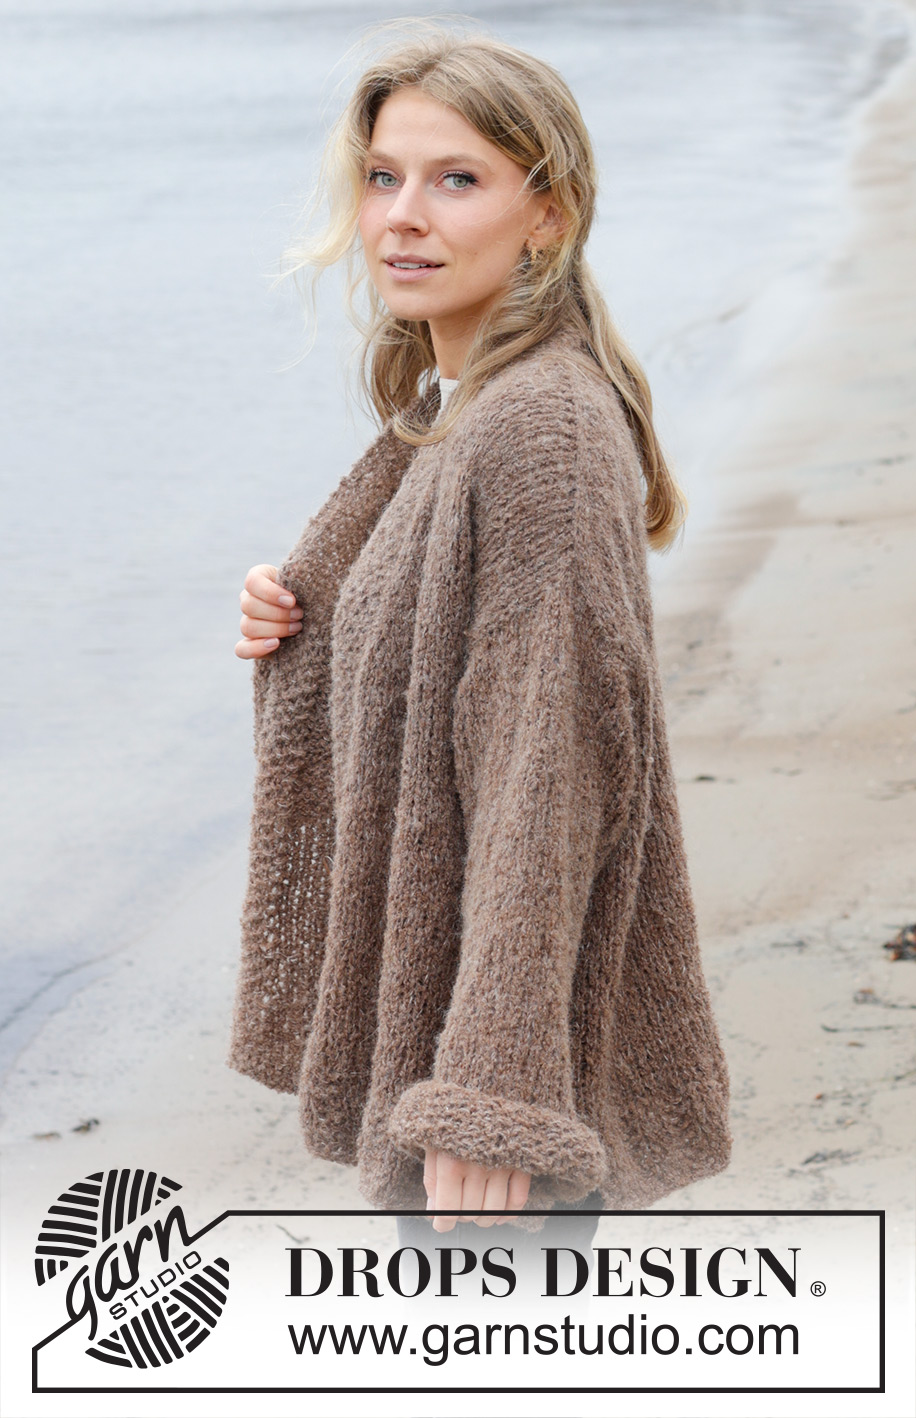
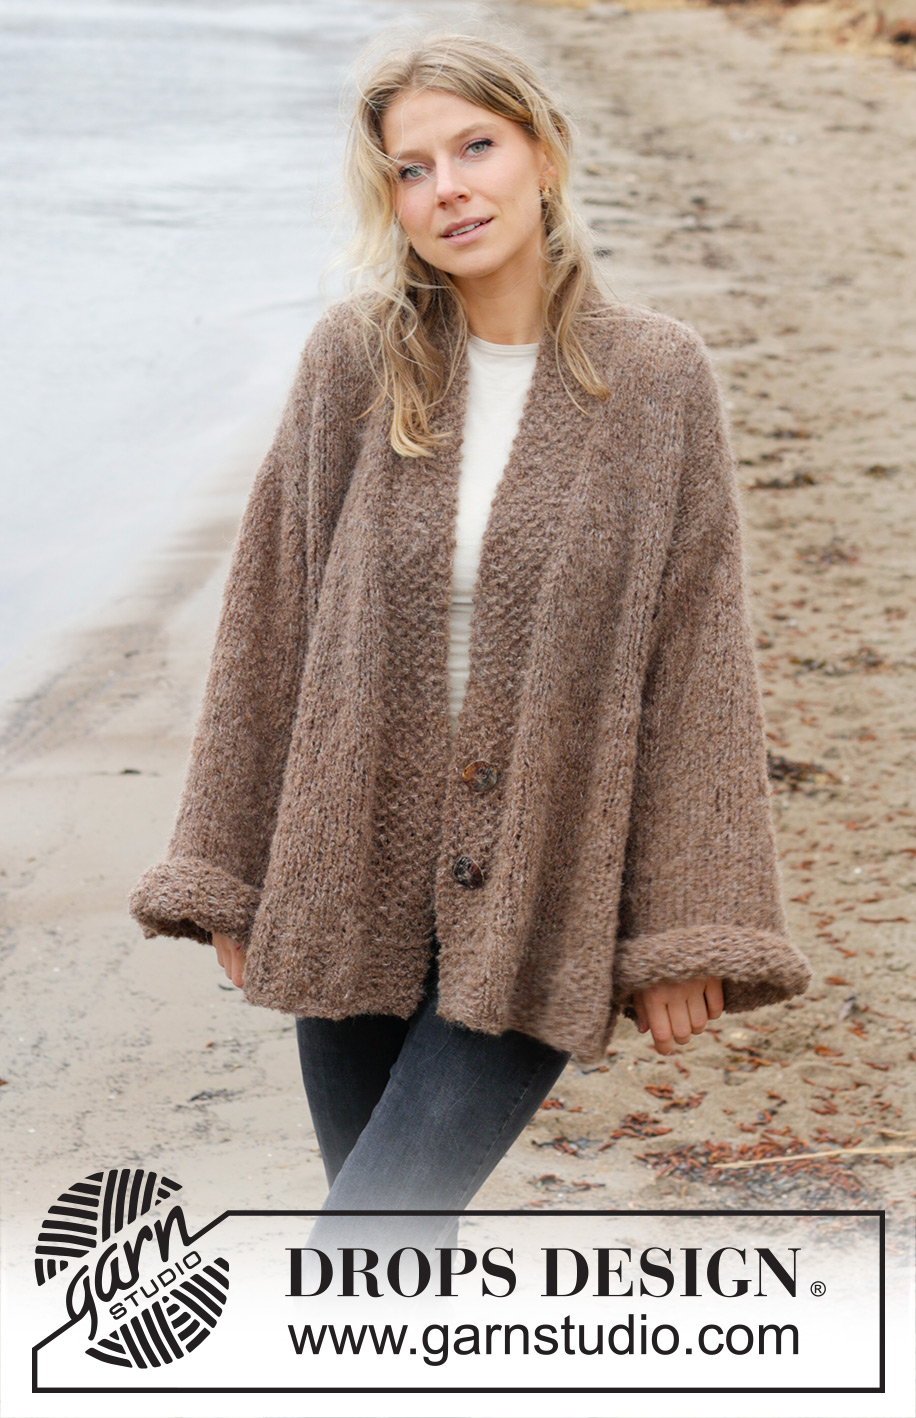
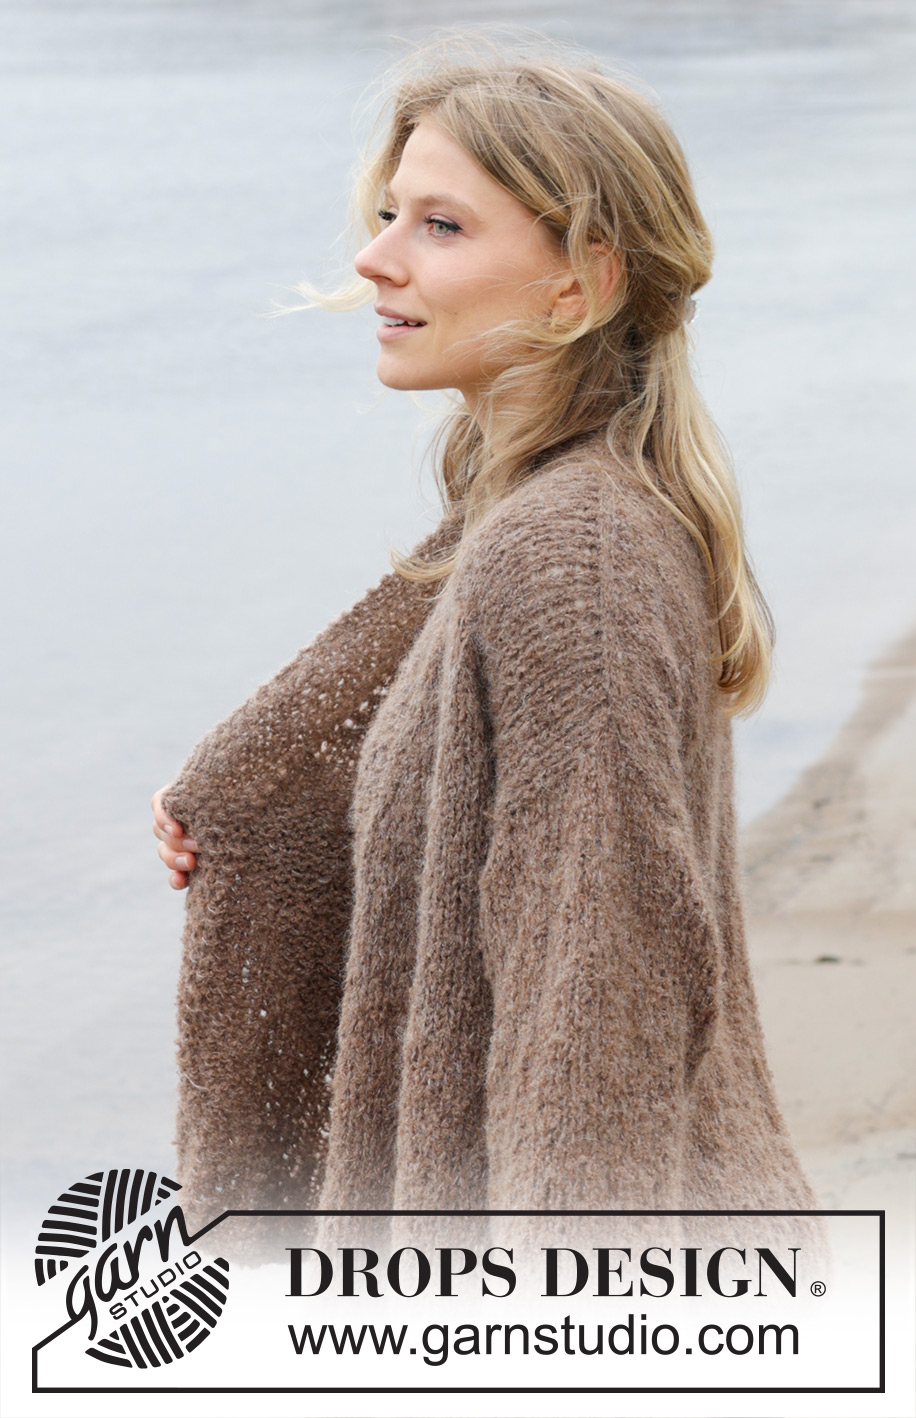
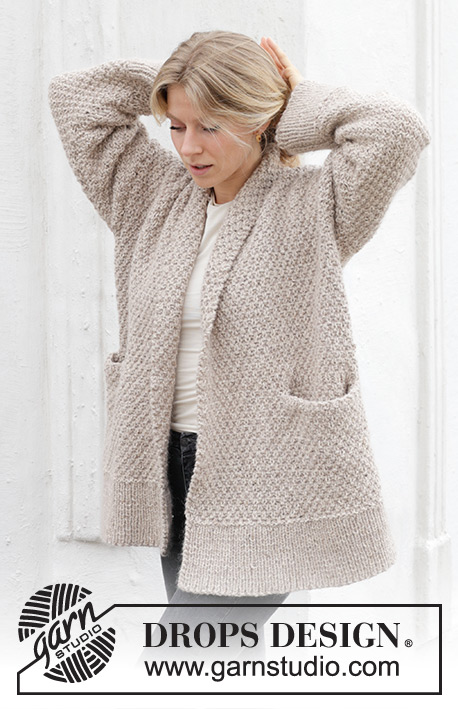
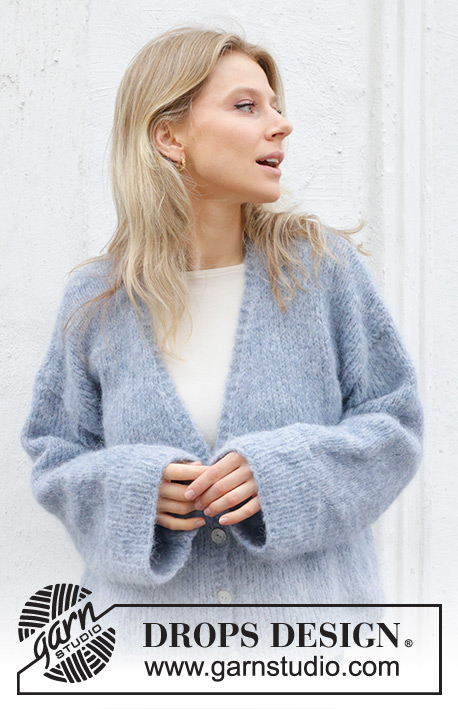
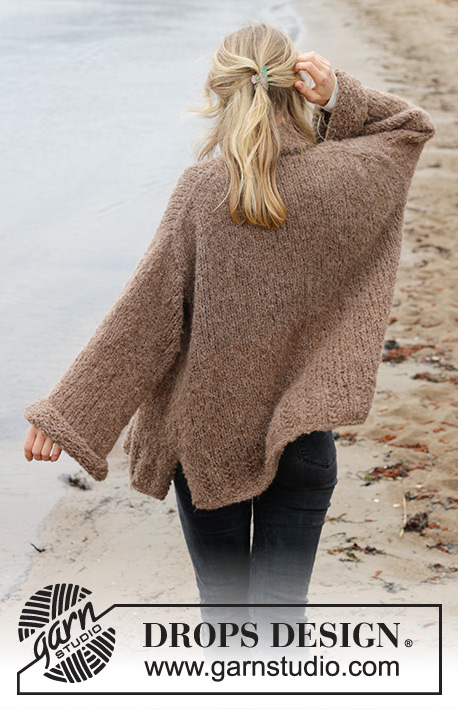
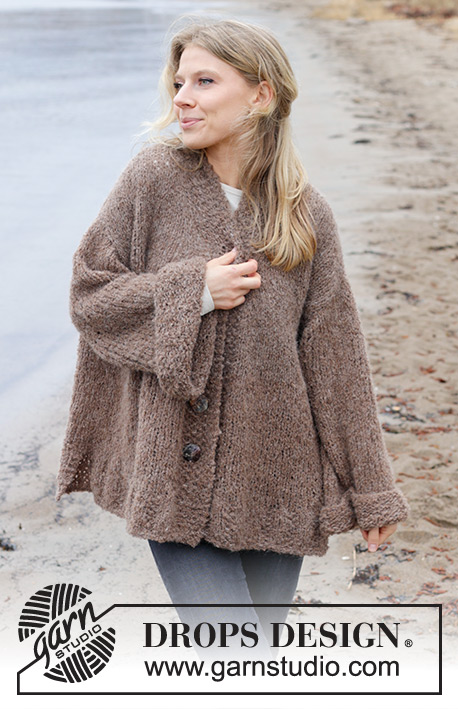
Knitted jacket in DROPS Alpaca Bouclé and DROPS Brushed Alpaca Silk. The piece is worked top down with European/diagonal shoulders. Sizes S - XXXL.
DROPS 244-21 |
||||||||||
|
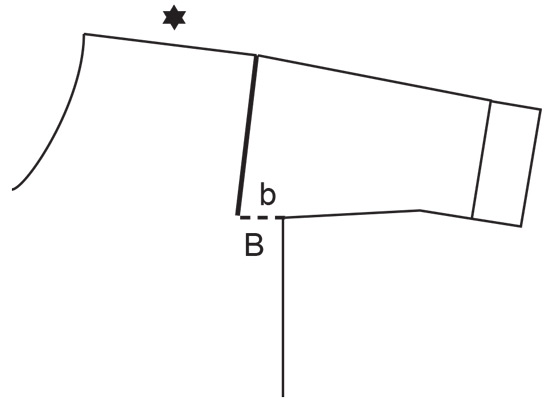
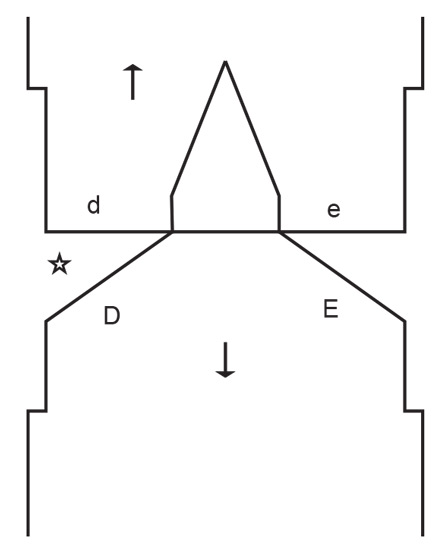
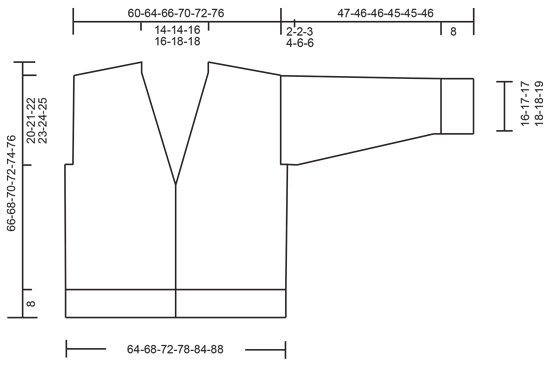
------------------------------------------------------- EXPLANATIONS FOR THE PATTERN: ------------------------------------------------------- GARTER STITCH (worked back and forth): Knit all rows. 1 ridge = knit 2 rows. MOSS STITCH (worked back and forth): ROW 1: * Knit 1. purl 1 *, work from *-*. ROW 2: Knit over purl and purl over knit. Repeat row 2 onwards. INCREASE TIP FROM THE RIGHT SIDE: Increase towards the left AFTER MARKER / 9 band stitches + 2 stitches in stocking stitch: Use left needle to pick up yarn between 2 stitches from row below, pick up yarn from the front and knit in the stitch loop that is on the back of the needle. Increase towards the right BEFORE MARKER / 9 band stitches + 2 stitches in stocking stitch: Use left needle to pick up yarn between 2 stitches from row below, pick up yarn from the back and knit in the stitch loop that is on the front side of the needle. INCREASE TIP FROM THE WRONG SIDE: Increase towards the right AFTER MARKER: Use left needle to pick up yarn between 2 stitches from row below, pick up yarn from the back and purl in the stitch loop that is on the front side of the needle. Increase towards the left BEFORE MARKER: Use left needle to pick up yarn between 2 stitches from row below, pick up yarn from the front and purl in the stitch loop that is on the back side of the needle. BUTTONHOLES: Work buttonholes on the right band (when the garment is worn). Work from the right side when there are 5 stitches left on the row as follows: Make 1 yarn over, knit 2 together and work 3 moss stitches. On the next row (wrong side), knit the yarn over to leave a hole. Work the buttonholes when the piece measures 40-41-42-43-44-45 cm and 48-49-50-51-52-53 cm. DECREASE TIP (for sleeves): Decrease 1 stitch on each side of the marker-thread as follows: Work until there are 3 stitches left before the marker-thread, knit 2 together, knit 2 (marker-thread sits between these 2 stitches), slip 1 stitch knit-wise, knit 1 and pass the slipped stitch over the knitted stitch. ------------------------------------------------------- START THE PIECE HERE: ------------------------------------------------------- JACKET– SHORT OVERVIEW OF THE PIECE: The pattern uses both long and short needles; start with the length which fits the number of stitches and change when necessary. The piece is started back and forth, casting on stitches at the back of the neck and working the back piece top down while increasing stitches on each side for the shoulders, which become slightly diagonal. The back piece is worked as far as the armholes. Start kniting up stitches along 1 back shoulder and work down to the armhole. Front band stitches are worked in moss stitch. Repeat on the other shoulder. After armholes, joint front and back pieces and work back and forth on circular needle top down to the vent. Then finish each front piece and back piece separately. Stitches are knitted up around the armholes for the sleeves, which are started back and forth for the sleeve cap then finished in the round, top down. Stitches are then knitted up around the neckline for the neck. BACK PIECE: Cast on 16-16-18-18-20-20 stitches with circular needle size 9 mm and 1 strand of each quality (2 strands). Purl 1 row from the wrong side. Insert 1 marker inside the 3 outermost stitches on each side. Work stocking stitch back and forth. AT THE SAME TIME increase AFTER the marker at the beginning of the row and BEFORE the marker at the end of the row – read INCREASE TIP FROM RIGHT SIDE. On the next row (wrong side) increase in the same way – read INCREASE TIP FROM WRONG SIDE. Increase from both the right and wrong side a total of 22-24-24-26-26-28 times = 60-64-66-70-72-76 stitches. THE PIECE IS NOW MEASURED FROM HERE! Continue with stocking stitch until the piece measures 14-15-16-16-17-18 cm, measured outermost along the armhole. Cut the strand and work the front pieces. LEFT FRONT PIECE: Use circular needle size 9 mm, cast on 9 stitches (band), then knit up 22-24-24-26-26-28 stitches inside 1 stitch along the top of the back left shoulder (1 stitch in each row) = 31-33-33-35-35-37 stitches. Purl 1 row from the wrong side. Then work as follows from the right side: work MOSS STITCH – read description above, over the first 9 stitches (band), then stocking stitch over the remaining stitches. When the piece measures 6 cm from the knitted up stitches, begin to increase after the 9 band stitches + 2 stocking stitches at the beginning of each row from the right side – remember INCREASE TIP FROM RIGHT SIDE. Increase 1 stitch every 4th row (every second row from the right side) 6-6-7-7-8-8 times, then every 6th row (every third row from the right side) 2 times. AT THE SAME TIME when the piece measures 26-27-28-30-31-32 cm, lay the piece to one side (the increases are not finished) after working a row from the right side. RIGHT FRONT PIECE: Use circular needle size 9 mm and knit up 22-24-24-26-26-28 stitches inside 1 stitch along the top of the back right shoulder, then cast on 9 stitches (band) = 31-33-33-35-35-37 stitches. Purl 1 row from the wrong side. Then work as follows from the right side: Stocking stitch until there are 9 stitches left, moss stitch over the band. When the piece measures 6 cm from the knitted up stitches, begin to increase before the 9 band stitches + 2 stocking stitches at the end of each row from the right side – remember INCREASE TIP FROM RIGHT SIDE. Increase 1 stitch every 4th row (every second row from the right side) 6-6-7-7-8-8 times, then every 6th row (every third row from the right side) 2 times. AT THE SAME TIME when the piece measures 26-27-28-30-31-32 cm, work as follows from the wrong side: Work the right front piece, cast on 4-4-6-8-12-12 stitches, work the back piece, cast on 4-4-6-8-12-12 stitches and work the left front piece. BODY: Continue back and forth with moss stitch and stocking stitch and continue to increase for the neck on both front pieces. When the increases are finished there are 146-154-162-174-186-194 stitches. When the piece measures 40-41-42-43-44-45 cm from the top of the front shoulder, start to work the BUTTONHOLES – read description above. Work until the piece measures 58-60-62-64-66-68 cm - from the top of the front shoulder. Place the first and last 41-43-45-48-51-53 stitches on a thread and work the back piece (64-68-72-78-84-88 stitches). BACK PIECE: Knit 1 row from the right side and increase 8-9-10-9-8-9 stitches evenly spaced = 72-77-82-87-92-97 stitches. Change to circular needle size 8 mm. Work rib as follows from the wrong side: 2 GARTER STITCHES – see description above, * purl 3, 2 moss stitches *, work from *-* until there are 5 stitches left, purl 3 and 2 garter stitches. Continue this rib for 8 cm. Cast off. The jacket measures approx. 66-68-70-72-74-76 cm, from the top of the shoulder. LEFT FRONT PIECE: Place the stitches from the left front piece back on needle size 9 mm. Knit 1 row from the right side and increase 3-6-4-6-8-6 stitches evenly spaced (do not increase over the band) = 44-49-49-54-59-59 stitches. Change to circular needle size 8 mm. Work rib as follows from the wrong side: 2 garter stitches, * purl 3, 2 moss stitches *, work from *-* until there are 12 stitches left, purl 3 and 9 moss stitches. Continue this rib for 8 cm. Cast off. Work the right front piece in the same way, working the first row as follows from the wrong side: 9 moss stitches, * purl 3, 2 moss stitches *, work from *-* until there are 5 stitches left, purl 3 and 2 garter stitches. LEFT SLEEVE: Use circular needle size 9 mm and knit up from the right side 26-27-28-30-31-32 stitches from the bottom of the armhole and up the front piece to the shoulder, then 14-15-16-16-17-18 stitches from the shoulder and down the back piece = 40-42-44-46-48-50 stitches. Work stocking stitch back and forth for 2-2-3-4-6-6 cm. Now join the sleeve and continue in the round with short circular needle/double pointed needles. Insert 1 marker-thread at the beginning of the round (mid-under sleeve). Allow the thread to follow your work onwards. Start at the marker-thread and continue stocking stitch in the round. When the sleeve measures 4-4-5-6-8-8 cm from the knitted-up stitches, decrease 2 stitches under the sleeve – read DECREASE TIP. Decrease like this every 9-9-7-7-5-5 cm a total of 4-4-5-5-6-6 times = 32-34-34-36-36-38 stitches. Continue working until the sleeve measures 39-38-38-37-37-38 cm. There is approx. 8 cm left. Try the jacket on and work to desired length before the rib. Knit 1 round and increase 8-11-11-9-14-12 stitches evenly spaced = 40-40-45-45-50-50 stitches. Change to double pointed needles size 8 mm. Work rib (knit 3, 2 moss stitches) for 8 cm. Cast off a little loosely. The sleeve measures approx. 47-46-46-45-45-46 cm from the knitted up stitches. RIGHT SLEEVE: Work in the same way as the left sleeve but knit up 14-15-16-16-17-18 stitches from the bottom of the armhole and up the back piece to the shoulder, then 26-27-28-30-31-32 stitches from the shoulder down the front piece. Sew together the openings under the sleeves – see sketch. NECK: Use circular needle size 9 mm and knit up 1 stitch in each of the 9 band stitches on the right front piece, work moss stitch over these stitches for 7-7-8-8-9-9 cm; check the band reaches mid-back when slightly stretched. Cast off. Work the left band in the same way. Sew the bands together mid-back. Sew the bands to the neckline. ASSEMBLY: Sew the buttons onto the left band |
||||||||||
Diagram explanations |
||||||||||
|
||||||||||
 |
||||||||||
 |
||||||||||
 |
||||||||||
Have you finished this pattern?Tag your pictures with #dropspattern #oversizedhugcardigan or submit them to the #dropsfan gallery. Do you need help with this pattern?You'll find 33 tutorial videos, a Comments/Questions area and more by visiting the pattern on garnstudio.com. © 1982-2026 DROPS Design A/S. We reserve all rights. This document, including all its sub-sections, has copyrights. Read more about what you can do with our patterns at the bottom of each pattern on our site. |
||||||||||


With over 40 years in knitting and crochet design, DROPS Design offers one of the most extensive collections of free patterns on the internet - translated to 17 languages. As of today we count 324 catalogues and 12290 patterns translated into English (UK/cm). 12290
We work hard to bring you the best knitting and crochet have to offer, inspiration and advice as well as great quality yarns at incredible prices! Would you like to use our patterns for other than personal use? You can read what you are allowed to do in the Copyright text at the bottom of all our patterns. Happy crafting!
Post a comment to pattern DROPS 244-21
We would love to hear what you have to say about this pattern!
If you want to leave a question, please make sure you select the correct category in the form below, to speed up the answering process. Required fields are marked *.