
Popular categories
Looking for a yarn?


Comments / Questions (42)
![]() Gaetan wrote:
Gaetan wrote:
Bonjour! J ai tout saisi merci 🙏! Lorsque vous dites (ajuster sur rang envers) on tricotes tu ce rang ou on le laisse sur endroit? Autre chose ( diminuer au 2 rang ou au 4 rang ) ça veut tu dire je diminue à l’endroit et à l envers sans diminution et à l endroit je diminue ? Est-ce tel quel ? Merci 🙏
27.05.2024 - 13:43DROPS Design answered:
Bonjour Gaetane, je ne vois malheureusement pas où vous en êtes; mais pour le dos, on ajuste la hauteur des côtes du haut du dos, autrement dit, on tricote 2 cm de côtes, le dernier rang de ces 2 cm sera un rang sur l'envers, ainsi le rang suivant est à tricoter sur l'endroit (on rabat les mailles centrales sur l'endroit). Pour les bretelles, on ajuste la hauteur de la même façon (à quelques rangs près si besoin) pour arrêter par l'avant dernier rang du diagramme (1 rang sur l'endroit) et rabattre ainsi au rang suivant sur l'envers. Bon tricot!
27.05.2024 - 16:22
![]() Gaetane wrote:
Gaetane wrote:
Bonjour ! Là je suis rendu au dos je n y comprends rien ! Y a t il un vidéo svp merci !
27.05.2024 - 00:49DROPS Design answered:
Bonjour Gaetane, le dos se commence de la même façon de chacun des devants: avec A.2 côté emmanchure gauche et A.3 côté emmanchure droite, quand les 2 bordures sont terminées, vous allez alors tricoter toutes les mailles du dos: A.3, jersey et A.2 (vu sur l'endroit). Diminuez en même temps pour les emmanchures de chaque côté. Bon tricot!
27.05.2024 - 08:55
![]() Gaetane wrote:
Gaetane wrote:
Bonjour! Pour le coté gauche, on fait A3 côté emmanchure et A2 côté torsade, mais après ce diagramme on tricote les 27 mailles côté envers ou endroit ? Etc, merci 🙏
26.05.2024 - 00:36DROPS Design answered:
Bonjour Gaetane, les mailles entre les diagrammes se tricotent en jersey (comme pour le devant droit). Bon tricot!
27.05.2024 - 08:33
![]() Gaetane wrote:
Gaetane wrote:
Bonjour ! Suite à ma 1ère question , j ai monté mes 5 mailles tricoter A2 ,sur endroit ,et tricoter sûr envers voilà , c est après ça je saisi pas ? Merci : Tricoter A.2 au-dessus des 4 premières mailles, tricoter ensemble à l'endroit la dernière maille + la 1ère + la 2ème maille après le fil marqueur sur le côté
24.05.2024 - 13:58DROPS Design answered:
Vous allez maintenant attacher les mailles de A.2 aux mailles en attente pour l'emmanchure - regardez la réponse ci-dessous et la vidéo indiquée (également disponible sous l'onglet "vidéos" en haut de page). Bon tricot!
24.05.2024 - 16:01
![]() Gaetane wrote:
Gaetane wrote:
Bonjour! Je comprends pas ce bout là ? RANG 2 (= sur l'envers): Tricoter A.2 au-dessus des 4 premières mailles, tricoter ensemble à l'endroit la dernière maille + la 1ère + la 2ème maille après le fil marqueur sur le côté (autrement dit: les 8-8-8-10-10-12 mailles sur le fil), ainsi, les 5 mailles de A.2 sont tricotées avec les mailles mises en attente sur le fil pour l'emmanchure, tourner.
24.05.2024 - 13:54DROPS Design answered:
Bonjour Gaetane, dans cette vidéo, nous montrons (pour l'autre top, mais la technique est identique si les diagrammes ont des noms différents); comment procéder: vous devez tricoter A.2 (A.4 dans la vidéo) comme avant sur l'endroit, mais en même temps, tricoter ensemble à l'endroit la dernière maile de A.2 et les 2 premières des 8 mailles en attente (dans les 3 premières tailles) = vous avez 5 mailles sur l'aiguille droite et ces mailles ont été attachées à la bordure de l'emmanchure. Bon tricot!
24.05.2024 - 16:00
![]() Gaetane wrote:
Gaetane wrote:
Bonjour, ajuster pour que le tour suivant soit un tour de torsades dans A.1, ça veut tu dire qu après mes 32 cm de hauteur, je fait le rang de la torsade et le rang suivant je fait A1B ? Ou bien je termine par le diagramme A1A et qu après je fait A1B ? Merci !
21.05.2024 - 12:04DROPS Design answered:
Bonjour Gaetane, tricotez quelques rangs en moins/en plus que les 32 cm si besoin, mais commencez A.1B par 1 rang de torsades, autrement dit vous devez avoir tricoté 5 rangs après la dernière torsade de A.1. Bon tricot!
21.05.2024 - 16:19
![]() Gaetane wrote:
Gaetane wrote:
Bonjour! Peut-on le faire plus long ? Merci !
08.05.2024 - 21:40DROPS Design answered:
Bonjour Gaetane, tout à fait, tricotez simplement plus longtemps = jusqu'à la longueur souhaitée avant les emmanchures et continuez comme indiqué; adaptez la quantité en conséquence, votre magasin saura vous y aider, même par mail ou téléphone. Bon tricot!
10.05.2024 - 07:46
![]() Christy wrote:
Christy wrote:
I am to the area I need to start the right front piece but I'm really confused on where I need to cast on. If I cast on near the arm hole I end up knitting backwards (from right needle to left). Is there a video or instructions to help me?
06.04.2024 - 19:22DROPS Design answered:
Dear Christy, you can find all the relevant videos to this to (including what to do for armholes and the V neck) if you click on the "Videos" sign near to the top pf the page , just below the title. I hope you will find the one that can help you. Happy Knitting!
06.04.2024 - 20:21
![]() Angela wrote:
Angela wrote:
Sto lavorando la taglia L, al momento di dividere i 152 non mi tornano i conti. Credo vi sia un errore nelle spiegazioni. Devo sospendere in sequenza 10maglie, 28,28,10maglie,56, 10maglie. Così ho uno scalo di 10maglie e uno di 20. Credo che le 10 maglie tra il davanti destro e il dietro debbano essere 20. Potete verificare? Grazie
30.03.2024 - 21:20DROPS Design answered:
Buonasera Angela, grazie per la segnalazione; abbiamo corretto la versione italiana. Buon lavoro!
01.04.2024 - 20:15
![]() Hinke wrote:
Hinke wrote:
Klopt het dat de schouderbandjes van de voorpanden met naald 5,5 en die van het achterpand met 4,5?
10.09.2023 - 11:38
|
|||||||||||||||||||||||||
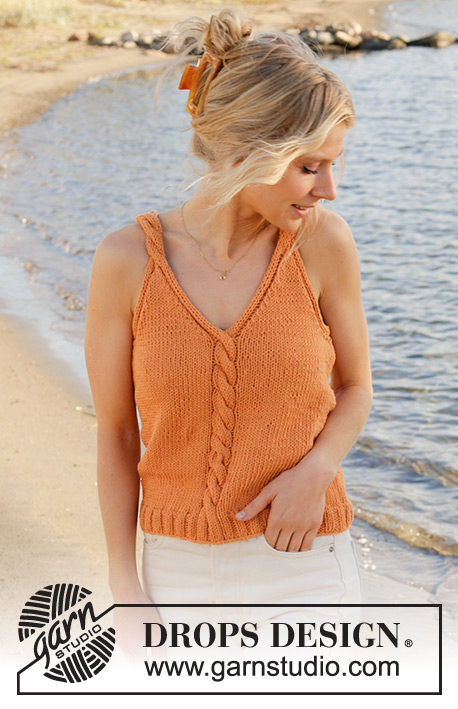
Tangerine Twist Top#tangerinetwisttop |
|||||||||||||||||||||||||
 |
 |
||||||||||||||||||||||||
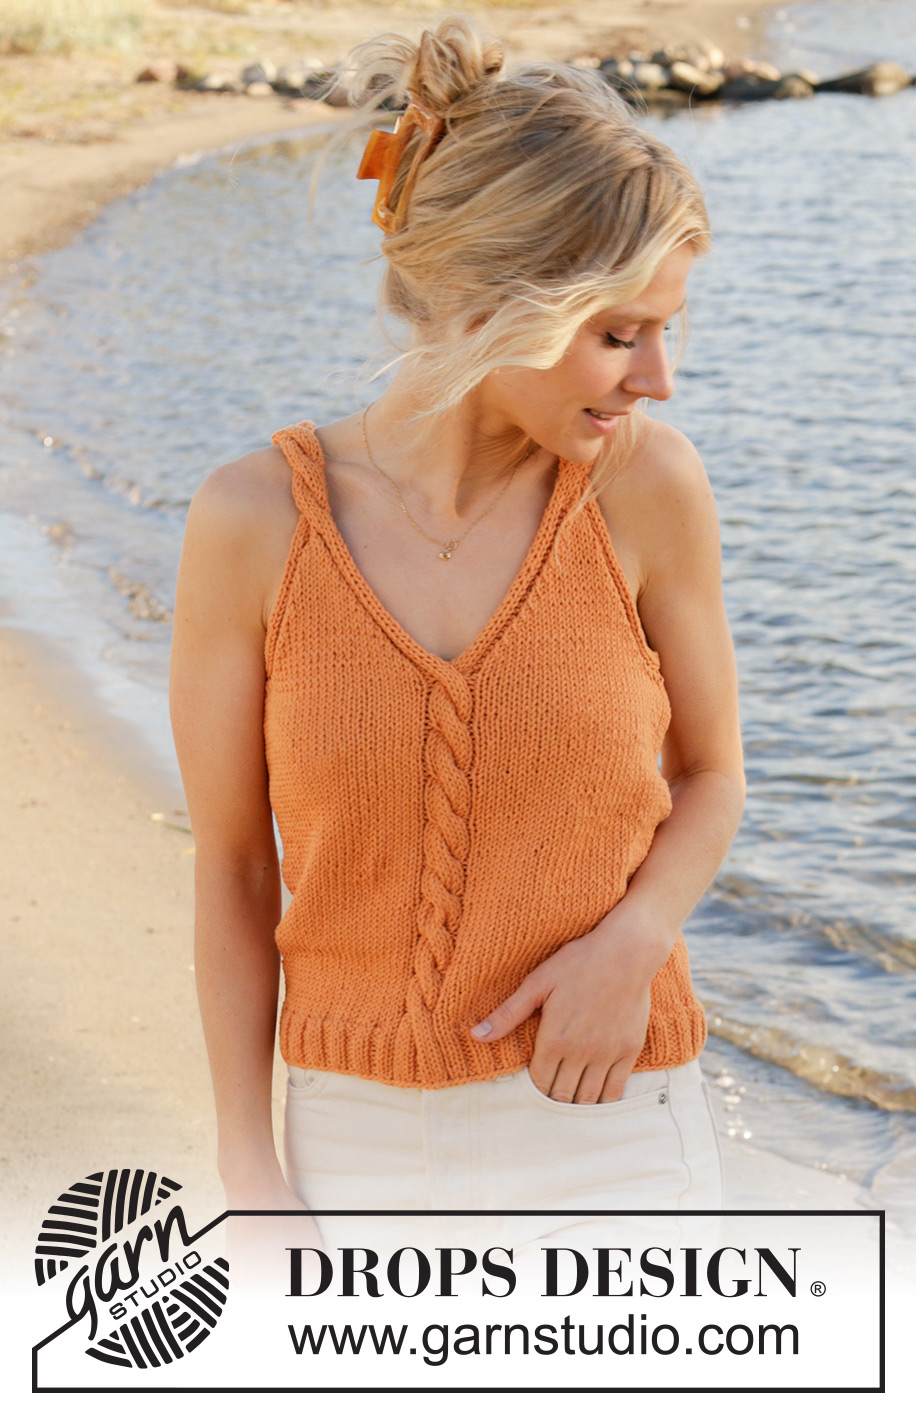
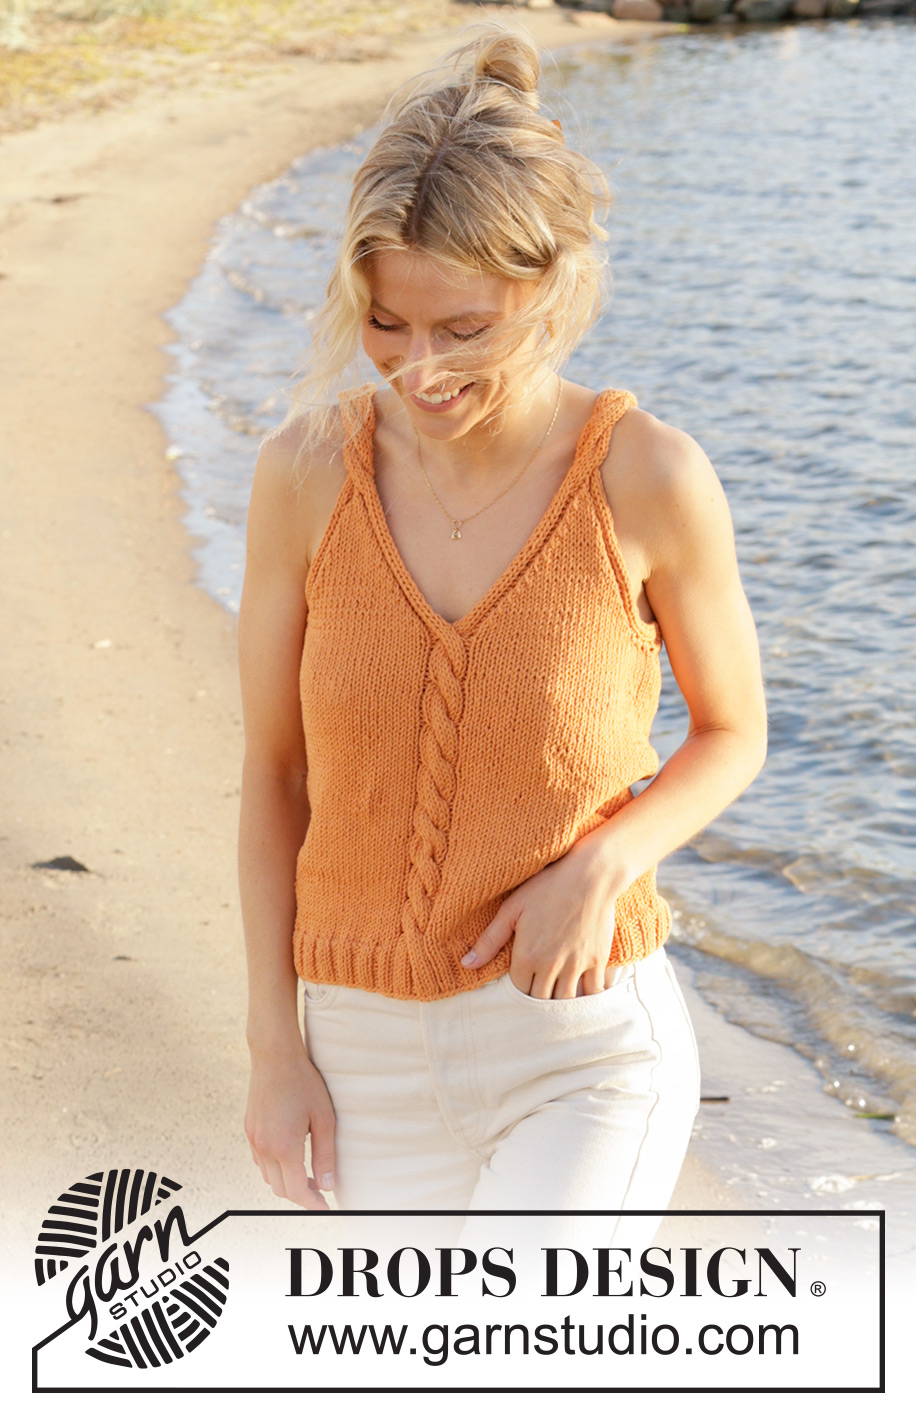
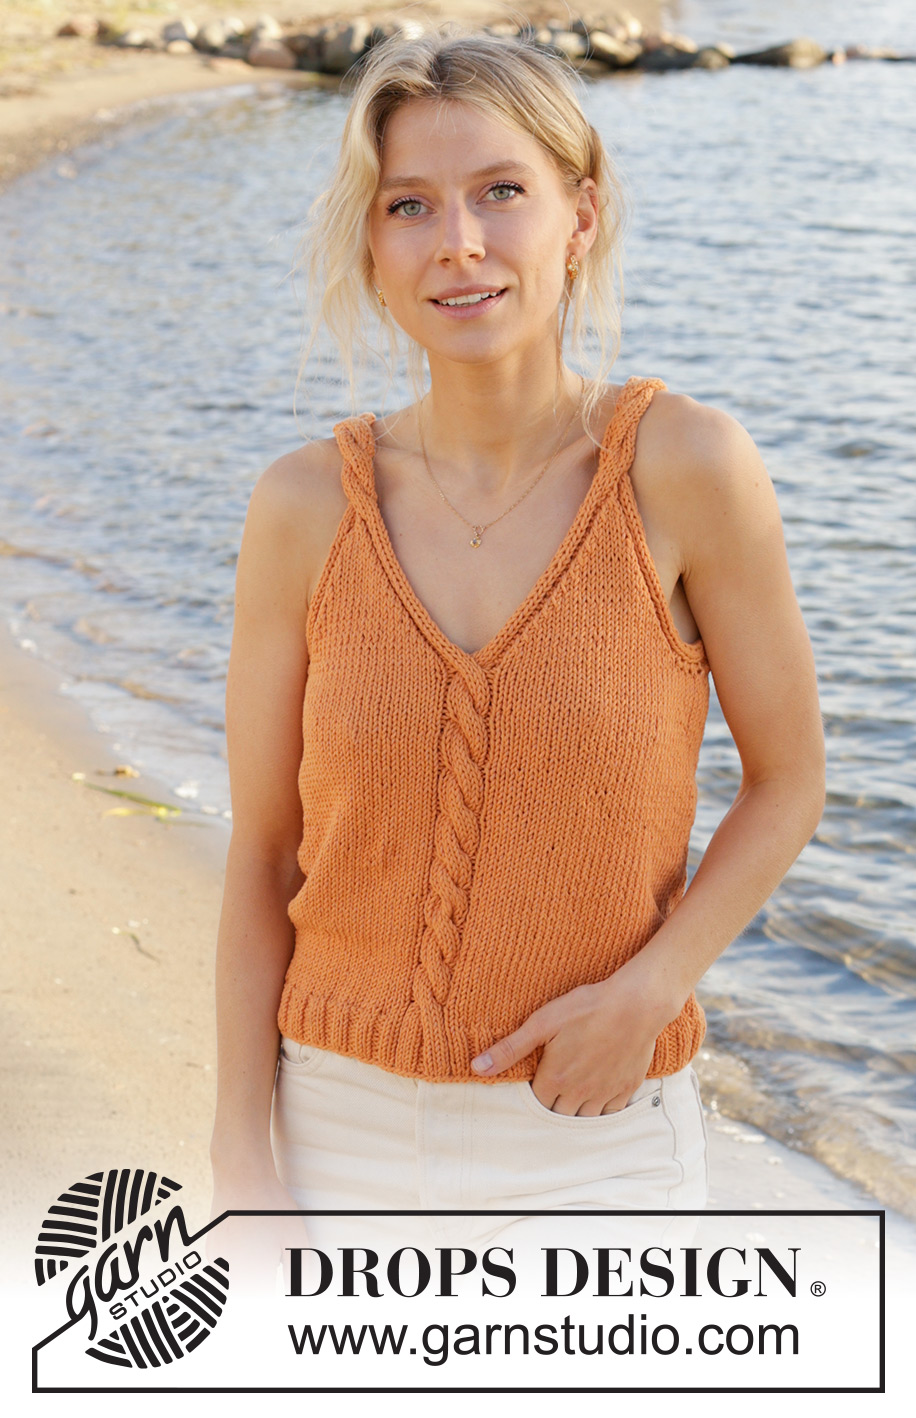
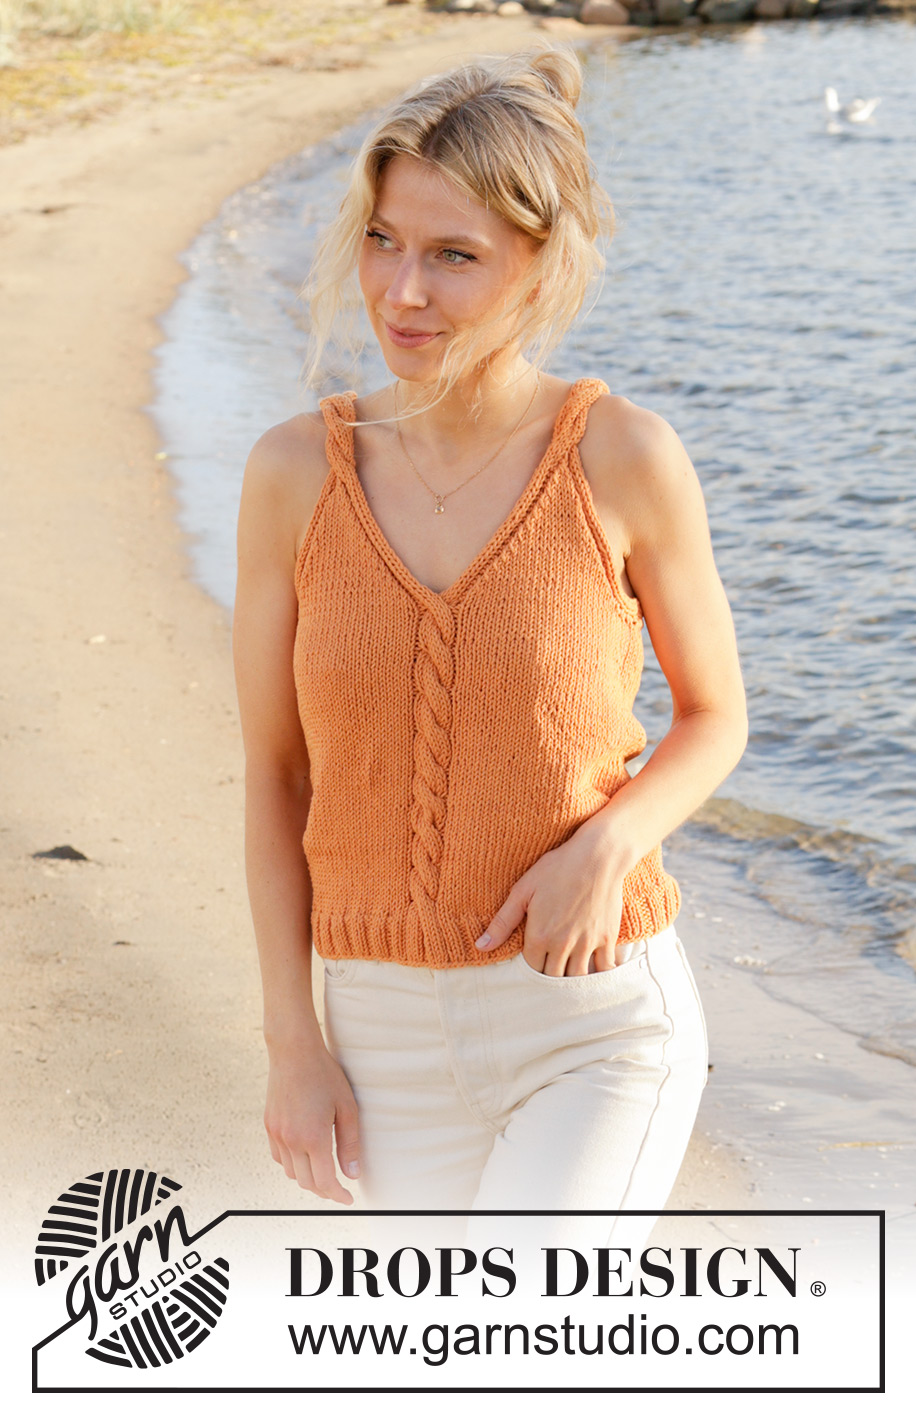
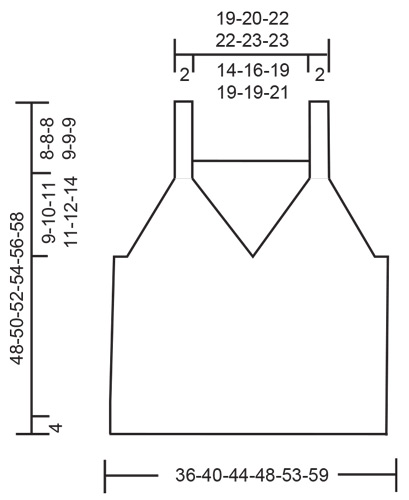
Knitted top in DROPS Paris. Piece is knitted bottom up with cables and V-neck. Size XS – XXL.
DROPS 240-19 |
|||||||||||||||||||||||||
|
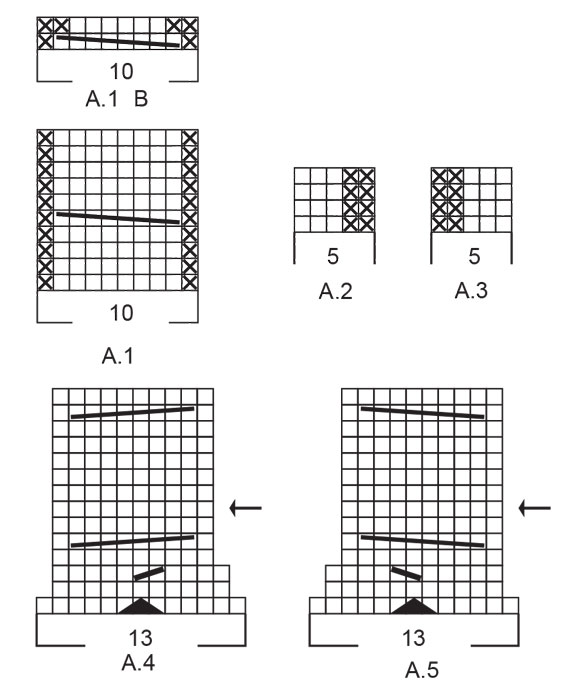
---------------------------------------------------------- EXPLANATION FOR THE PATTERN: ---------------------------------------------------------- PATTERN: See diagrams A.1 to A.5. Diagrams show all rows in pattern seen from the right side. DECREASE TIP: Decrease as follows after A.3: Knit 2 together. Decrease as follows before A.2: Slip 1 stitch knitwise, knit 1, pass slipped stitch over. ---------------------------------------------------------- START THE PIECE HERE: ---------------------------------------------------------- TOP - SHORT OVERVIEW OF THE PIECE: Worked in the round on circular needle, from the bottom and up to V-neck and armholes. Then divide the piece into back piece and right and left front pieces, and finish each part separately. TOP: Cast on 120-132-148-152-168-192 stitches on circular needle size 4.5 mm with DROPS Paris. Knit 1 round, then work rib as follows: Knit 1, * purl 2, knit 2 *, work from *-* over the next 24-28-32-32-36-40 stitches, purl 1, knit 3, purl 2, knit 3, purl 1, * knit 2, purl 2 *, work from *-* stitch until 1 stitch remain, knit 1. Continue rib like this for 4 cm. Switch to circular needle size 5.5 mm, and work next round as follows. Insert 1 marker thread at the beginning of round, knit over the first 25-29-33-33-37-41 stitches and decrease 1-2-3-0-0-1 stitch evenly over these stitches, work A.1 (work A.1 over 1 purl, 3 knit, 2 purl, 3 knit, 1 purl from rib), knit the next 25-29-33-33-37-41 stitches and decrease 1-2-3-0-0-1 stitches evenly over these stitches, insert 1 marker thread here, knit the last 60-64-72-76-84-96 stitches, and decrease 2-0-2-0-0-2 evenly over these stitches = 116-128-140-152-168-188 stitches. There is now 1 marker thread in each side of piece. Move the marker threads upwards when working – they should be used later. When piece measures 30-31-32-33-34-34 cm from cast-on edge, adjust so that next round is an cable round in A.1, work A.1B over stitches in A.1. Work A.1B 1 time vertically. Cut the yarn. Now slip stitches on thread, this is done without working the stitches. Slip the first 8-8-8-10-10-12 stitches at the beginning of round on a thread for armhole, slip the next 21-24-27-28-32-35 stitches on another thread for left front piece, keep the next 21-24-27-28-32-35 stitches on needle for right front piece, slip the next 8-8-8-10-10-12 stitches on a thread for armhole, slip the next 8-8-8-10-10-12 stitches on a thread for armhole, slip the next 42-48-54-56-64-70 stitches on another thread for back piece, and slip the last 8-8-8-10-10-12 stitches on another thread for armhole. Finish each part separately. RIGHT FRONT PIECE: Cast on 5 stitches on circular needle size 5.5 mm with a new ball DROPS Paris. ROW 1 (= right side): Work A.2 over these 5 stitches, turn. ROW 2 (= wrong side): Work A.2 over the first 4 stitches, knit last stitch together with 1st and 2nd stitch after marker thread in the side (i.e. of the 8-8-8-10-10-12 stitches on thread), so that the 5 stitches in A.2 is worked together with stitch on thread for armhole, turn. ROW 3: Work A.2 over these 5 stitches, turn. ROW 4: Work A.2 over the first 4 stitches, knit last stitch together with 3rd and 4th stitch after marker thread, so that the 5 stitches in A.2 is worked together with stitch on thread for armhole, turn. Continue back and forth like this by working last stitch in A.2 together with the next 2 stitches along armhole until all the 8-8-8-10-10-12 stitches along armhole have been worked together with A.2. Finish after a row from wrong side, and work as before (from the wrong side) over the 21-24-27-28-32-35 stitches on thread for right front piece (i.e. work from armhole and until middle of cable = in the middle of A.1B) = 26-29-32-33-37-40 stitches on row. Now work pattern from the right side, and decrease for V-neck and armhole as follows: Work A.3 over the first 5 stitches, knit until 5 stitches remain, A.2 over the last 5 stitches. Continue back and forth like this, AT THE SAME TIME on first row from right side decrease for V-neck and armhole as explained below - read DECREASE TIP. V-NECK: Decrease for V-neck every other row 9-10-11-11-12-13 times in total. ARMHOLES: Decrease for armhole every other row 0-2-5-7-12-14 times, then every 4th row 4-4-3-2-0-0 times. After all decreases are done there are 13 stitches on needles. Now work A.4 over the last 13 stitches. When A.4 has been worked vertically, 10 stitches remain on needle. Repeat the last 8 rows in diagram (from row with arrow) until piece measures 17-18-19-20-21-23 cm from the first decrease for V-neck - adjust to finish after a row with cable. Cast off from wrong side with purl, at the same time purl 2 and 2 stitches together. The top measures total approx. 48-50-52-54-56-58 cm in total from cast-on edge. LEFT FRONT PIECE: Cast on 5 stitches on circular needle size 5.5 mm with DROPS Paris. ROW 1 (= right side): Work A.3 over the first 4 stitches, purl last stitch together with 1st and 2nd stitch after marker thread in the side (i.e. of the 8-8-8-10-10-12 stitches on thread), so that the 5 stitches in A.3 is worked together with stitch on thread for armhole, turn. ROW 2 (= wrong side): Work A.3 over these 5 stitches, turn. ROW 3: Work A.3 over the first 4 stitches, purl last stitch together with 3rd and 4th stitch after marker thread, so that the 5 stitches in A.3 is worked together with stitch on thread for armhole, turn. Continue back and forth like this by working last stitch in A.3 together with the next 2 stitches along armhole until all the 8-8-8-10-10-12 stitches along armhole have been worked together with A.3. Finish with a row from wrong side. Now work pattern from the right side, and decrease for V-neck and armhole as follows: Work A.3 over the first 5 stitches, until 5 stitches remain, A.2 over the last 5 stitches. Continue back and forth like this, AT THE SAME TIME on first row from right side decrease for V-neck and armhole as explained below - read DECREASE TIP. V-NECK: Decrease for V-neck every other row 9-10-11-11-12-13 times in total. ARMHOLES: Decrease for armhole every other row 0-2-5-7-12-14 times, then every 4th row 4-4-3-2-0-0 times. After all decreases are done there are 13 stitches on needles. Now work A.5 over the last 13 stitches. When A.5 has been worked vertically, 10 stitches remain on needle. Repeat the last 8 rows in diagram (from row with arrow) until piece measures 17-18-19-20-21-23 cm from the first decrease for neck - adjust to finish after a row with cable. Cast off from wrong side with purl, at the same time purl 2 and 2 stitches together. The top measures approx. 48-50-52-54-56-58 cm in total. BACK PIECE: Edge on left armhole: Cast on 5 stitches on circular needle size 5.5 mm with a new ball DROPS Paris. ROW 1 (= right side): Work A.2 over all stitches, turn. ROW 2 (= wrong side): Work A.2 over the first 4 stitches, knit last stitch together with 1st and 2nd stitch after marker thread in the side (i.e. of the 8-8-8-10-10-12 stitches on thread), so that the 5 stitches in A.2 is worked together with stitch on thread for armhole, turn. ROW 3: Work A.2 over these 5 stitches, turn. ROW 4: Work A.2 over the first 4 stitches, knit last stitch together with 3rd and 4th stitch after marker thread so that the 5 stitches in A.2 is worked together with back piece, turn. Continue back and forth like this by working last stitch in A.2 together with the next 2 stitches along armhole until all the 8-8-8-10-10-12 stitches along armhole have been worked together with A.2. Finish with a row from wrong side. Put aside. Edge on right armhole: Cast on 5 stitches on circular needle size 5.5 mm with DROPS Paris. ROW 1 (= right side): Work A.3 over the first 4 stitches, purl last stitch together with 1st and 2nd stitch after marker thread in the side (i.e. of the 8-8-8-10-10-12 stitches on thread), so that the 5 stitches in A.3 is worked together with back piece, turn. ROW 2 (= wrong side): Work A.3 over these 5 stitches, turn. ROW 3: Work A.3 over the first 4 stitches, purl last stitch together with 3rd and 4th stitch after marker thread, so that the 5 stitches in A.3 is worked together with stitch on thread for armhole, turn. Continue back and forth like this by working last stitch in A.3 together with the next 2 stitches along armhole until all the 8-8-8-10-10-12 stitches along armhole have been worked together with A.3. Finish with a row from wrong side. Now work stitches from thread for back piece together with the 5 stitches for edge along armhole from right side as follows: Work A.3 over the first 5 stitches, knit over the 42-48-54-56-64-70 stitches from thread for back piece, work A.2 over the last 5 stitches (= 52-58-64-66-74-80 stitches on row), at the same time begin decrease for armhole – remember DECREASE TIP. Decrease for armhole in each side every other row 1-2-5-7-12-14 times, then every 4th row 4-4-3-2-0-0 times= 42-46-48-48-50-52 stitches. Continue back and forth with knit over knit and purl over purl until piece measures 9-10-11-11-12-14 cm - from first decrease for armhole. Work 1 row from right side with knit over knit and purl over purl, and increase 0-0-2-2-0-2 stitches evenly (but not over the 5 outermost stitches in each side) = 42-46-50-50-50-54 stitches. Work 1 row in pattern from wrong side. Switch to circular needle size 4.5 mm. Now work rib as follows: Knit 3, purl 2, knit 2, purl 1, * knit 2, purl 2 *, work from *-* until 10 stitches remain on row, knit 2, purl 1, knit 2, purl 2, knit 3. Continue like this back and forth until rib measures 2 cm – adjust so that next row is from right side, work from next to last row in A.5 over the first 10 stitches before these stitches are slipped on a thread (= strap), cast off with knit over knit and purl over purl over the next 22-26-30-30-30-34 stitches, work from next to last row in A.4 over the last 10 stitches on row (= strap). Repeat the pattern from row with arrow back and forth over these 10 stitches until strap measures approx. 6-6-6-7-7-7 cm - adjust to finish after next to last row in diagram. Cast off from wrong side with purl, at the same time purl 2 and 2 stitches together. Slip 10 stitches from thread back on circular needle and work last row in A.5 (= from wrong side). Then repeat the pattern from row with arrow until strap measures approx. 6-6-6-7-7-7 cm - adjust to finish after next to last row with cable. Cast off from wrong side with purl, at the same time purl 2 and 2 stitches together. ASSEMBLY: Sew together the straps with grafting/kitchener stitches. Sew together cast-on edge in the side where 5 new stitches were cast on (A.2/A.3). Sew with grafting/kitchener stitches to avoid a chunky seam. Fasten off. |
|||||||||||||||||||||||||
Diagram explanations |
|||||||||||||||||||||||||
|
|||||||||||||||||||||||||
 |
|||||||||||||||||||||||||
 |
|||||||||||||||||||||||||
Have you finished this pattern?Tag your pictures with #dropspattern #tangerinetwisttop or submit them to the #dropsfan gallery. Do you need help with this pattern?You'll find 25 tutorial videos, a Comments/Questions area and more by visiting the pattern on garnstudio.com. © 1982-2026 DROPS Design A/S. We reserve all rights. This document, including all its sub-sections, has copyrights. Read more about what you can do with our patterns at the bottom of each pattern on our site. |
|||||||||||||||||||||||||


With over 40 years in knitting and crochet design, DROPS Design offers one of the most extensive collections of free patterns on the internet - translated to 17 languages. As of today we count 324 catalogues and 12290 patterns translated into English (UK/cm). 12290
We work hard to bring you the best knitting and crochet have to offer, inspiration and advice as well as great quality yarns at incredible prices! Would you like to use our patterns for other than personal use? You can read what you are allowed to do in the Copyright text at the bottom of all our patterns. Happy crafting!
Post a comment to pattern DROPS 240-19
We would love to hear what you have to say about this pattern!
If you want to leave a question, please make sure you select the correct category in the form below, to speed up the answering process. Required fields are marked *.