
Popular categories
Looking for a yarn?


Comments / Questions (50)
![]() Amber Again wrote:
Amber Again wrote:
It's OK. I worked it out.
12.05.2024 - 20:18
![]() Amber Again wrote:
Amber Again wrote:
Hi, my apologies. Please ignore last question. My problem is after knitting 21 for the 2nd sleeve, I have 17 stitches left not 13. 96 - 12 - 21 - 25 - 21 leaves 17.
12.05.2024 - 18:26
![]() Amber Again wrote:
Amber Again wrote:
Hi there, Me again. I'm still confused. How does inserting 4 stitch markers create 4 more stitches? Do I need to increase here as well?
12.05.2024 - 18:01
![]() Amber wrote:
Amber wrote:
Hello, I am knitting 233-10 size large. So I have cast on 96 stitches. Then it says knit 12, 21, 25, 21,13 with 4 stitches increased. This adds up to 96 but the pattern says 100. The maths isn't right.can you help me please. Amber
07.05.2024 - 17:49DROPS Design answered:
Dear Amber, note that the 4 markers are each inserted in one stitch, these might be the 4 sts you are missing: 12, 21, 25, 21, 13 + 4 sts increased + 4 stitches with each a marker = 100. Happy knitting!
08.05.2024 - 07:32
![]() Eva Arnström Sundman wrote:
Eva Arnström Sundman wrote:
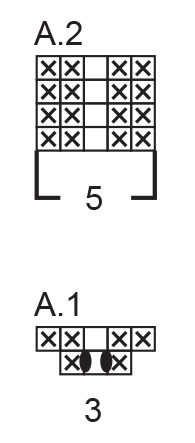
Borde det inte vara inskrivet omslag, dvs ökningar, även i A2 på samma sätt som i A1?
22.04.2024 - 20:44DROPS Design answered:
Hej Eva, A.1 strikkes kun 1 gang og her tager du ud i midten så du kan fortsætte ifølge A.2. Udtagningerne til raglan er ikke tegnet ind i diagrammet.
23.04.2024 - 15:13
![]() Viviana wrote:
Viviana wrote:
Buongiorno, Cosa intendete quando scrivete di lavorare A2 su A1 nella sezione scollatura?. E come si può aumentare le maglie vicino a segna punti (A1) e ottenere il modello al rovescio uniforme? Grazie
20.04.2024 - 10:26DROPS Design answered:
Buonasera Viviana, alla fine di A.2 deve lavorare A,1 sulla scollatura. Riguardo gli aumenti, a quale parte del modello sta facendo riferimento? Buon lavoro!
21.04.2024 - 23:08
![]() Jane wrote:
Jane wrote:
Hi, I'm a bit confused with Yoke. I have 140 stitches for XXL after the neckline, but not sure how to increase for raglan. Also, when it says "Start mid-back, work stocking stitch and A.2, continuing to increase for raglan on the body on every round 2-6 more times and every other round on the sleeves1-3 more time", which side of the sleeves should increase?
21.11.2023 - 23:45DROPS Design answered:
Hi Jane, You began A.2 on the neckline and the diagram is continued on the yoke, with stocking stitch across the other stitches. The increases for raglan are different on the body and sleeves and at this stage you increase only on the body the first round (before markers 1 and 3 and after markers 2 and 4), then on both sides of all A.2 on the 2nd round (on both the body and sleeves). Do this twice on the body in your size (one time on the sleeves). Then continue before and after all A.2, every 2nd round 10 times. Continue by following the instructions, with these explanations in mind. Hope this helps and happy knitting! '
22.11.2023 - 06:46
![]() Ayse Coskun wrote:
Ayse Coskun wrote:
Spice Market, herre bluse, størrelse M- Jeg prøver at strikke til min søn. Men jeg kan ikke forstå godt strikning af RAGLAN! Efter Dobbelt Halskant har vi 96 masker. OK men hvordan kan jeg få 128 masker efter Halsudskæring? Til sidst: Kan I vise os, den slags Raglan under Tips&Hjælp sider? Med venlig hilsen.
10.09.2023 - 15:55DROPS Design answered:
Hei Ayse. Jo, du har 96 masker etter den doble halskanten er ferdig. Nå skal det strikkes forkortete pinner, A.1 og økning til raglan. Når du strikker A.1 økes det med 2 masker hver gang A.1 strikkes + raglan i forkortete pinner (8+4+8+4 økte masker til raglan). Du har da 96 masker (halsen) + 8 masker (A.1) + 24 (raglansøkninger i forkortete pinner) = 96+8+24= 128 masker. Ta en titt på videoen: Hvordan tages der ud til raglan og strikkes forkortede pinde samtidigt Ikke samme raglan (A.1), men kanskje vil være en hjelp å se. mvh DROPS Design
18.09.2023 - 10:56
![]() Lise wrote:
Lise wrote:
Er I vildrede det er første gang jeg prøver raglan.i fx mønstret når man tager ud indenfor vrang maskerne vil det ikke give vifte og at der derfor bliver længere mellemrum mellem de 2 vrang og midtersømmen?
29.04.2023 - 16:11
![]() Shah wrote:
Shah wrote:
Hi again so after I do the 8 stitch increase I turn my work 2 stitches after marker 2 or marker 3? Cause turning work at marker 2 would cause me to knit past marker 1 and 4 to get to marker 3 which would not really created a wedge like the short row is looking for .
24.04.2023 - 01:39
|
||||||||||
Spice Market#spicemarketsweater |
||||||||||
 |
 |
|||||||||
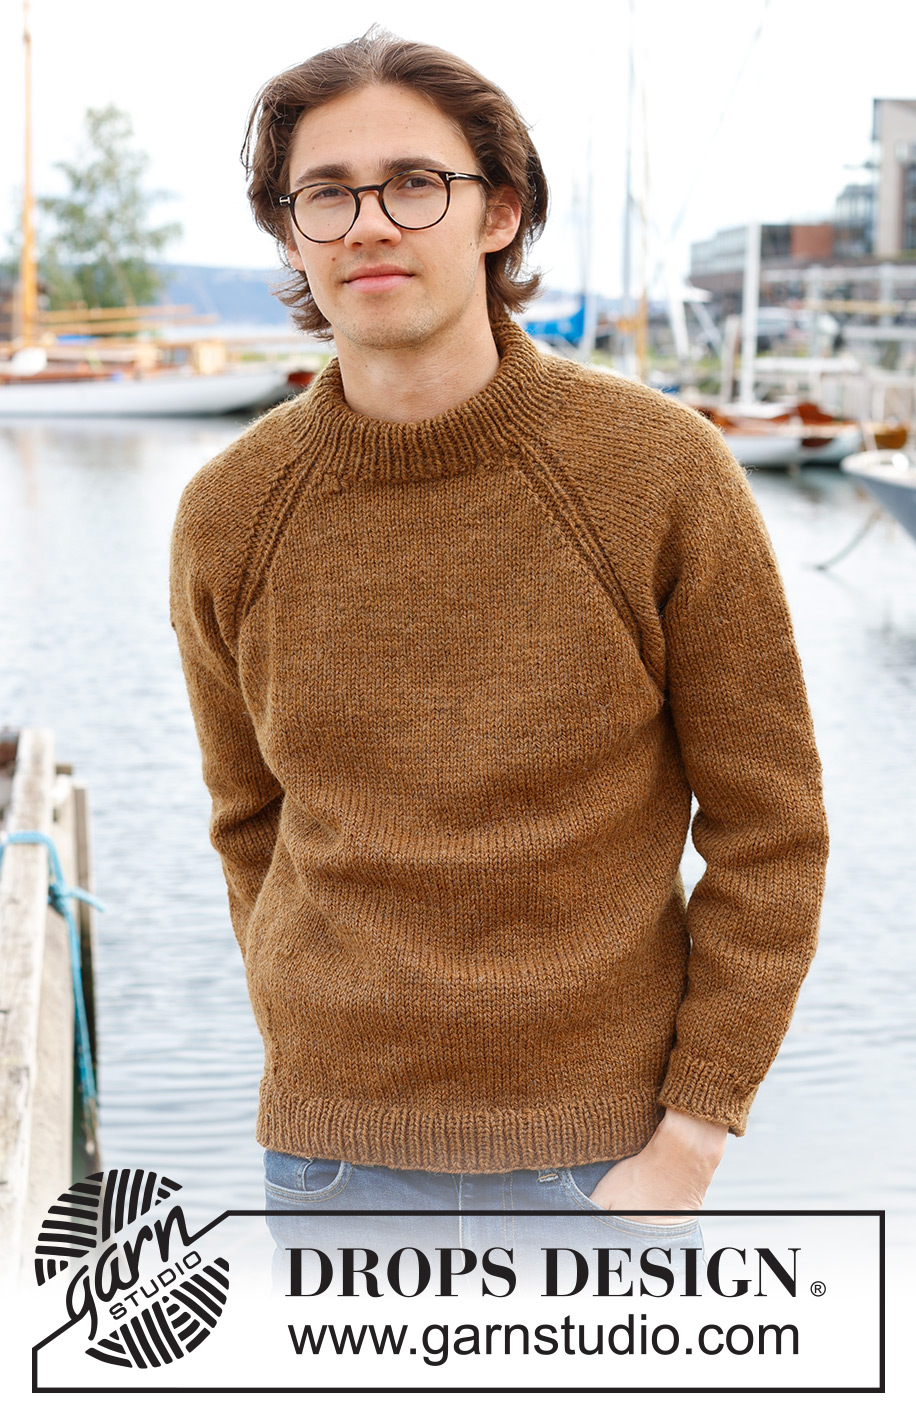
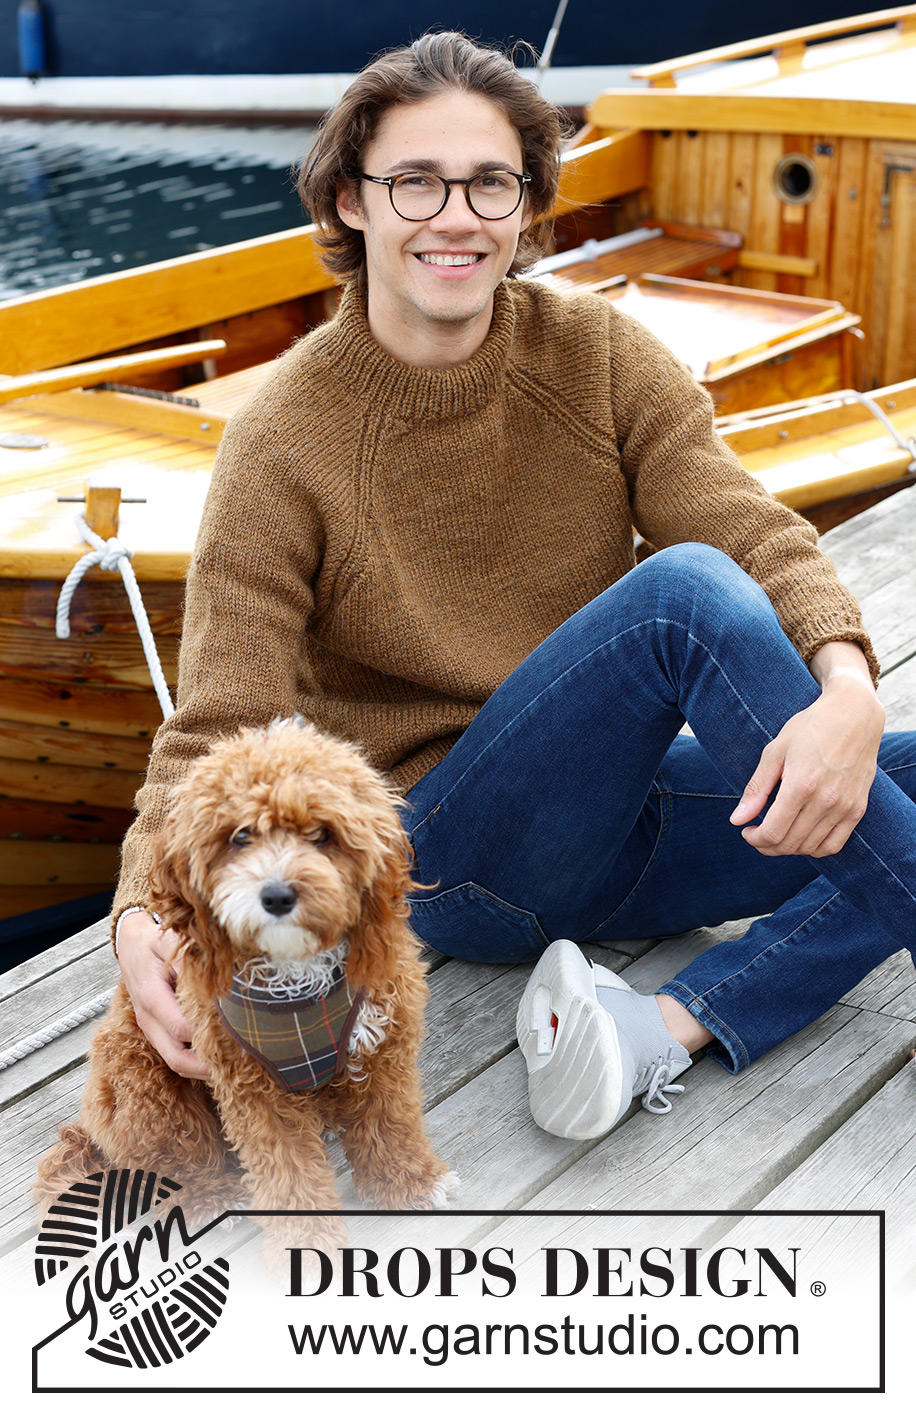
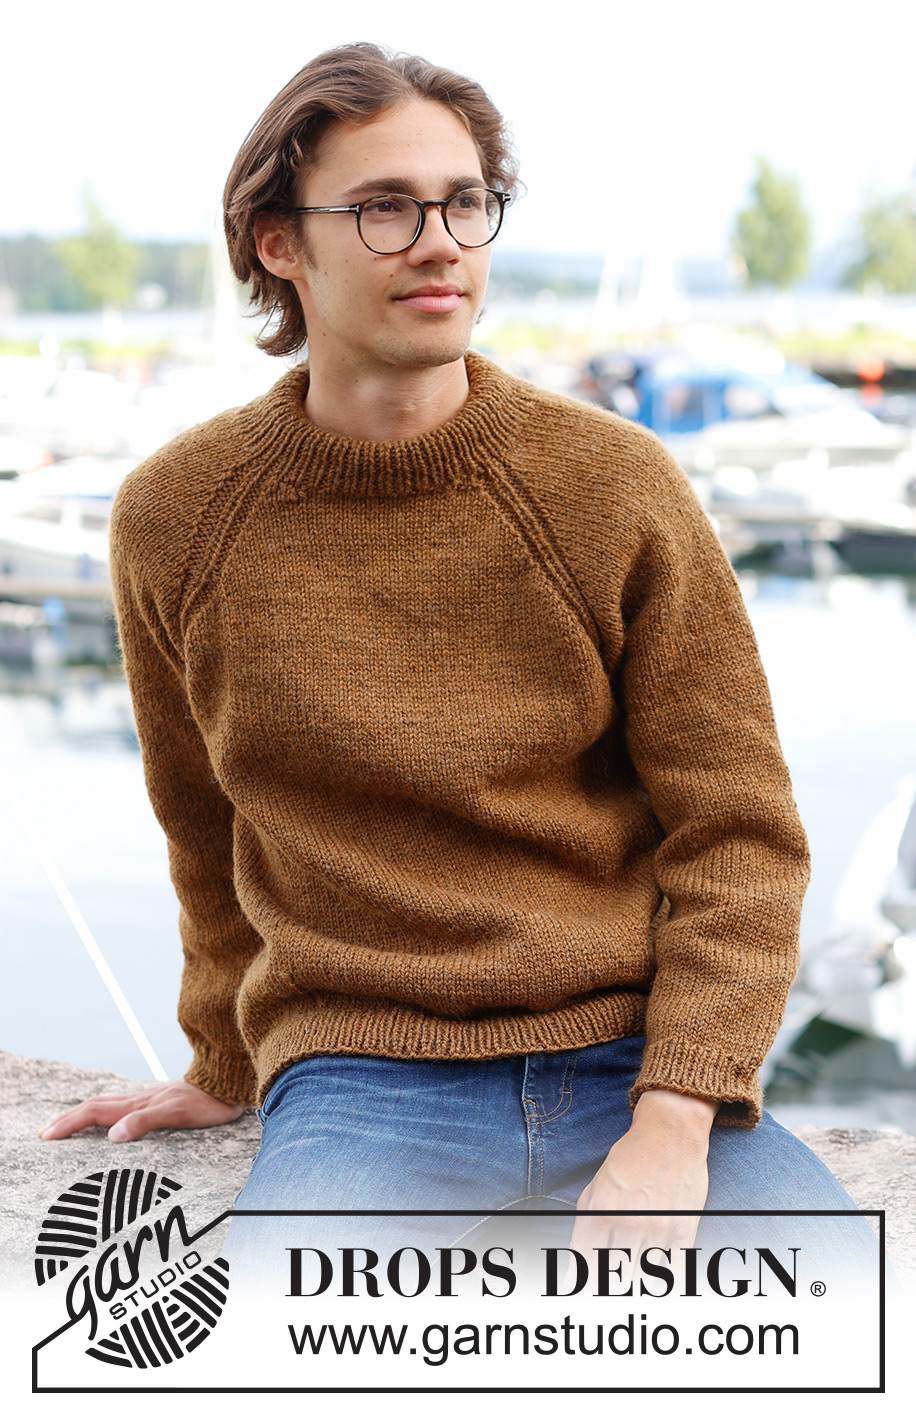
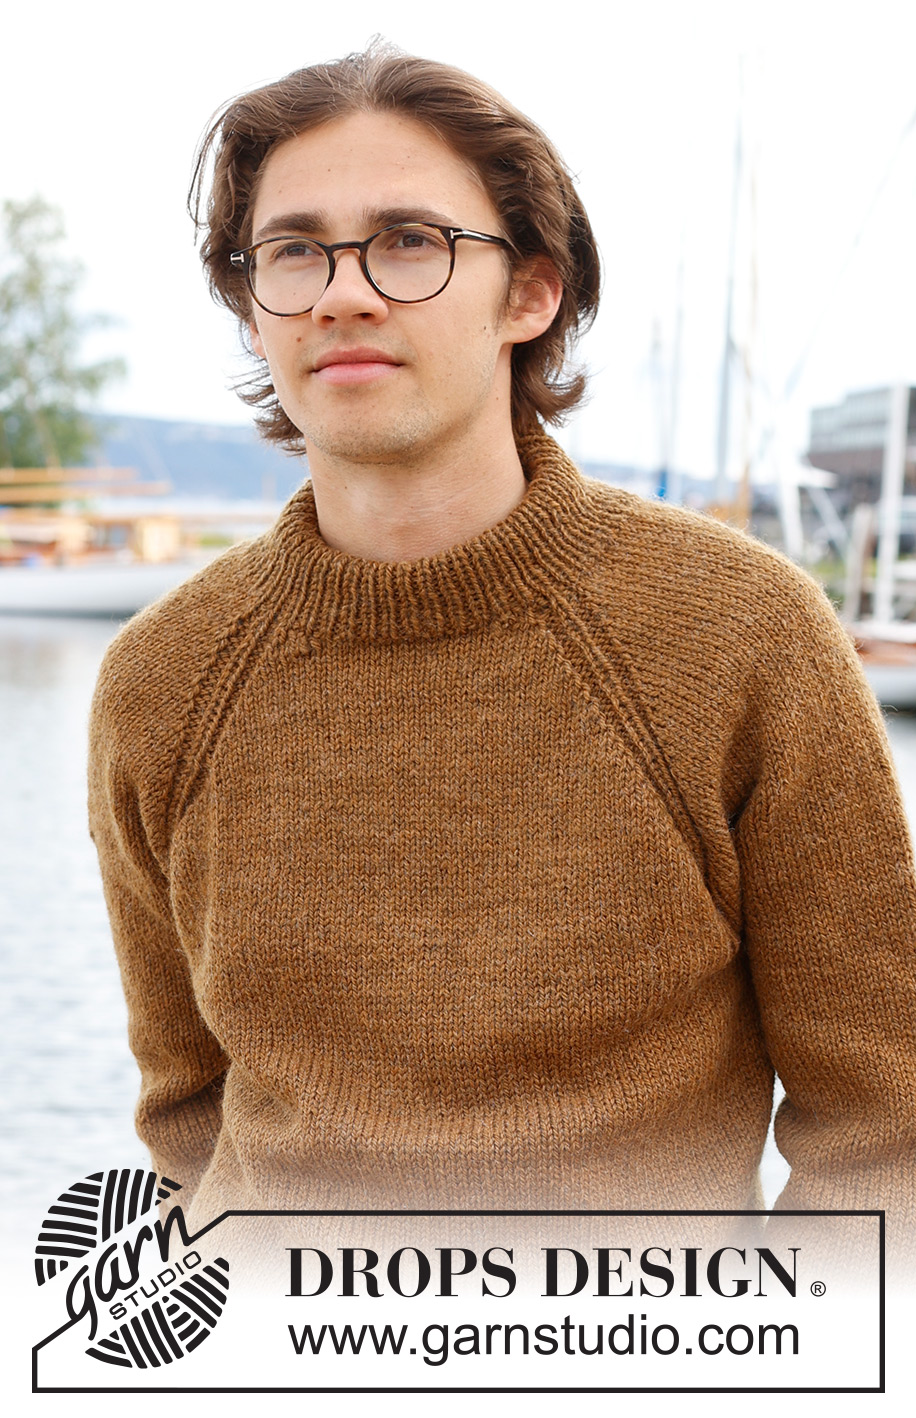
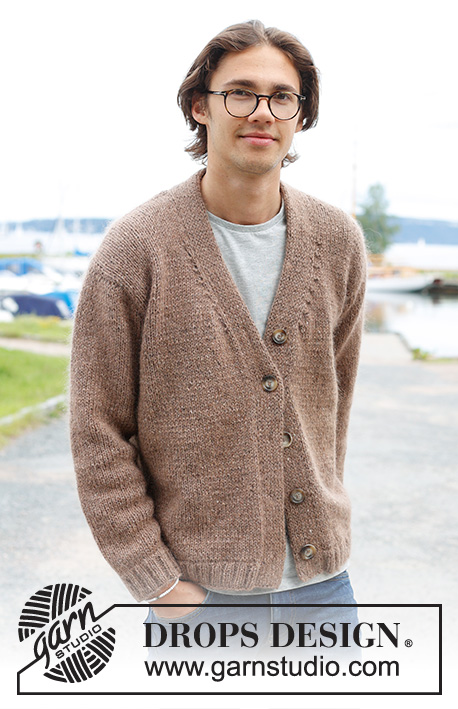
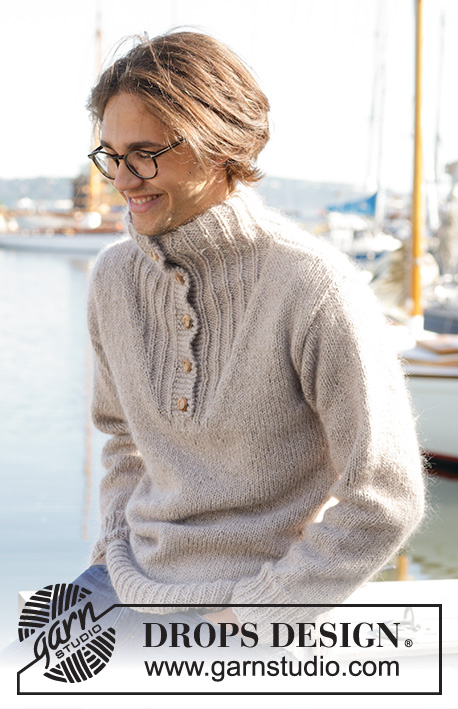
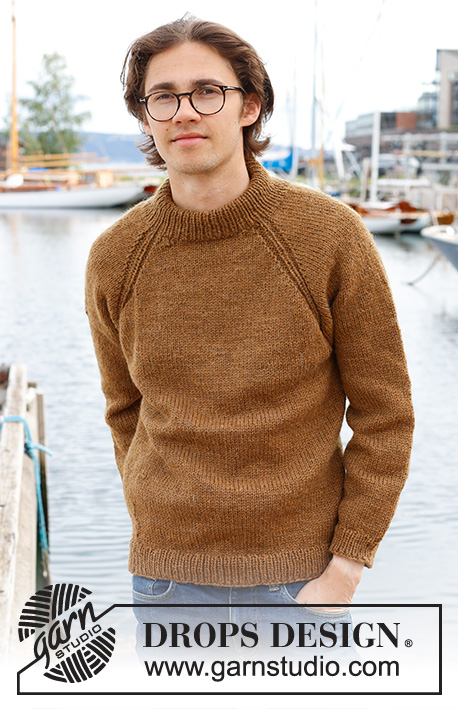
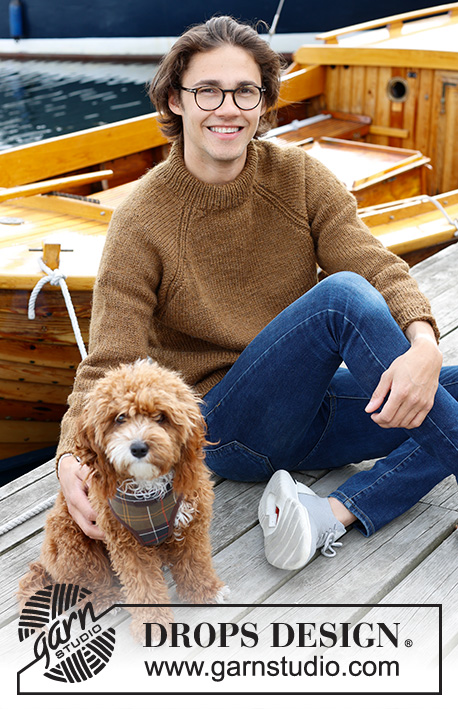
Knitted jumper for men in DROPS Alaska. The piece is worked top down with stocking stitch, double neck and raglan. Sizes S - XXXL.
DROPS 233-10 |
||||||||||
|
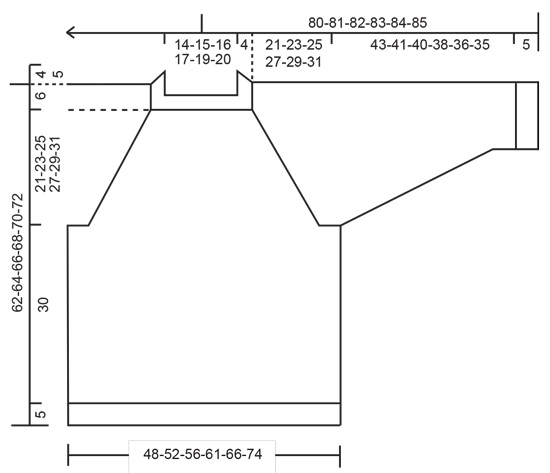
------------------------------------------------------- EXPLANATIONS FOR THE PATTERN: ------------------------------------------------------- PATTERN: See diagrams A.1 and A.2. The diagrams show all rows in the pattern from the right side. RAGLAN: Increases vary on the body and sleeves and in the different sizes. Increase before/after A.1/A.2 (the marker-stitch is the middle stitch in A.1/A.2). Increase for the body before markers 1 and 3 and after markers 2 and 4 when working from the right side, after markers 1 and 3 and before markers 2 and 4 when working from the wrong side. Increase for the sleeves after markers 1 and 3 and before markers 2 and 4. Always increase from the right side on the sleeves. Increase by making 1 yarn over. When working back and forth work the yarn overs from the wrong side as follows: BEFORE A.1/A.2: Purl the back loop. No hole. AFTER A.1/A.2: Slip the yarn over off the needle and replace it twisted (insert the left needle from the back when replacing it). Purl the front loop. No hole. When working back and forth work the yarn overs from the right side as follows (also applies when working in the round): BEFORE A.1/A.2: Slip the yarn over off the needle and replace it twisted (insert the left needle from the back when replacing it). Knit the front loop (the stitch twists to the right. No hole. AFTER A.1/A.2 Knit the back loop (the stitch twists to the left). No hole. DECREASE TIP (for sleeves): Start 3 stitches before the marker, knit 2 together, knit 2 (marker sits between these 2 stitches), slip 1 stitch as if to knit, knit 1 and pass the slipped stitch over the knitted stitch. ------------------------------------------------------- START THE PIECE HERE: ------------------------------------------------------- JUMPER – SHORT OVERVIEW OF THE PIECE: The neck and yoke are worked in the round with circular needle, from mid back and top down. The yoke is divided for body and sleeves and the body is continued in the round with circular needle. The sleeves are worked with short circular needle/double pointed needles. DOUBLE NECK: Cast on 88-92-96-100-104-108 stitches with short circular needle size 5 mm and DROPS Alaska. Change to circular needle size 4 mm and work rib in the round (knit 1, purl 1) for 9-9-9-11-11-11 cm. On the next round insert 4 markers and increase 4 stitches as described below. The markers are used when increasing for raglan (each marker is inserted in a knitted stitch from the rib): Knit 10-12-12-14-14-16 and increase 1 stitch (half back piece), insert marker-1 in the next stitch, knit 21 (sleeve), insert marker-2 in the next stitch, knit 21-23-25-27-29-31 and increase 2 stitches evenly spaced (front piece), insert marker-3 in the next stitch, knit 21 (sleeve), insert marker-4 in the next stitch, knit the last 11-11-13-13-15-15 stitches and increase 1 stitch (half back piece) = 92-96-100-104-108-112 stitches. Cut the strand. NECKLINE: Change to circular needle size 5 mm and work a neckline with short rows, AT THE SAME TIME increase for raglan as described below. In addition work A.1 at each marker (the marker-stitches are the middle stitches in each A.1). Start from the right side 2 stitches before marker-stitch-3 (front left neck when the garment is worn). Work stocking stitch, A.1 and increase for RAGLAN – read description above, until you have worked 2 stitches past marker-stitch-2 (front right of neck and 8 stitches increased for raglan). Turn, tighten the strand and work from the wrong side (increasing for raglan on the body only) to 2 stitches past where the short rows began by marker-3 (4 increased stitches). Turn and work from the right side, increasing for raglan and working A.2 over A.1, to 2 stitches past where you turned last time by marker-2. Turn, tighten the strand and work from the wrong side (increasing for raglan on the body only) to 2 stitches past marker-3. Cut the strand. YOKE: = 124-128-132-136-140-144 stitches. Work in the round over all stitches as follows: SIZES S, M, L and XL: Start mid-back, work stocking stitch and A.2 and increase for raglan on the body and sleeves every 2nd round 2-8-10-11 times = 140-192-212-224 stitches. Continue working and increasing, but every 2nd increase is only on the body (4 stitches increased); i.e. increase on the body every 2nd round and on the sleeves every 4th round. Increase like this 18-15-14-16 times on the body (9-7-7-8 times on the sleeves). A total of 24-27-28-31 times on the body and 13-17-19-21 times on the sleeves. After the last increase there are 248-280-296-320 stitches. Go to ALL SIZES. SIZES XXL and XXXL: Start mid-back, work stocking stitch and A.2, continuing to increase for raglan on the body on every round 2-6 more times and every other round on the sleeves1-3 more time = 152-180 stitches. Then increase on the body and sleeves every 2nd round 10-7 times = 232-236 stitches. Continue working and increasing, but every 2nd increase is only on the body (4 stitches increased); i.e. increase on the body every 2nd round and on the sleeves every 4th round. Increase like this 18-22 times on the body (9-11 times on the sleeves). A total of 34-39 times on the body and 22-23 times on the sleeves. After the last increase there are 340-368 stitches. Go to ALL SIZES. ALL SIZES. = 248-280-296-320-340-368 stitches. Continue with stocking stitch and A.2 without further increases until the piece measures 21-23-25-27-29-31 cm mid-front – measured from the neck. Now divide for the body and sleeves as follows: Work 37-42-43-48-51-58 stitches (half back piece), place the next 49-57-61-65-67-69 stitches on a thread for the sleeve, cast on 6-6-8-8-10-10 stitches (in side under sleeve), work 75-83-87-95-103-115 stitches (front piece), place the next 49-57-61-65-67-69 stitches on a thread for the sleeve, cast on 6-6-8-8-10-10 stitches (in side under sleeve), work the last 38-41-44-47-52-57 stitches (half back piece). Finish the body and sleeves separately. The piece is now measured from here! BODY: = 162-178-190-206-226-250 stitches. Work stocking stitch in the round until the body measures 30 cm from the division. Knit 1 round and increase 20-20-22-26-26-32 stitches evenly spaced = 182-198-212-232-252-282 stitches. Change to circular needle size 4 mm and work rib (knit 1, purl 1) for 5 cm. Cast off a little loosely with knit over knit and purl over purl. The jumper measures approx. 62-64-66-68-70-72 cm from the shoulder down. SLEEVES: Place the 49-57-61-65-67-69 stitches from the thread on the one side of the piece on short circular needle/double pointed needles size 5 mm and knit up 1 stitch in each of the 6-6-8-8-10-10 stitches cast on under the sleeve = 55-63-69-73-77-79 stitches. Insert a marker in the middle of the new stitches under the sleeve. Allow the marker to follow your work onwards; it is used when decreasing under the sleeve. Work stocking stitch in the round. When the sleeve measures 4 cm decrease 2 stitches on each side of the marker – read DECREASE TIP. Decrease like this every 6-3½-3-2½-2-2 cm a total of 7-10-12-13-15-15 times = 41-43-45-47-47-49 stitches. Continue working until the sleeve measures 43-41-40-38-36-35 cm from the division (or to desired length; there is approx. 5 cm left). Knit 1 round and increase 5-5-5-5-7-7 stitches evenly spaced = 46-48-50-52-54-56 stitches. Change to double pointed needles size 4 mm and work rib (knit 1, purl 1) for 5 cm. Cast off a little loosely with knit over knit and purl over purl. The sleeve measures approx. 48-46-45-43-41-40 cm from the division. Work the other sleeve in the same way. ASSEMBLY: Fold the neck double to the inside and fasten with a stitch in each raglan-line. |
||||||||||
Diagram explanations |
||||||||||
|
||||||||||
 |
||||||||||
 |
||||||||||
Have you finished this pattern?Tag your pictures with #dropspattern #spicemarketsweater or submit them to the #dropsfan gallery. Do you need help with this pattern?You'll find 31 tutorial videos, a Comments/Questions area and more by visiting the pattern on garnstudio.com. © 1982-2026 DROPS Design A/S. We reserve all rights. This document, including all its sub-sections, has copyrights. Read more about what you can do with our patterns at the bottom of each pattern on our site. |
||||||||||


With over 40 years in knitting and crochet design, DROPS Design offers one of the most extensive collections of free patterns on the internet - translated to 17 languages. As of today we count 324 catalogues and 12239 patterns translated into English (UK/cm). 12239
We work hard to bring you the best knitting and crochet have to offer, inspiration and advice as well as great quality yarns at incredible prices! Would you like to use our patterns for other than personal use? You can read what you are allowed to do in the Copyright text at the bottom of all our patterns. Happy crafting!
Post a comment to pattern DROPS 233-10
We would love to hear what you have to say about this pattern!
If you want to leave a question, please make sure you select the correct category in the form below, to speed up the answering process. Required fields are marked *.