
Popular categories
Looking for a yarn?


Comments / Questions (31)
![]() Andrea wrote:
Andrea wrote:
No entiendo cuando dice que la pieza se mide a partir de aquí en el frente cuando se montan puntos para el cuello quiere decir que se mide a partir de ahí después parala talla s dice tejer 18 cm más hacer la raya y en total tejer 23 cm antes de unir todo en redondo esa medida es partir de ahí cuando se montan los puntos del cuello? Porque dice medir por el lado exterior d e la sisa ?
18.11.2025 - 12:34
![]() Emily wrote:
Emily wrote:
Dear DROPS team, the pattern gauge says 16 sts x 20 rows = 10x10 cm. My gauge is 16 sts in width and 28 rows in height. When I knit the back piece (size M), my work will be about 4 cm shorter after 30 rows. I’m a bit unsure how to proceed. Will this difference in row gauge impact the garment, or are there adjustments I can make? Thank you for your time and assistance.
15.02.2025 - 13:25DROPS Design answered:
Dear Emily, yes, the row gauge will end up affecting the work slightly. Most of our measurements are in cm instead of rows, so simply work the pattern up to the number of cm indicated (instead of counting how many rows there should be). Be careful not to increase or decrease more stitches than needed when you need to work more rows than in the pattern. On another note, have you tried working with a slightly larger needle?; you may be able to correct a little bit the vertical gauge and then adjust your knitting tension to the horizontal gauge and be able to work correctly. Happy knitting!
17.02.2025 - 01:05
![]() Ann wrote:
Ann wrote:
Hallo, kann es sein, dass bei der Ankeitung der Zunahmetipp für Hin- und Rückreihen falsch ist. Die Beschreibung passt nicht zu den Video oder zu Teil 1 der Lektion zu der europäischen Schulter.
24.11.2024 - 10:55DROPS Design answered:
Liebe Ann, beide stimmen, nach dem Markierer wird den Faden von vorne aufgefassen und nach dem Markierer wird den Faden von hinten aufgefassen, dh genauso wie bei der Erklärung in der Anleitung und bei der Lektion sowie bei dem Video. Oder vielleicht misverstehe ich Ihre Frage? Viel Spaß beim Stricken!
25.11.2024 - 08:49
![]() Marie wrote:
Marie wrote:
Hello, I am knitting size M and the length of the torso reaches 50 cm immediately after the end of the 4th strip, so should I start knitting the elastic pattern straight away, although in the accompanying photo it is followed by a part of the stockinette jersey? I would also like to ask how to measure the armholes, it comes out to me at 24 cm instead of 20 cm and I followed the instructions exactly, the test sample comes out as in the instructions. Do you know where I might have made a mistake?
27.02.2024 - 14:45DROPS Design answered:
Dear Marie, do you get and keep correct tension in both width and height? Piece is not supposed to be that elastic with DROPS Alaska. Armhole should be measured along the side after you have stopped increase on back piece, ie 16 cm; on front piece you measure on the outside of piece, from where you picked up sts = 24 cm in size M, so that you get: (16+24)/2= 20 cm for the armhole - see also the videos listed at the bottom of the pattern to help you understanding how this kind of pattern is worked. Happy knitting!
27.02.2024 - 16:13
![]() Solveig wrote:
Solveig wrote:
Hei. Har problemer med å forstå målene på ermhull. Str L på bakstykket skal det måle 17 cm helt ned. På forstykket 25. Det står mål herfra der halsåpningen er ferdig. Får ikke disse målene til å stemme.. mvh Solveig
22.11.2023 - 16:16DROPS Design answered:
Hej Solveig, den skrå skulder går et stykke ned på bagstykket. Se gerne vores instruktionsvideoer nederst på siden om du er usikker .)
24.11.2023 - 14:29
![]() Marie wrote:
Marie wrote:
Dobrý den, pletu velikost M a délka trupu dosahuje 50cm hned po ukončení 4.pruhu, měla bych tedy začít rovnou plést pružný vzor ačkoliv na průvodní fotce po něm následuje ještě část lícového žerzeje? Také bych se ráda zeptala jak měřit průramky, vychází mi na 24cm místo 20cm a postupovala jsem přesně podle instrukcí, zkušební vzorek mi vychází jako v návodu. Nevíte, kde by bylo možné, že jsem udělala chybu? Děkuji
04.11.2023 - 22:12
![]() Margherita wrote:
Margherita wrote:
Buonasera Ho fato una domanda l'11 febbraio e non ho ancora avuto risposta. Come mai????
20.02.2023 - 20:04DROPS Design answered:
Buonasera Margherita, abbiamo risposto alla sua domanda precedente: solitamente le riposte richiedono circa 5/10 gg lavorativi. Buon lavoro!
20.02.2023 - 23:40
![]() Margherita wrote:
Margherita wrote:
BUONGIORNO: DAVANTI: Iniziare sulla spalla sinistra (con il capo indossato). Riprendere 28-30-30-32-34-36 maglie all’interno della maglia di vivagno lungo la spalla sul dietro. Lavorare a maglia rasata in piano per 4 cm. Aumentare le maglie per il collo all’inizio di ogni ferro dal diritto del lavoro, aumentare dopo le prime 3 maglie come spiegato sopra. Aumentare 1 maglia per un totale di 4 volte QUANDO DEVO FARE GLI AUMENTI. DOPO 4 CM DI MAGLIA RASATA O DURANTE ?
11.02.2023 - 10:48DROPS Design answered:
Buonasera Margherita, comincerà con gli aumenti dopo i 4 cm. Buon lavoro!
20.02.2023 - 23:39
![]() Margherita wrote:
Margherita wrote:
DAVANTI SPALLA SX: dopo aver ripreso 30 maglie dalla spalla sx del dietro si lavorano 4 cm di maglia rasata e poi si fanno i 4 aumenti oppure gli aumenti si fanno nei 4 cm di maglia rasata?
10.02.2023 - 22:07DROPS Design answered:
Buonasera Margherita, dopo aver lavorato 4 cm a maglia rasata, deve unire il lavoro in tondo e lavorare ancora a maglia rasata fino alla lunghezza indicata per la sua taglia e poi iniziare le diminuzioni. Buon lavoro!
10.02.2023 - 23:26
![]() Victoria Edwards wrote:
Victoria Edwards wrote:
Could this be knitted in Drops Air?
08.02.2023 - 19:26DROPS Design answered:
Dear Victoria, yes - feel free to knit this jumper in DROPS Air as it belongs to the same DROPS yarn group. Happy knitting!
09.02.2023 - 06:22
|
||||
Fudge Stripes#fudgestripessweater |
||||
 |
 |
|||
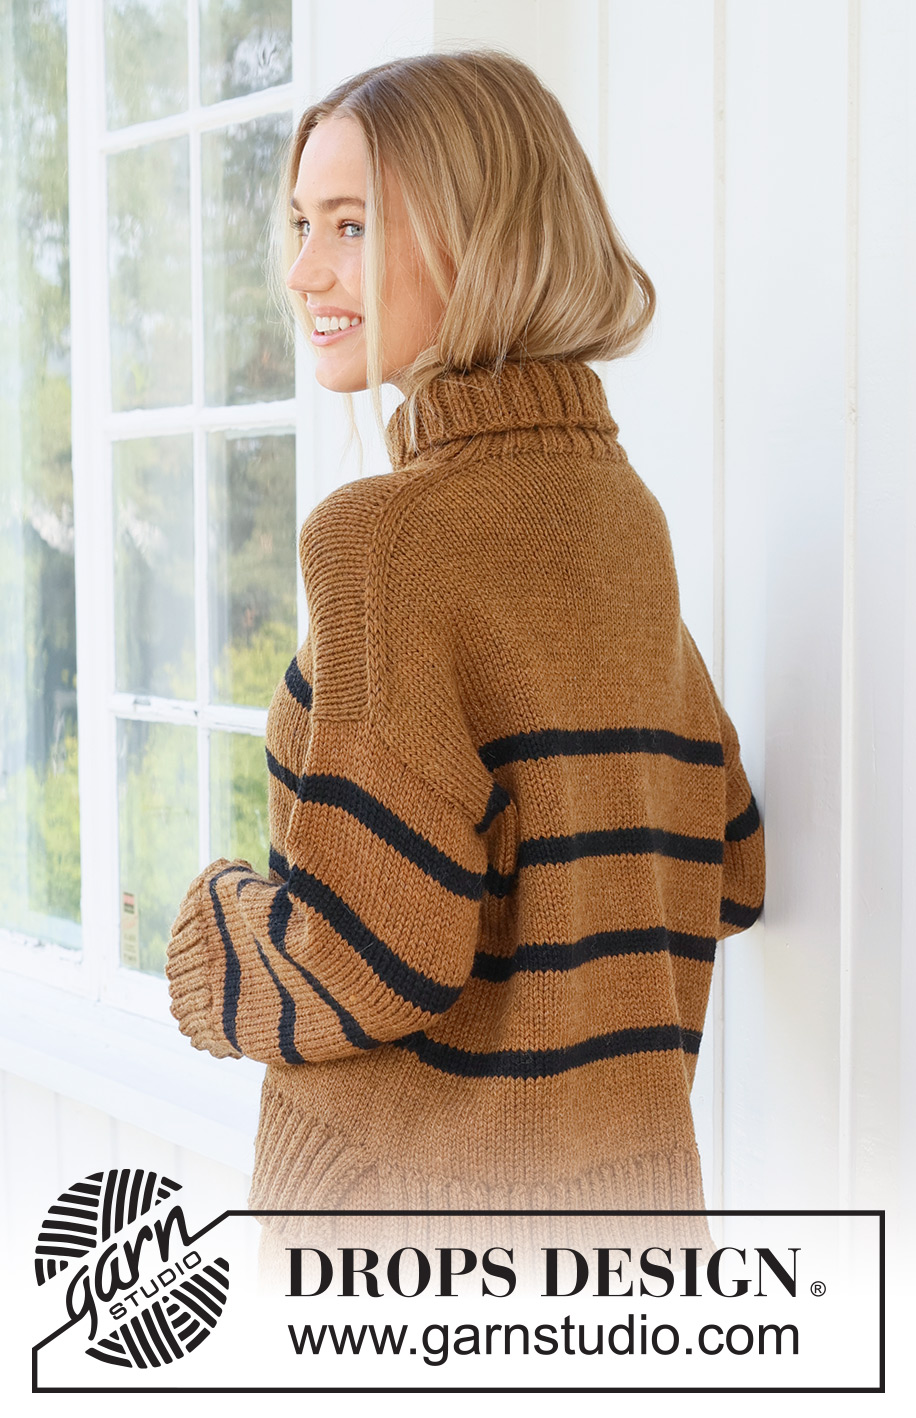
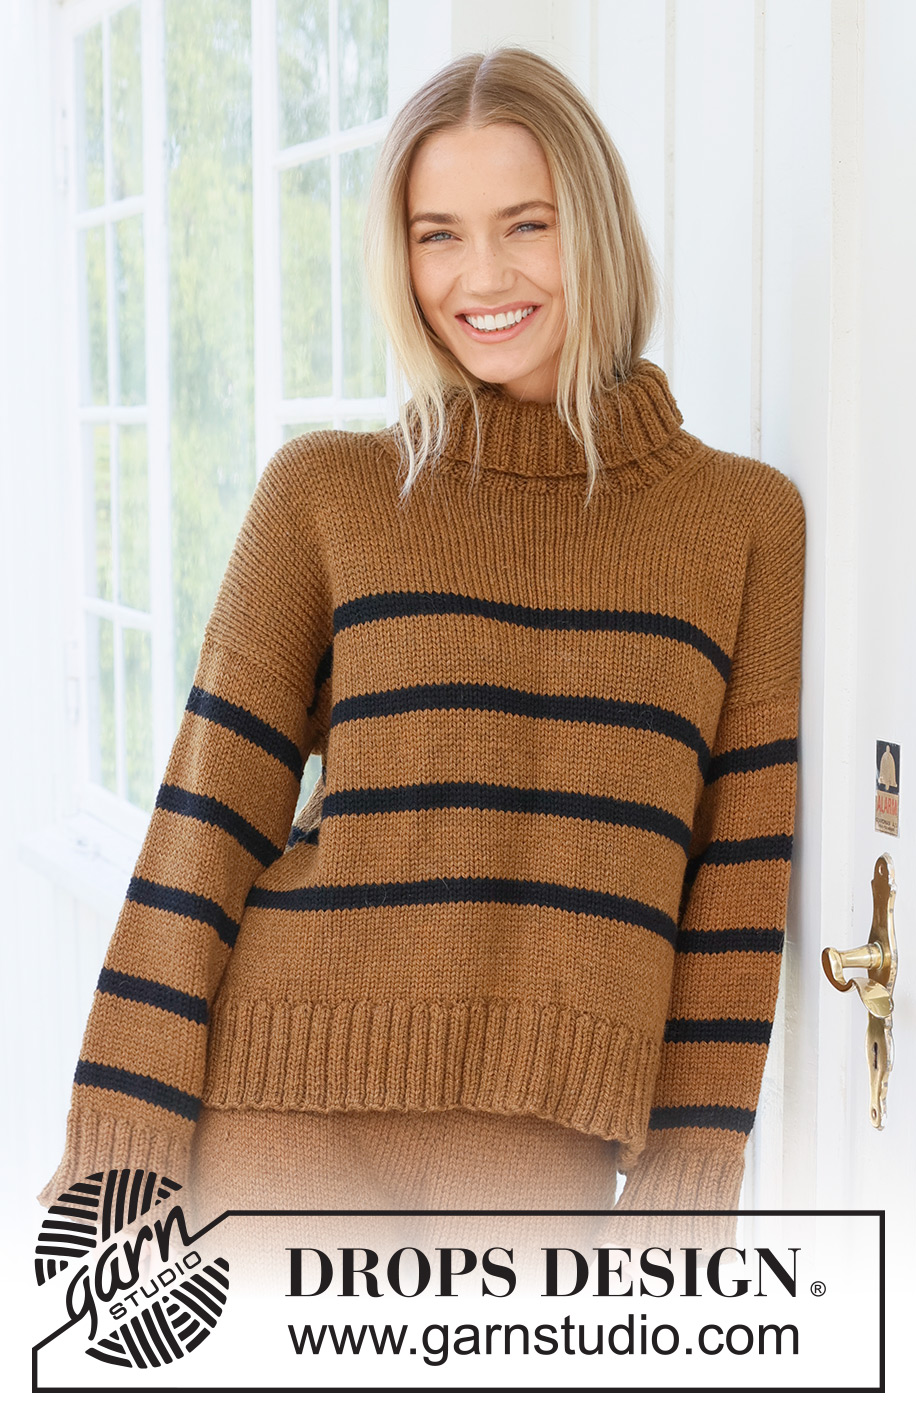
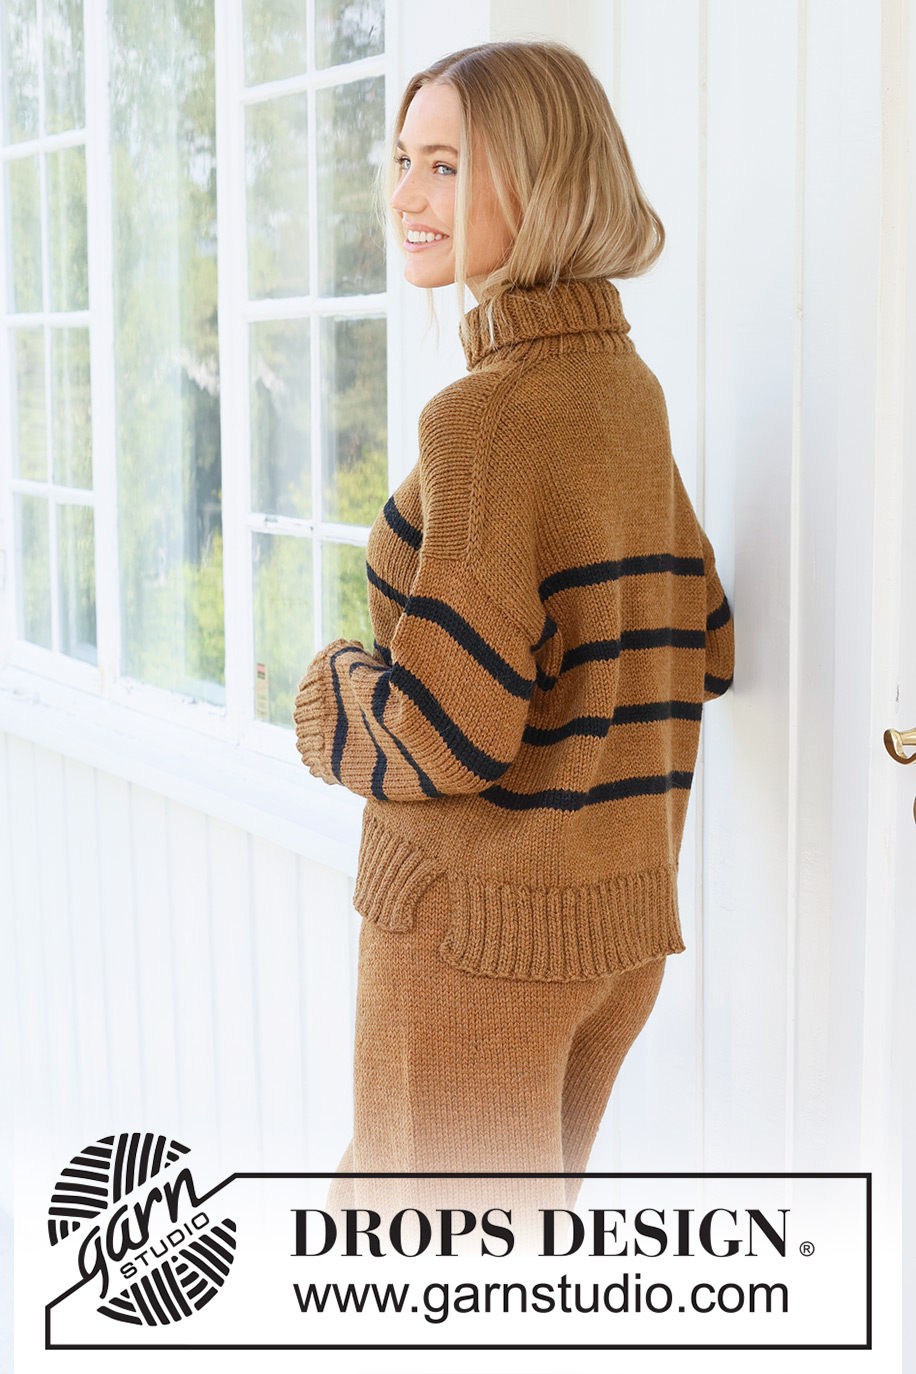
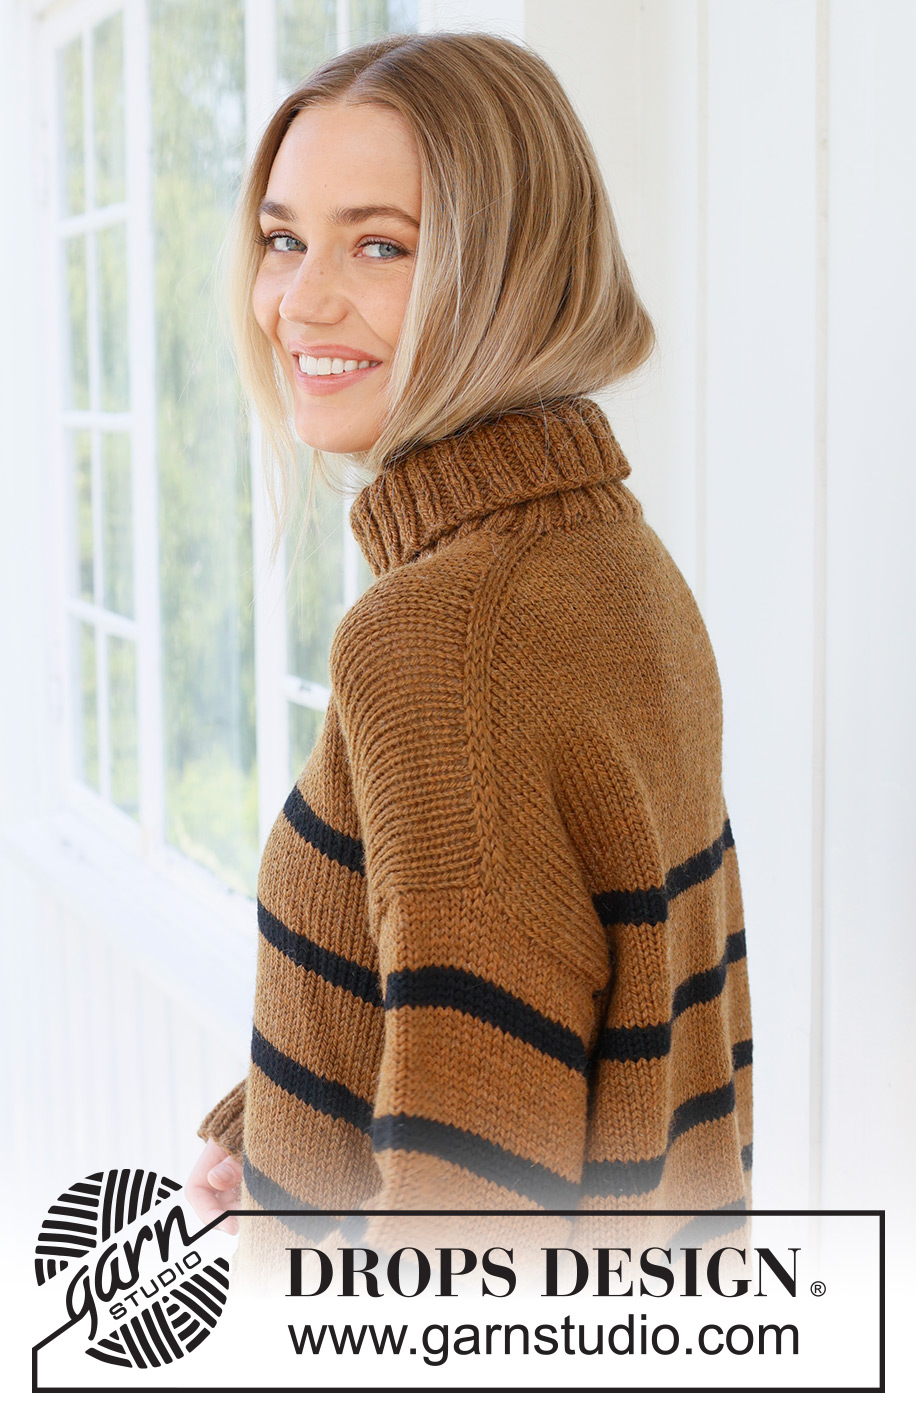
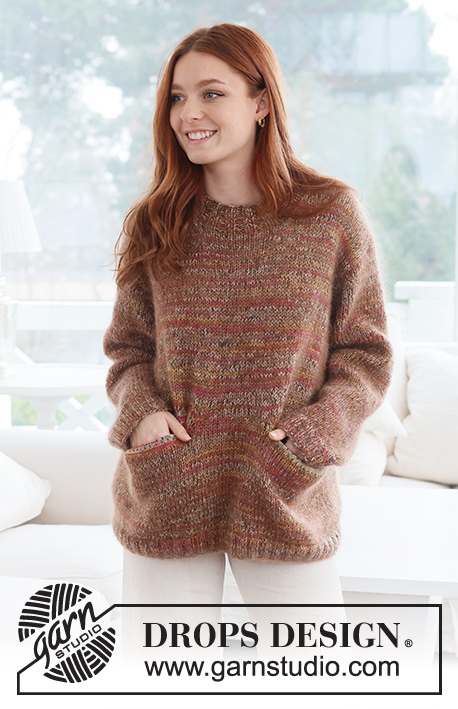
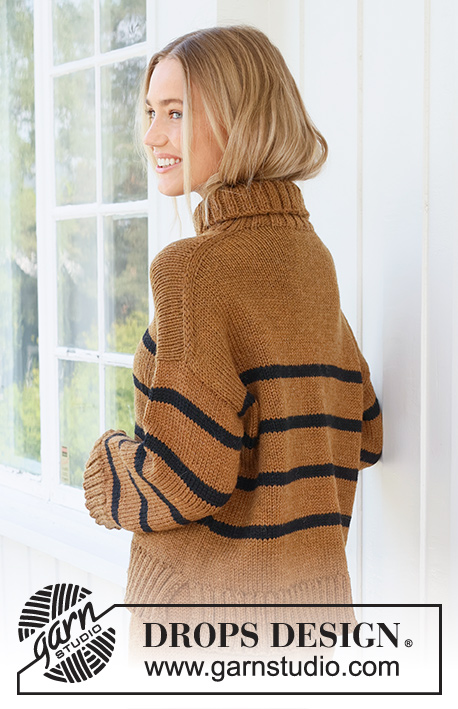
Knitted jumper in DROPS Alaska. The piece is worked top down with stocking stitch, European shoulders / diagonal shoulders, stripes and high neck. Sizes S - XXXL.
DROPS 237-16 |
||||
|
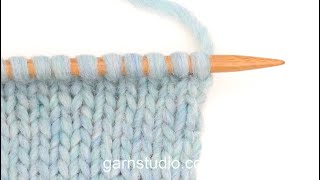
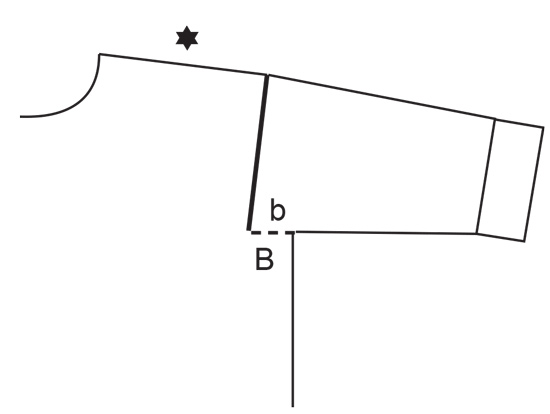
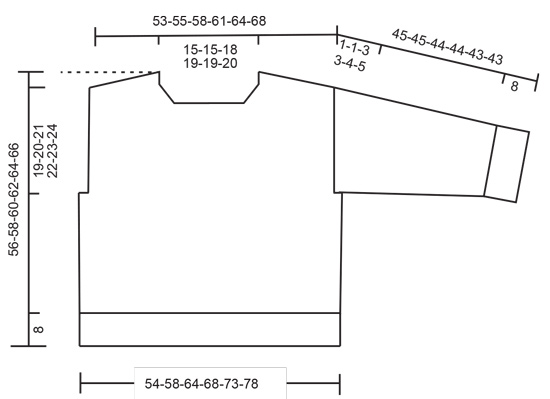
------------------------------------------------------- EXPLANATIONS FOR THE PATTERN: ------------------------------------------------------- RIDGE/GARTER STITCH (worked back and forth): Knit all rows. 1 ridge = knit 2 rows. INCREASE TIP FROM THE RIGHT SIDE: Increase towards the left AFTER MARKER: Use left needle to pick up yarn between 2 stitches from row below, pick up yarn from the front and knit in the stitch loop that is on the back of the needle. Increase towards the right BEFORE MARKER: Use left needle to pick up yarn between 2 stitches from row below, pick up yarn from the back and knit in the stitch loop that is on the front side of the needle. INCREASE TIP FROM THE WRONG SIDE: Increase towards the right AFTER MARKER: Use left needle to pick up yarn between 2 stitches from row below, pick up yarn from the back and purl in the stitch loop that is on the front side of the needle. Increase towards the left BEFORE MARKER: Use left needle to pick up yarn between 2 stitches from row below, pick up yarn from the front and purl in the stitch loop that is on the back side of the needle. STRIPES BODY: Work 4 rows/rounds with colour black, 12 rows/rounds with colour toffee. Repeat until you have worked 4 black stripes. STRIPES SLEEVES: Work 4 rows/rounds with colour black, 12 rows/rounds with colour toffee. Repeat until you have worked 5-5-5-5-4-4 black stripes. DECREASE TIP (for sleeves): Decrease 1 stitch on either side of the marker as follows: Work until there are 3 stitches left before the marker, knit 2 together, knit 2 (marker sits between these 2 stitches), slip 1 stitch as if to knit, knit 1 and pass the slipped stitch over the knitted stitch. ------------------------------------------------------- START THE PIECE HERE: ------------------------------------------------------- JUMPER – SHORT OVERVIEW OF THE PIECE: The back piece is worked back and forth with circular needle, top down until the armholes are finished. Stitches are knitted up on each shoulder and increased for the neck, then the front piece is worked back and forth with circular needle and top down until the armholes are finished. The front and back pieces are joined and the body continued in the round. Stitches are knitted up around the armholes, the sleeve-cap is worked back and forth then the rest of the sleeve is worked in the round with short circular needle/double pointed needles. The neck is worked in the round to finish. BACK PIECE: Cast on 28-28-32-34-34-36 stitches with circular needle size 5.5 mm and DROPS Alaska. Purl 1 row from the wrong side. Insert 1 marker inside 3 stitches on each side. Markers should sit inside these 3 stitches on every row onwards. Work stocking stitch back and forth. AT THE SAME TIME increase AFTER the marker at the beginning of the first row and BEFORE the marker at the end of the row – read INCREASE TIP FROM THE RIGHT SIDE. On the next row (wrong side) increase in the same way – read INCREASE TIP FROM THE WRONG SIDE. Increase from both the right and wrong side a total of 28-30-30-32-34-36 times. After the last increase there are 84-88-92-98-102-108 stitches. The piece is measured from here! Continue with stocking stitch until the piece measures 10-11-12-13-14-14 cm (measured outermost along the armhole). Now work STRIPES BODY – read description above. Continue working until the piece measures 15-16-17-18-19-19 cm. Cut the yarn, put stitches on a thread or an extra needle and work the front piece. FRONT PIECE: Start on the left shoulder (when the garment is worn). Knit up 28-30-30-32-34-36 stitches inside the outermost stitch along the shoulder on back piece (i.e. knit up 1 stitch in each row from the top of the back piece). Work stocking stitch back and forth for 4 cm. Increase stitches for the neck at the beginning of each row from the right side, increase after the 3 first stitches, remember INCREASE FROM THE RIGHT SIDE. Increase 1 stitch a total of 4 times = 32-34-34-36-38-40 stitches. Purl 1 row from the wrong side. Cut the yarn and put stitches on a thread or an extra needle and work the right shoulder. Knit up 28-30-30-32-34-36 stitches inside the outermost stitch along the right back shoulder. Work stocking stitch back and forth for 4 cm. Increase stitches for the neck, at the end of each row from the right side, increase before the last 3 stitches, remember INCREASE TIP FROM THE RIGHT SIDE. Increase 1 stitch a total of 4 times = 32-34-34-36-38-40 stitches. Purl 1 row from the wrong side after the last increase. Work the next row from the right side as follows: Knit the 32-34-34-36-38-40 stitches from the right front piece, cast on 20-20-24-26-26-28 stitches for the neck at the end of the row, knit the 32-34-34-36-38-40 stitches from the left front piece = 84-88-92-98-102-108 stitches. The piece is measured from here! Continue with stocking stitch back and forth until the piece measures 18-19-20-21-22-24 cm (measured outermost along the armhole). Work STRIPES BODY – read description above. Continue until the piece measures 23-24-25-26-27-29 cm. Now join the front and back pieces for the body: BODY: Work stocking stitch over the 84-88-92-98-102-108 stitches from the front piece, cast on 2-4-10-10-14-16 new stitches at the end of the row (= side), work the 84-88-92-98-102-108 stitches from the back piece, cast on 2-4-10-10-14-16 stitches at the end of the row = 172-184-204-216-232-248 stitches. Work stocking stitch and stripes in the round until the piece measures 48-50-52-54-56-58 cm measured from the top of the shoulder on the front piece. Now divide the front and back piece for the split in each side. Place the 86-92-102-108-116-124 stitches from the front piece on a thread or extra needle and work the back piece. BACK PIECE: Change to circular needle size 4.5 mm. Knit 1 row from the right side and increase 12-14-12-14-14-18 stitches evenly spaced = 98-106-114-122-130-142 stitches. Work as follows from the wrong side: 2 edge stitches in GARTER STITCH – read description above, * purl 2, knit 2 *, work from *-* until there are 4 stitches left, purl 2 and 2 edge stitches in garter stitch. Continue this rib for 8 cm. Cast off. FRONT PIECE: Place the stitches on circular needle size 4.5 mm and work in the same way as the back piece. LEFT SLEEVE: Using circular needle size 5.5 mm and DROPS Alaska, knit up from the right side 36-38-41-41-44-46 stitches from the bottom of the armhole and up the front piece, then 24-26-27-29-30-30 stitches from the shoulder, down the back piece to the bottom of the armhole = 60-64-68-70-74-76 stitches. Insert 1 marker in the middle of the row – the sleeve is measured from this marker. Work stocking stitch back and forth for 1-1-3-3-4-5 cm. Now join the sleeve using circular needle/double pointed needles size 5.5 mm. Insert 1 marker at the beginning of the round (mid-under sleeve). Allow the marker to follow your work onwards. Start at the marker and work stocking stitch in the round until the sleeve measures 3-3-5-5-6-7 cm, now decrease 2 stitches mid-under the sleeve – read DECREASE TIP. Decrease like this every 4-3½-3-3-2½-2½ cm a total of 8-9-10-10-11-11 times = 44-46-48-50-52-54 stitches. AT THE SAME TIME when the sleeve measures 4-4-6-6-7-8 cm, work STRIPES SLEEVES – read description above. Continue working until the sleeve measures 37-37-36-36-35-35 cm from the marker. There is 8 cm left. Try the jumper on and work to desired length. Knit 1 round and increase 8-6-8-6-8-6 stitches evenly spaced = 52-52-56-56-60-60 stitches. Change to double pointed needles size 4.5 mm. Work rib (knit 2, purl 2) for 8 cm. Cast off a little loosely. The sleeve measures approx. 45-45-44-44-43-43 cm from the marker. RIGHT SLEEVE: Work the same way as left sleeve but knit up 24-26-27-29-30-30 stitches from the bottom of the armhole up the back piece and 36-38-41-41-44-46 stitches from the shoulder down the front piece to the bottom of the armhole. Sew the bottom of the armhole together – see sketch. NECK: Start on one shoulder and knit up from the right side, inside the 1 edge stitch, 88 to 108 stitches using short circular needle size 4.5 mm. The stitch-number should be divisible by 4. Work rib in the round (knit 2, purl 2) for 14 cm. Cast off a little loosely. The neck can be folded double to the inside. |
||||
Diagram explanations |
||||
|
||||
 |
||||
 |
||||
Have you finished this pattern?Tag your pictures with #dropspattern #fudgestripessweater or submit them to the #dropsfan gallery. Do you need help with this pattern?You'll find 35 tutorial videos, a Comments/Questions area and more by visiting the pattern on garnstudio.com. © 1982-2026 DROPS Design A/S. We reserve all rights. This document, including all its sub-sections, has copyrights. Read more about what you can do with our patterns at the bottom of each pattern on our site. |
||||


With over 40 years in knitting and crochet design, DROPS Design offers one of the most extensive collections of free patterns on the internet - translated to 17 languages. As of today we count 324 catalogues and 12290 patterns translated into English (UK/cm). 12290
We work hard to bring you the best knitting and crochet have to offer, inspiration and advice as well as great quality yarns at incredible prices! Would you like to use our patterns for other than personal use? You can read what you are allowed to do in the Copyright text at the bottom of all our patterns. Happy crafting!
Post a comment to pattern DROPS 237-16
We would love to hear what you have to say about this pattern!
If you want to leave a question, please make sure you select the correct category in the form below, to speed up the answering process. Required fields are marked *.