
Popular categories
Looking for a yarn?


Comments / Questions (118)
![]() Ida Eline Sørensen wrote:
Ida Eline Sørensen wrote:
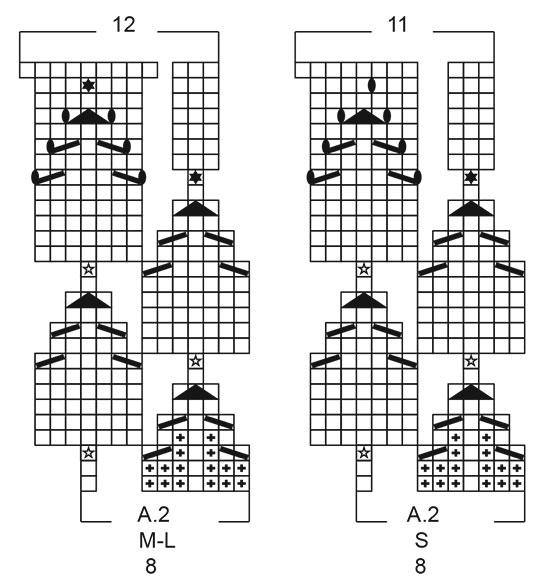
Hei. Jeg forstår ikke hvordan jeg skal lese diagram A2. Skal en og en av rapportene strikkes? Hvordan henger de sammen? Skal det være noen masker med kun rett, strikkes ett og ett diagram eller flere samtidig? Dette var en forvirrende oppskrift. Takk for svar på forhånd. Strikker forresten str.s.
17.06.2021 - 21:48DROPS Design answered:
Hei Ida Eline, Du strikker A.2 i ett, så første omgang: 3 vrang, 1 rett, 3 vrang og 1 rett. Gjenta dette på omgangen. Når du er på omgang 3, skal du strikke 3 masker i stjernemasken (som forklart rett over diagrammene) slik at du kan strikke alle maskene i omgang 4. Håper dette hjelper og god fornøyelse!
18.06.2021 - 07:17
![]() Roswitha Zu Dritten wrote:
Roswitha Zu Dritten wrote:
Die letzte Frage habe ich mir selbst bewntworten können. Hab zu schnell aufgegeben. Jetzt läuft es. Aber trotzdem herzlichen Dank für die schnelle Hilfe. Habt einen schönen Freitag
11.06.2021 - 15:22
![]() Roswitha wrote:
Roswitha wrote:
Herzlichen Dank für die schnelle Antwort. Uns schon hab ich ein neues Problem. Wie stricke ich weiter? Ich beginne nach Vorlage 1re-2li-1re-2 li-1re. So, dann stricke ich aus der einen Masche 9 Maschen. Dann bleiben aber noch so viele Maschen übrig. Ignoriere ich die und fahre mit dem Muster einfach weiter? Entschuldigung, wenn ich so viel nachfrage hab bestimmt 30 Jahre nicht mehr richtig gestrickt.
11.06.2021 - 15:05DROPS Design answered:
Liebe Roswitha, nach der 3. Reihe in A.2 haben Sie 8 Maschen zugenommen und 2 Maschen abgenommen (= 10 M - 2 + 8= 16 M in jedem A.2), bei der 4. Reihe in A.2 stricken Sie: 1 re, 2 li, 1 re, 2 li, 1 re (= die 1. Hälfte von A.2) und jetzt stricken Sie die 9 Maschen rechts = 16 Maschen. Bei der 5. Reihe nehmen Sie 2 M in die 1. Hälfte ab = 14 M, bei der 7. Reihe nehmen Sie noch 2 M ab = 12 M und bei der 9. Reihe nochmal = 10 M, bei der 11. Reihe nehmen Sie dieses Mal in die 1. Hälfte (Sternchen) zu und in die 2. Hälfte ab. Hoffentlich kann es Ihnen helfen. Viel Spaß beim stricken!
11.06.2021 - 17:18
![]() Roswitha wrote:
Roswitha wrote:
Hallo zusammen, ich verstehe die Anleitung zu A2 nicht. Die ersten 2 Reihen sind verstanden. 3. Reihe macht mir Probleme. Wie verstehe ich die Sternchenanleitung im Diagramm? Ich stricke 9 Maschen und hole aus der 10 9 heraus und dann? Arbeite ich das die Reihe durch? Was bedeutet dann die Angabe 4 x arbeiten? $ x auf die Reihe verteilt? Der Antwort entgegensehend verbleibe ich mit freundlichen Grüßen für ein schönes Wochenende Roswitha
11.06.2021 - 12:49DROPS Design answered:
Liebe Roswitha, so stricken Sie das Sternchen: die 10. Masche von A.2 insgesamt 9 Mal stricken (1 Masche recht, dann (1 Umschlag, dieselbe Masche noch mal rechts stricken) und von (bis) insgesamt 4 Mal stricken) = es sind jetzt 9 Maschen auf der rechten Nadel aus der 1 Maschen auf der linken Nadel - die von der linken Nadel fallen lassen - dieses Video, zeigt wie man 7 Maschen so strickt, in Ihrem Fall sollen Sie noch einmal von *bis* wiederholen um 9 Maschen zu bekommen. Kann es Ihnen helfen? Viel Spaß beim stricken!
11.06.2021 - 14:10
![]() Fjola Løvendahl Thomsen wrote:
Fjola Løvendahl Thomsen wrote:
Hej, jeg strikker i str. L. og færdig med mønsteret, men som , men som Irene Jerløv skriver, så ligner det ikke det på billedet. Jeg skulle have 312 m. men havde 370. Så jeg har trævlet det hele op. MVH Fjola
07.06.2021 - 12:54DROPS Design answered:
Hej Fjola, du starter med 104 masker (4m x 26), tager 4 masker ud ifølge A.1 (4m x 26) = 208. Slutter med 12 masker når du er klar med A.2L (12m x 26) = 312 masker. Husk at du tager 6 masker ud ved stjernen i str L :)
07.06.2021 - 14:31
![]() Irene Jerløv wrote:
Irene Jerløv wrote:
Jeg kan ikke få mønstret A2 i 222-32 til at passe. Jeg strikker str XL. Mønster tegningen ligner slet ikke slet ikke bluse mønstret, når jeg forstørrer det, håber at få hjælp hurtigst muligt. Mvh Irene Jerløv
06.06.2021 - 23:12DROPS Design answered:
Hej Irene, Det er svært at sige hvor det går galt for dig... Du følger diagram A.2-XL, starter med de 8 masker nederst i diagrammet og strikker hver pind og følger diagrammet opad. På 3.pind tager du 8 masker ud ved stjernen, hver gang du gentager diagrammet. På 5., 7. og 9. pind tager du 2 masker ind for hver gang du gentager diagrammet. På 11.pind tager du 8 masker ud igen, hver gang du kommer til stjernen og samtidigt tager du 2 masker ind i samme rapport. Vi har set mange af denne model på Ravelry. Sig til hvis det er en speciel pind i diagrammet du vil have forklaret. :)
07.06.2021 - 13:36
![]() Fjola Løvendahl Thomsen wrote:
Fjola Løvendahl Thomsen wrote:
Hej, jeg tror der er mange fejl i denne opskrift på blusen, både i opskrift og diagram. da jeg var færdig med mønsteret endte jeg med at have 70 m. mere end der står i opskriften????? MVH Fjola
06.06.2021 - 11:25DROPS Design answered:
Hej Fjola, Vi vil gerne hjælpe dig. Hvilken størrelse strikker du? Hvor er du i opskriften? Hvor mange masker skal du have ifølge opskriften?
07.06.2021 - 12:14
![]() Kari Varpe wrote:
Kari Varpe wrote:
Eg forstår ikkje A2 str M. Korleis skal eg følge dei ulike diagramma, rekkefølge.
05.06.2021 - 21:45DROPS Design answered:
Hej Kari, A.2M første og anden pind strikkes således: 3 vrang, 1 ret, 3 vrang, 1 ret (gentag disse 8 m pinden ud). 3.pind strikkes således: tag 1 m løst af, 1 ret, løft den løse over, 1vrang, 1 ret, 1 vrang, 2 ret sammen, strik 7 masker i den med stjernen (se diagramforklaringen) gentag disse 8 masker pinden ud. 4.pind: nu har du 12 masker som strikkes således: 1 ret, 1 vrang, 1 ret, 1 vrang, 8 ret, gentag disse 12 masker pinden ud. God fornøjelse!
07.06.2021 - 14:18
![]() Mervi wrote:
Mervi wrote:
Mihin on kadonneet pitsineuleen kaaviot A1ja A2 suomenkieliseltä sivulta? Ehdin jo yhden paidan neuloa ja aloitin toista, mutta kaarrokkeen kuvalliset ohjeet eivät näy enää?
05.06.2021 - 20:24
![]() Fjola Løvendahl Thomsen wrote:
Fjola Løvendahl Thomsen wrote:
Hej, jeg forstår ikke Diagrammet i denne bluse, Diagram A2. jeg syntes den virker mystisk. Håber i kan hjælpe mig MVH Fjola
04.06.2021 - 21:26DROPS Design answered:
Hej, Vi behøver mere information for at vi skal kunne hjælpe dig. Hvilken størrelse? Hvilken pind i A2 synes du er mystisk....?
07.06.2021 - 12:17
|
|||||||||||||||||||||||||
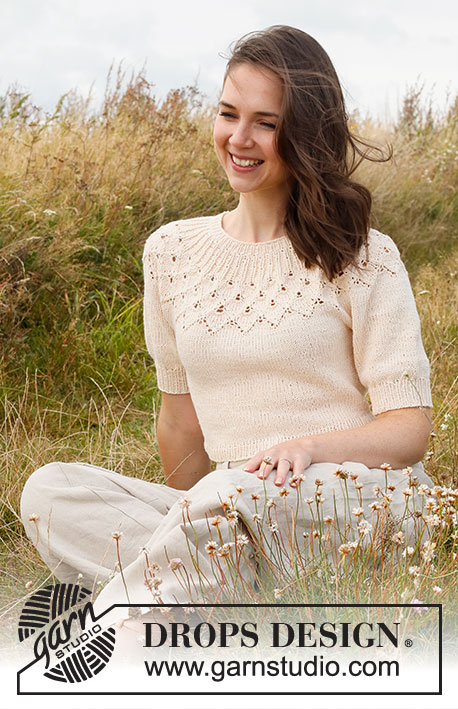
Swing by Spring Top#swingbyspringtop |
|||||||||||||||||||||||||
 |
 |
||||||||||||||||||||||||
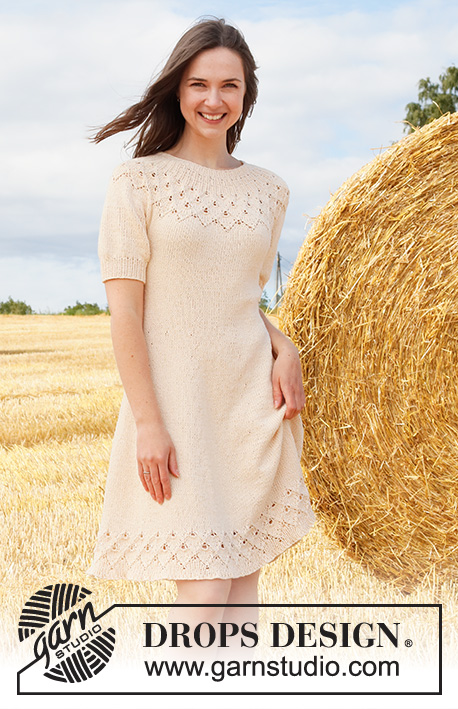
Knitted jumper in DROPS Belle. Piece is knitted top down with round yoke, lace pattern, leaf pattern and short balloon sleeves. Size: S - XXXL
DROPS 222-32 |
|||||||||||||||||||||||||
|
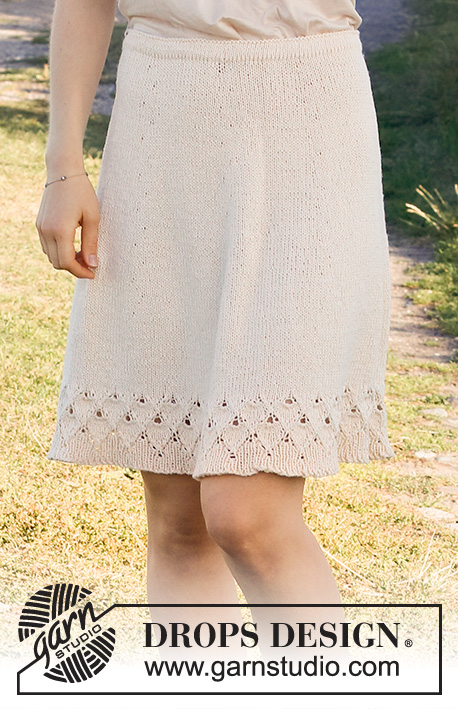
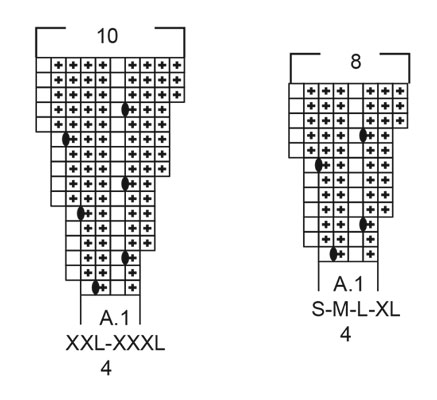
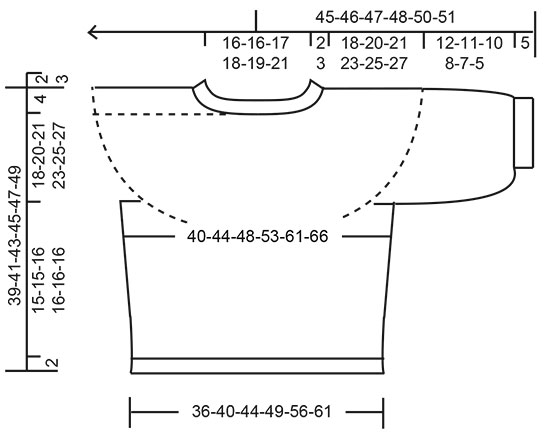
------------------------------------------------------- EXPLANATION FOR THE PATTERN: ------------------------------------------------------- PATTERN: See diagrams A.1 and A.2. Choose diagram for your size. DECREASE TIP (applies to side of body): Decrease 1 stitch on each side of marker thread as follows: Work until 3 stitches remain before marker thread and knit 2 together, knit 2 (marker thread is between these 2 stitches), slip 1 stitch knitwise, knit 1, pass slipped stitch over stitch worked. CAST-OFF TIP: To avoid a tight cast-off edge you may use a larger needle size. If this also is too tight, work a 1 yarn over after approx. every 4th stitch while casting off (cast off yarn overs as regular stitches). ------------------------------------------------------- START THE PIECE HERE: ------------------------------------------------------- JUMPER - SHORT OVERVIEW OF THE PIECE: Work neck edge and yoke in the round from mid back, top down. Now divide yoke for body and sleeves. Body is worked in the round on circular needle, top down. Work sleeves in the round on double pointed needles/short circular needle, top down. NECK EDGE: Cast on 100-100-104-108-112-120 stitches on circular needle size 3 mm with Belle. Knit 1 round. Then work rib = knit 1/purl 1. When rib measures 2-2-3-3-3-3 cm, switch to circular needle size 4 mm. Insert 1 marker at the beginning of round mid back, measure yoke from this marker! YOKE: Work A.1 in the round (= 25-25-26-27-28-30 repetitions of 4 stitches). When A.1 has been worked, there are 200-200-208-216-280-300 stitches on needle. Piece now measures 4-4-4-4-6-6 cm from marker. Then work A.2 in the round (= 25-25-26-27-28-30 repetitions of 8-8-8-8-10-10 stitches). REMEMBER THE KNITTING TENSION! When A.2 has been worked, there are 275-300-312-351-392-420 stitches on needle. Piece measures approx. 14-14-14-17-19-19 cm from marker (i.e. 16-16-17-20-22-22 cm from cast-on edge). Work in stocking stitch until piece measures 18-20-21-23-25-27 cm from marker. Now divide piece for body and sleeves. Work next round as follows: Knit 38-42-44-50-58-63 (= ½ back piece), slip the next 62-66-68-76-80-84 stitches on a stitch holder for sleeve, cast on 8-8-12-12-12-12 new stitches on needle (= in the side under sleeve), knit 75-84-88-99-116-126 (= front piece), slip the next 62-66-68-76-80-84 stitches on a stitch holder for sleeve, cast on 8-8-12-12-12-12 new stitches on needle (= in the side under sleeve), knit the last 38-42-44-50-58-63 stitches (= ½ back piece). Finish body and sleeves separately. NOW MEASURE PIECE FROM HERE! BODY: = 167-184-200-223-256-276 stitches. Insert 1 marker thread in the middle of the 8-8-12-12-12-12 new stitches under each sleeve (= in the side of body). There are now 83-92-100-111-128-138 stitches on front piece and 84-92-100-112-128-138 stitches on back piece. Move the marker threads upwards when working; they are used when decreasing in the sides later. Work in stocking stitch in the round. When piece measures 3 cm from division, decrease 1 stitch on each side of every marker thread - read DECREASE TIP (= 4 stitches decreased). Decrease like this every 2 cm 4-4-4-4-5-5 times in total = 151-168-184-207-236-256 stitches. Work in stocking stitch in the round until piece measures 15-15-16-16-16-16 cm from division – or desired length (approx. 2 cm remain until finished measurements). Knit 1 round while increasing 23-26-28-31-36-38 stitches evenly = 174-194-212-238-272-294 stitches. Switch to circular needle size 3 mm. Work rib (knit 1/purl 1) in the round for 2 cm. Cast off with knit over knit and purl over purl - read CAST-OFF TIP. Jumper measures approx. 39-41-43-45-47-49 cm from shoulder and down. SLEEVES: Slip the 62-66-68-76-80-84 stitches from stitch holder in one side of piece on double pointed needles/a short circular needle size 4 mm, and pick up 1 stitch in each of the 8-8-12-12-12-12 new stitches cast on in the side under sleeve = 70-74-80-88-92-96 stitches. Work in stocking stitch in the round until sleeve measures 12-11-10-8-7-5 cm from division (approx. 5 cm remain until finished measurements, try the jumper on and work to desired length. Knit 1 round while decreasing 16-16-14-14-14-14 stitches evenly = 54-58-66-74-78-82 stitches. Switch to double pointed needles size 3 mm. Work rib in the round = knit 1/purl 1 for 5 cm. Cast off with knit over knit and purl over purl - remember CAST-OFF TIP! Sleeve measures approx. 17-16-15-13-12-10 cm from division. Work the other sleeve the same way. |
|||||||||||||||||||||||||
Diagram explanations |
|||||||||||||||||||||||||
|
|||||||||||||||||||||||||
 |
|||||||||||||||||||||||||
 |
|||||||||||||||||||||||||
 |
|||||||||||||||||||||||||
 |
|||||||||||||||||||||||||
Have you finished this pattern?Tag your pictures with #dropspattern #swingbyspringtop or submit them to the #dropsfan gallery. Do you need help with this pattern?You'll find 30 tutorial videos, a Comments/Questions area and more by visiting the pattern on garnstudio.com. © 1982-2026 DROPS Design A/S. We reserve all rights. This document, including all its sub-sections, has copyrights. Read more about what you can do with our patterns at the bottom of each pattern on our site. |
|||||||||||||||||||||||||


With over 40 years in knitting and crochet design, DROPS Design offers one of the most extensive collections of free patterns on the internet - translated to 17 languages. As of today we count 324 catalogues and 12239 patterns translated into English (UK/cm). 12239
We work hard to bring you the best knitting and crochet have to offer, inspiration and advice as well as great quality yarns at incredible prices! Would you like to use our patterns for other than personal use? You can read what you are allowed to do in the Copyright text at the bottom of all our patterns. Happy crafting!
Post a comment to pattern DROPS 222-32
We would love to hear what you have to say about this pattern!
If you want to leave a question, please make sure you select the correct category in the form below, to speed up the answering process. Required fields are marked *.