
Popular categories
Looking for a yarn?


Comments / Questions (118)
![]() Hazel Wilson wrote:
Hazel Wilson wrote:
I don't see any free patterns! It goes to a link that does not show any pattern.
24.08.2024 - 21:40DROPS Design answered:
Dear Hazel, all of our patterns are free! You can find this one right here in this page; remember to select pattern right under the title of the model to see the full pattern instructions. When you select "FREE PATTERNS" at the top of the page, it should display several pattern types to choose from. Happy knitting!
25.08.2024 - 23:04
![]() Pollie wrote:
Pollie wrote:
Ik begrijp niet goed welke scheiding er wordt bedoelt bij het lijf, er staat 3 cm na de scheiding, is dat de scheiding waar 12 steken zijn opgezet en dan die markeerdraad?
04.08.2024 - 15:57
![]() NS wrote:
NS wrote:
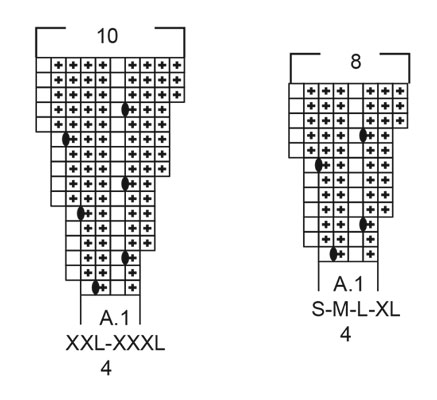
Further to Randi Rycroft’s question and your answer, Shouldn’t Row 1 of A1 be Purl, knit,purl, yarn over, knit? So then you have 5 stitches, not four? So 10 stitches, not 8 when A1 is done x 27 repeats? I’m confused.
06.06.2024 - 16:55DROPS Design answered:
Dear NS, you will work each A.1 over 4 sts (P,K,P,K) but on the very first row you already increase one stitch, so that you have 5 sts in each A.1 at the end of the first row, so in 4th size you have 216 sts and work first row (27 times 4 sts increasing 1 stitch in each of the 27 repeats), so you had 108 sts and have increased 27 sts on the first round = 135 sts and 5 sts in each repeat. Happy knitting!
07.06.2024 - 07:34
![]() Chantal Darchis wrote:
Chantal Darchis wrote:
Je viens de commencer ce modèle je suis au diagramme A2 L et je ne tombe pas bien pourriez vous me donner la correction je vous remercie
02.06.2024 - 16:51
![]() Inge Helbo wrote:
Inge Helbo wrote:
Kan ikke få rettelsen på diagrammet mønster 2
07.04.2024 - 20:02DROPS Design answered:
Hej Inge, diagrammet er opdateret på nettet, så det du ser her på opskriften er det opdaterede diagram :)
09.04.2024 - 11:07
![]() Laurie wrote:
Laurie wrote:
Bonjour, combien de centimètres d'aisance positive ou négative recommandez-vous ? Il serait utile de le mentionner dans vos modèles, et de connaître la taille des mannequins et la taille du vêtement qu'elles portent. Merci !
05.04.2024 - 22:07DROPS Design answered:
Bonjour Laurie, mesurez un vêtement similaire que vous avez et dont vous aimez la forme et comparez ces mesures à celles du schéma, vous trouverez ainsi la taille et l'aisance qui vous convient. Retrouvez ici plus d'infos sur le schéma et les tailles. Bon tricot!
08.04.2024 - 07:41
![]() Manon Blais wrote:
Manon Blais wrote:
Je ne comprends pas comment faire le diagramme A.2 en XL. Jamais fait avec des espaces et en hauteurs.Merci de m'aider je vient de commencer a faire mon début . Pour le A.1. Le premier rang ses 1 maille envers 1 maille endroit 1 maille envers une jetée 1mailles endroit jusqu'a fin du rang.
05.04.2024 - 21:50DROPS Design answered:
Bonjour Mme Blais, les espaces sont dus à la représentation graphique du diagramme, autrement dit, ne les prenez pas en compte et tricotez simplement toutes les mailles d'un même rang àla suite, autrement dit, le 1er rang de A.2, XL se tricote ainsi: 3 m env, 1 m end, 3 m env, 1m end. Bon tricot!
08.04.2024 - 07:40
![]() Bo-fe wrote:
Bo-fe wrote:
Un modèle chic et très agréable à tricoter. Réaliser sans problème avec une laine Bergère Estelle pour un rendu très souple...effet dentelle. Je pense le refaire avec du fil Belle jaune.
31.03.2024 - 16:27
![]() Nicole Mahan wrote:
Nicole Mahan wrote:
The volume on the videos doesn’t seem to be working. Is it something I’m doing? Thank you
28.03.2024 - 12:36DROPS Design answered:
Dear Nicole, since our site is available on many languages, our videos do not have sound, you need to read the explanations underneath to help you undertsnad exactly what is happening. Happy Crafting!
30.03.2024 - 01:07
![]() Randi Rycroft wrote:
Randi Rycroft wrote:
Cast on for xl size is 108 stiches' and then yoke work A.1 in round 27 reps of 4 stiches At that point there are 138 stiches' not 216 . could you help me as the math does not add up and I have tried it twice and neck is too small and the pattern subsequently is not right. I would really like to knit it up, a very pretty top
04.03.2024 - 05:24DROPS Design answered:
Dear Mrs Rycroft, you repeat the 4 sts on first row in A.1 a total of 27 times (= 4x27=108 sts) and increase a total of 4 times (see 4th symbol under diagram text) so that there are 8 sts when A.1 is done x 27 repeats = 216 sts. Happy knitting!
04.03.2024 - 09:54
|
|||||||||||||||||||||||||
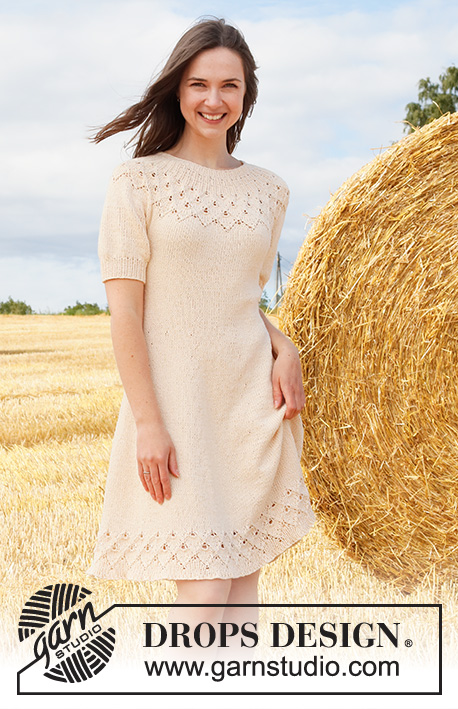
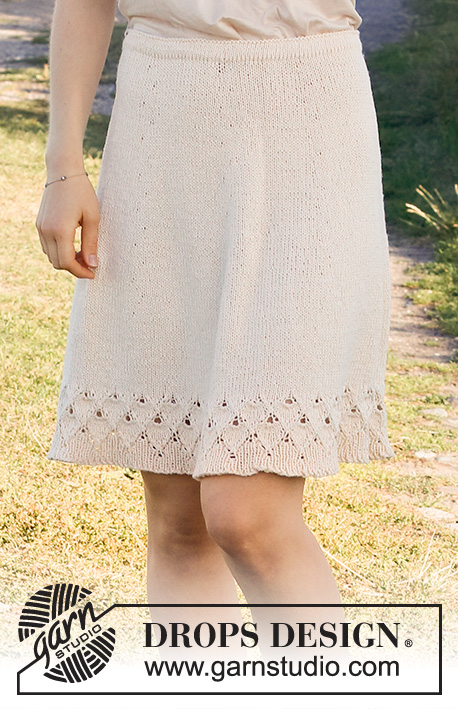
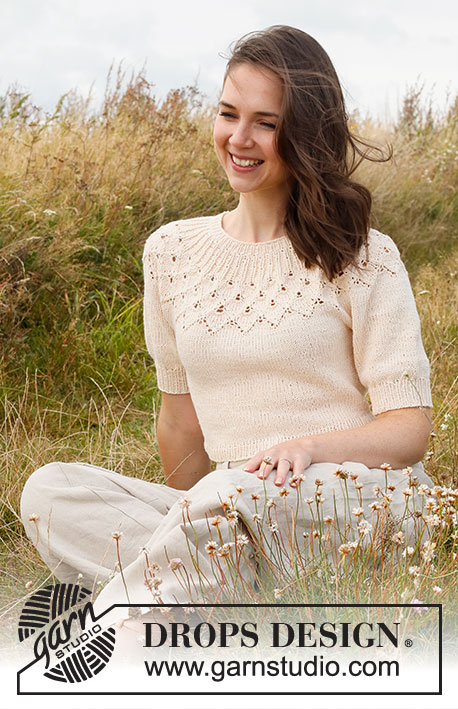
Swing by Spring Top#swingbyspringtop |
|||||||||||||||||||||||||
 |
 |
||||||||||||||||||||||||
Knitted jumper in DROPS Belle. Piece is knitted top down with round yoke, lace pattern, leaf pattern and short balloon sleeves. Size: S - XXXL
DROPS 222-32 |
|||||||||||||||||||||||||
|
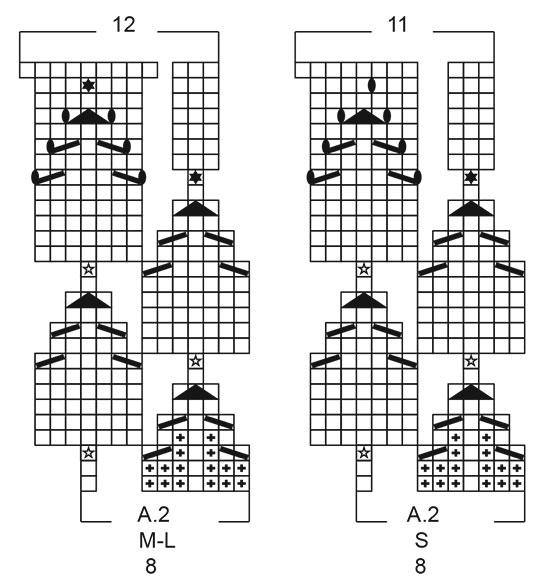
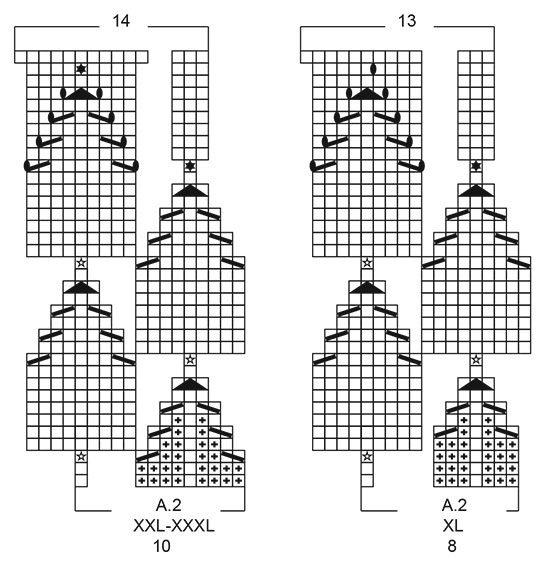
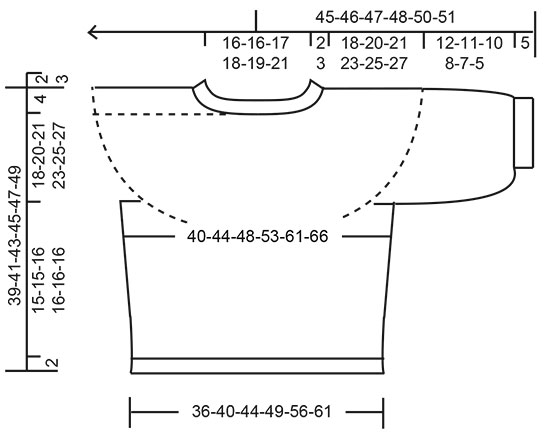
------------------------------------------------------- EXPLANATION FOR THE PATTERN: ------------------------------------------------------- PATTERN: See diagrams A.1 and A.2. Choose diagram for your size. DECREASE TIP (applies to side of body): Decrease 1 stitch on each side of marker thread as follows: Work until 3 stitches remain before marker thread and knit 2 together, knit 2 (marker thread is between these 2 stitches), slip 1 stitch knitwise, knit 1, pass slipped stitch over stitch worked. CAST-OFF TIP: To avoid a tight cast-off edge you may use a larger needle size. If this also is too tight, work a 1 yarn over after approx. every 4th stitch while casting off (cast off yarn overs as regular stitches). ------------------------------------------------------- START THE PIECE HERE: ------------------------------------------------------- JUMPER - SHORT OVERVIEW OF THE PIECE: Work neck edge and yoke in the round from mid back, top down. Now divide yoke for body and sleeves. Body is worked in the round on circular needle, top down. Work sleeves in the round on double pointed needles/short circular needle, top down. NECK EDGE: Cast on 100-100-104-108-112-120 stitches on circular needle size 3 mm with Belle. Knit 1 round. Then work rib = knit 1/purl 1. When rib measures 2-2-3-3-3-3 cm, switch to circular needle size 4 mm. Insert 1 marker at the beginning of round mid back, measure yoke from this marker! YOKE: Work A.1 in the round (= 25-25-26-27-28-30 repetitions of 4 stitches). When A.1 has been worked, there are 200-200-208-216-280-300 stitches on needle. Piece now measures 4-4-4-4-6-6 cm from marker. Then work A.2 in the round (= 25-25-26-27-28-30 repetitions of 8-8-8-8-10-10 stitches). REMEMBER THE KNITTING TENSION! When A.2 has been worked, there are 275-300-312-351-392-420 stitches on needle. Piece measures approx. 14-14-14-17-19-19 cm from marker (i.e. 16-16-17-20-22-22 cm from cast-on edge). Work in stocking stitch until piece measures 18-20-21-23-25-27 cm from marker. Now divide piece for body and sleeves. Work next round as follows: Knit 38-42-44-50-58-63 (= ½ back piece), slip the next 62-66-68-76-80-84 stitches on a stitch holder for sleeve, cast on 8-8-12-12-12-12 new stitches on needle (= in the side under sleeve), knit 75-84-88-99-116-126 (= front piece), slip the next 62-66-68-76-80-84 stitches on a stitch holder for sleeve, cast on 8-8-12-12-12-12 new stitches on needle (= in the side under sleeve), knit the last 38-42-44-50-58-63 stitches (= ½ back piece). Finish body and sleeves separately. NOW MEASURE PIECE FROM HERE! BODY: = 167-184-200-223-256-276 stitches. Insert 1 marker thread in the middle of the 8-8-12-12-12-12 new stitches under each sleeve (= in the side of body). There are now 83-92-100-111-128-138 stitches on front piece and 84-92-100-112-128-138 stitches on back piece. Move the marker threads upwards when working; they are used when decreasing in the sides later. Work in stocking stitch in the round. When piece measures 3 cm from division, decrease 1 stitch on each side of every marker thread - read DECREASE TIP (= 4 stitches decreased). Decrease like this every 2 cm 4-4-4-4-5-5 times in total = 151-168-184-207-236-256 stitches. Work in stocking stitch in the round until piece measures 15-15-16-16-16-16 cm from division – or desired length (approx. 2 cm remain until finished measurements). Knit 1 round while increasing 23-26-28-31-36-38 stitches evenly = 174-194-212-238-272-294 stitches. Switch to circular needle size 3 mm. Work rib (knit 1/purl 1) in the round for 2 cm. Cast off with knit over knit and purl over purl - read CAST-OFF TIP. Jumper measures approx. 39-41-43-45-47-49 cm from shoulder and down. SLEEVES: Slip the 62-66-68-76-80-84 stitches from stitch holder in one side of piece on double pointed needles/a short circular needle size 4 mm, and pick up 1 stitch in each of the 8-8-12-12-12-12 new stitches cast on in the side under sleeve = 70-74-80-88-92-96 stitches. Work in stocking stitch in the round until sleeve measures 12-11-10-8-7-5 cm from division (approx. 5 cm remain until finished measurements, try the jumper on and work to desired length. Knit 1 round while decreasing 16-16-14-14-14-14 stitches evenly = 54-58-66-74-78-82 stitches. Switch to double pointed needles size 3 mm. Work rib in the round = knit 1/purl 1 for 5 cm. Cast off with knit over knit and purl over purl - remember CAST-OFF TIP! Sleeve measures approx. 17-16-15-13-12-10 cm from division. Work the other sleeve the same way. |
|||||||||||||||||||||||||
Diagram explanations |
|||||||||||||||||||||||||
|
|||||||||||||||||||||||||
 |
|||||||||||||||||||||||||
 |
|||||||||||||||||||||||||
 |
|||||||||||||||||||||||||
 |
|||||||||||||||||||||||||
Have you finished this pattern?Tag your pictures with #dropspattern #swingbyspringtop or submit them to the #dropsfan gallery. Do you need help with this pattern?You'll find 30 tutorial videos, a Comments/Questions area and more by visiting the pattern on garnstudio.com. © 1982-2026 DROPS Design A/S. We reserve all rights. This document, including all its sub-sections, has copyrights. Read more about what you can do with our patterns at the bottom of each pattern on our site. |
|||||||||||||||||||||||||


With over 40 years in knitting and crochet design, DROPS Design offers one of the most extensive collections of free patterns on the internet - translated to 17 languages. As of today we count 324 catalogues and 12239 patterns translated into English (UK/cm). 12239
We work hard to bring you the best knitting and crochet have to offer, inspiration and advice as well as great quality yarns at incredible prices! Would you like to use our patterns for other than personal use? You can read what you are allowed to do in the Copyright text at the bottom of all our patterns. Happy crafting!
Post a comment to pattern DROPS 222-32
We would love to hear what you have to say about this pattern!
If you want to leave a question, please make sure you select the correct category in the form below, to speed up the answering process. Required fields are marked *.