
Popular categories
Looking for a yarn?


Comments / Questions (19)
![]() Elise Jense wrote:
Elise Jense wrote:
Hej Jeg forstår ikke mønstret A3? Vh Elise
21.03.2026 - 14:01DROPS Design answered:
Hei Elise. Du skal strikke etter A.3 til det gjenstår 7 masker på pinnen (om du strikker str. S skal A.3 strikkes 19 ganger, men om du strikker etter str. XXXL skal du strikke A.3 27 ganger. Når 1. pinne av A.1 strikkes økes det også masker. Det økes med 2 masker hver gang A.3 strikkes. I str S økes det da med 2 masker x 19 ganger = 38 masker og i str. XXXL økes det med 2 masker x 27 ganger = 54 masker). mvh DROPS Design
23.03.2026 - 14:19
![]() Elise Jensen wrote:
Elise Jensen wrote:
Hej Hvordan skal A3 strikkes. Jeg forstår ikke mønstret. Bh Elise
21.03.2026 - 14:00
![]() Esther Haller wrote:
Esther Haller wrote:
Modell Crushed Walnuts. Die Höhe von der Passe wird ja ab Markierer gemessen. Also Bei der 1. Zunahme 8 cm glatt weiterstricken ab Markierer, nach 2. Zunahme glatt weiterstricken bis 13 cm ab Markierer, nach 3. Zunahme auf 252 M (Gr. M), stricken bis Arbeit eine Länge von 22 cm hat. Ab Markierer oder vom Anschlag gemessen?? das ist meine Frage. Im voraus besten Dank für Antwort.
16.03.2026 - 14:34DROPS Design answered:
Liebe Frau Haller, diese 22 cm messen Sie ab Markierer. Viel Spaß beim stricken!
17.03.2026 - 08:29
![]() Freitag wrote:
Freitag wrote:
Bonjour J’aimerais tricoter ce modèle avec une autre laine légère aérée douce Que me conseillez-vous?
03.02.2026 - 19:31DROPS Design answered:
Bonjour Mme Freitag, utilisez notre convertisseur pour voir les alternatives possibles ainsi que les quantités correspondantes. Votre magasin saura également vous conseiller, même par mail ou téléphone si besoin. Bon tricot!
04.02.2026 - 17:18
![]() Beryl Drake wrote:
Beryl Drake wrote:
Hello Drops, Like Barbara, I find your instructions for the increases ambiguous. I’ve translated Barbara’s comments into English and got my answer.
06.01.2026 - 00:46
![]() Helena Breitholtz wrote:
Helena Breitholtz wrote:
Varför står det inte vilket bystomfång det är till resp. Storlekar?
31.03.2025 - 11:28DROPS Design answered:
Hei Helena. Jo, alle mål står på målskissen. Du finner målskissen nederst på oppskriften. mvh DROPS Design
31.03.2025 - 13:47
![]() Doreen Ivesen wrote:
Doreen Ivesen wrote:
Hej, jeg har købt garn til Crushed walnuts trøje. Skal til at lave strikkeprøven men kan ikke se hvilke nr pinde den skal strikkes på. Kan I hjælpe mig? Vh Doreen
21.02.2025 - 19:15DROPS Design answered:
Hei Doreen. Pinne 5,5. Strikkefastheten er oppgitt i glattstrikk og plagget strikkes i glattstrikk. Pinne 4,5 er brukt til vrangbord. mvh DROPS Design
24.02.2025 - 13:10
![]() Auer wrote:
Auer wrote:
Bonjour, merci pour vos modèles que je trouve toujours bien expliqués . Je découvre, sur ce modèle, la possibilité d’entourer la taille choisie et c’est un petit plus bien pratique 🤩 Meilleures salutations
29.09.2024 - 10:21
![]() Ann Henderson wrote:
Ann Henderson wrote:
I love this sweater, I would like to make the neckline higher. Is this possible alter the pattern by starting out making a smaller size then knitting it to the larger size. What I mean is make the neck size small then continue to knit the xl size? Thank You, Ann
28.06.2024 - 22:39DROPS Design answered:
Dear Ann, you can start with the sitch-count for the smaller size and then increase until you reach the number (and length) requred for the bigger one. Happy Knitting!
30.06.2024 - 15:35
![]() Linda Harrison wrote:
Linda Harrison wrote:
I like this pattern and also Blue Glaze (Pattern no ai-332). Are they similar shaped patterns? The main difference I can see is that Blue Glaze has saddle shoulders. Is this correct? It is hard to see what sort of shoulders Crushed Walnuts has because of the yarn used. Thanks
14.12.2023 - 19:34DROPS Design answered:
Dear Mrs Harrisson, correct, Blue Gaze has saddle shoulders while this one has a round yoke. The tension is also different on both patterns and measurements too, this one for example is somewhat wider (see measurement chart). Happy knitting!
15.12.2023 - 08:13
|
||||||||||||||||
Crushed Walnuts#crushedwalnutscardigan |
||||||||||||||||
 |
 |
|||||||||||||||
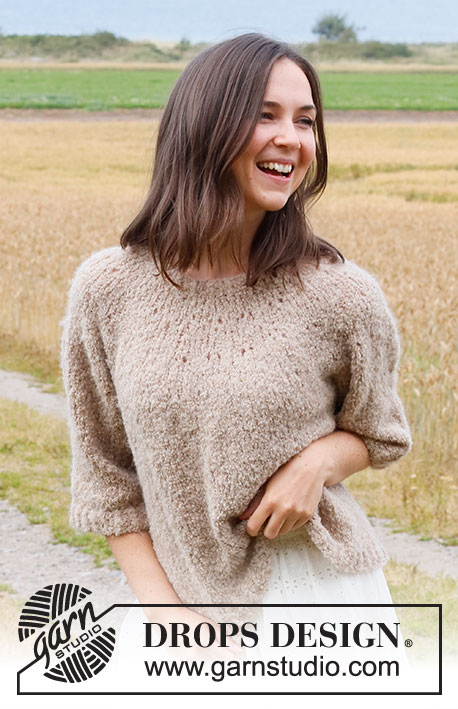
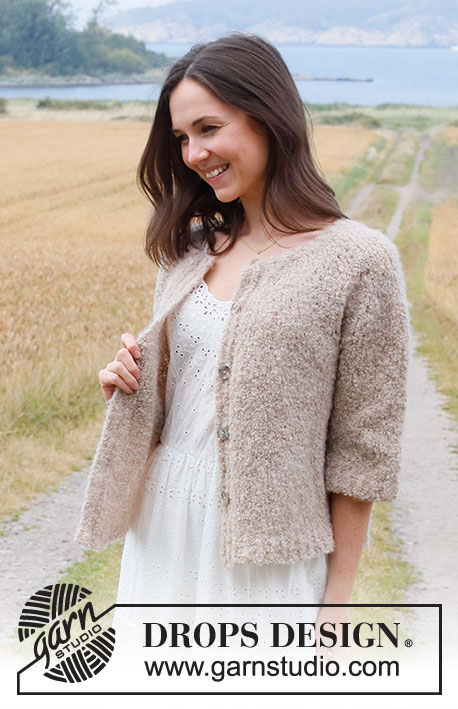
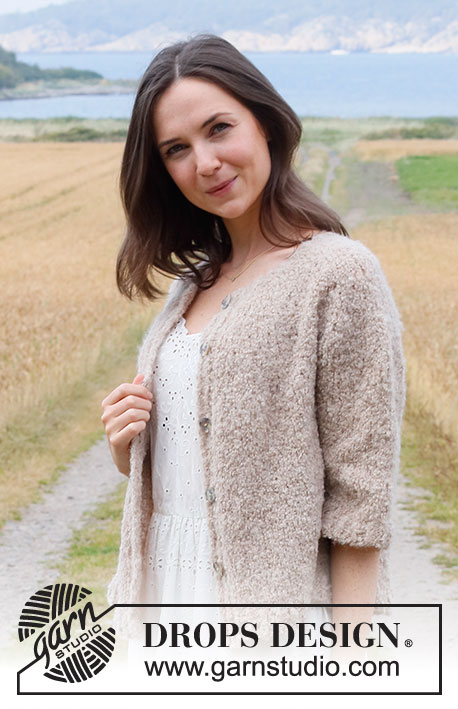
Knitted jacket in DROPS Alpaca Bouclé. The piece is worked top down with round yoke and ¾-length sleeves. Sizes S - XXXL.
DROPS 222-16 |
||||||||||||||||
|
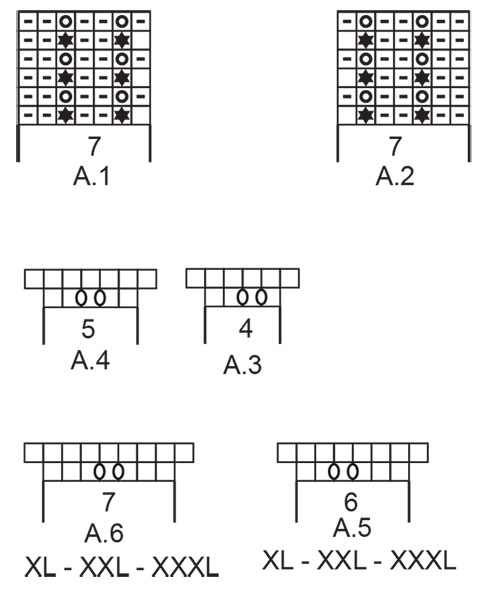
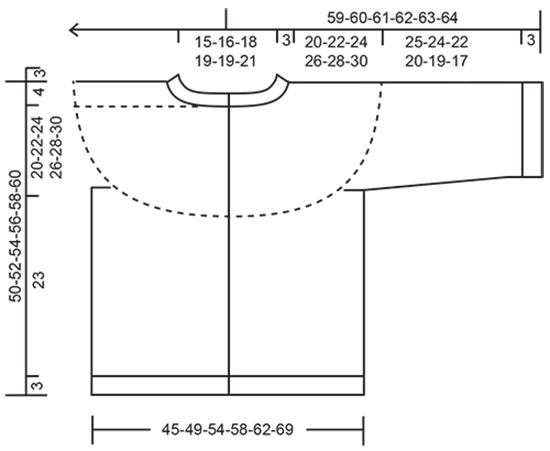
------------------------------------------------------- EXPLANATIONS FOR THE PATTERN: ------------------------------------------------------- PATTERN: See diagrams A.1 to A.6 (diagrams A.5 to A.6 apply to sizes XL, XXL and XXXL). INCREASE/DECREASE TIP (evenly spaced): To work out how to increase/decrease evenly, count the total number of stitches on needle (e.g. 87 stitches), minus the bands (e.g. 14 stitches) and divide the remaining stitches by the number of increases/decreases to be made (e.g. 3) = 24.3. In this example, increase by making 1 yarn over after approx. each 24th stitch. On the next row work the yarn overs twisted to avoid holes. When decreasing, knit together approx. each 23rd and 24th stitch. DECREASE TIP (for sleeves): Decrease 1 stitch on either side of the marker thread as follows: Work until there are 3 stitches left before the marker thread, knit 2 together, knit 2 (marker thread sits between these 2 stitches), slip 1 stitch as if to knit, knit 1 and pass the slipped stitch over the knitted stitch (2 stitches decreased). CASTING-OFF TIP: To avoid the cast-off edge being tight you can cast off with a larger size needle. If the edge is still tight, make 1 yarn over after approx. each 4th stitch at the same time as casting off; the yarn overs are cast off as normal stitches. BUTTONHOLES: Work buttonholes on right band (when garment is worn). Work from the right side when there are 4 stitches left on row as follows: Make 1 yarn over, knit 2 together and work the last stitches as before. On the next row (wrong side) knit the yarn over to leave a hole. The first buttonhole is worked when the neck measures 2 cm. Then work the other 4-4-5-5-5-5 buttonholes with approx. 9-10-8½-9-9-9½ cm between each one. ------------------------------------------------------- START THE PIECE HERE: ------------------------------------------------------- JACKET – SHORT OVERVIEW OF THE PIECE: The neck and yoke are worked back and forth with circular needle from mid front and top down. The yoke is divided for body and sleeves and the body continued back and forth. The sleeves are worked in the round with short circular needle/double pointed needles, top down. NECK: Cast on 87-90-96-99-102-105 stitches (including 7 band stitches on each side towards mid front) with circular needle size 4 mm and Alpaca Bouclé. Purl 1 row (= wrong side). Now work rib as follows: ROW 1: Work A.1 over the first 7 stitches, * knit 1 twisted, purl 2 *, work from *-* until there are 8 stitches left on the row, knit 1 twisted and finish with A.2 over the last 7 stitches. ROW 2: Work A.2 over the first 7 stitches, * purl 1 twisted, knit 2 *, work from *-* until there are 8 stitches left, purl 1 twisted, A.1 over the last 7 stitches. Continue this rib for 3 cm – remember BUTTONHOLES on the right band – read description above. When the rib is finished, knit 1 row from the right side where you increase 3-4-6-7-12-17 stitches evenly spaced – read INCREASE/DECREASE TIP = 90-94-102-106-114-122 stitches. Purl 1 row from the wrong side (yarn overs purled twisted and bands as before). Change to circular needle size 5.5 mm and insert 1 marker after the band at the beginning of the row; the yoke is measured from this marker! YOKE: Work stocking stitch back and forth with 7 band stitches as before on each side. When the piece measures 3 cm from the marker, work pattern and increase as follows: INCREASE 1: Work A.1 over the first 7 stitches, A.3 until there are 7 stitches left (= 19-20-22-23-25-27 repeats of 4 stitches), A.2 over the last 7 stitches. When A.3 has been completed there are 128-134-146-152-164-176 stitches. Knit 1 row from the right side where the number of stitches in adjusted evenly to 129-134-149-154-164-179 stitches (i.e. in sizes S, L, XL, XXXL increase 1-3-2-3 stitches and in sizes M and XXL the number of stitches remains the same). REMEMBER THE KNITTING TENSION! Continue with stocking stitch and 7 band stitches on each side as before. When the piece measures 7-8-9-9-9-10 cm increase as follows: INCREASE 2: Work A.1 over the first 7 stitches, A.4 until there are 7 stitches left (= 23-24-27-28-30-33 repeats of 5 stitches), A.2 over the last 7 stitches. When A.4 has been completed there are 175-182-203-210-224-245 stitches. Knit 1 row from the right side where the number of stitches is adjusted evenly to 174-184-204-212-224-248 stitches (i.e. in size S decrease 1 stitch, in sizes M, L, XL and XXXL increase 2-1-2-3 stitches and in size XXL the number of stitches remains the same). Continue with stocking stitch. When the piece measures 11-13-15-16-16-18 cm, work the different sizes as follows: SIZES S, M and L: Now work pattern and increase as follows: INCREASE 3: Work A.1 over the first 7 stitches, A.4 until there are 7 stitches left (= 32-34-38 repeats of 5 stitches), A.2 over the last 7 stitches. When A.4 has been completed there are 238-252-280 stitches. Continue with stocking stitch and the bands as before until the piece measures 20-22-24 cm. Go to ALL SIZES. SIZES XL, XXL and XXXL: Now work pattern and increase as follows: INCREASE 3: Work A.1 over the first 7 stitches, A.5 until there are 7 stitches left, (= 33-35-39 repeats of 6 stitches), A.2 over the last 7 stitches. When A.5 has been completed there are 278-294-326 stitches. Knit 1 row from the right side where the number of stitches is adjusted to 280-294-329 stitches (i.e. in sizes XL and XXXL increase 2-3 stitches and in size XXL the number of stitches remains the same). Continue with stocking stitch. When the piece measures 21-21-24 cm, work as follows: INCREASE 4: Work A.1 over the first 7 stitches, work 13-10-14 stitches in stocking stitch, * A.6 over the next 7 stitches, 22-14-21 stitches in stocking stitch *, work from *-* until 28-25-28 stitches remain on row, A.6 over the next 14-11-14 stitches and A.2 over the last 7 stitches. When A.6 has been completed there are 298-320-351 stitches. Continue with stocking stitch until the piece measures 26-28-30 cm. Go to ALL SIZES. ALL SIZES: Now divide the piece for body and sleeves on the next row as follows: Work the first 39-41-45-48-51-56 stitches (= front piece), place the next 48-50-57-59-64-70 stitches on a thread for the sleeve, cast on 8-10-10-10-10-12 stitches (= in side under sleeve), work the next 64-70-76-84-90-99 stitches (= back piece), place the next 48-50-57-59-64-70 stitches on a thread for the sleeve, cast on 8-10-10-10-10-12 stitches (= in side under sleeve), work the last 39-41-45-48-51-56 stitches (= front piece). Body and sleeves are finished separately. THE PIECE IS NOW MEASURED FROM HERE. BODY: = 158-172-186-200-212-235 stitches. Continue back and forth with stocking stitch and 7 band stitches on each side as before. When the piece measures 23 cm from the division, increase 13-14-18-19-22-23 stitches evenly spaced = 171-186-204-219-234-258 stitches. Change to circular needle size 4 mm and work rib from the right side as follows: A.1 over the first 7 stitches, * knit 1 twisted, purl 2 *, work from *-* until there are 8 stitches left, knit 1 twisted, work A.2. The next row from the wrong side is worked as follows: A.2, * purl 1 twisted, knit 2 *, work from *-* until there are 8 stitches left, purl 1 twisted and work, A.1. Continue this rib for 3 cm. Cast off with knit over knit and purl over purl – read CASTING-OFF TIP. The jacket measures approx. 50-52-54-56-58-60 cm from the shoulder down. SLEEVES: Place the 48-50-57-59-64-70 stitches from the thread on the one side of the piece on double pointed needles/short circular needle size 5.5 mm and knit up 1 stitch in each of the 8-10-10-10-10-12 stitches cast on under the sleeve = 56-60-67-69-74-82 stitches. Insert a marker thread in the middle of the 8-10-10-10-10-12 stitches under the sleeve. Allow the thread to follow your work onwards; it will be used when decreasing under the sleeve. Start the round at the marker thread and work stocking stitch in the round. When the piece measures 3 cm from the division in all sizes, decrease 2 stitches under the sleeve – read DECREASE TIP. Decrease like this every 5½-5-2-2-1½-1 cm a total of 4-4-7-7-8-10 times = 48-52-53-55-58-62 stitches. Continue with stocking stitch until the sleeve measures 25-24-22-20-19-17 cm (shorter sleeves in the larger sizes due to longer yoke). Knit 1 round where you decrease 0-1-2-1-1-2 stitches evenly spaced = 48-51-51-54-57-60 stitches. Change to double pointed needles size 4 mm and work rib (= knit 1 twisted, purl 2) for 3 cm. Cast off with knit over knit and purl over purl – remember CASTING-OFF TIP. The sleeve measures approx. 28-27-25-23-22-20 cm from the division. Work the other sleeve in the same way. ASSEMBLY: Sew the buttons onto the left band. |
||||||||||||||||
Diagram explanations |
||||||||||||||||
|
||||||||||||||||
 |
||||||||||||||||
 |
||||||||||||||||
Have you finished this pattern?Tag your pictures with #dropspattern #crushedwalnutscardigan or submit them to the #dropsfan gallery. Do you need help with this pattern?You'll find 28 tutorial videos, a Comments/Questions area and more by visiting the pattern on garnstudio.com. © 1982-2026 DROPS Design A/S. We reserve all rights. This document, including all its sub-sections, has copyrights. Read more about what you can do with our patterns at the bottom of each pattern on our site. |
||||||||||||||||


With over 40 years in knitting and crochet design, DROPS Design offers one of the most extensive collections of free patterns on the internet - translated to 17 languages. As of today we count 324 catalogues and 12290 patterns translated into English (UK/cm). 12290
We work hard to bring you the best knitting and crochet have to offer, inspiration and advice as well as great quality yarns at incredible prices! Would you like to use our patterns for other than personal use? You can read what you are allowed to do in the Copyright text at the bottom of all our patterns. Happy crafting!
Post a comment to pattern DROPS 222-16
We would love to hear what you have to say about this pattern!
If you want to leave a question, please make sure you select the correct category in the form below, to speed up the answering process. Required fields are marked *.