
Popular categories
Looking for a yarn?


Comments / Questions (20)
![]() Lise wrote:
Lise wrote:
Lorsquʼon me demande (après les 4 maillés ajoutées) de refaire 15 augmentations mais selon A1. Est-ce encore 4 mailles répartie à tous les rangs ? Ces augmentations en A1 dois-je les calculer sur la totalité du tricot ou calculer seulement les augmentations sur le devant et le dos ? Ce passage n’est pas clair pour moi…
05.11.2025 - 16:13DROPS Design answered:
Bonjour Lise, je suis désolée je ne vois pas du tout à quel niveau vous en êtes, pouvez-vous m'indiquer quelle taille vous tricotez et quelle partie vous devez maintenant faire? Merci pour votre compréhension.
06.11.2025 - 09:05
![]() Magda wrote:
Magda wrote:
Jak prać sweter z wełny moher z jedwabiem?
09.02.2025 - 10:04DROPS Design answered:
Witaj Magdo, instrukcję prania znajdziesz w karcie kolorów DROPS Kid-Silk TUTAJ. Co mogę jeszcze poradzić - nie odwirowuj w pralce, rozłóż na ręczniku i zwiń w niego, odciskając nadmiar wody. Jak trzeba użyj drugiego ręcznika. Później rozłóż na płasko odpowiednio formując ubranie i zostaw do wysuszenia. Włóczka ta bardzo dobrze trzyma kształt. Pozdrawiamy!
10.02.2025 - 11:38
![]() Anna wrote:
Anna wrote:
Hello, is it possible to knit the back in plain stocking stitch instead of the pattern?
28.10.2022 - 12:36DROPS Design answered:
Dear Anna, sure you can work stocking stitch instead. Happy knitting!
28.10.2022 - 13:27
![]() Anna wrote:
Anna wrote:
Hello. Where the increased stitches are worked into A.1, are they accounted for immediately as the first stitch of the A.1 diagram?
29.04.2022 - 23:17DROPS Design answered:
Dear Anna, please see answer below.
30.04.2022 - 21:59
![]() Anna wrote:
Anna wrote:
Hello. Where the increased stitches are worked into A.1, are they accounted for immediately as first stitch of A.1?
29.04.2022 - 23:16DROPS Design answered:
Dear Anna, as you increase for the saddle-shoulders, sleeves and yoke, you will increase the amount of repeats of A.1 (= 6 stitches), as many as the new increased stitches will allow you. These increased stitches are worked in A.1. Those that do not fit into a repeat are worked in stocking stitch. Happy knitting!
30.04.2022 - 21:59
![]() Ale wrote:
Ale wrote:
Ciao, negli aumenti per lo sprone dove bisogna spostare esattamente i 4 segnapunti? Qual è la la corretta distribuzione dei punti tra un segnapunto e l'altro? Grazie mille
30.12.2021 - 17:51DROPS Design answered:
Buonasera Ale, i segnapunti vengono posizionati come indicato e seguono il lavoro, non si spostano. Buon lavoro!
30.12.2021 - 22:09
![]() Delfina wrote:
Delfina wrote:
Come fare per realizzare maniche a chimono o a pipistrello con ferri 3?
09.05.2021 - 06:41DROPS Design answered:
Buonasera Delfina, per le maniche deve seguire le istruzioni indicate. Per un'assistenza più personalizzata, può rivolgersi al suo rivenditore DROPS di fiducia. Buon lavoro!
09.05.2021 - 17:14
![]() Mette wrote:
Mette wrote:
Jeg strikker den i str S. Når jeg sætter de 4 mærker på bærestykket, så kommer de ikke til at sidde ens i forhold til ret og vrang masker i ribkanten. Dvs. En sidder mellem en ret og en vrangmaske og en sidder mellem 2 vrang masker osv. Kan det godt passe?
24.02.2021 - 22:48DROPS Design answered:
Hej Mette, det gør ikke noget, du strikker kun ribben i halskanten, så det bliver et helt andet mønster nedenfor :)
25.02.2021 - 14:14
![]() Rosa Olimpia Fuschino De Chacon wrote:
Rosa Olimpia Fuschino De Chacon wrote:
Tienen versión en español ?
09.02.2021 - 18:12
![]() Karolina wrote:
Karolina wrote:
"Flower symphony"?
16.01.2021 - 22:03
|
|||||||||||||||||||||||||
Lost in Lavender#lostinlavendersweater |
|||||||||||||||||||||||||
 |
 |
||||||||||||||||||||||||
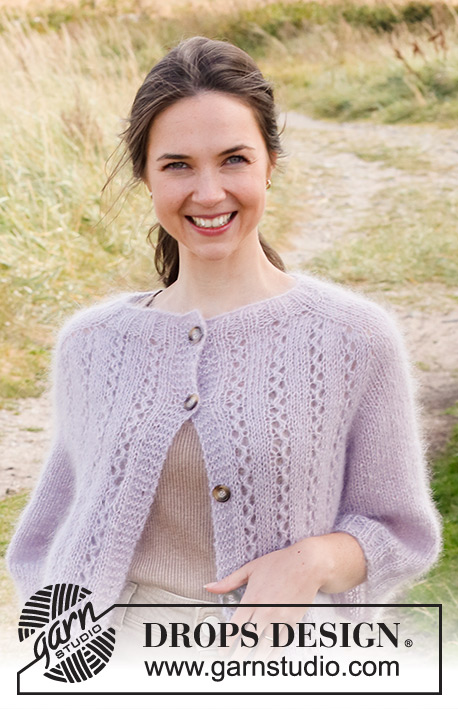
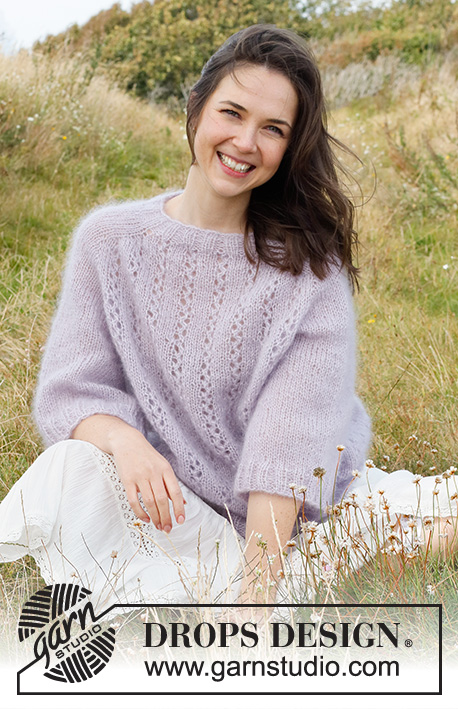
Knitted jumper with saddle-shoulders and lace pattern, in 3 strands DROPS Kid-Silk. The piece is worked top down. Sizes S - XXXL.
DROPS 222-1 |
|||||||||||||||||||||||||
|
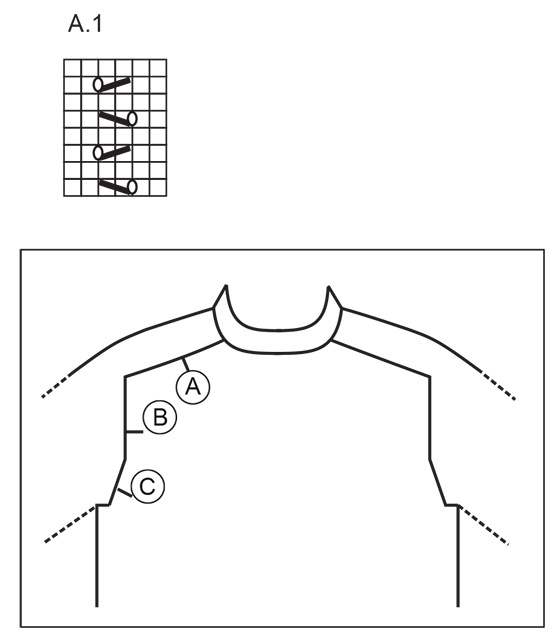
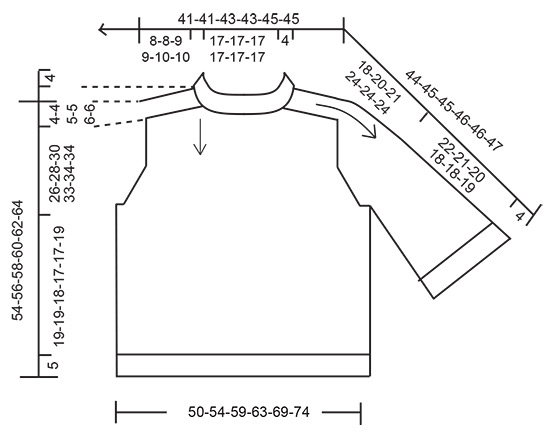
------------------------------------------------------- EXPLANATIONS FOR THE PATTERN: ------------------------------------------------------- INCREASE TIP-1 (evenly spaced): To work out how to increase evenly, count the total number of stitches on the needle (e.g. 68 stitches) and divide by the number of increases to be made (e.g. 6) = 11. In this example, increase by making 1 yarn over after each 11th stitch. On the next round work the yarn overs twisted to avoid holes. INCREASE TIP-2: BEFORE MARKER: The new stitch will twist to the right. Use the left needle to pick up the back strand between 2 stitches from the previous round and knit in the front loop. AFTER MARKER: The new stitch will twist to the left. Use the left needle to pick up the front strand between 2 stitches from the previous round and knit in the back loop. INCREASE TIP-3 (sleeves): Start 1 stitch before the marker thread. Make 1 yarn over, knit 2 (marker thread sits between these 2 stitches), 1 yarn over. On the next round knit the yarn over twisted to avoid a hole. KNITTING TIP: Because the whole garment is worked with 3 strands; in some sizes it will be necessary to use the strand from both the inside and outside of the remaining skein. CASTING-OFF TIP: To avoid the cast-off edge being tight you can cast off with a larger size needle. If the edge is still tight, make 1 yarn over after approx. each 4th stitch at the same time as casting off; the yarn overs are cast off as normal stitches. ------------------------------------------------------- START THE PIECE HERE: ------------------------------------------------------- JUMPER – SHORT OVERVIEW OF THE PIECE: The piece is worked in the round, top down. Stitches are increased for the shoulders, then stitches are increased for the sleeves. The yoke is divided for the body and sleeves and the body is continued in the round. The sleeves are worked in the round, top down. The piece is worked with 3 strands of Kid-Silk – read KNITTING TIP. NECK: Cast on 68-68-72-72-76-76 stitches with circular needle size 5 mm and 3 strands Kid-Silk. Knit 1 round, then work rib (knit 2, purl 2) in the round for 4 cm; on the last round increase 4 stitches evenly spaced – read INCREASE TIP-1 = 72-72-76-76-80-80 stitches. Change to circular needle size 6 mm. YOKE: Insert a marker thread in the beginning of the round – THE PIECE IS NOW MEASURED FROM HERE! In addition, insert 4 other markers as described below – without working the stitches and each marker is inserted between 2 stitches. These markers are used when increasing. Marker 1: Count 12-12-12-12-12-12 stitches (= half back piece), insert marker before the next stitch. Marker 2: Count 12-12-14-14-16-16 stitches from marker 1 (= shoulder), insert marker before the next stitch. Marker 3: Count 24-24-24-24-24-24 stitches from marker 2 (= front piece), insert marker before the next stitch. Marker 4: Count 12-12-14-14-16-16 stitches from marker 3 (= shoulder), insert marker before the next stitch. There are 12-12-12-12-12-12 stitches left on the back piece after marker 4. Allow the markers to follow your work onwards; they are used when increasing for the shoulders. INCREASE FOR SADDLE-SHOULDERS: Read the next section before continuing! The piece is continued, with A.1 over the stitches on the front piece (= 4 repeats of 6 stitches in width) and back piece (= 4 repeats of 6 stitches in width) and stocking stitch over the shoulders/sleeves. AT THE SAME TIME, on the first round, increase 4 stitches for the saddle-shoulders as follows: Increase BEFORE markers 1 and 3 and AFTER markers 2 and 4 – read INCREASE TIP-2. You are only increasing on the front and back pieces, the number of stitches on the shoulders remains the same. Continue this pattern and increase like this every round a total of 12-12-14-14-16-16 times = 120-120-132-132-144-144 stitches (the increased stitches are worked into A.1). REMEMBER THE KNITTING TENSION! After the last increase, the piece measures 8-8-9-9-10-10 cm from the marker on the neck. Now increase for the sleeves as described below. INCREASE FOR SLEEVES: NOTE! Do not increase in size XXXL, continue with increases for yoke in this size. SIZES S-M-L-XL-XXL: Work stocking stitch and A.1 as before. AT THE SAME TIME, on the next round, increase 4 stitches for the sleeves as follows: Increase AFTER markers 1 and 3 and BEFORE markers 2 and 4 – remember INCREASE TIP-2 You are only increasing on the sleeves, the number of stitches on the front and back pieces remains the same. The increased stitches are worked in stocking stitch. Increase like this every 2nd round a total of 5-4-5-4-3 times = 140-136-152-148-156 stitches. The piece measures approx. 14-12-15-13-13 cm from the marker on the neck. Now increase for the yoke as described below. ALL SIZES: INCREASE FOR YOKE: Move the 4 markers so each marker sits in the outermost sleeve stitches on each side. There are now 20-18-22-20-20-14 stitches between the marker-stitches on each sleeve. On the next round increase 8 stitches by increasing both before and after all 4 marker-stitches – remember INCREASE TIP-2. You are now increasing on both the front and back pieces and on the sleeves, and the increased stitches are worked into A.1 on the body and in stocking stitch on the sleeves. Increase like this every 2nd round a total of 9-12-12-15-16-19 times = 212-232-248-268-284-296 stitches. When all the increases are finished, the piece measures approx. 26-28-30-33-34-34 cm from the marker on the neck. If the piece is shorter than this, continue working, without further increases to the correct length. On the next round divide for the body and sleeves as follows: Work the first 33-36-38-41-44-47 stitches (= half back piece), place the next 40-44-48-52-54-54 stitches on 1 thread for the sleeve, cast on 4-4-6-6-8-10 stitches under the sleeve, work 66-72-76-82-88-94 stitches (= front piece), place the next 40-44-48-52-54-54 stitches on 1 thread for the sleeve, cast on 4-4-6-6-8-10 stitches under the sleeve, work the last 33-36-38-41-44-47 stitches (= half back piece). Body and sleeves are finished separately. BODY: = 140-152-164-176-192-208 stitches. Continue the pattern as before, with A.1 over all the stitches; the stitches which do not fit into the pattern on each side are worked in stocking stitch. Continue until the piece measures 19-19-18-17-17-19 cm from the division. Change to circular needle size 5 mm and work rib (knit 2, purl 2) for 5 cm. Loosely cast off with knit over knit and purl over purl, read CASTING-OFF TIP. The jumper measures approx. 54-56-58-60-62-64 cm from the shoulder. SLEEVE: Place the 40-44-48-52-54-54 stitches from the thread on the one side of the piece on short circular needle/double pointed needles size 6 mm. In addition, knit up 1 stitch in each of the 4-4-6-6-8-10 new stitches under the sleeve = 44-48-54-58-62-64 stitches. Insert 1 marker in the middle of the new stitches under the sleeve; it will be used when increasing under the sleeve. Work stocking stitch in the round. When the piece measures 3 cm from the division, increase 1 stitch on each side of the marker – read INCREASE TIP-3. Repeat the increase every 3 cm a total of 6 times in all sizes = 56-60-66-70-74-76 stitches. Continue with stocking stitch until the sleeve measures 22-21-20-18-18-19 cm from the division. Knit 1 round where you increase 0-0-2-2-2-0 stitches evenly spaced = 56-60-68-72-76-76 stitches. Change to double pointed needles size 5 mm. Work rib (knit 2, purl 2) for 4 cm. Cast off with knit over knit and purl over purl – remember CASTING-OFF TIP. The sleeve measures 26-25-24-22-22-23 cm from the division. Work the other sleeve in the same way. |
|||||||||||||||||||||||||
Diagram explanations |
|||||||||||||||||||||||||
|
|||||||||||||||||||||||||
 |
|||||||||||||||||||||||||
 |
|||||||||||||||||||||||||
 |
|||||||||||||||||||||||||
Have you finished this pattern?Tag your pictures with #dropspattern #lostinlavendersweater or submit them to the #dropsfan gallery. Do you need help with this pattern?You'll find 27 tutorial videos, a Comments/Questions area and more by visiting the pattern on garnstudio.com. © 1982-2026 DROPS Design A/S. We reserve all rights. This document, including all its sub-sections, has copyrights. Read more about what you can do with our patterns at the bottom of each pattern on our site. |
|||||||||||||||||||||||||


With over 40 years in knitting and crochet design, DROPS Design offers one of the most extensive collections of free patterns on the internet - translated to 17 languages. As of today we count 324 catalogues and 12290 patterns translated into English (UK/cm). 12290
We work hard to bring you the best knitting and crochet have to offer, inspiration and advice as well as great quality yarns at incredible prices! Would you like to use our patterns for other than personal use? You can read what you are allowed to do in the Copyright text at the bottom of all our patterns. Happy crafting!
Post a comment to pattern DROPS 222-1
We would love to hear what you have to say about this pattern!
If you want to leave a question, please make sure you select the correct category in the form below, to speed up the answering process. Required fields are marked *.