
Popular categories
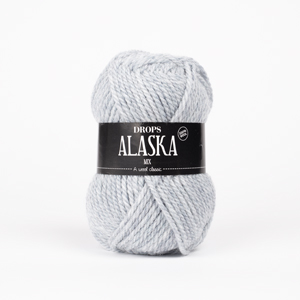
Looking for a yarn?


































Comments / Questions (68)
 Maria Elena wrote:
Hej. Jeg er i gang med forstykket (str. L) og har strikket ribstrik og første pind på retsiden herefter. Jeg har 108 masker på pinden. Jeg er i tvivl om de følgende pinde herefter. Skal jeg fortsat tage ind i siderne? Hvad mener man med at strikke diagrammerne i højden? Betyder det at jeg skal strikke 4 pinde, så jeg er igennem diagrammerne? Vh Maria Elena
22.10.2026 - 12:58DROPS Design answered:
Hei Maria. Når du strikker rib blir pinne 1.-4. gjentatt til arbeidet målte 5 cm. Så skal det byttes pinne str. og det skal tages inn 4 masker (1. pinne av X og 5. pinne i selve diagrammet) = 108 masker på pinnen. Når du fortsetter arbeidet strikkes nå pinne 6, 7 og 8 = du har nå strikket diagram A.1x, A.2x, A.3x, A.4x og A.5x 1 gang i høyden (A.1x, A.2x, A.3x, A.4x og A.5x = 4 pinner). mvh DROPS Design
26.10.2026 - 09:28
 Nicole wrote:
Hallo, Leider hilft mir Ihre Antwort zum Ärmel nicht weiter. Mein Rumpfteil hat wie in der Skizze dargestellt einen Armausschnitt von 25 cm (xl). Mein Ärmel hat nach den Zunahmen nun 76 Maschen das sind ungefähr 35 cm. Jetzt soll ich nur noch abketten. Dadurch wird der Ärmel an der Schulter enger und passt nicht zu dem Rumpfteil. Muss ich nicht eher zunehmen damit ich auf 2 x 25cm komme. Vielen Dank
21.10.2026 - 14:37DROPS Design answered:
Liebe Nicole, laut Maschenprobe (16 Maschen = 10 cm) müssten 76 Maschen ca. 47 cm breit sein. Die Reihenhöhe, die Sie beim Abketten stricken, trägt auch noch zur Länge für den gesamten Armausschnitt bei. Sollte Ihre Maschenprobe in der Höhe stark abweichen (d.h. Sie brauchen mehr als 20 Reihen für 10 cm), können Sie aber ggf. auch Zwischenreihen stricken ohne abzuketten oder Sie ketten zwischendurch nur 1 Masche beidseitig ab, damit die Armkugel nicht zu schnell schmaler wird. Wichtig ist, dass Sie nach dem ersten Abketten (die je 4 Maschen beidseitig bei einer Länge von 48 cm) dann noch insgesamt 9 cm stricken, sodass der Ärmel eine Länge von 57 cm hat. Gutes Gelingen!
21.10.2026 - 23:45
Nicole wrote:
Hallo, Mein Ärmel hat jetzt eine Länge von 52 cm . Ich müsste laut Anleitung nun 2 Maschen beidseitig abketten bis der Ärmel eine Länge von 56 cm hat. Das wären bei mir bis zu einer Länge von 56 cm ca 8 Reihen also wären 16Maschen abzuketten ? Wird das nicht zu eng ? Vielen Dank für die Hilfe
11.10.2026 - 09:50DROPS Design answered:
Liebe Nicole, damit die Ärmelkugel die richtige Länge (= 6-7-8-9-10-11 cm) hat, muss man zuerst diese 2 Maschen beidseitig bis insg. 56 cm dann noch 3 Maschen 1 Mal beidseitig. Viel Spaß beim Stricken!
12.10.2026 - 08:55
Nicole wrote:
Hallo, Ich stricke jetzt den ersten Ärmel und würde gern wissen warum ich die Zunahmen mit Umschlag stricken sollte. Kann ich auch eine Zunahme aus der unteren Masche machen oder aus dem Querfaden oder ist das im Verlauf des Strickstückes ungünstig. Vielen Dank
02.10.2026 - 10:14DROPS Design answered:
Liebe Nicole, grundsätzlich können Sie die Zunahme auch anders machen, wenn Ihnen das besser gefällt. Die Zunahme mit Umschlag wird etwas lockerer bzw. weniger eng als die anderen Zunahmen, da hier ja noch zusätzlich das Garn des Umschlags hinzukommt. Außerdem kann es sein, dass sich die kraus rechte Rand-Masche etwas verzieht, wenn Sie aus dem Querfaden zunehmen, was aber nicht ins Gewicht fällt, da die kraus rechten Maschen in der Naht verschwinden. Vielleicht probieren Sie verschiedene Zunahmearten mal an einem Probestück aus und schauen, wie sich die jeweilige Zunahme verhält. Viel Spaß beim Stricken!
02.10.2026 - 14:07
Nicole wrote:
Hallo aus Berlin, beim Vorderteil steht, dass man bei einer Länge von 66cm 30 Maschen abketten soll und dabei 8 Maschen abnehmen soll. Im weiteren sollen die restlichen 22 Maschen stillgelegt werden. Das verstehe ich nicht entweder in kette Maschen ab oder man legt sie still. Das sind doch verschiedene Vorgänge. Soll ich die Maschen abketten oder stillegen . Vielen Dank für Ihre Hilfe
03.06.2026 - 17:22DROPS Design answered:
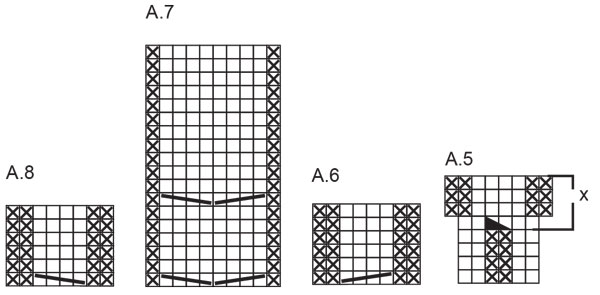
Liebe Nicole, diese Maschen werden so gestrickt und stillgelegt: stricken Sie die nächsten 30 Maschen aber gleichzeitig nehmen Sie 2 Maschen in jedem Zopf regelmäßig verteilt, dh 2 M in A.6+ 4 M in A.7 + 2 M in A.8 = 2+4+2=8 Maschen wird man abnehmen, so daß 30-8=22 Maschen bleiben und diese 22 Maschen werden für den Hals stillgelegt (man muss hier abnehmen, damit den Hals ganz schön flach bleibt). Viel Spaß beim Stricken!
04.06.2026 - 09:37
 Carina Novarese wrote:
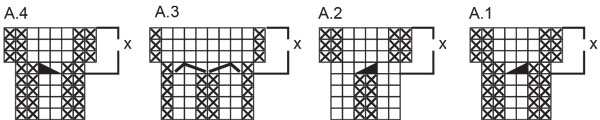
Hola! Estoy comenando el delantero pero no entienddo cuando pone dos gráficos juntos. Si lo hago así necesito más que los 98 puntos montados. como cuando dice: A.1, A.3 (= 8 puntos) Debo hacer los dos gráficos? porque en ese caso A.1 tiene 6 puntos más los 8 de A.3. Gracias
17.05.2026 - 05:44DROPS Design answered:
Hola Carina, A.1 tiene 6 puntos; una vez indicado en el patrón que A.1 tiene 6 puntos no volvemos a repetir en la misma frase que A.1 tiene 6 puntos. Cada vez que pone A.1 son 6 puntos, cada vez que pone A.2, A,4 y A.5 son 6 también y A.3 son 8. Así que tenemos: 1 punto de orillo * 2 derechos, 2 reveses * sobre 24 puntos, 2 derechos, A.1 (= 6 puntos), A.2 (= 6 puntos), A.1 (= 6 puntos), A.3 (= 8 puntos), A.4 (= 6 puntos), A.5 (= 6 puntos), A.4 (= 6 puntos), * 2 derechos, 2 reveses * sobre 24 puntos, terminar con 2 derechos y 1 punto de orillo en punto musgo. = 1+24+2+6+6+6+8+6+6+6+24+2+1 =98 pts.
18.05.2026 - 01:37
 Marianne wrote:
Goedenavond..het patroon voorpand klopt niet: start met 122 st. Dan totaal 2 x 0 st minderen...je hebt 136 st op de naald?? Greetz Marianne
26.03.2026 - 20:02
 Ely wrote:
È possibile lavorare con i ferri lineari?
01.02.2026 - 20:13DROPS Design answered:
Buonasera Ely, questo modello è lavorato in parti separate, per cui può lavorarlo con i ferri dritti. Buon lavoro!
01.02.2026 - 20:17
 Bente Marie Thorsrud wrote:
På str L legges opp 98 m til forstykket. Etter vrangbord skal det felles 4 masker. Hvordan kan man da ha 108 m ??
07.12.2025 - 18:27DROPS Design answered:
Hei Bente Marie, I diagrammene A.1-A.5 øker du 2 masker på 6. rad i hver rapport. Du strikker 7 rapporter (når man teller alle diagrammene) slik at du øker 14 masker. Samtidig feller du 4 masker som beskrevet i teksten. Da øker du 10 masker totalt og har 108 masker når diagrammene er ferdige. Hilsen Drops Team.
08.12.2025 - 07:32
Rossella wrote:
Buonasera Michela, dopo aver cambiato la misura dei ferri circolari, si lavora sulle ultime righe dei diagrammi (indicate con X), in cui ci sono degli aumenti. Buon lavoro! 22.09.2022 - 16:25 questa la vostra risposta ma non sta scritto da nessuna parte che si devono fare aumenti, se si legge il diagramma sembra di doverlo lavorare sulle maglie presenti. non è spiegato per nulla bene scusate!!!
06.12.2025 - 17:47DROPS Design answered:
Buongiorno Rossella, gli aumenti non sono indicati nel testo perchè sono inclusi nei diagrammi. Deve seguire la successione dei diagrammi come indicato nel testo. Buon lavoro!
07.12.2025 - 14:01
|
|||||||||||||||||||||||||
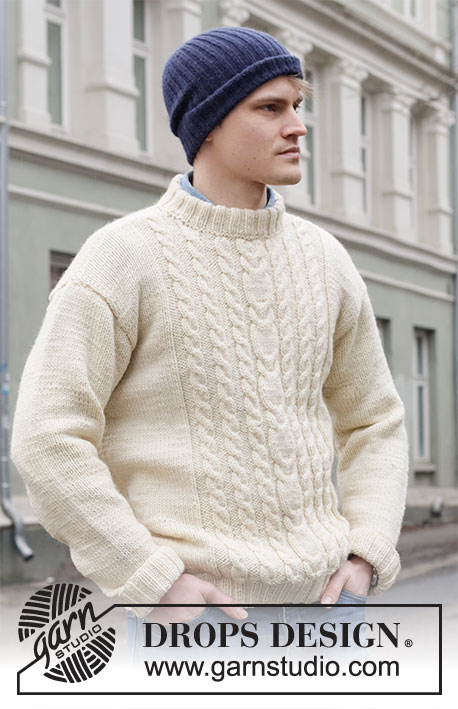
Fisher’s Moon#fishersmoonsweater |
|||||||||||||||||||||||||
 |
 |
||||||||||||||||||||||||
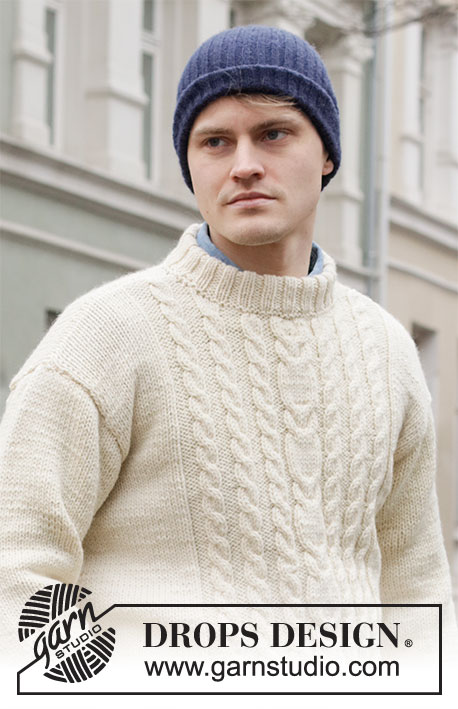
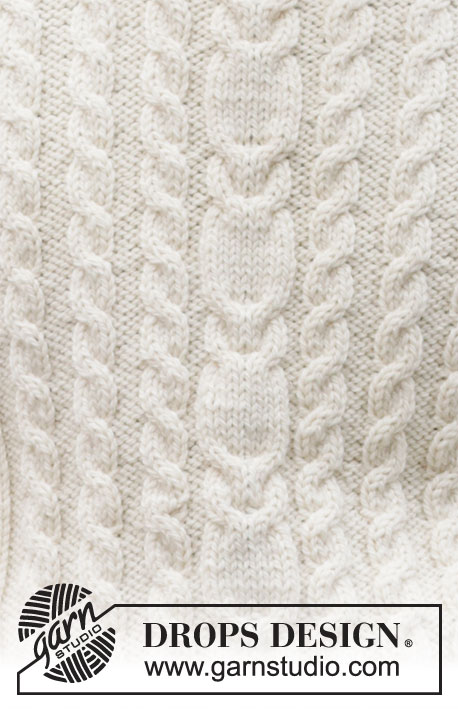
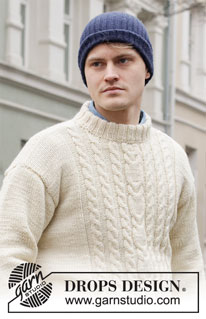
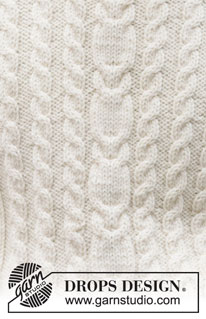
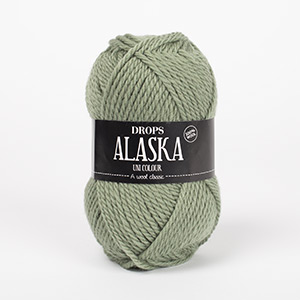
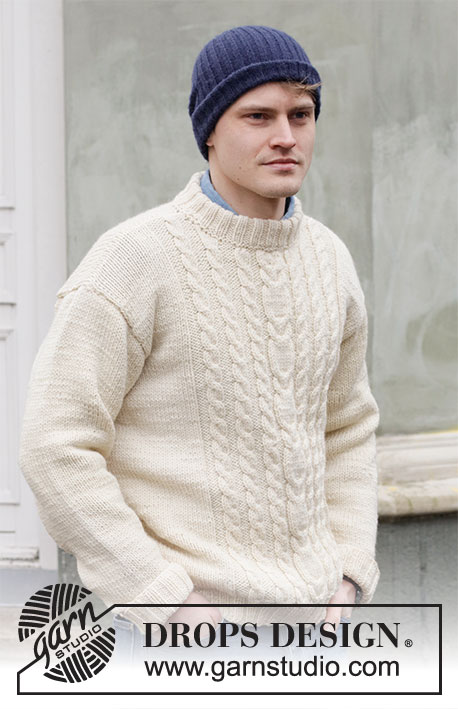
Knitted jumper for men with cables in DROPS Alaska. Size: S - XXXL
DROPS 219-9 |
|||||||||||||||||||||||||
|
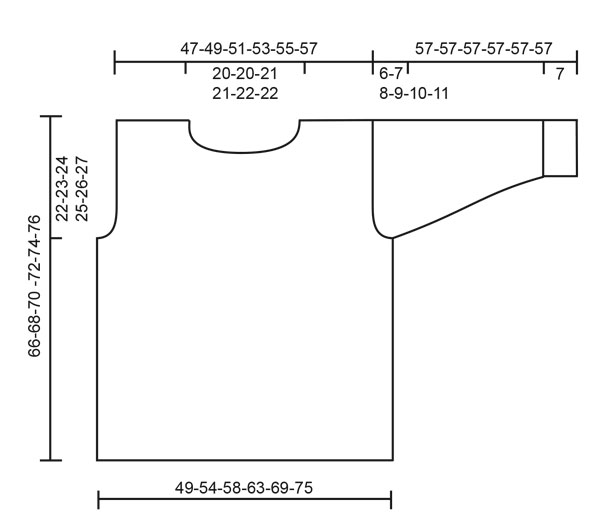
---------------------------------------------------------- EXPLANATION FOR THE PATTERN: ---------------------------------------------------------- GARTER STITCH (back and forth): Knit all rows. 1 ridge vertically = knit 2 rows. PATTERN: See diagrams A.1 to A.8. INCREASE TIP (applies to sleeve): Make 1 yarn over in each side inside 1 edge stitch in garter stitch. On next row work yarn overs twisted to avoid holes. Then work the new stitches in stocking stitch. ----------------------------------------------------- START THE PIECE HERE: ---------------------------------------------------------- JUMPER - SHORT OVERVIEW OF THE GARMENT: Worked back and forth on circular needle in parts and sewn together when finished. Work back piece in stocking stitch and front piece with cables and stocking stitch. Work sleeves back and forth on needle. Work neck edge in the round. BACK PIECE: Cast on 84-88-96-104-112-124 stitches on circular needle size 5 mm with Alaska. Work back and forth as follows – first row is from right side: 1 edge stitch in GARTER STITCH - read explanation above, * purl 2 and knit 2 *, work from *-* until 3 stitches remain, purl 2 and 1 edge stitch in garter stitch. Work rib like this until piece measures 5 cm. Switch to circular needle size 5.5 mm. Work in stocking stitch with 1 stitch in garter stitch in each side. On first row adjust number of stitches to 82-88-94-102-110-122. REMEMBER THE KNITTING TENSION! When piece measures 44-45-46-47-48-49 cm, cast off for armholes in each side. Cast off stitches at beginning of every row in each side: Cast off 4 stitches 0-1-1-1-1-1 time, 3 stitches 1-0-0-0-0-0 times, 2 stitches 0-0-0-1-2-3 times and 1 stitch 0-1-2-3-3-5 times = 76-78-82-84-88-92 stitches. Continue in stocking stitch. When piece measures 64-66-68-70-72-74 cm, cast off the middle 30-30-32-32-34-34 stitches for neck. Then cast off 1 stitch on next row from neck = 22-23-24-25-26-28 stitches for shoulder. Continue until piece measures 66-68-70-72-74-76 cm and cast off. Work the other shoulder the same way. FRONT PIECE: Cast on 82-90-98-106-114-122 stitches on circular needle size 5 mm with Alaska. Work back and forth as follows – first row is from right side: 1 edge stitch in garter stitch, * knit 2, purl 2 *, work from *-* over the next 16-20-24-28-32-36 stitches, knit 2, A.1 (= 6 stitches), A.2 (= 6 stitches), A.1, A.3 (= 8 stitches), A.4 (= 6 stitches), A.5 (= 6 stitches), A.4, * knit 2, purl 2 *, work from *-* over the next 16-20-24-28-32-36 stitches, finish with knit 2 and 1 edge stitch in garter stitch. Continue rib like this (repeat the first 4 rows in A.1 to A.5) until piece measures 5 cm. Switch to circular needle size 5.5 mm. Then work as follows from right side: 1 edge stitch in garter stitch, stocking stitch over the first 16-20-24-28-32-36 stitches, AT THE SAME TIME decrease 0-1-2-2-2-0 stitches evenly, purl 2, A.1x, A.2x. A.1x, A.3x, A.4x, A.5x, A.4x, purl 2, stocking stitch over the next 16-20-24-28-32-36 stitches, AT THE SAME TIME decrease 0-1-2-2-2-0 stitches evenly, 1 edge stitch in garter stitch. There are now 96-102-108-116-124-136 stitches on needle. When A.1x to A.5x have been worked 1 time vertically, continue as follows: 1 edge stitch in garter stitch, 16-19-22-26-30-36 stitches in stocking stitch, purl 2, A.6, A.6, A.6, A.7, A.8, A.8, A.8, purl 2, 16-19-22-26-30-36 stitches in stocking stitch, 1 edge stitch in garter stitch. Continue this pattern. When piece measures 44-45-46-47-48-49 cm, cast off for armhole in each side as on back piece = 90-92-96-98-102-106 stitches. When piece measures 60-62-64-66-68-70 cm, work next row as follows: Work the first 30-31-33-34-36-38 stitches as before, work the next 30 stitches - at the same time decrease 2 stitch evenly over each cable (= decrease 2 stitches over cable in A.6, 4 stitches over cables in A.7, and 2 stitches over cable in A.8, 8 stitches decreased in total), then slip these stitches on a stitch holder for neck (= 22 stitches on stitch holder), work the remaining 30-31-33-34-36-38 stitches as before. Now work each shoulder separately. Continue to cast off for neck at beginning of every row from neck as follows: Cast off 2 stitches 1-1-1-1-2-2 times and 1 stitch 2-2-3-3-2-2 times - NOTE: When working over cables in A.6/A.8, decrease at the same time 2 stitches over every cable = 24-25-26-27-28-30 stitches. Continue until piece measures 65-67-69-71-73-75 cm– decrease 2 stitches over cable in last repetition of A.6/A.8 = 22-23-24-25-26-28 stitches on shoulder. Cast off when piece measures 66-68-70-72-74-76 cm. Work the other shoulder the same way. SLEEVE: Cast on 42-46-46-50-50-50 stitches (including 1 edge stitch in each side) on circular needle size 5 mm with Alaska. Work back and forth as follows – first row is from right side: 1 edge stitch in garter stitch, * knit 2 and purl 2 *, work from *-* until 1 stitch remains, work 1 edge stitch in garter stitch. Work rib like this until piece measures 7 cm. Switch to circular needle size 5.5 mm. Purl 1 row from wrong side while decreasing 0-2-0-4-2-0 stitches evenly = 42-44-46-46-48-50 stitches. Then work in stocking stitch with 1 edge stitch in garter stitch in each side. When piece measures 8-8-8-8-8-10 cm, increase 1 stitch inside 1 edge stitch in each side - read INCREASE TIP. Increase like this every 3½-3½-3-2½-2½-2 cm 12-12-13-15-15-16 times in total = 66-68-72-76-78-82 stitches. When piece measures 51-50-49-48-47-46 cm, cast off 4 stitches in each side. Cast off for sleeve cap at beginning of every row in each side as follows: 2 stitches 2-2-3-3-4-4 times, 1 stitch 0-1-0-1-0-1 time. Then cast off 2 stitches in each side until piece measures 56 cm in all sizes, cast off 3 stitches in each side, then cast off the remaining stitches. Sleeve measures 57 cm in all sizes. Work another sleeve the same way. ASSEMBLY: Sew shoulder seams with grafting/kitchener stitches inside cast-off edge. Sew in sleeve cap. Sew underarm and side seams in one inside 1 edge stitch in garter stitch. NECK EDGE: Work neck edge in the round. Use circular needle size 5 mm and begin from right side at one shoulder seam. Pick up 72 to 84 stitches (including stitches on stitch holder at the front and divisible by 4). Purl 1 round and knit 1 round. Work rib with knit 2 and purl 2 for 9 cm. Cast off stitches with knit over knit and purl over purl. Fold rib at the top of neck down on the inside of garment. Fasten rib to form a folding edge. To avoid a tight neck edge and avoiding the edge to tip outwards, it is important to make the seam elastic. |
|||||||||||||||||||||||||
Diagram explanations |
|||||||||||||||||||||||||
|
|||||||||||||||||||||||||
 |
|||||||||||||||||||||||||
 |
|||||||||||||||||||||||||
 |
|||||||||||||||||||||||||
Have you finished this pattern?Tag your pictures with #dropspattern #fishersmoonsweater or submit them to the #dropsfan gallery. Do you need help with this pattern?You'll find 16 tutorial videos, a Comments/Questions area and more by visiting the pattern on garnstudio.com. © 1982-2026 DROPS Design A/S. We reserve all rights. This document, including all its sub-sections, has copyrights. Read more about what you can do with our patterns at the bottom of each pattern on our site. |
|||||||||||||||||||||||||






With over 40 years in knitting and crochet design, DROPS Design offers one of the most extensive collections of free patterns on the internet - translated to 17 languages. As of today we count 333 catalogues and 12532 patterns translated into English (UK/cm). 12532
We work hard to bring you the best knitting and crochet have to offer, inspiration and advice as well as great quality yarns at incredible prices! Would you like to use our patterns for other than personal use? You can read what you are allowed to do in the Copyright text at the bottom of all our patterns. Happy crafting!
Post a comment to pattern DROPS 219-9
We would love to hear what you have to say about this pattern!
If you want to leave a question, please make sure you select the correct category in the form below, to speed up the answering process. Required fields are marked *.