
Categorías populares
¿Buscas un hilo?


Comentarios / Preguntas (70)
![]() Misia escribió:
Misia escribió:
Hei, haluan varmistaa: "kun olet neulonut piirrokset A.1 ja A.2 loppuun, jatka mallineuletta ja lisäyksiä kuten aiemmin" tarkoittaa siis, että pitsineuletta jatketaan niin, että joka toinen kerros lisätään silmukka A1a:n alkuun, A1c:n loppuun ja A2:n alkuun ja loppuun? Kuinka monta kerrosta tätä tulee yhteensä?
04.03.2021 - 15:19DROPS Design respondió:
Kyllä, lisäyksiä jatketaan kuten aiemmin, eli työhön lisätään joka 2. kerroksella 8 silmukkaa. Tämä tehdään yhteensä 22-25-28-32-35-38 kertaa.
24.03.2021 - 16:41
![]() Elisabeth Burrell escribió:
Elisabeth Burrell escribió:
Trying to get the diagram into my head and already stuck on this question: does every other round begin with a YARN OVER as per your symbol description??
25.02.2021 - 03:13DROPS Design respondió:
Hi Elizabeth, No, each round begins with knit 1, then you start the pattern, The same at the end of the round, you finish with knit 1. Happy knitting!
25.02.2021 - 07:29
![]() Thérèse Champagne escribió:
Thérèse Champagne escribió:
C'est la première fois que j'essaie un modèle de haut en bas, que veut dire en A.1b au-dessus des mailles? Est-ce que je dois monter 27 mailles? Merci beaucoup, j'aimerais tellement faire ce modèle.
19.02.2021 - 23:32DROPS Design respondió:
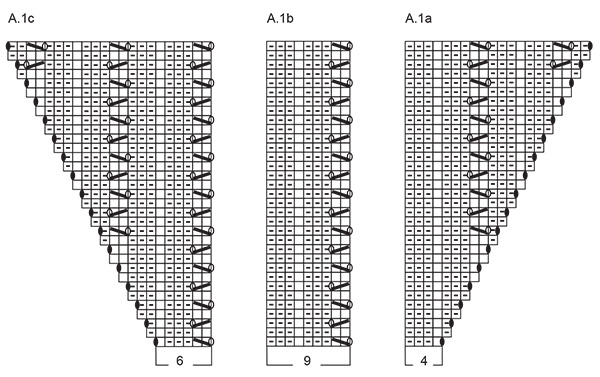
Bonjour Mme Champagne, quand il est indiqué de tricoter A.1b au-dessus des 27 mailles suivantes, ceci veut dire que vous devez tricoter les 27 mailles suivantes en suivant le diagramme A.1b, autrement dit répétez 3 fois les 9 mailles du diagramme. Bon tricot!
22.02.2021 - 07:32
![]() Lena escribió:
Lena escribió:
Jeg har strikket denne toppen og den ble veldig fin, bortsett fra at avfellingskanten ruller seg utover. Jeg har sett videoen om å felle og felte av veldig løst, så jeg tror ikke at det er for stramt. Da burde kanten dessuten ha rullet innover. Jeg lurer på om jeg må ta opp og felle av strammere. Det er kanskje nok å presse ned kantene, men jeg vil ikke prøve fordi det da vil bli vanskeligere å ta opp hvis jeg må strikke om. Har dere et godt råd?
11.02.2021 - 11:20DROPS Design respondió:
Hej Lena, ja det er muligt at du kan have felt af for løst. De 2 riller skal være med til at gøre så kanten ikke ruller, men prøv at felle lidt strammere. God fornøjelse!
16.02.2021 - 14:09
![]() Judy escribió:
Judy escribió:
What are the measurements for the different sizes please?
05.02.2021 - 17:26DROPS Design respondió:
Hi Judy, you will find the schematic drawing for each garment below the pattern. how to read it you will find HERE . Happy knitting!
05.02.2021 - 17:35
![]() Karyn McLean escribió:
Karyn McLean escribió:
Hi, I\'m making XL total 376. I only have 5 more rows and after meticulously increasing 8 STS every other round not missing those sneaky yarn overs I only have a total count of only 232 STS on row 28. What rows do you suggest that I continue increasing every other row to get to 376 after I finish row 33.
28.01.2021 - 23:07DROPS Design respondió:
Dear Mrs McLean, increasing 8 sts on every other round a total of 32 times means you will have worked 64 rows in total and increased (8x32=) 256 sts in total (+ 120 sts cast on = 376 sts). If you have only worked to row 28, this means you have increased 14 times 8 sts = 112 sts + 120= 232 sts. Continue increasing as shown in diagram and as you made before with 1 yarn over and working the yarn over twisted either k or p. Happy knitting!
29.01.2021 - 08:08
![]() Susan Senerth escribió:
Susan Senerth escribió:
Hello- When working the pattern according to the diagram - there are 17 increase rows . (8 stitches each increase row) Which would give you 136 additional stitches added to 102 starting stitches =238 total not the 278 that I need. In the pattern It states that there are 22 increase rows ( not 17) where are the additional increase rows outside the diagram? Please let me know when you get a chance. I appreciate the help- Sue
03.11.2020 - 15:36DROPS Design respondió:
Dear Sue, after you have worked the diagrams one time in height, increases are not done, in size S you are supposed to increase a total of 22 times this means you have to work 5 more increase round (= 10 rounds in total). Continue pattern as before increasing the same way as before. 102 sts + (8 sts inc x 22 times) = 278 sts. Happy knitting!
03.11.2020 - 16:04
![]() Kaya escribió:
Kaya escribió:
Hadde planer om å strikke denne, men er tydelig noe feil i oppskrifta så den her dropper jeg. Synd, for toppen er utrolig fin!
01.11.2020 - 23:50
![]() Jutta escribió:
Jutta escribió:
Ich verstehe auch nicht, wie die passe gestrickt wird. Da steht : „ Die nächste Runde wie folgt stricken: Die ersten 78-86-92-105-115-125 Maschen wie zuvor stricken (ohne Zunahmen), kraus rechts über die nächsten 61-65-71-83-85-87 Maschen stricken, die nächsten 78-86-92-105-115-125 Maschen wie zuvor stricken (ohne Zunahmen), .... „. Wie Muss ich da Stricken? Was bedeutet“ohne Zunahmen“sind die raglanzunahnen im Diagramm enthalten?
29.06.2020 - 19:29DROPS Design respondió:
Liebe Jutta, die Zunahmen sind jetzt fertig, stricken Sie die Maschen vom Vorder- und Rückenteil im Muster wie zuvor (mit den Umschlägen vom Lochmuster) und die Maschen von den Ärmeln stricken Sie krausrechts. Viel Spaß beim stricken!
30.06.2020 - 11:06
![]() Jutta escribió:
Jutta escribió:
Hallo, wo kommen denn in der passe die Markierungsfäden hin? Wo muss ich die Raglanzunahmen machen? Habe grade ein top mit anderer Anleitung von Ihnen fertig. Da war alles gut erklärt. Hier verstehe ich die passe leider nicht. In der kurzerklärung steht was von Einteilung mit markierungsfäden. Aber nicht mehr in der Anleitung.
29.06.2020 - 10:57DROPS Design respondió:
Liebe Jutta, bei der Passe legen wird in der Anleitung keine Markierungsfäden ein, die Raglanline sind die 2 rechte Maschen die zwischen A.1a-b-c und A.2 gestrickt sind. Wenn Sie Markierungsfäden gerne einsetzen möchten, dann können Sie einen zwischen den jeweiligen 2 Maschen recht für den Raglan- die Raglanzunahmen entstehen auf beiden Seiten den 2 rechten Maschen - siehe Diagramme. Viel Spaß beim stricken!
29.06.2020 - 14:07
|
|||||||||||||||||||
Sweet Impressions#sweetimpressionstop |
|||||||||||||||||||
 |
 |
||||||||||||||||||
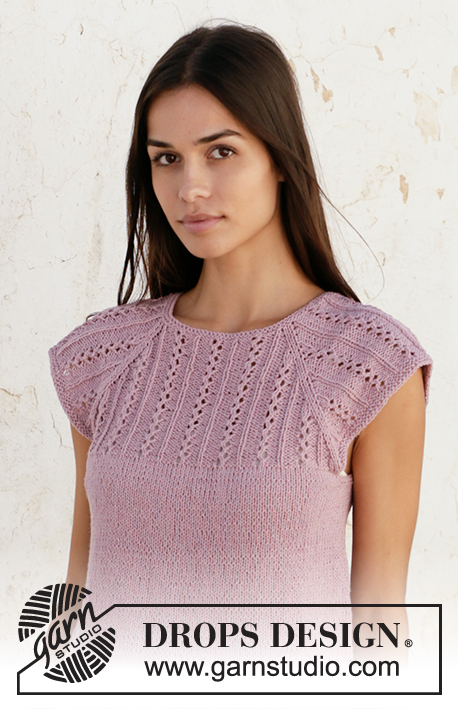
Top a punto con raglán en DROPS Belle. La labor está realizada de arriba abajo con patrón de calado Talla S - XXXL
DROPS 211-12 |
|||||||||||||||||||
|
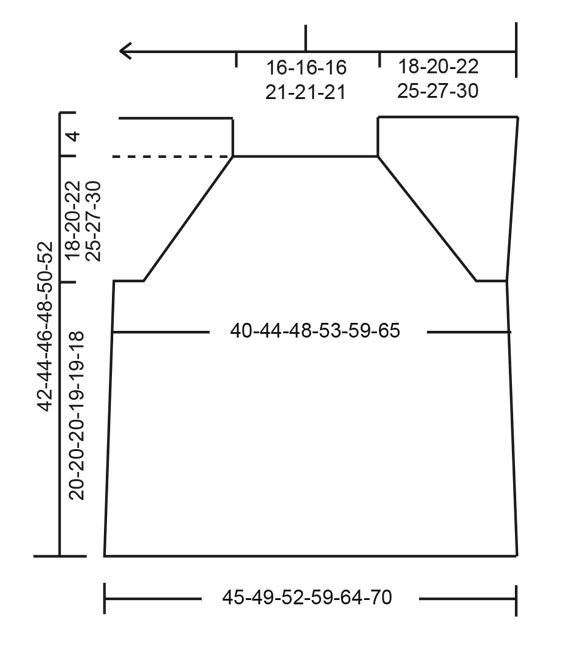
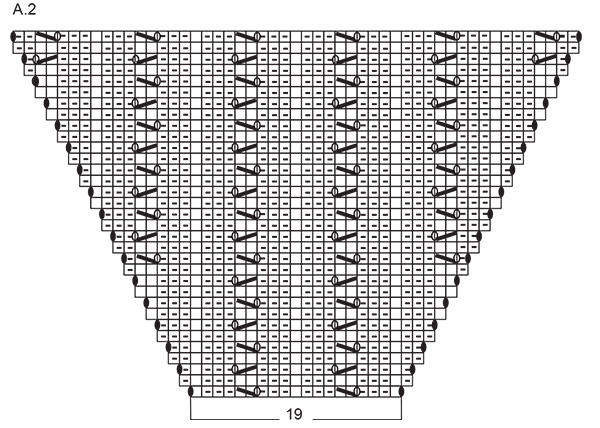
EXPLICACIONES PARA REALIZAR LA LABOR: ---------------------------------------------------------- PUNTO MUSGO (en redondo): 1 pliegues = 2 vueltas, es decir 1 vuelta de derecho y 1 vuelta de revés PATRÓN: Ver los diagramas A.1 y A.2 TIP PARA LOS AUMENTOS (aplicar a los lados del cuerpo): Trabajar hasta que queden 2 puntos antes del marcapuntos, 1 hebra, 4 derechos (el marcapuntos está en el centro de estos puntos), 1 hebra. En la siguiente vuelta trabajar las hebras retorcidas para evitar que se formen agujeros. Trabajar los puntos nuevos en punto jersey. TIP PARA CERRAR: Para evitar que el borde de remate quede tenso se puede cerrar con una aguja más grande, o hacer 1 hebra después de aprox. cada 4º punto y al mismo tiempo cerrar (las hebras se cierran como puntos normales). ---------------------------------------------------------- COMENZAR LA LABOR AQUÍ: ---------------------------------------------------------- TOP - RESUMEN DE LA LABOR: La cenefa del escote y el canesú se trabajan en redondo con una aguja circular, de arriba abajo. Ahora dividir el canesú para el cuerpo y las mangas. Trabajar el cuerpo en redondo con una aguja circular, de arriba abajo. CENEFA DEL ESCOTE: Montar 102-102-102-120-120-120 puntos con una aguja circular de 3 mm con Belle. Trabajar 2 pliegues en PUNTO MUSGO - ver las explicaciones arriba. Cambiar a una aguja de 4 mm. CANESÚ: Comenzar la vuelta en la transición entre el hombro izquierdo y la espalda. Trabajar el patrón como sigue: * 1 derecho, A.1a (= 4 puntos), A.1b sobre los siguientes 18-18-18-27-27-27 puntos (2-2-2-3-3-3 repeticiones de 9 puntos), A.1c (= 6 puntos), 2 derechos, A.2 (= 19 puntos), 1 derecho *, trabajar de * a * 2 veces. Trabajar y aumentar como se muestra en el diagrama, después de trabajar A.1 y A.2 una vez en vertical, continuar con el patrón y los aumentos de la misma manera. Aumentar 8 puntos cada 2ª vuelta, trabajar los puntos aumentados dentro del patrón. Aumentar cada 2ª vuelta un total de 22-25-28-32-35-38 veces. Después de completar todos los aumentos hay 278-302-326-376-400-424 puntos en aguja. RECORDAR MANTENER LA TENSIÓN DEL TEJIDO! Trabajar la siguiente vuelta como sigue: Trabajar los primeros 78-86-92-105-115-125 puntos como antes (sin aumentos), trabajar en punto musgo sobre los siguientes 61-65-71-83-85-87 puntos, trabajar los siguientes 78-86-92-105-115-125 puntos como antes (sin aumentos), trabajar en punto musgo los últimos 61-65-71-83-85-87 puntos. Continuar de esta manera hasta trabajar 2 pliegues (= 4 vueltas). Trabajar la siguiente vuelta como sigue: Trabajar los primeros 78-86-92-105-115-125 puntos (= espalda), cerrar los siguientes 61-65-71-83-85-87 puntos, trabajar de derecho los siguientes 78-86-92-105-115-125 puntos (= delantero), cerrar los últimos 61-65-71-83-85-87 puntos. AHORA MEDIR LA LABOR DESDE AQUÍ CUERPO: Trabajar los primeros 78-86-92-105-115-125 puntos en punto jersey, montar 6-6-8-8-10-12 puntos nuevos, trabajar 78-86-92-105-115-125 puntos en punto jersey, montar 6-6-8-8-10-12 puntos nuevos, y trabajar en redondo = 168-184-200-226-250-274 puntos. Trabajar en punto jersey, pero sobre los 6-6-8-8-10-12 puntos nuevos a cada lado trabajar 2 pliegues, antes de continuar en punto jersey sobre todos los puntos. Insertar 1 marcapuntos a cada lado, en el centro de los puntos nuevos que se acaban de montar. Cuando la labor mida 4 cm, aumentar 1 punto a cada lado de los marcapuntos en cada lado - leer TIP PARA LOS AUMENTOS. Repetir los aumentos cada 3 cm un total de 5 veces = 188-204-220-246-270-294 puntos. Cuando la labor mida 19-19-19-18-18-17 cm desde la división, trabajar 2 pliegues sobre todos los puntos, después cerrar - LEER TIP PARA CERRAR. |
|||||||||||||||||||
Explicaciones del diagrama |
|||||||||||||||||||
|
|||||||||||||||||||
 |
|||||||||||||||||||
 |
|||||||||||||||||||
 |
|||||||||||||||||||
¿Terminaste este patrón?Entonces, etiqueta tus fotos con #dropspattern #sweetimpressionstop o envíalas a la galería #dropsfan. ¿Necesitas ayuda con este patrón?Encontrarás 23 videos tutoriales, un espacio para comentarios/preguntas y más visitando la página del patrón en garnstudio.com © 1982-2026 DROPS Design A/S. Todos los derechos reservados. Este documento, incluyendo todas sus sub-secciones, está protegido por los derechos de autor (copyright). Lee más acerca de lo que puedes hacer con nuestros patrones en la parte de abajo de cada patrón de nuestro sitio. |
|||||||||||||||||||


Con más de 40 años en el diseño de modelos de punto y de ganchillo, DROPS Design ofrece una de las más vastas colecciones de patrones gratuitos en el internet - traducidos en 17 idiomas. Al día de hoy, contamos con 324 catálogos y 12290 patrones - de los cuales 11673 están traducidos en español.
Nosotros trabajamos con mucho esmero para brindarte lo mejor que las labores de punto y ganchillo tienen para ofrecer,inspiración y consejos, así como hilos de magnífica calidad a precios increíbles! Te gustaría usar nuestros patrones para otro fin además del uso personal? Puedes leer acerca de lo que estás permitida a hacer en el texto de Copyright en la parte de abajo de todos nuestros patrones. Felices labores!
Escribe un comentario sobre DROPS 211-12
¡Nos encantaría saber qué piensas acerca de este patrón!
Si quieres escribir una pregunta referente al patrón, por favor asegúrate de elegir la categoría correcta en el formulario debajo, para acelerar el proceso de respuesta. Los campos obligatorios están marcados con un *.