
Categorías populares
¿Buscas un hilo?


Comentarios / Preguntas (71)
![]() Eva escribió:
Eva escribió:
Hello! How large is the waist of different sizes? I can't find the measurements in the pattern.
23.04.2022 - 14:36DROPS Design respondió:
Dear Eva, the waist measurements are in the chart below the pattern instructions, in cm. They are: 35-39-43-49-54-60. Happy knitting!
23.04.2022 - 16:34
![]() Debbie escribió:
Debbie escribió:
Drops enchanted evening . Hi I am now at section where I have put the sleeve stitches on waste yarn . Why would I cut the thread after knitting the last 45 stitches of back ? Wouldn’t I knit to the middle of the 8 stitches under the arm and that would be the new beginning of the round ? Also is it necessary to use thread marker or can I use regular stitch markers for the 4 markers where thread would be ? In addition to the 2 side markers in contrasting color so I would know difference?
24.11.2021 - 20:23DROPS Design respondió:
Dear Debbie, you cut the thread at the end of yoke so that you can start again with pattern from on of both sides; you can use markers if you like to, most important is to place anything to mark these places to increase on the right places - and good idea to use different colours for both kind of markers. Happy knitting!
25.11.2021 - 08:51
![]() Debbie escribió:
Debbie escribió:
Drops enchanted evening . Yes ! That helps . Yay , I finally figured it out . Next question is on the first increase round . How many stitches should I have on needles after this round? Knot over 3, make 1, k, m1. \\r\\nShould that be an increase of 54 stitches ? 27x2? Thank you so much for your help .
17.11.2021 - 13:24DROPS Design respondió:
Dear Debbie, yes correct :) On the 10th round in A.1 you will increase 2 sts = there will be 8 sts in every A.1 x 27 repeats = 216 sts (162 sts + 54 sts increased). And in the next to last row inA.1 you increase 2 more sts = 10 sts x 27 = 270 sts (again 54 sts increased + 216). Happy knitting!
17.11.2021 - 16:44
![]() Debbie escribió:
Debbie escribió:
Drops enchanted evening . So perhaps I am following chart incorrect . From what you say now: for first round would it be all knit ? Since it’s 6 knits ? Next round would be knot over 3 , k3- repeat to end of round ? Next round 3 rounds are knit , next round is repeat of k3, knot over 3 etc? By the top of the chart that would be 25 rounds and then would I start at bottom again and do 2 more rounds to make 27? Otherwise I don’t know what 27 reps mean ? Sorry to be such a bother .
16.11.2021 - 18:10DROPS Design respondió:
Dear Debbie, that's exactly how to read the diagram A.1 and how to work it. When it says to repeat A.1 a total of 27 times, it means to work: row 1: K6 x 27 (= 6*27= 162 sts); Round 2: (Knot, K3) x 27 = still 162 sts and 27 knots etc... After these 25 rows are done, work now A.2 (there were 10 sts at the end of each A.1, work now A.2 lined up over each A.1: the knots in A.2 will be lined up over the knots in A.1. And you will still repeat A.2 a total of 27 times in the round. Can this help somewhat more?
17.11.2021 - 07:35
![]() Debbie escribió:
Debbie escribió:
Drops enchanted evening . Yes that does help. I believe I’m following chart correct . My original question was : following the 5th repetition of the chart and starting the 6th repetition , should the row match up exactly? K6, knot over 3, k3 etc... ? I found it odd to be back at same starting point of the chart over top of the 5th repetition. Also , I feel my knots look more Spread out than in the picture . I am just going to follow the chart without knots the 27 reps til 270 stitches-size L
16.11.2021 - 14:17DROPS Design respondió:
Dear Debbie, I'm still not sure to understand what you mean here with "repetition", diagram will be worked the same way all the round, ie repeat row 1 to the end of the round, then repeat row 2 to the end of the round (= 1 knot x 27 repeats in L) etc.. If you mean 5th knot in height (= 18th row in diagram) then work (from right to left: *1 knot, K5* and repeat from *-* all the round). Can this help?
16.11.2021 - 16:26
![]() Debbie escribió:
Debbie escribió:
Drops enchanted evening . Sorry , perhaps I’m not following chart properly . I am following from bottom right to left . Next row again from left to right . Ex . Start with K 6 , Make knot over next 3,stitches , knit 24, make knot over next 3, k24, knot over next 3 stitches , make 1, k1, M1, K8 etc following up. By repetition I meant the 5th and 6th reps in repeating the chart 27 times . Following the chart , the beginning of the round continues to change. Am I following incorrectly?
16.11.2021 - 04:50DROPS Design respondió:
Dear Debbie, since diagram is worked in the round, you will always read it from the right towards the left, ie the knot on 2nd row will be worked over the first 3 sts, then knit 3. Can this help?
16.11.2021 - 09:13
![]() Debbie escribió:
Debbie escribió:
Drops enchanted evening . Sorry I still am confused by the knots . I am being very careful to count and place knots in correct spaces. But does it make sense. That on the 6th repetition and starting the row That below it is exact same stitches ? Sorry if I’m not explaining clearly. I may just follow the chart without making knots at all . I’ve unripped too many times now .
12.11.2021 - 21:46DROPS Design respondió:
Dear Debbie, I'm sorry, I'm not sure what you call here "repetition", do you mean the 6th knot in height? Then you have 8 sts in every repetition of A.1 and work: K3, increase 1 stitch (last symbol), 1 knot over the next 3 sts, increase 1 st (= 8 sts worked and increased to 10 sts). Can this help?
15.11.2021 - 07:15
![]() Debbie escribió:
Debbie escribió:
Drops enchanted evening . Just to clarify , do you mean yes the 4th and 5th row of the chart repeat each other (lined up over precious repeat ) or have I miscounted somewhere ? It’s pretty hard to do those make one stitches over the previous row if it is correct that these rows align. Thank you
12.11.2021 - 14:06DROPS Design respondió:
Dear Debbie, knots should be lined up just as shown in diagram, ie the 4th in height (= 14th row in A.1 smaller sizes) over the 2nd ( = 6th row in same diagram), the 3rd (= 10th row in same diagram) over the 1st (2nd row same diagram), just follow the stitches as shown in diagram to locate the knots over the correct sts. Hope this will help. Happy knitting!
12.11.2021 - 14:19
![]() Debbie escribió:
Debbie escribió:
Still in regards to drop enchanted evening dress . I’m following chart for the knots . Does it make sense that on the 5th time the pattern matches up to row below and I’m creating knots over the previous row knots ? Or have I miscounted somewhere ? I have 182 stitches after 4 rounds . I’m ready to give up the knots and just knit with the increases .
12.11.2021 - 05:47DROPS Design respondió:
Dear Debbie, yest that's right, the knots are lined up - look at the last picture, it might help you to check with your work. Happy knitting!
12.11.2021 - 07:52
![]() Debbie escribió:
Debbie escribió:
The chart instructions It says “work A1 chart in the round 27 repetitions of 6 stitches. The bottom of chart starts with 6 inches and after about 8 boxes high x 6 stitches there is a increase so next section has 8 boxes in the row . Fir the next 8 or so rows of boxes going up and then increases to 10. My question is do I follow the whole chart with increases for the 27 times or just the 6 stitches section ? Wish I could put a picture . The pattern is Drops Enchanted evening dress .
10.11.2021 - 00:25DROPS Design respondió:
Dear Debby, you repeat the pattern "unit" or pattern repeat 27 times, beginning with the 6 stitch, then repeat the 8 stitch repeat, etc. so your piece will be increased evenly. Happy Stitching!
10.11.2021 - 06:09
|
||||||||||
Enchanted Evening#enchantedeveningdress |
||||||||||
 |
 |
|||||||||
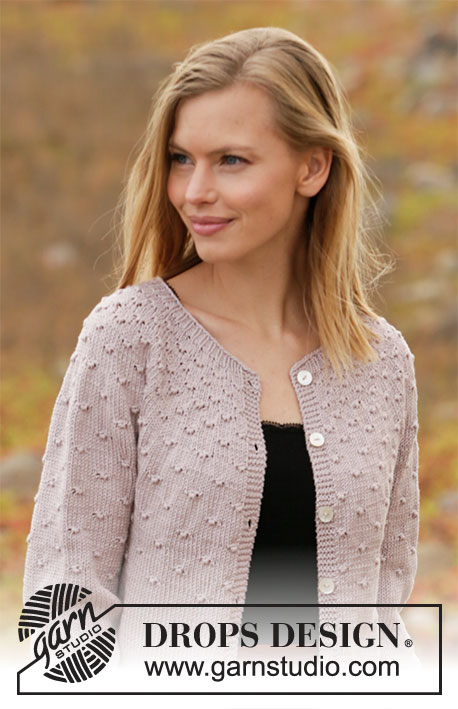
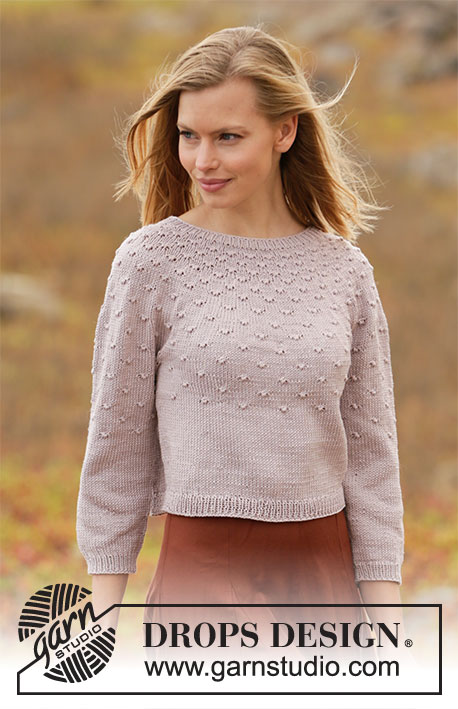
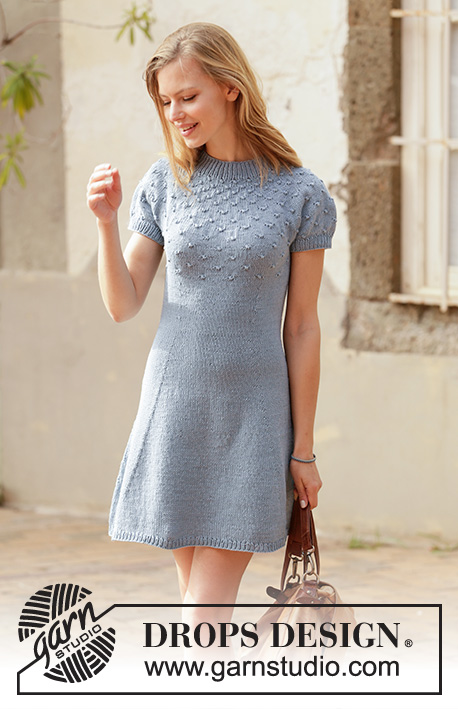
Vestido de punto en DROPS Muskat. La pieza está tejida de arriba para abajo con canesú redondo, patrón de nudos y mangas cortas. Tallas S – XXXL.
DROPS 211-1 |
||||||||||
|
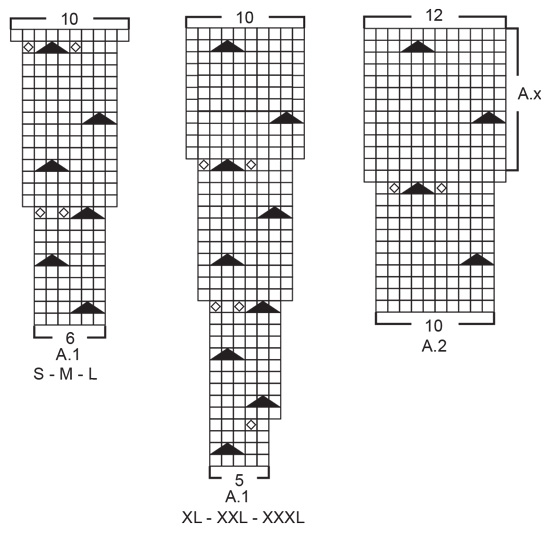
EXPLICACIONES PARA REALIZAR EL PATRÓN: ------------------------------------------------ PATRÓN: Ver diagramas A.1 y A.2. Elegir el diagrama para tu talla (aplica a A.1). TIP PARA AUMENTAR/DISMINUIR (equitativamente): Para calcular cómo aumentar/disminuir equitativamente, usar el número total de puntos en la hilera (p. ej. 120 puntos) y dividir los puntos entre el número de aumentos/disminuciones a hacer (p. ej. 18) = 6.7. En este ejemplo, aumentar haciendo 1 lazada después de aprox. cada 6º y 7º punto alternadamente. En la vuelta siguiente, tejer las lazadas retorcidas de derecho para evitar que se formen agujeros. Cuando se disminuye, tejer en este ejemplo aprox. cada 5º y 6º punto y cada 6º y 7º punto juntos de derecho alternadamente. TIP-1 PARA AUMENTAR (aplica a la cintura del cuerpo): Aumentar 1 punto después del 1º y 3er hilo marcador y antes del 2º y 4º hilo marcador como está explicado abajo. AUMENTAR DE LA MANERA SIGUIENTE DESPUÉS DEL HILO MARCADOR: Tejer 1 punto derecho en el bucle alrededor del primer punto de la aguja izquierda (es decir, en el punto de la vuelta anterior). AUMENTAR DE LA MANERA SIGUIENTE ANTES DEL HILO MARCADOR: Tejer hasta el hilo marcador, después tejer 1 punto derecho alrededor del punto más externo de la aguja derecha (es decir, en el punto de la vuelta anterior). TIP-2 PARA AUMENTAR (aplica a los lados del cuerpo): Aumentar de la misma manera antes y después del marcador como está explicado en el TIP-1 PARA AUMENTAR, pero aumentar alternadamente antes y después del marcador. Es decir, aumentar solo 1 vez en cada lado a cada 1½ cm y esto sucede alternadamente antes y después del marcador (no en cada lado). TIP PARA DISMINUIR (aplica a la cintura del cuerpo): Las primeras disminuciones son hechas al mismo tiempo que se teje el patrón. Ajustar para disminuir en una vuelta sin nudos, y notar que habrá menos puntos en punto jersey entre 2 nudos después de una disminución. Disminuir 1 punto después del 1º y 3er hilo marcador y antes del 2º y 4º hilo marcador como está explicado abajo. DISMINUIR DE LA MANERA SIGUIENTE DESPUÉS DEL HILO MARCADOR: Deslizar 1 punto como de derecho, tejer 1 punto derecho, pasar el punto deslizado por encima del punto tejido. DISMINUIR DE LA MANERA SIGUIENTE ANTES DEL HILO MARCADOR: Tejer hasta que resten 2 puntos antes del hilo marcador, tejer 2 puntos juntos de derecho. TIP PARA REMATAR: Para evitar una orilla de remate apretada, se puede usar agujas de tamaño más grande. Si la orilla aún estuviese apretada, tejer 1 lazada después de aprox. cada 8º punto mientras se rematan los puntos (rematar las lazadas como puntos normales). ------------------------------------------------ COMENZAR LA PIEZA AQUÍ: ------------------------------------------------ VESTIDO – RESUMEN DE LA PIEZA: Tejer la orilla del escote y el canesú en redondo en aguja circular a partir del centro de la espalda, de arriba para abajo. Dividir el canesú para el cuerpo y la orilla de las mangas. Tejer el cuerpo en redondo en aguja circular, de arriba para abajo. Tejer la orilla de las mangas en redondo en agujas de doble punta, de arriba para abajo. ORILLA DEL ESCOTE: Montar 120-124-130-134-138-140 puntos en una aguja circular corta tamaño 3 mm con Muskat. Tejer 1 vuelta de derecho. Después tejer en resorte en redondo (= 1 derecho/1 revés) durante 4 cm. Tejer 1 vuelta de derecho aumentando 18-26-32-16-22-35 puntos distribuidos equitativamente – leer TIP PARA AUMENTAR/DISMINUIR = 138-150-162-150-160-175 puntos. Tejer 1 vuelta de derecho en la que las lazadas se tejen retorcidas de derecho. Insertar 1 marcador en el centro de la vuelta (= centro del frente). ¡Medir el canesú a partir de este marcador! Continuar a tejer el canesú como está explicado abajo. CANESÚ: Cambiar a aguja circular tamaño 4 mm y tejer A.1 en redondo (= 23-25-27-30-32-35 repeticiones de 6-6-6-5-5-5 puntos). Continuar el patrón así, y aumentar como se muestra en A.1. ¡RECORDAR MANTENER LA MISMA TENSIÓN DE TEJIDO DE LA MUESTRA! Cuando se ha tejido A.1, hay 230-250-270-300-320-350 puntos en la aguja. Después tejer A.2 en redondo (= 23-25-27-30-32-35 repeticiones de 10 puntos). Continuar el patrón así y aumentar como se muestra en A.2. Después del último aumento de A.2, hay 276-300-324-360-384-420 puntos en la aguja. Tejer hasta que la pieza mida 17-19-21-23-25-27 cm a partir del marcador en el escote – NOTA: Tejer A.2 hasta tener las medidas correctas y, en algunas tallas, A.x debe ser repetido verticalmente hasta tener las medidas correctas (el patrón debe continuar en el cuerpo). Ahora dividir el canesú para el cuerpo y las mangas; es decir, tejer la vuelta siguiente de la manera siguiente a partir del centro de la espalda: Tejer 38-42-45-51-56-62 puntos como antes (= ½ pieza de la espalda), deslizar los 62-66-72-78-80-86 puntos siguientes en 1 gancho auxiliar para la orilla de la manga, montar 6-6-8-8-10-10 puntos nuevos en la hilera (= en el lado bajo la manga), tejer 76-84-90-102-112-124 puntos como antes (= pieza del frente), deslizar los 62-66-72-78-80-86 puntos siguientes en 1 gancho auxiliar para la orilla de la manga, montar 6-6-8-8-10-10 puntos nuevos en la hilera (= en el lado bajo la manga) y tejer los 38-42-45-51-56-62 puntos restantes como antes (= ½ pieza de la espalda). Cortar el hilo. Terminar el cuerpo y las orillas de las mangas separadamente. ¡AHORA MEDIR LA PIEZA A PARTIR DE AQUÍ! CUERPO: = 164-180-196-220-244-268 puntos. Insertar 1 marcador a cada lado del cuerpo, en el centro de los 6-6-8-8-10-10 puntos montados bajo cada manga. Insertar adicionalmente 4 hilos marcadores en la pieza de la manera siguiente: Contar 21-24-27-32-37-42 puntos a partir del marcador en un lado de la pieza, insertar el 1er hilo marcador antes del marcador siguiente, contar 40-42-44-46-48-50 puntos, insertar el 2º hilo marcador antes del punto siguiente, contar 42-48-54-64-74-84 puntos (el marcador en el lado está en el centro de estos puntos), insertar el 3er hilo marcador antes del punto siguiente, contar 40-42-44-46-48-50 puntos, insertar el 4º hilo marcador antes del punto siguiente. Restan 21-24-27-32-37-42 puntos en la vuelta después del último hilo marcador. Mover los hilos marcadores hacia arriba a media que se teje, serán usados para disminuir y aumentar más tarde. Ahora continuar A.x AL MISMO TIEMPO que se disminuye en los lados del cuerpo como está explicado abajo: Comenzar la vuelta en el marcador en un lado de la pieza y tejer A.x en redondo, pero asegurarse de continuar en la hilera correcta del diagrama de acuerdo a donde fue dividida la pieza, y asegurarse de colocar correctamente nudos sobre nudos en el canesú. Tejer los 6-6-8-8-10-10 puntos montados bajo cada manga en punto jersey. Cuando la pieza mida 6 cm a partir de la división en todas las tallas, terminar A.x, pero terminar después de 1 vuelta con nudos. Continuar a tejer punto jersey en redondo sobre todos los puntos. AL MISMO TIEMPO, cuando la pieza mida aprox. 3 cm a partir de la división en todas las tallas, disminuir 1 punto después del 1er y 3er hilo marcador y antes del 2º y 4º hilo marcador – leer TIP PARA DISMINUIR (= 4 puntos disminuidos). Disminuir así a cada 2½ cm 4 veces en total verticalmente = 148-164-180-204-228-252 puntos. Cuando la pieza mida 16 cm a partir de la división en todas las tallas, aumentar 1 punto después del 1º y 3er hilo marcador y antes del 2º y 4º hilo marcador – leer TIP-1 PARA AUMENTAR. Aumentar adicionalmente 1 punto en el marcador en cada lado – leer TIP-2 PARA AUMENTAR (= 6 puntos aumentados en total en la vuelta). Aumentar así a cada 2 cm 21 veces verticalmente en todas las tallas = 274-290-306-330-354-378 puntos. Tejer sin aumentos hasta que la pieza mida aprox. 61-62-63-64-65-66 cm a partir de la división (falta por tejer aprox. 2 cm para completar las medidas, probarse el vestido y tejer hasta el largo deseado). Tejer 1 vuelta de derecho aumentando 20-22-24-26-26-28 puntos distribuidos equitativamente = 294-312-330-356-380-406 puntos (se aumenta poco para evitar que el resorte a ser tejido frunza la orilla). Cambiar a aguja circular tamaño 3 mm. Tejer en resorte en redondo = 1 derecho/1 revés durante 2 cm. Rematar con derecho sobre derecho y revés sobre revés – leer TIP PARA REMATAR. El vestido mide aprox. 85-88-91-94-97-100 cm a partir del hombro para abajo. ORILLA DE LAS MANGAS: Deslizar los 62-66-72-78-80-86 puntos del gancho auxiliar en uno de los lados de la pieza en agujas de doble punta tamaño 4 mm y levantar adicionalmente 1 punto en cada uno de los 6-6-8-8-10-10 puntos nuevos montados bajo la manga = 68-72-80-86-90-96 puntos. Comenzar la vuelta en el centro de los 6-6-8-8-10-10 puntos que fueron montados bajo la manga y tejer 3 vueltas en punto jersey. AL MISMO TIEMPO, en la última vuelta, disminuir 4-4-4-4-2-2 puntos distribuidos equitativamente – recordar el TIP PARA AUMENTAR/DISMINUIR = 64-68-76-82-88-94 puntos. Cambiar a agujas de doble punta tamaño 3 mm. Tejer en resorte en redondo = 1 derecho/1 revés durante 3 cm. Rematar con derecho sobre derecho y revés sobre revés - ¡recordar el TIP PARA REMATAR! La orilla de la manga mide aprox. 4 cm a partir de la división. Tejer la orilla de la otra manga de la misma manera. |
||||||||||
Explicaciones del diagrama |
||||||||||
|
||||||||||
 |
||||||||||
 |
||||||||||
¿Terminaste este patrón?Entonces, etiqueta tus fotos con #dropspattern #enchantedeveningdress o envíalas a la galería #dropsfan. ¿Necesitas ayuda con este patrón?Encontrarás 28 videos tutoriales, un espacio para comentarios/preguntas y más visitando la página del patrón en garnstudio.com © 1982-2026 DROPS Design A/S. Todos los derechos reservados. Este documento, incluyendo todas sus sub-secciones, está protegido por los derechos de autor (copyright). Lee más acerca de lo que puedes hacer con nuestros patrones en la parte de abajo de cada patrón de nuestro sitio. |
||||||||||


Con más de 40 años en el diseño de modelos de punto y de ganchillo, DROPS Design ofrece una de las más vastas colecciones de patrones gratuitos en el internet - traducidos en 17 idiomas. Al día de hoy, contamos con 324 catálogos y 12291 patrones - de los cuales 11689 están traducidos en español.
Nosotros trabajamos con mucho esmero para brindarte lo mejor que las labores de punto y ganchillo tienen para ofrecer,inspiración y consejos, así como hilos de magnífica calidad a precios increíbles! Te gustaría usar nuestros patrones para otro fin además del uso personal? Puedes leer acerca de lo que estás permitida a hacer en el texto de Copyright en la parte de abajo de todos nuestros patrones. Felices labores!
Escribe un comentario sobre DROPS 211-1
¡Nos encantaría saber qué piensas acerca de este patrón!
Si quieres escribir una pregunta referente al patrón, por favor asegúrate de elegir la categoría correcta en el formulario debajo, para acelerar el proceso de respuesta. Los campos obligatorios están marcados con un *.