
Categorías populares
¿Buscas un hilo?


Comentarios / Preguntas (227)
![]() Fabienne escribió:
Fabienne escribió:
Je réponds à la réponse J’ai bien compris le droite-gauche par rapport à la façon dont on porte le pull. Tout s’est bien passé pour l’épaule droite (devant) je ne pouvais que commencer sur l’envers. Mais pour l’épaule gauche (devant) mon aiguille est orientée pour commencer sur l’envers alors que le patron nous demande de commencer sur l’endroit Cordialement Ps: bravo et merci pour la rapidité des réponses !
29.04.2026 - 10:22DROPS Design respondió:
Bonjour Fabienne, glissez les mailles de l'épaule droite si besoin sur une autre aiguille (ou si vous tricotez en circulaire, faites les glisser à l'autre extrémité), ainsi le 1er rang sera tricoté sur l'endroit. Bon tricot!
29.04.2026 - 16:06
![]() Fabienne escribió:
Fabienne escribió:
Question déjà posée mais je ne comprends pas les réponses pour l’épaule gauche du devant. On me dit de commencer sur l’endroit mais mon aiguille est orientée pour nouveau rang sur l’envers, le câble et l’autre aiguille soutiennent le dos. Concrètement, faut-il tout mettre sur une ligne de vie ou une épingle retenant les mailles et inverser le sens des aiguilles ? PS: ce serait bien de pouvoir filtrer les questions/réponses selon la langue.
29.04.2026 - 09:02DROPS Design respondió:
Bonjour Fabienne, l'épaule droite du devant quand on porte le pull est l'épaule qui se trouve à gauche quand l'ouvrage se présente sur l'endroit, donc vous allez bien la commencer sur l'envers car le rang sur l'endroit précédent est le rang où vous avez rabattu les mailles de l'encolure. Notez qu'ici l'épaule droite/gauche s'entend quand on porte le pull et pas quand on a l'ouvrage sur les aiguilles. À moins que j'ai mal compris votre question? Nous ne pouvons malhreuseument pas proposer ce type de filtre car la langue n'est pas forcément liée à un drapeau. Mais vous avez toujours cette rubrique pour y poser vos questions. Bon tricot!
29.04.2026 - 09:46
![]() Anna escribió:
Anna escribió:
Interessante e semplice
25.04.2026 - 16:35
![]() Anna escribió:
Anna escribió:
Interessante e semplice
25.04.2026 - 16:35
![]() FRANCE escribió:
FRANCE escribió:
Je ne trouve pas combien de pelotes je dois commander en taille S
18.04.2026 - 17:42DROPS Design respondió:
Bonjour, 150gr = 3 pelotes du DROPS Air. Bon tricot!
18.04.2026 - 18:06
![]() Rose escribió:
Rose escribió:
Are you to put the back stitches on a holder while you work back and forth on the front. It isn't stated on the pattern.
15.04.2026 - 18:07DROPS Design respondió:
Hi Rose, Yes, it is easiest if you place the back piece stitches on a stitch holder while working the front. Regards, Drops team.
16.04.2026 - 06:52
![]() Nancy escribió:
Nancy escribió:
Ik wil graag spencer patroon voor rechte naalden
14.04.2026 - 16:44DROPS Design respondió:
Dag Nancy,
Om een patroon aan te passen om op rechte naalden te breien hebben we een instructie gemaakt. Deze vind je hier.
15.04.2026 - 11:36
![]() Margot escribió:
Margot escribió:
Liebe Drops-Mitarbeiter*innen: wieviel "positive ease" hat das Modell? Mein Brustumfang ist 88 cm, ich möchte, dass der Pullunder locker sitzt, welche Größe empfehlt ihr? Danke vielmals für eine Antwort! liebe Grüße:)
01.04.2026 - 22:34DROPS Design respondió:
Liebe Margot, das können Sie selber entscheiden, mehr lesen Sie hier. Viel Spaß beim Stricken!
07.04.2026 - 16:43
![]() Alessandra escribió:
Alessandra escribió:
Hi, I'm at the left shoulder on the front piece. The pattern says I should start from the right side, but it looks like a wrong-side row. I read the other comments where you explain to join the yarn on the side and start working on the RS, but I don’t understand how to do that because the outer side of the shoulder is on the cable. Thank you!
24.03.2026 - 16:26DROPS Design respondió:
Dear Alessandra, after you have worked the right shoulder you should have only stitches for left shoulder on needle, start from the rigth side, ie from the armhole towards the neckline and cast off stitches for neck at the beg of each row from the wrong side then cast off when left shoulder have same height than right shoulder. Happy knitting!
25.03.2026 - 07:02
![]() Frida escribió:
Frida escribió:
Hi, How many balls of Air Mix yarn would I need to make this in size small please? Thank you
18.03.2026 - 23:28DROPS Design respondió:
Hi Frida, Drops Air is sold in 50 g skiens, so you need 3 skiens for this top in your size. Regards, Drops Team.
19.03.2026 - 06:25
|
|
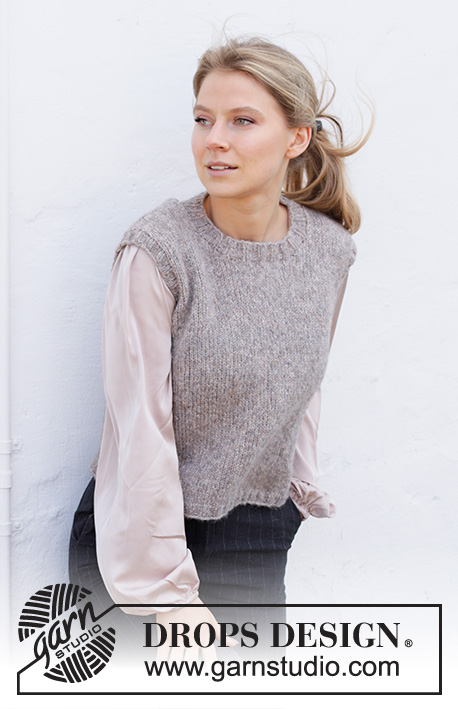
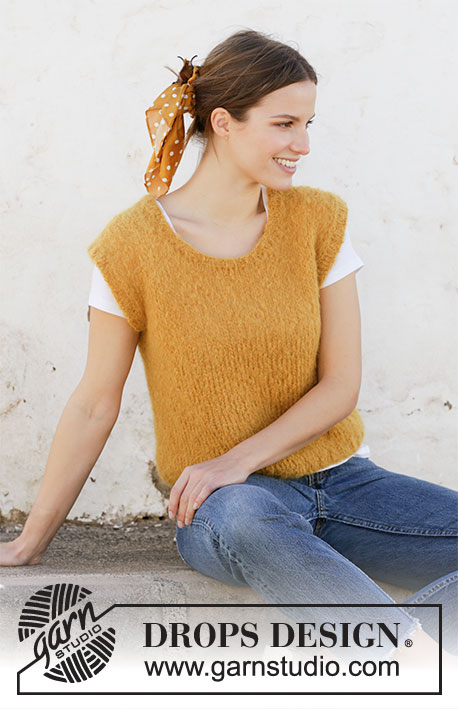
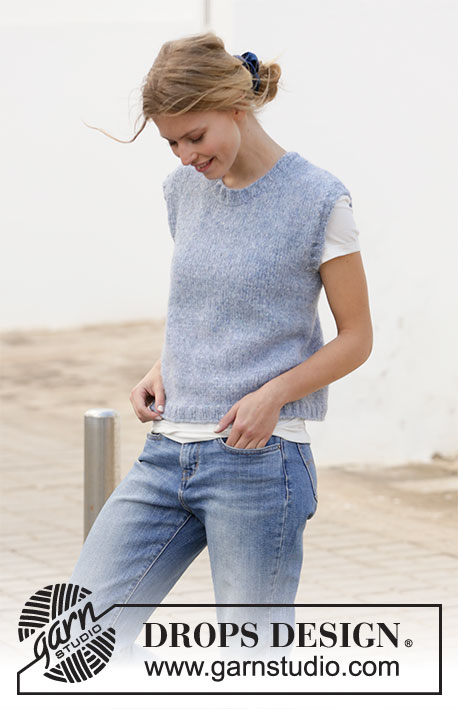
College Days#collegedaysvest |
|
 |
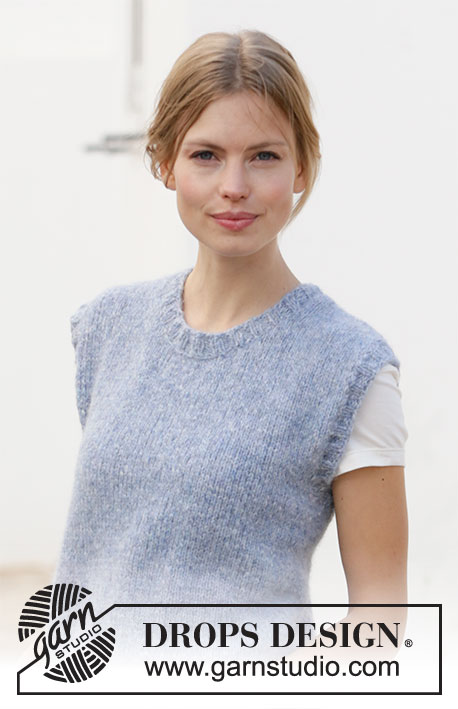 |
Chaleco con escote redondo en DROPS Air. Tallas S – XXXL.
DROPS 210-28 |
|
|
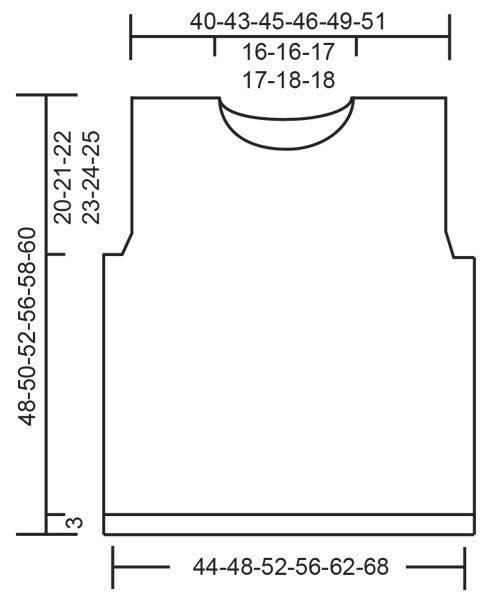
EXPLICACIONES PARA REALIZAR LA LABOR: ------------------------------------------------------- TIP PARA LAS DISMINUCIONES (repartidos): Para calcular cómo disminuir puntos repartidos, contar el número total de puntos en la aguja ( p.e 156 puntos) y dividir los puntos entre el número de disminuciones a trabajar (p.e 8) = 19,5. En este ejemplo disminuir trabajando aprox. cada 18º y 19º y cada 19º y 20º puntos juntos de derecho. ------------------------------------------------------- COMENZAR LA LABOR AQUÍ: ------------------------------------------------------- CHALECO - RESUMEN DE LA LABOR: La labor se trabaja en redondo con una aguja circular, de abajo arriba hasta las sisas. Finalizar el delantero y la espalda por separado de ida y vuelta. Las cenefas en el escote y las sisas se trabajan en redondo con una aguja circular hasta finalizar. CUERPO: Montar 156-172-184-200-220-240 puntos con una aguja circular de 4,5 mm y Air. Trabajar 1 vuelta de derecho, después trabajar el elástico (2 derechos, 2 reveses) 3 cm. Cambiar a una aguja circular de 5 mm. Trabajar en punto jersey, disminuir 8 puntos repartidos en la primera vuelta = 148-164-176-192-212-232 puntos – leer TIP PARA LAS DISMINUCIONES arriba. Insertar 1 marcapuntos al inicio de la vuelta y 1 marcapuntos después de los siguientes 74-82-88-96-106-116 puntos. Permitir que los marcapuntos sigan la labor; se usan para cerrar las sisas. Trabajar en punto jersey hasta que la labor mida 28-29-30-33-34-35 cm desde el borde de montaje. RECORDAR MANTENER LA TENSIÓN DEL TEJIDO! En la siguiente vuelta cerrar para las sisas, comenzar 3-3-3-4-4-4 puntos antes del primer marcapuntos; cerrar 6-6-6-8-8-8 puntos (el marcapuntos está en el centro de estos puntos), trabajar como antes hasta que queden 3-3-3-4-4-4 puntos antes del siguiente marcapuntos, cerrar los siguientes 6-6-6-8-8-8 puntos (el marcapuntos está en el centro de estos puntos) y trabajar hasta el final de la vuelta. Ahora finalizar el delantero y la espalda por separado, de ida y vuelta en la aguja. DELANTERO: = 68-76-82-88-98-108 puntos. Trabajar en punto jersey y cerrar para las sisas a cada lado al inicio de cada fila como sigue: Cerrar 2 puntos 1 vez y 1 punto 1-3-4-6-9-12 veces = 62-66-70-72-76-80 puntos. Continuar trabajando hasta que la labor mida 38-40-40-44-44-46 cm (queda aprox. 10-10-12-12-14-14 cm para alcanzar las medidas finales). En la siguiente fila por el lado derecho cerrar para el escote como sigue: Trabajar los primeros 25-27-28-29-30-32 puntos, cerrar los siguientes 12-12-14-14-16-16 puntos y trabajar los últimos 25-27-28-29-30-32 puntos. Finalizar los hombros por separado; no cortar el hilo - continuar con el hombro derecho por el lado revés. HOMBRO DERECHO DEL DELANTERO: = 25-27-28-29-30-32 puntos. Trabajar en punto jersey, comenzar por el lado revés y cerrar puntos para el escote al inicio de cada fila por el lado derecho como sigue: Cerrar 2 puntos 2 veces y 1 punto 4 veces = 17-19-20-21-22-24 puntos. Continuar trabajando hasta que la labor mida 48-50-52-56-58-60 cm desde el borde de montaje. Cerrar y cortar el hilo. HOMBRO IZQUIERDO DEL DELANTERO: = 25-27-28-29-30-32 puntos. Trabajar en punto jersey, comenzar por el lado derecho y cerrar puntos para el escote al inicio de cada fila por el lado revés como sigue: Cerrar 2 puntos 2 veces y 1 punto 4 veces = 17-19-20-21-22-24 puntos. Continuar trabajando hasta que la labor mida 48-50-52-56-58-60 cm desde el borde de montaje (ajustar con el hombro derecho). Cerrar y cortar el hilo. ESPALDA: = 68-76-82-88-98-108 puntos. Trabajar en punto jersey y rematar puntos para las sisas a cada lado al inicio de cada fila como sigue: Cerrar 2 puntos 1 vez y 1 punto 1-3-4-6-9-12 veces = 62-66-70-72-76-80 puntos. Continuar trabajando hasta que la labor mida 44-46-48-52-54-56 cm (quedan aprox. 4 cm hasta el largo final). En la siguiente fila por el lado derecho, cerrar para el escote como sigue: Trabajar los primeros 18-20-21-22-23-25 puntos, cerrar los siguientes 26-26-28-28-30-30 puntos y trabajar los últimos 18-20-21-22-23-25 puntos. Finalizar los hombros por separado; no cortar el hilo - continuar con el hombro izquierdo por el lado revés. HOMBRO IZQUIERDO EN LA ESPALDA: = 18-20-21-22-23-25 puntos. Trabajar en punto jersey, comenzando por el lado revés y rematar 1 punto al inicio de cada fila por el lado derecho = 17-19-20-21-22-24 puntos. Continuar trabajando hasta que la labor mida 48-50-52-56-58-60 cm desde el borde de montaje; ajustar al delantero. Cerrar y cortar el hilo. HOMBRO IZQUIERDO EN LA ESPALDA: = 18-20-21-22-23-25 puntos. Trabajar en punto jersey, comenzar por el lado derecho y cerrar 1 punto al inicio de la siguiente fila por el lado revés = 17-19-20-21-22-24 puntos. Continuar trabajando hasta que la labor mida 48-50-52-56-58-60 cm desde el borde de montaje; ajustar al delantero derecho. Cerrar y cortar el hilo. TERMINACIÓN: Coser las costuras de los hombros con grafting. ESCOTE: Comenzar por el lado derecho en una de las costuras de los hombros. Con una aguja circular de 4.5 mm recoger aprox. 76 - 92 puntos dentro de 1 punto alrededor de toda la línea del escote (el número tiene que ser divisible entre 4). Trabajar el elástico (2 derechos, 2 reveses) en redondo 2 cm. Cerrar con derecho sobre derecho y revés sobre revés. CENEFA ALREDEDOR DE LAS SISAS: Comenzar por el lado derecho donde se dividió la labor para la sisa. Con una aguja circular de 4.5 mm recoger aprox. 84 -124 puntos alrededor de la sisa ( el número tiene que ser divisible entre 4). Trabajar el elástico ( 2 derechos, 2 reveses) en redondo 2 cm. Cerrar con derecho sobre derecho y revés sobre revés Trabajar una cenefa alrededor de la otra sisa de la misma manera. |
|
 |
|
¿Terminaste este patrón?Entonces, etiqueta tus fotos con #dropspattern #collegedaysvest o envíalas a la galería #dropsfan. ¿Necesitas ayuda con este patrón?Encontrarás 22 videos tutoriales, un espacio para comentarios/preguntas y más visitando la página del patrón en garnstudio.com © 1982-2026 DROPS Design A/S. Todos los derechos reservados. Este documento, incluyendo todas sus sub-secciones, está protegido por los derechos de autor (copyright). Lee más acerca de lo que puedes hacer con nuestros patrones en la parte de abajo de cada patrón de nuestro sitio. |
|


Con más de 40 años en el diseño de modelos de punto y de ganchillo, DROPS Design ofrece una de las más vastas colecciones de patrones gratuitos en el internet - traducidos en 17 idiomas. Al día de hoy, contamos con 324 catálogos y 12290 patrones - de los cuales 11675 están traducidos en español.
Nosotros trabajamos con mucho esmero para brindarte lo mejor que las labores de punto y ganchillo tienen para ofrecer,inspiración y consejos, así como hilos de magnífica calidad a precios increíbles! Te gustaría usar nuestros patrones para otro fin además del uso personal? Puedes leer acerca de lo que estás permitida a hacer en el texto de Copyright en la parte de abajo de todos nuestros patrones. Felices labores!
Escribe un comentario sobre DROPS 210-28
¡Nos encantaría saber qué piensas acerca de este patrón!
Si quieres escribir una pregunta referente al patrón, por favor asegúrate de elegir la categoría correcta en el formulario debajo, para acelerar el proceso de respuesta. Los campos obligatorios están marcados con un *.