
Categorías populares
¿Buscas un hilo?


Comentarios / Preguntas (16)
![]() Sharon escribió:
Sharon escribió:
Hi! Good morning. I have the sleeves of this sweater so am almost done. Polaris is a thick yarn which make this sweater very heavy. It will be however very warm. Can I wash this on the wool program. It is impossible to wash this by hand per ball band instruction. Just knitting the sleeves make my shoulder hurts. Love this sweater though and do not want to damage it, but I must wash it som how. Thanks for all your help and responses to my many questions. Sharon
29.08.2023 - 09:21DROPS Design respondió:
Hi Sharon, The recommendation for this yarn is hand-washing at max 30 degrees. You could try a cool machine wash, if hand washing is difficult. Always dry the garment flat and shape it while it is still wet. Good luck!
30.08.2023 - 06:52
![]() Sharon Hunt escribió:
Sharon Hunt escribió:
Hi Working on the sleeves. Just checking to make sure that the increases on the sleeves are done every 4th row. Is my calculation correct? Thanks for your help. S
11.08.2023 - 18:45DROPS Design respondió:
Dear Mrs Hunt, when working sleeves you will only decrease - read decrease tip - alternately at the beg and at the end of the row on every other row: first decrease at the end of the row, then on next row from RS decrease at the beg of the row and repeat these 2 decreases as many time as required in your size, so that the decrease will be worked on every 4th row at the beg/end of the row. Happy knitting!
14.08.2023 - 08:31
![]() Sharon Hunt escribió:
Sharon Hunt escribió:
Hi and good day. Thanks 🙏 for answering my previous question. I tried on my sweater and must admit that I like my sweaters longer. Is this doable without it affecting the overall sweater? How many more balls should I purchase. Thank you for your response . Sharon.
17.07.2023 - 18:38DROPS Design respondió:
Hi Sharon, of course you can do it. Do not forget to increase 1 stitch after each marker thread every few centimetres. You will need at least 2 more balls of yarn but it depends on the total lenght of your sweater. Happy knitting!
17.07.2023 - 22:07
![]() Sharon Hunt escribió:
Sharon Hunt escribió:
Hi! Can I work the sleeves in the round? Can I work k2 tog on the right side and ssk on the left side. I hate sewing . Sharon
16.07.2023 - 08:20DROPS Design respondió:
Dear Sharon, yes, you could work them in the round. And yes, you could for ssk on the left side, just make sure that no holes are left in the sleeves. Happy knitting!
17.07.2023 - 11:55
![]() Sharon Hunt-Edwards escribió:
Sharon Hunt-Edwards escribió:
Hi Started the Cedar sweater and I have completed the first round of the chart A1 and A2 for Size XXL. I have 2 stitches left at the end of round one. Have I done something wrong her as I expected that there would be 4 stitches to complete the round. Please explain this and let me know what I should do to correct this. Thank you.
07.07.2023 - 20:00DROPS Design respondió:
Dear Sharon, you have 42 initial stitches. Work A.1 and A.2 10 times (= 40 stitches) and A.1 once more (= 2 stitches). You will have 42 stitches and 10 increases. Happy knitting!
10.07.2023 - 16:32
![]() Sharon Hunt escribió:
Sharon Hunt escribió:
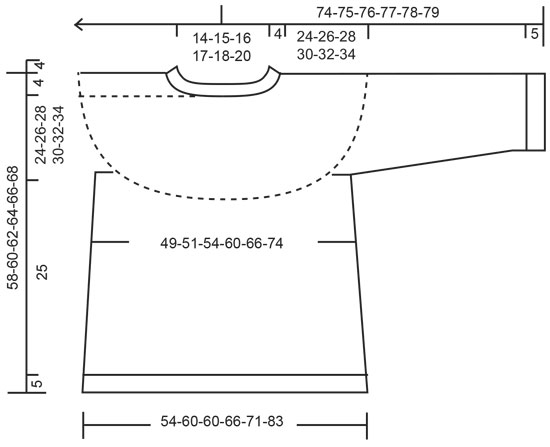
Hi! Got cold feet after my question about this sweater. I have the yarn so I have no choice. I was looking at the schematics and it seem if I make the size 52 I would get a finished size 60. Not what I want, however if I choose size 47 I would have a finished size of 51. Close enough? Am not sure about this and need some help not to redesign the sweater, but to avoid making a sweater that is way too big. Thanks for your help.
09.03.2023 - 18:51DROPS Design respondió:
Dear Mrs Hunt, make first sure you have the correct tension so that you will have the finished measurements as in the chart, then take a similar garment you have and like the size and compare them to the ones in the chart, if you are between 2 sizes, choose the smaller one for a tighter fit and the larger one for a looser fit. read more here. Happy knitting!
10.03.2023 - 09:26
![]() Gabi escribió:
Gabi escribió:
Hallo, die Polaris wird als Filzwolle bezeichnet. Wie kann ich den Pullover waschen?
13.09.2022 - 18:52DROPS Design respondió:
Liebe Gabi, DROPS Polaris waschen Sie wie an der Banderolle bzw Farbekarte erklärt; mehr über Pflegehinweise lesen Sie hier. Viel Spaß beim stricken!
14.09.2022 - 09:01
![]() Sharon Hunt escribió:
Sharon Hunt escribió:
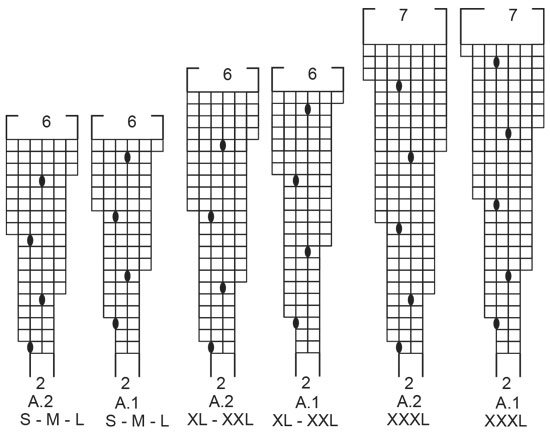
Hi! Am preparing to make this sweater and I have a question. I am making size (xxl) which gives a finished size 52. My question so far relates to the diagram. Reading from left to write I would start A2 then A1, or should I start reading right to left in that case I would Start with A1 as stated in the pattern. What does the number 6 at the top indicates? Thanks for your response. Sharon
02.08.2022 - 12:09DROPS Design respondió:
Dear Mrs Hunt, the jumper is worked top down and the diagrams are read bottom up; this means you will read every round from the right towards the left and repeat (A.1, A.2) all the round. Each diagram (A.1 and A.2) starts with 2 sts and finish with 6 sts (you increase 4 sts in each diagram). Can this help? Happy knitting!
02.08.2022 - 13:06
![]() Sharon escribió:
Sharon escribió:
Would i cast on 136 sts to make a size 52? I hsve never made a sweater top down so there will be a few questions.
20.01.2022 - 12:04DROPS Design respondió:
Dear Sharon, in size S you will cast on 34 sts for neck edge; look at this lesson, it shows how to work a jumper top down (this one is worked with a circular yoke but the lesson may help you to understand how to work here from top down) and maybe also this lesson for the diagrams. Happy knitting!
20.01.2022 - 17:00
![]() Bianca escribió:
Bianca escribió:
P.S. I found your tutorial on how to read knitting diagrams but I could not find a video tutorial. If you have one, I'd appreciate you post the link.
01.12.2019 - 08:00
|
|||||||
Cedar Wood#cedarwoodsweater |
|||||||
 |
 |
||||||
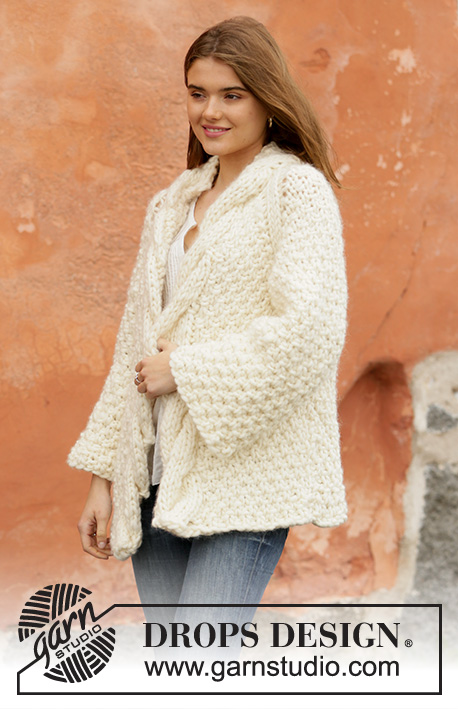
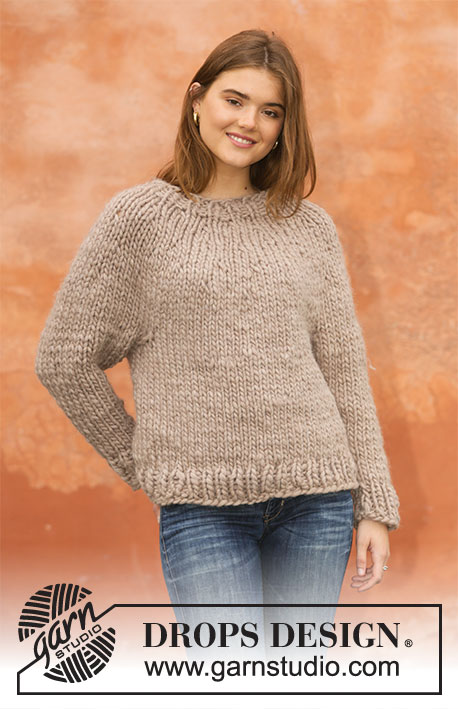
Jersey a punto con canesú redondo en DROPS Polaris. La prenda está realizada de arriba abajo. Tallas S-XXXL.
DROPS 206-39 |
|||||||
|
EXPLICACIONES PARA REALIZAR LA LABOR: ------------------------------------------------------- PATRÓN: Ver el diagrama A.1 y A. 2. Elegir el diagrama para tu talla. TIP: NOTA: En nuestra colección no tenemos agujas más cortas que 60 cm en 15 mm. La circunferencia de la labor es menor que 60 cm. Se puede montar con agujas de doble punta o trabajar el ANILLO MÁGICO en una aguja circular - ver descripción debajo, hasta tener los puntos suficientes para usar agujas circulares de forma normal. ANILLO MÁGICO: Si estás trabajando en redondo con una aguja circular demasiado larga para la circunferencia de la labor, trabajar como sigue (la aguja circular debe tener un cable flexible): Colocar los puntos en el centro del cable, dividirlos por la mitad y tirar del cable entre los puntos. Colocar los puntos en los extremos de cada aguja, asegúrate de que el cable no esté retorcido. El hilo que se está trabajando está en la aguja posterior y se trabaja primero en la aguja delantera. Tirar de la aguja posterior para trabajar los puntos en la aguja delantera. Cuando se hayan trabajado los puntos en la aguja delantera, girar y pasar los puntos de vuelta a la aguja vacía; trabajar el otro lado de la misma manera. Continuar en redondo de la misma manera, asegúrate de que siempre quites la aguja del lado con el hilo. TIP PARA LOS AUMENTOS (aplicar al cuerpo): Aumentar 1 punto haciendo 1 hebra. En la siguiente vuelta trabajar la hebra de derecho retorcido para evitar que se formen agujeros. TIP PARA LAS DISMINUCIONES (aplicar a las mangas) NOTA: Para que las disminuciones se hagan alternadamente en el lado derecho e izquierdo de la labor, trabajar como sigue: Disminuir alternadamente al principio y al final de las filas con disminuciones. Disminuir como sigue por el lado derecho: 2 puntos juntos de derecho. Disminuir como sigue por el lado revés: 2 puntos juntos de revés. ------------------------------------------------------- COMENZAR LA LABOR AQUÍ: ------------------------------------------------------- JERSEY - RESUMEN DE LA LABOR: La labor se trabaja en redondo con agujas de doble punta/ una aguja circular, de arriba abajo. Las mangas se trabajan de ida y vuelta con una aguja circular. ESCOTE: Montar 34-36-38-40-42-44 puntos con agujas de doble punta/ una aguja circular de 12 mm – leer TIP, y Polaris. Trabajar 1 vuelta de derecho. Después trabajar el elástico (= 1 derecho/ 1 revés) 4 cm. Cambiar a una aguja circular de 15 mm. Insertar un marcapuntos. LA LABOR SE MIDE DESDE AQUÍ! CANESÚ: Trabajar el patrón en las diferentes tallas como sigue: Tallas S, L y XXL: Trabajar * A.1, A.2 *, trabajar desde * a * un total de 8-9-10 veces, trabajar A.1. RECORDAR MANTENER LA TENSIÓN DEL TEJIDO! Tallas M, XL y XXXL: Trabajar * A.1, A.2 *, trabajar desde * a * un total de 9-10-11 veces hasta el final de la vuelta. RECORDAR MANTENER LA TENSIÓN DEL TEJIDO! TODAS LAS TALLAS: Cuando se haya completado A.1 y A.2 en vertical hay 102-108-114-120-126-154 puntos en la aguja. Trabajar 1 vuelta de derecho y al mismo tiempo aumentar 0-4-2-8-10-2 puntos repartidos = 102-112-116-128-136-156 puntos. Continuar en punto jersey hasta que la labor mida 24-26-28-30-32-34 cm desde el marcapuntos. La siguiente vuelta se trabaja como sigue: Trabajar los primeros 15-16-17-19-20-23 puntos (= mitad de la espalda), colocar los siguientes 21-24-24-26-28-32 puntos en 1 gancho auxiliar para la manga y montar 4-4-4-4-6-6 puntos nuevos en la aguja (= en el lado bajo la manga), trabajar los siguientes 30-32-34-38-40-46 puntos (= delantero), colocar los siguientes 21-24-24-26-28-32 puntos en un gancho auxiliar para la manga y montar 4-4-4-4-6-6 puntos nuevos en la aguja (= en el lado bajo las mangas), trabajar los siguientes 15-16-17-19-20-23 puntos (= mitad de la espalda). El cuerpo y las mangas se terminan por separado. LA LABOR SE MIDE AHORA DESDE AQUÍ. CUERPO: = 68-72-76-84-92-104 puntos. Insertar 1 marcapuntos a cada lado, en el medio de los 4-4-4-4-6-6 puntos nuevos montados bajo cada manga. Permitir a los marcapuntos seguir la labor hacia delante; se utilizarán al aumentar en los lados. Continuar en redondo con punto jersey. Cuando la labor mida 5 cm desde la división aumentar 1 punto antes de ambos marcapuntos - leer TIP PARA LOS AUMENTOS (= 2 puntos aumentados). Después aumentar como sigue: Cuando la labor mida 8 cm aumentar 1 puntos después de cada marcapuntos. Cuando la labor mida 11 cm aumentar 1 punto antes de cada marcapuntos. Cuando la labor mida 14 cm aumentar 1 punto después de cada marcapuntos. En las tallas M y XXXL continuar aumentando como sigue: Cuando la labor mida 17 cm aumentar 1 punto antes de cada marcapuntos. Cuando la labor mida 20 cm aumentar 1 punto después de cada marcapuntos. TODAS LAS TALLAS: Cuando se hayan finalizado los aumentos hay 76-84-84-92-100-116 puntos en la aguja. Continuar en redondo con punto jersey hasta que la labor mida 25 cm desde la división. Después trabajar el elástico (= 2 derechos/ 2 reveses) 5 cm. Rematar flojo con derecho sobre derecho y revés sobre revés. El jersey mide aprox. 58-60-62-64-66-68 cm desde el hombro hacia abajo. MANGA: Las mangas se trabajan de ida y vuelta con una aguja circular y se cosen para finalizar. Colocar los 21-24-24-26-28-32 puntos desde el marcapuntos a un lado de la labor en una aguja circular de 15 mm y montar 2-2-2-2-3-3 puntos nuevos a cada lado = 25-28-28-30-34-38 puntos. Trabajar en punto jersey de ida y vuelta, al mismo tiempo en la siguiente fila por el lado derecho disminuir 1-0-0-0-0-0 punto (disminuir sólo en la talla S) trabajando los 2 puntos más externos juntos de derecho = 24-28-28-30-34-38 puntos. Cuando la labor mida 4-4-2-4-4-2 cm disminuir 1 punto en el lado derecho de la labor - leer TIP PARA LAS DISMINUCIONES. Disminuir alternadamente en el lado derecho y el lado izquierdo cada 2ª-2ª-2ª-1ª-1ª-1ª fila un total de 8-12-12-14-14-18 veces (= 4-6-6-7-7-9 veces a cada lado) = 16-16-16-16-20-20 puntos. Continuar trabajando hasta que la labor mida 34-33-32-30-28-26 cm desde la división. (NOTA: Las medidas son más cortas en las tallas más grandes debido a la mayor anchura de los hombros). Cambiar a una aguja circular de 12 mm y trabajar el elástico (= 1 derecho/ 1 revés) 5 cm. Rematar flojo con derecho sobre derecho y revés sobre revés. Trabajar la otra manga de la misma manera. TERMINACIÓN: Coser las costuras de las mangas en el bucle más externo del punto más externo para que la costura quede plana. Coser las aberturas bajo las mangas. |
|||||||
Explicaciones del diagrama |
|||||||
|
|||||||
 |
|||||||
 |
|||||||
¿Terminaste este patrón?Entonces, etiqueta tus fotos con #dropspattern #cedarwoodsweater o envíalas a la galería #dropsfan. ¿Necesitas ayuda con este patrón?Encontrarás 26 videos tutoriales, un espacio para comentarios/preguntas y más visitando la página del patrón en garnstudio.com © 1982-2026 DROPS Design A/S. Todos los derechos reservados. Este documento, incluyendo todas sus sub-secciones, está protegido por los derechos de autor (copyright). Lee más acerca de lo que puedes hacer con nuestros patrones en la parte de abajo de cada patrón de nuestro sitio. |
|||||||


Con más de 40 años en el diseño de modelos de punto y de ganchillo, DROPS Design ofrece una de las más vastas colecciones de patrones gratuitos en el internet - traducidos en 17 idiomas. Al día de hoy, contamos con 324 catálogos y 12290 patrones - de los cuales 11675 están traducidos en español.
Nosotros trabajamos con mucho esmero para brindarte lo mejor que las labores de punto y ganchillo tienen para ofrecer,inspiración y consejos, así como hilos de magnífica calidad a precios increíbles! Te gustaría usar nuestros patrones para otro fin además del uso personal? Puedes leer acerca de lo que estás permitida a hacer en el texto de Copyright en la parte de abajo de todos nuestros patrones. Felices labores!
Escribe un comentario sobre DROPS 206-39
¡Nos encantaría saber qué piensas acerca de este patrón!
Si quieres escribir una pregunta referente al patrón, por favor asegúrate de elegir la categoría correcta en el formulario debajo, para acelerar el proceso de respuesta. Los campos obligatorios están marcados con un *.