
Categorías populares
¿Buscas un hilo?


Comentarios / Preguntas (32)
![]() Cathie Castaneda escribió:
Cathie Castaneda escribió:
Hello! Regarding the yoke decreasing in pattern 202-11. I understand how to calculate how often to decrease the stitches. I’m not understanding how to decrease in the lacework charts A5. Decreasing in the charts doesn’t leave me enough stitches to do each repetition. I understand that the number of repetitions will be decreased, I just don’t get how to work A5 pattern with less stitches.
10.08.2022 - 09:24DROPS Design respondió:
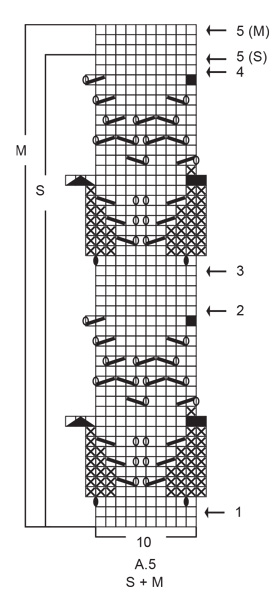
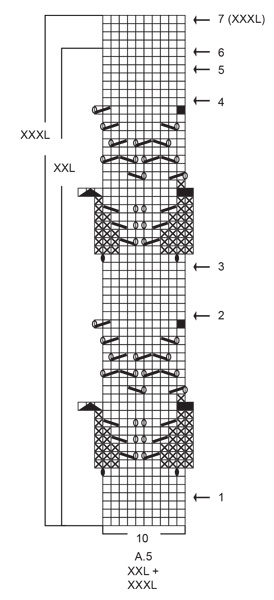
Dear Mrs Castaneda, you should have enough stitches in each size to repeat A.5 as explained, please note that you should increase 2 sts in each A.5 before working the lace pattern (with the purled stitches), then decrease 2 sts in each A.5 on the last row of this section. Hope it can help, happy knitting!
10.08.2022 - 16:12
![]() Cathie Castaneda escribió:
Cathie Castaneda escribió:
Previous question correction haha! What is the vertical height of A4? And the vertical height of A5? And how many vertical times is the A4 section repeated on the body and the sleeves? Thank you!
06.08.2022 - 07:06DROPS Design respondió:
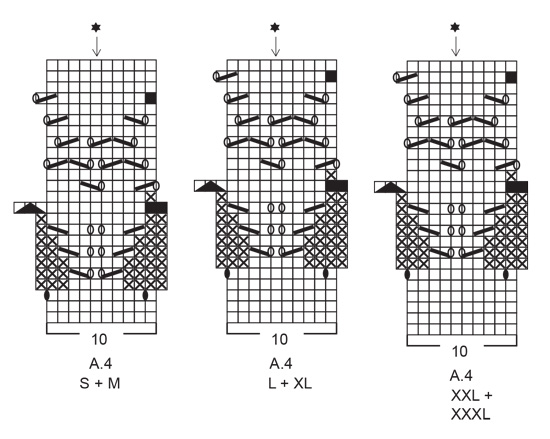
Dear Cathie, A.4 is repeated twice in the body and the sleeves vertically. Its length depends on the size: for size XXL A.4 is longer than for size S. For sizes S-XL it's 24 rows; for sizes XXL and XXXL it's 25 rows. Remember to work with the correct gauge so that you will have enough cm to reach the armhole with just 2 repeats of A.4. A.5 measures between 20 and 27 cm depending on the size (the number of rows to work will depend on the size you are working). Happy knitting!
07.08.2022 - 23:00
![]() Cathie Castaneda escribió:
Cathie Castaneda escribió:
Another question on pattern 202-11. What is the of A4 ? And A5?
06.08.2022 - 07:00DROPS Design respondió:
Dear Cathie, please see answer above.
07.08.2022 - 23:00
![]() Cathie Castaneda escribió:
Cathie Castaneda escribió:
202-11: In the body, it appears A4 is only worked twice (which equals approximately 12 1/2”) before combining the body with the sleeves. In the sleeve directions it states to work A4 three times on the sleeves before working the yoke & sleeve together. In the 202-11 photo there are 3 sections of A4 on the body (not 2), not 3 like the sleeves. Am I missing working a 3rd repitition of A4 on the body?
05.08.2022 - 22:10DROPS Design respondió:
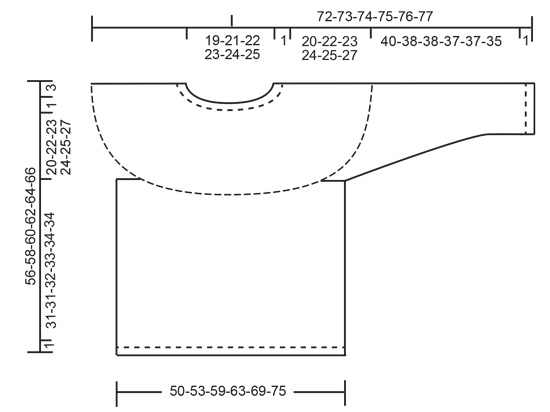
Dear Cathie, you work A.4 twice in the sleeves and body (in the sleeves it says to work A.4 until finishing vertically and then repeat 1 more times = 2 in total). Remember that you start working A.4 in the body when the piece measures approx. 12 cm (in size S). One repeat is approx. 10 cm in vertical (24 rows for size S, for example), so 2 repeats are 20 cm approx. As you can see, the body up to the yoke measures 31 cm for size S (see measurements schematic below the pattern charts) so with 2 repeats of A.4 you have already reached the armhole. Happy knitting!
07.08.2022 - 23:00
![]() Cathie Castaneda escribió:
Cathie Castaneda escribió:
I have been trying to get the correct knitting gauge. I have had to knit this pattern with size 11 needles to get the gauge. which seems way too big. The gauge works out to 4 stitches per inch. I think 4 stitches per inch is too few stitches with using ‘C’ weight yarn. That gauge is more when using bulky weight yarn. Any answers? I’m wondering if there could be an error in the printing of the knitting gauge. Thank you!
22.07.2022 - 22:43DROPS Design respondió:
Hi Cathie, the pattern is correct. Please remember there is no correct needle size; everyone’s knitting is different. Needle size is only a suggestion! If you have too many stitches on 10 cm switch to larger needles. If you have too few stitches on 10 cm switch to smaller needles. For more information please see the lesson Drops HERE. Happy knitting!
24.07.2022 - 14:32
![]() Eva Skytte escribió:
Eva Skytte escribió:
Jeg skal gentage mønster diagram A4, men skal tage masker ud på 5 pind i diagrammet, hvis jeg gør det i gentagelsen, så bliver hver diagram på 12 masker i stedet for de 10 masker som diagrammet er på, det kommer jo ikke til at passe sammen, så hvad gør jeg , tager masker ud og strikker dem ret på hver side af diagrammet, eller skal jeg ikke tage ud, så diagram stadig passer i maskeantal
29.05.2021 - 23:38DROPS Design respondió:
Hei Eva. Du øker med 1 kast, slik det er beskrevet i diagrammet, du vil da på neste omgang ha 12 masker pr rapport av diagram A.4. De nye maskene strikkes som vist i diagrammet (vrang). Ved 13. omg (str. L+XL) minskes maskeantallet og du vil igjen ha 10 masker pr rapport. Bruk gjerne maskemarkører (tråd) mellom hver rapport, så får man en bedre oversikt. mvh DROPS design
31.05.2021 - 09:53
![]() HilaryHilary escribió:
HilaryHilary escribió:
Hi I have this pattern and bought 350g of Drops Big Merino group C yarn - to knit the large size. The tension is fine based on 17 x 22 on the yarn with 5mm needles and 16 x 20 on the pattern with 5.5. needles. However, I have already used up 2 balls and have barely started. Just a few rows past the bottom patterned piece. Is this weight correct? If I need to buy more I will need to do it soon to hopefully get the same dye lot.
26.01.2021 - 12:31DROPS Design respondió:
Dear HilaryHilary, both yarn have different meterages, you have to calculate the total amount of yarn required from the total meterage in Air and the meterage of Big Merino - use our yarn converter or read more here. So that in size L you need 350 g DROPS Air but 700 g DROPS Big Merino - 1 ball Air is approx. 150 m while 1 ball Big Merino is approx. 75 m. Happy knitting!
26.01.2021 - 14:47
![]() Marielle Dame escribió:
Marielle Dame escribió:
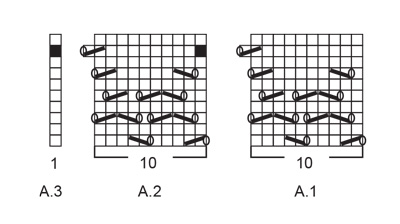
Merci pour votre réponse rapide. Par contre ma question était plus au niveau des rangs 3 et 5 de A.2 et 15 et 17 de A.4 . Si vous regardez le diagramme, les 3 mailles ensembles envers occupent 4 carrés et si vous faites le calcul au bout du rang, il n'y a plus 10 mailles mais 8. Merci encore et bonne journée.
24.11.2020 - 15:53DROPS Design respondió:
Bonjour Mme Dame, ce sera la même chose dans ces diagrammes: tricotez la dernière maille de A.1 avec la 1ère m du 1er A.2 (= les 2 m ens l'end = la dernière m de A.1), la case noire de A.2 = le jeté - continuez ensuite A.2 (= 8 m end), et tricotez la dernière m de A.2 avec la 1ère m du A.2 suivant (= c'est maintenant la dernière m de ce A.2 et le jeté = 1ère m du A.2 suivant). Continuez ainsi jusqu'à la fin du tour = au dernier A.2, on tricote la dernière m de ce A.2 avec la m de A.3, le jeté = la m de A.3. Bon tricot!
24.11.2020 - 16:36
![]() Marielle Dame escribió:
Marielle Dame escribió:
Bonjour, Dans la légende, vous indiquez 3 mailles ensembles à l'envers. Par contre, quand je regarde les diagrammes, il y a 4 mailles ensembles à l'envers... ce qui débalance le nombre de mailles et le modèle. Pouvez-vous m'expliquez ce que je ne comprends pas? Merci beaucoup pour votre réponse.
23.11.2020 - 20:54DROPS Design respondió:
Bonjour Mme Dame, le triangle noir correspond à 3 mailles ensemble à l'envers, dans A.4 par ex, au début du tour avec 2 cases noires, glissez ces mailles sans les tricoter et tricotez jusqu'au triangle noir: vous allez tricoter ensemble à l'envers la dernière maille envers du 1er A.4 avec les 2 premières mailles envers du A.4 suivant = il reste 1 m envers = c'est la première m env du 2ème A.4 (elle "termine" le triangle de mailles envers, continuez ainsi et à la fin du tour, tricotez la dernière m du dernier A.4 avec les 2 premières m du tour = cette maille est maintenant la première m du tour. Bon tricot!
24.11.2020 - 09:31
![]() Csilla Molnar escribió:
Csilla Molnar escribió:
Sziasztok! Segitseg kellene. A teli fekete kocka azt irja hogy a kor ahol elcsusztatjuk a kort. Hogyan kell ezt csinalni? Si an lekotom a szemet vagy kihagyom? Koszonom elore is a valaszt
15.10.2020 - 16:58
|
||||||||||||||||||||||||||||||||||
Birch Woods#birchwoodssweater |
||||||||||||||||||||||||||||||||||
 |
 |
|||||||||||||||||||||||||||||||||
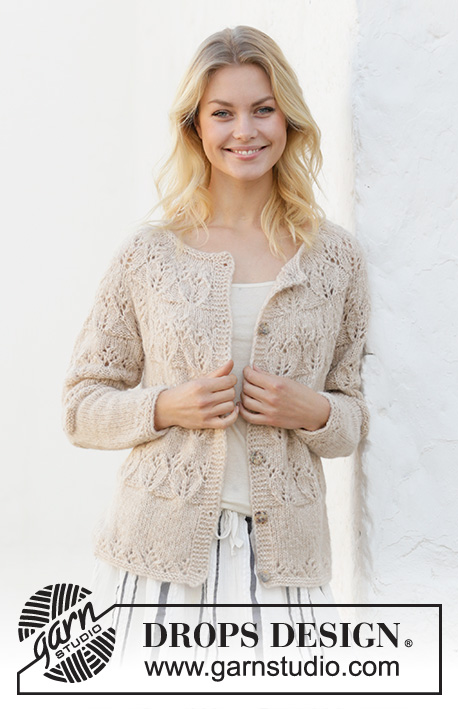
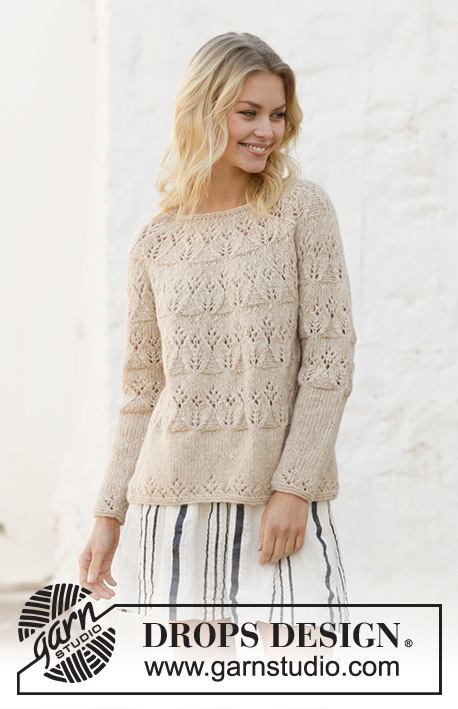
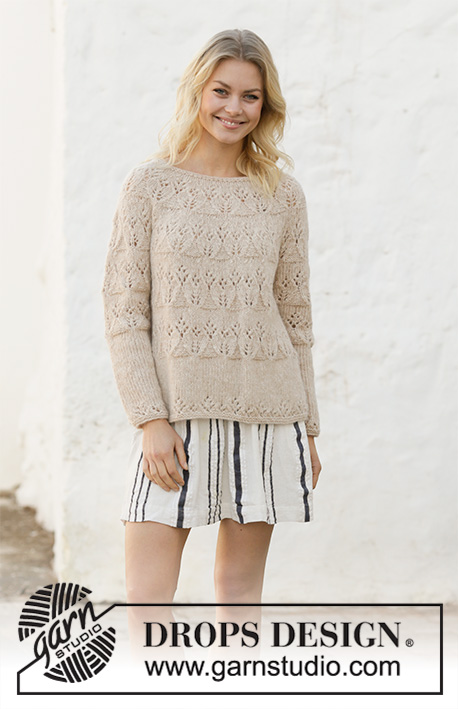
Jersey de punto con canesú redondo en DROPS Air. La prenda está realizada con patrón de calados. Tallas S – XXXL.
DROPS 202-11 |
||||||||||||||||||||||||||||||||||
|
EXPLICACIONES PARA REALIZAR LA LABOR: ---------------------------------------------------------- PUNTO MUSGO (trabajado en redondo): 1 pliegue = 2 vueltas. Trabajar 1 vuelta de derecho y 1 vuelta de revés PATRÓN: Ver los diagramas A.1 - A.5. Elegir el diagrama correspondiente a la talla (aplicar a A.4 y A.5). TIP PARA LOS AUMENTOS (aplicar a las mangas): Trabajar hasta que quede 1 punto antes del marcapuntos, 1 hebra, 2 derechos (el marcapuntos está en el centro de estos 2 puntos), 1 hebra. En la siguiente vuelta trabajar las hebras de derecho retorcido para evitar que se formen agujeros. Ahora trabajar los puntos nuevos en punto jersey/dentro del patrón. TIP PARA LAS DISMINUCIONES (repartidos): Para calcular cómo disminuir de manera repartida, contar el número total de puntos en la aguja (p.e. 238 puntos) y dividirlo entre el número de disminuciones a trabajar (p.e 38) = 6,3. En este ejemplo, disminuir trabajando juntos de derecho alternadamente cada 5º y 6º punto. ---------------------------------------------------------- COMENZAR LA LABOR AQUÍ: ---------------------------------------------------------- JERSEY - RESUMEN DE LA LABOR: Se trabaja en redondo con aguja circular desde el centro de la espalda, se trabaja desde abajo hasta las sisas. Las mangas se trabajan en redondo con agujas de doble punta/aguja circular corta, de abajo arriba. Después pasar el cuerpo y las mangas a la misma aguja circular y finalizar el canesú en redondo. CUERPO: Montar 160-170-190-200-220-240 puntos con aguja circular de 5 mm y Air. Trabajar 2 pliegues en PUNTO MUSGO - leer la explicación arriba. Cambiar a aguja circular tamaño 5,5 mm y trabajar como sigue: Trabajar A.2 sobre todos los puntos (= 16-17-19-20-22-24 repeticiones de 10 puntos). Continuar hasta completar A.2 en vertical. Ahora trabajar en punto jersey hasta que la labor mida 12-12-13-14-13-13 cm (o la medida deseada - ajustar el largo de la prenda aquí si lo deseas) - RECUERDE MANTENER LA TENSIÓN DEL TEJIDO! Trabajar la siguiente vuelta como sigue: Trabajar A.4 sobre todos los puntos (=16-17-19-20-22-24 repeticiones de 10 puntos). Continuar con este patrón hasta completar A.4 en vertical. Repetir A.4 una vez más en vertical, pero trabajar la última vuelta como sigue: Trabajar 37-39-43-46-50-54 puntos como antes (= mitad de la espalda), cerrar los siguientes 6-6-8-8-10-12 puntos para la sisa, trabajar 74-80-88-92-100-108 puntos como antes (= delantero), cerrar los siguientes 6-6-8-8-10-12 puntos para la sisa y trabajar los últimos 37-39-43-46-50-54 puntos como antes (= mitad de la espalda) = 148-158-174-184-200-216 puntos. La labor mide aprox. 32-32-33-34-35-35 cm. Dejar la labor en espera y trabajar las mangas. MANGA: Montar 31-33-35-37-39-41 puntos con agujas de doble punta tamaño 5 mm y Air. Trabajar 2 pliegues. Insertar 1 marcapuntos al inicio de la vuelta y subir el marcapuntos según se avanza la labor. Este marcapuntos se utilizará cuando trabajemos los aumentos en el centro bajo la manga. Cambiar a agujas de doble punta/aguja circular tamaño 5,5 mm. Trabajar la siguiente vuelta como sigue: 0-1-2-3-4-0 derechos, A.1 sobre los siguientes 10 puntos, repetir A.2 hasta que queden 1-2-3-4-5-1 puntos en la vuelta (= 2-2-2-2-2-3 repeticiones de 10 puntos), A.3 sobre el siguiente punto, finalizar con 0-1-2-3-4-0 derechos. Continuar hasta completar A.1-A.3 en vertical. Ahora trabajar en punto jersey - RECORDAR MANTENER LA TENSIÓN DEL TEJIDO! Cuando la labor mida 7-7-8-7-9-8 cm, aumentar 1 punto a cada lado del marcapuntos en el centro bajo la manga - leer TIP PARA LOS AUMENTOS. Aumentar de la misma manera cada 3½-2½-2-2-1½-1½ cm un total de 10-12-14-15-16-16 veces = 51-57-63-67-71-73 puntos. AL MISMO TIEMPO cuando la labor mida 21-19-19-18-16-14 cm (o la medida deseada - ajustar el largo de la prenda aquí si lo deseas), trabajar A.4 sobre todos los puntos – ajustar para que el punto con la estrella quede en el centro de la parte superior de la manga y ajustar el patrón hacia fuera a cada lado. Es decir, cuando se hayan completado los aumentos bajo la manga, trabajar como sigue: 0-3-1-3-0-1 derechos, A.4 (= 5-5-6-6-7-7 repeticiones de 10 puntos) y 1-4-2-4-1-2 derechos. Trabajar los puntos que no forman parte del patrón en punto jersey y trabajar los puntos aumentados dentro de A.4 (asegurarse de tener el mismo número de disminuciones y lazadas en el patrón). Continuar de la misma manera hasta completar A.4 en vertical. Trabajar 1 repetición de A.4 más en vertical, pero trabajar la última vuelta como sigue: Cerrar los primeros 3-3-4-4-5-6 puntos para la sisa, trabajar 45-51-55-59-61-61 puntos como antes y cerrar los últimos 3-3-4-4-5-6 puntos para la sisa = 45-51-55-59-61-61 puntos. La labor mida aprox 41-39-39-38-38-36 cm (las medidas son más cortas en las tallas más grandes debido a una mayor largura del canesú). Dejar la labor en espera y trabajar la otra manga de la misma manera. CANESÚ: Pasar las mangas a la misma aguja circular de 5,5 mm que el cuerpo, donde se remató para las sisas = 238-260-284-302-322-338 puntos. AHORA MEDIR LA LABOR DESDE AQUÍ. Trabajar A.5 sobre todos los puntos - AL MISMO TIEMPO en la vuelta marcada con la flecha en A.5 trabajar las disminuciones repartidas como se explica abajo: FLECHA-1: Disminuir 38-40-44-42-42-38 puntos repartidos - leer TIP PARA LAS DISMINUCIONES = 200-220-240-260-280-300 puntos. (Ahora trabajar A.5 20-22-24-26-28-30 veces en horizontal). FLECHA-2: Disminuir 40-50-50-50-40-40 puntos repartidos = 160-170-190-210-240-260 puntos. (Ahora trabajar A.5 16-17-19-21-24-26 veces en horizontal). FLECHA-3: Disminuir 40-40-40-40-40-40 puntos repartidos = 120-130-150-170-200-220 puntos. (Ahora trabajar A.5 12-13-15-17-20-22 veces en horizontal). FLECHA-4: Disminuir 28-30-42-30-40-40 puntos repartidos = 92-100-108-140-160-180 puntos. FLECHA-5: Disminuir 16-20-18-28-42-30 puntos repartidos = 76-80-90-112-118-150 puntos. TALLA: XL-XXL: FLECHA-6: Disminuir 18-20 puntos repartidos = 94-98 puntos. TALLA XXXL: FLECHA-6: Disminuir 28 puntos repartidos = 122 puntos. FLECHA-7: Disminuir 20 puntos repartidos = 102 puntos. TODAS LAS TALLAS: Después de completar A.5, el canesú mide aprox. 20-22-23-24-25-27 cm y hay 76-80-90-94-98-102 puntos en la vuelta. Cambiar a aguja circular de 5 mm y trabajar 2 pliegues. Rematar flojo, asegurándose de que el borde de remate no quede tenso (cambiar a agujas de mayor tamaño si fuese necesario). TERMINACIÓN: Coser la abertura bajo las mangas. |
||||||||||||||||||||||||||||||||||
Explicaciones del diagrama |
||||||||||||||||||||||||||||||||||
|
||||||||||||||||||||||||||||||||||
 |
||||||||||||||||||||||||||||||||||
 |
||||||||||||||||||||||||||||||||||
 |
||||||||||||||||||||||||||||||||||
 |
||||||||||||||||||||||||||||||||||
 |
||||||||||||||||||||||||||||||||||
 |
||||||||||||||||||||||||||||||||||
¿Terminaste este patrón?Entonces, etiqueta tus fotos con #dropspattern #birchwoodssweater o envíalas a la galería #dropsfan. ¿Necesitas ayuda con este patrón?Encontrarás 25 videos tutoriales, un espacio para comentarios/preguntas y más visitando la página del patrón en garnstudio.com © 1982-2026 DROPS Design A/S. Todos los derechos reservados. Este documento, incluyendo todas sus sub-secciones, está protegido por los derechos de autor (copyright). Lee más acerca de lo que puedes hacer con nuestros patrones en la parte de abajo de cada patrón de nuestro sitio. |
||||||||||||||||||||||||||||||||||


Con más de 40 años en el diseño de modelos de punto y de ganchillo, DROPS Design ofrece una de las más vastas colecciones de patrones gratuitos en el internet - traducidos en 17 idiomas. Al día de hoy, contamos con 324 catálogos y 12291 patrones - de los cuales 11689 están traducidos en español.
Nosotros trabajamos con mucho esmero para brindarte lo mejor que las labores de punto y ganchillo tienen para ofrecer,inspiración y consejos, así como hilos de magnífica calidad a precios increíbles! Te gustaría usar nuestros patrones para otro fin además del uso personal? Puedes leer acerca de lo que estás permitida a hacer en el texto de Copyright en la parte de abajo de todos nuestros patrones. Felices labores!
Escribe un comentario sobre DROPS 202-11
¡Nos encantaría saber qué piensas acerca de este patrón!
Si quieres escribir una pregunta referente al patrón, por favor asegúrate de elegir la categoría correcta en el formulario debajo, para acelerar el proceso de respuesta. Los campos obligatorios están marcados con un *.