
Categorie popolari
State cercando un filato?


Lasciare un commento sul modello DROPS 202-11
Noi saremmo felici di ricevere i tuoi commenti e opinioni su questo modello!
Se vuoi fare una domanda, fai per favore attenzione a selezionare la categoria corretta nella casella qui sotto per velocizzare il processo di risposta. I campi richiesti sono indicati da *.
|
||||||||||||||||||||||||||||||||||
Birch Woods |
||||||||||||||||||||||||||||||||||
 |
 |
|||||||||||||||||||||||||||||||||
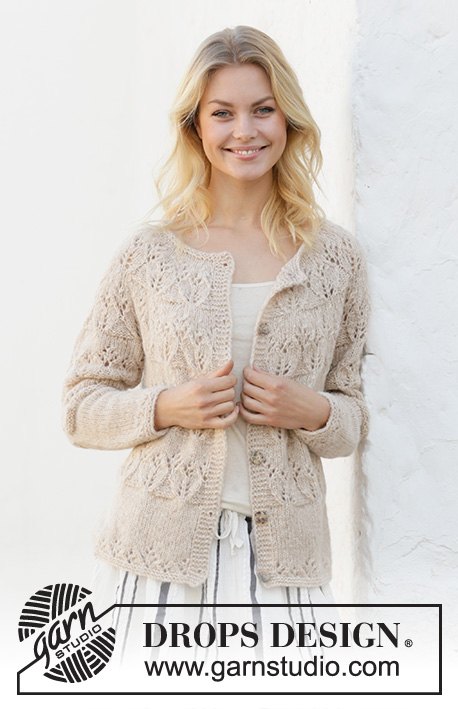
Maglia ai ferri con sprone rotondo e motivo traforato in DROPS Air. Taglie: Dalla S alla XXXL.
DROPS 202-11 |
||||||||||||||||||||||||||||||||||
|
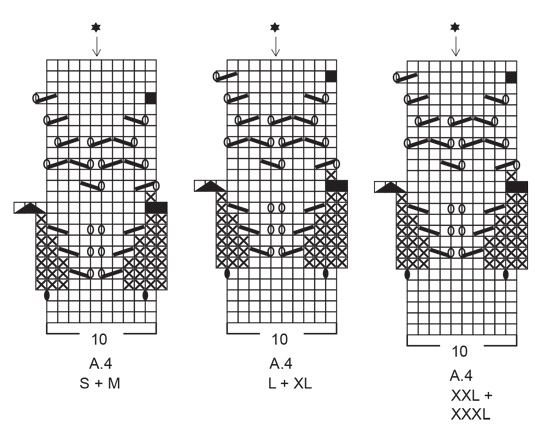
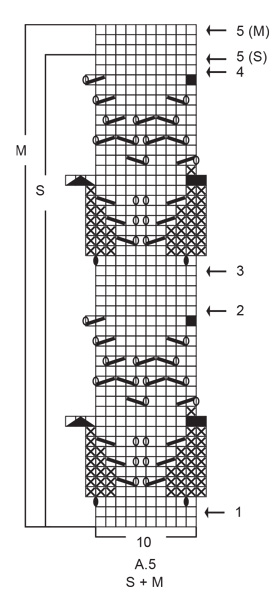
---------------------------------------------------------- TECNICHE IMPIEGATE: ---------------------------------------------------------- PUNTO LEGACCIO (in tondo): 1 costa a legaccio = 2 giri. Lavorare 1 giro a diritto e 1 giro a rovescio. MOTIVO: Vedere i diagrammi da A.1 a A.5. Seguire i diagrammi corrispondenti alla propria taglia (per i diagrammi A.4 e A.5). SUGGERIMENTO PER GLI AUMENTI (per le maniche): Lavorare finché non rimane 1 maglia prima del segno, 1 maglia gettata, 2 maglie diritto (il segno si trova al centro di queste 2 maglie), 1 maglia gettata. Sul giro successivo, lavorare le maglie gettate ritorte per evitare che si formino dei buchi. Lavorare le nuove maglie a maglia rasata/ seguendo il motivo. SUGGERIMENTO PER LE DIMINUZIONI (a intervalli regolari): Per calcolare ogni quante maglie diminuire, dividere il numero complessivo delle maglie (p.es: 238 maglie) per il numero di diminuzioni da fare (p.es 38) = 6,3. Quindi, in questo esempio, per diminuire lavorare insieme ogni 5a e 6a maglia circa. ---------------------------------------------------------- IL LAVORO INIZIA QUI: ---------------------------------------------------------- MAGLIONE - BREVI INDICAZIONI PER IL LAVORO: Si lavora in tondo sui ferri circolari a partire dal centro sul dietro, dal basso verso l’alto fino agli scalfi. Lavorare le maniche in tondo sui ferri a doppia punta/ferri circolari corti, dal basso verso l’alto. Riportare poi le maglie del davanti / dietro e delle maniche sugli stessi ferri e finire lo sprone in tondo. DAVANTI E DIETRO: Avviare 160-170-190-200-220-240 maglie sui ferri circolari n° 5 con il filato Air. Lavorare 2 coste a PUNTO LEGACCIO - vedere le spiegazioni sopra. Passare ai ferri circolari n° 5,5 e lavorare come segue: Lavorare il diagramma A.2 su tutte le maglie (= 16-17-19-20-22-24 ripetizioni di 10 maglie). Proseguire finché il diagramma A.2 non è stato lavorato una volta in verticale. Proseguire a maglia rasata finché il lavoro non misura 12-12-13-14-13-13 cm (o fino alla misura necessaria - aggiustare qui alla lunghezza necessaria) - RICORDARSI DI MANTENERE LA CORRETTA TENSIONE DEL LAVORO! Lavorare il giro successivo come segue: diagramma A.4 su tutte le maglie (= 16-17-19-20-22-24 ripetizioni di 10 maglie). Proseguire in questo modo finché il diagramma A.4 non è stato lavorato 1 volta in verticale. Ripetere il diagramma A.4 ancora 1 volta in verticale, ma lavorare l’ultimo giro come segue: Lavorare 37-39-43-46-50-54 maglie come prima (= metà dietro), intrecciare le 6-6-8-8-10-12 maglie successive per lo scalfo, lavorare 74-80-88-92-100-108 maglie come prima (= davanti), intrecciare le 6-6-8-8-10-12 maglie successive per lo scalfo e lavorare le ultime 37-39-43-46-50-54 maglie come prima (= metà dietro) = 148-158-174-184-200-216 maglie. Il lavoro misura circa 32-32-33-34-35-35 cm. Lasciare il lavoro in sospeso e lavorare le maniche. MANICHE: Avviare 31-33-35-37-39-41 maglie sui ferri a doppia punta n° 5 con il filato Air. Lavorare 2 coste a legaccio. Inserire 1 segno all’inizio del giro; il segno segue il lavoro e servirà più avanti per gli aumenti al centro, sotto la manica. Passare ai ferri a doppia punta/ferri circolari n° 5,5. Lavorare il giro successivo come segue: 0-1-2-3-4-0 maglie diritto, diagramma A.1 sulle 10 maglie successive, ripetere il diagramma A.2 finché non rimangono 1-2-3-4-5-1 maglie (= 2-2-2-2-2-3 ripetizioni di 10 maglie), diagramma A.3 sulla maglia successiva, finire lavorando 0-1-2-3-4-0 maglie a diritto. Proseguire in questo modo finché i diagrammi da A.1 a A.3 non sono stati lavorati 1 volta in verticale. Proseguire a maglia rasata - RICORDARSI DI MANTENERE LA CORRETTA TENSIONE DEL LAVORO! Quando il lavoro misura 7-7-8-7-9-8 cm, aumentare 1 maglia da ciascun lato del segno al centro, sotto la manica - vedere il SUGGERIMENTO PER GLI AUMENTI. Aumentare in questo modo ogni 3½-2½-2-2-1½-1½ cm 10-12-14-15-16-16 volte in tutto = 51-57-63-67-71-73 maglie. ALLO STESSO TEMPO, quando il lavoro misura 21-19-19-18-16-14 cm (o la misura necessaria - aggiustare qui la lunghezza della manica se necessario), lavorare il diagramma A.4 su tutte le maglie – assicurarsi che la maglia con la stella coincida con la maglia centrale della manica e aggiustare il motivo da ciascun lato, di conseguenza. Quindi quando sono terminati gli aumenti sotto la manica, si lavora come segue: 0-3-1-3-0-1 maglie diritto, diagramma A.4 (= 5-5-6-6-7-7 ripetizioni di 10 maglie) e 1-4-2-4-1-2 maglie diritto. Lavorare a maglia rasata le maglie che non possono essere lavorate seguendo il motivo, e lavorare le maglie aumentate seguendo il diagramma A.4 (assicurarsi che nel motivo, il numero delle diminuzioni e quello delle maglie gettate sia uguale). Proseguire in questo modo finché il diagramma A.4 non è stato lavorato 1 volta in verticale. Ripetere il diagramma A.4 ancora 1 volta in verticale, ma lavorare l’ultimo giro come segue: Intrecciare le prime 3-3-4-4-5-6 maglie, lavorare 45-51-55-59-61-61 maglie come prima e intrecciare le ultime 3-3-4-4-5-6 maglie = 45-51-55-59-61-61 maglie. Il lavoro misura circa 41-39-39-38-38-36 cm (misure più corte nelle taglie più grandi perché lo sprone è più lungo). Lasciare il lavoro in sospeso e lavorare l’altra manica in modo uguale. SPRONE: Portare le maglie delle maniche sugli stessi ferri circolari n° 5,5 del davanti / dietro dove sono state intrecciate le maglie per gli scalfi = 238-260-284-302-322-338 maglie. DA ADESSO IN AVANTI, MISURARE IL LAVORO DA QUESTO PUNTO ! Lavorare il diagramma A.5 su tutte le maglie - ALLO STESSO TEMPO, sul giro indicato dalla freccia nel diagramma A.5, diminuire a intervalli regolari come spiegato di seguito: FRECCIA -1: Diminuire 38-40-44-42-42-38 maglie a intervalli regolari - vedere il SUGGERIMENTO PER LE DIMINUZIONI = 200-220-240-260-280-300 maglie. (rimangono sufficienti maglie per lavorare il diagramma A.5 20-22-24-26-28-30 volte in larghezza). FRECCIA -2: Diminuire 40-50-50-50-40-40 maglie a intervalli regolari = 160-170-190-210-240-260 maglie. (rimangono sufficienti maglie per lavorare il diagramma A.5 16-17-19-21-24-26 volte in larghezza). FRECCIA -3: Diminuire 40-40-40-40-40-40 maglie a intervalli regolari = 120-130-150-170-200-220 maglie. (rimangono sufficienti maglie per lavorare il diagramma A.5 12-13-15-17-20-22 volte in larghezza). FRECCIA -4: Diminuire 28-30-42-30-40-40 maglie a intervalli regolari = 92-100-108-140-160-180 maglie. FRECCIA -5: Diminuire 16-20-18-28-42-30 maglie a intervalli regolari = 76-80-90-112-118-150 maglie. TAGLIE: XL-XXL: FRECCIA -6: Diminuire 18-20 maglie a intervalli regolari = 94-98 maglie. TAGLIA XXXL: FRECCIA -6: Diminuire 28 maglie a intervalli regolari = 122 maglie. FRECCIA -7: Diminuire 20 maglie a intervalli regolari = 102 maglie. PER TUTTE LE TAGLIE: Dopo aver completato il diagramma A.5, lo sprone misura circa 20-22-23-24-25-27 cm e ci sono 76-80-90-94-98-102 maglie. Passare ai ferri circolari n° 5 e lavorare 2 coste a legaccio. Intrecciare le maglie senza stringere troppo il filo (usare ferro di misura più grande se necessario). CONFEZIONE: Cucire le aperture sotto le maniche. |
||||||||||||||||||||||||||||||||||
Spiegazioni del diagramma |
||||||||||||||||||||||||||||||||||
|
||||||||||||||||||||||||||||||||||

|
||||||||||||||||||||||||||||||||||
|
||||||||||||||||||||||||||||||||||
|
||||||||||||||||||||||||||||||||||

|
||||||||||||||||||||||||||||||||||

|
||||||||||||||||||||||||||||||||||

|
||||||||||||||||||||||||||||||||||
|
Avete realizzato questo o un altro dei nostri modelli? Taggate le vostre foto nei social media con #dropsdesign in modo che possiamo vederle! Avete bisogno di aiuto con questo modello?Troverete video tutorial, una sezione per i commenti/domande e molto altro guardando il modello su www.garnstudio.com © 1982-2024 DROPS Design A/S. Ci riserviamo tutti i diritti. Questo documento, compreso tutte le sue sotto-sezioni, è protetto dalle leggi sul copyright. Potete leggere quello che potete fare con i nostri modelli alla fine di ogni modello sul nostro sito. |
||||||||||||||||||||||||||||||||||


Con oltre 40 anni di esperienza nel design di modelli di maglia e uncinetto, DROPS Design offre la più estesa collezione di modelli gratuiti su internet - tradotti in 17 lingue. Ad oggi vi possiamo fornire 304 cataloghi e 11422 modelli - 8666 dei quali sono tradotti in Italiano.
Ci stiamo impegnando molto per darvi il meglio che vi possiamo offrire in termini di maglia e uncinetto, ispirazioni e consigli così come filati di grande qualità ad un prezzo incredibile! Volete utilizzare i nostri modelli per qualcosa d'altro oltre al vostro uso personale? Potete leggere tutto ciò che è consentito nel testo sul Copyright in basso su tutte le pagine dei nostri modelli. Buon lavoro!
Commenti / Domande (25)
Hej, jeg har fundet løsningen= a.5 er 2x a.4 i højden, så se bare bort fra mit tidliger spørgsmål. God dag til jer. MVH
12.04.2023 - 10:05DROPS Design answered:
Godt at høre :)
13.04.2023 - 11:22Hello! I am making pattern 202-11 for the second time & I just noticed something. Under the “Yoke” instructions it says to decrease 38 stitches on the A.5 stitch chart on Row 2. But then on A.5, Row 3 you increase 40 stitches. I’m confused because it just seems easier to increase just 2 stitches on Row 3. Let me know what you think. Thank you!!! I’m trying to happy knit haha.
11.10.2022 - 01:27DROPS Design answered:
Dear Mrs Castaneda, the stitches increased on row 3 in A.5 will be decreased on row 11, since they belong to the pattern - decrease 38 sts on row with the arrow (row 2), then work pattern as shown in diagram (increasing 2 sts in each repeat then decreasing these 2 sts in each repeat) and continue decreasing evenly on each row with an arrow as explained in the written pattern. Happy knitting!
11.10.2022 - 08:04Hello again! I didn’t state my previous question good enough. The decreases I am wondering about are in the yoke section. I am supposed to decrease 38-40 stitches and I don’t know where to decrease them in the design of the lacework without it affecting the look of the lacework pattern. I see that the lacework sections decrease each time the decreases are made . I know how to calculate how to calculate how often to do the decreases
10.08.2022 - 17:57DROPS Design answered:
Dear Mrs Castaneda, you have to decrease the stitches evenly on a same round - read more here. This means the pattern won't repeat in height exactly over each other as in the diagram but you will then have the correct number of stitches to repeat the diagrams in width. Happy knitting!
11.08.2022 - 10:35Hello! Regarding the yoke decreasing in pattern 202-11. I understand how to calculate how often to decrease the stitches. I’m not understanding how to decrease in the lacework charts A5. Decreasing in the charts doesn’t leave me enough stitches to do each repetition. I understand that the number of repetitions will be decreased, I just don’t get how to work A5 pattern with less stitches.
10.08.2022 - 09:24DROPS Design answered:
Dear Mrs Castaneda, you should have enough stitches in each size to repeat A.5 as explained, please note that you should increase 2 sts in each A.5 before working the lace pattern (with the purled stitches), then decrease 2 sts in each A.5 on the last row of this section. Hope it can help, happy knitting!
10.08.2022 - 16:12Previous question correction haha! What is the vertical height of A4? And the vertical height of A5? And how many vertical times is the A4 section repeated on the body and the sleeves? Thank you!
06.08.2022 - 07:06DROPS Design answered:
Dear Cathie, A.4 is repeated twice in the body and the sleeves vertically. Its length depends on the size: for size XXL A.4 is longer than for size S. For sizes S-XL it's 24 rows; for sizes XXL and XXXL it's 25 rows. Remember to work with the correct gauge so that you will have enough cm to reach the armhole with just 2 repeats of A.4. A.5 measures between 20 and 27 cm depending on the size (the number of rows to work will depend on the size you are working). Happy knitting!
07.08.2022 - 23:00Another question on pattern 202-11. What is the of A4 ? And A5?
06.08.2022 - 07:00DROPS Design answered:
Dear Cathie, please see answer above.
07.08.2022 - 23:00202-11: In the body, it appears A4 is only worked twice (which equals approximately 12 1/2”) before combining the body with the sleeves. In the sleeve directions it states to work A4 three times on the sleeves before working the yoke & sleeve together. In the 202-11 photo there are 3 sections of A4 on the body (not 2), not 3 like the sleeves. Am I missing working a 3rd repitition of A4 on the body?
05.08.2022 - 22:10DROPS Design answered:
Dear Cathie, you work A.4 twice in the sleeves and body (in the sleeves it says to work A.4 until finishing vertically and then repeat 1 more times = 2 in total). Remember that you start working A.4 in the body when the piece measures approx. 12 cm (in size S). One repeat is approx. 10 cm in vertical (24 rows for size S, for example), so 2 repeats are 20 cm approx. As you can see, the body up to the yoke measures 31 cm for size S (see measurements schematic below the pattern charts) so with 2 repeats of A.4 you have already reached the armhole. Happy knitting!
07.08.2022 - 23:00I have been trying to get the correct knitting gauge. I have had to knit this pattern with size 11 needles to get the gauge. which seems way too big. The gauge works out to 4 stitches per inch. I think 4 stitches per inch is too few stitches with using ‘C’ weight yarn. That gauge is more when using bulky weight yarn. Any answers? I’m wondering if there could be an error in the printing of the knitting gauge. Thank you!
22.07.2022 - 22:43DROPS Design answered:
Hi Cathie, the pattern is correct. Please remember there is no correct needle size; everyone’s knitting is different. Needle size is only a suggestion! If you have too many stitches on 10 cm switch to larger needles. If you have too few stitches on 10 cm switch to smaller needles. For more information please see the lesson Drops HERE. Happy knitting!
24.07.2022 - 14:32Jeg skal gentage mønster diagram A4, men skal tage masker ud på 5 pind i diagrammet, hvis jeg gør det i gentagelsen, så bliver hver diagram på 12 masker i stedet for de 10 masker som diagrammet er på, det kommer jo ikke til at passe sammen, så hvad gør jeg , tager masker ud og strikker dem ret på hver side af diagrammet, eller skal jeg ikke tage ud, så diagram stadig passer i maskeantal
29.05.2021 - 23:38DROPS Design answered:
Hei Eva. Du øker med 1 kast, slik det er beskrevet i diagrammet, du vil da på neste omgang ha 12 masker pr rapport av diagram A.4. De nye maskene strikkes som vist i diagrammet (vrang). Ved 13. omg (str. L+XL) minskes maskeantallet og du vil igjen ha 10 masker pr rapport. Bruk gjerne maskemarkører (tråd) mellom hver rapport, så får man en bedre oversikt. mvh DROPS design
31.05.2021 - 09:53Hi I have this pattern and bought 350g of Drops Big Merino group C yarn - to knit the large size. The tension is fine based on 17 x 22 on the yarn with 5mm needles and 16 x 20 on the pattern with 5.5. needles. However, I have already used up 2 balls and have barely started. Just a few rows past the bottom patterned piece. Is this weight correct? If I need to buy more I will need to do it soon to hopefully get the same dye lot.
26.01.2021 - 12:31DROPS Design answered:
Dear HilaryHilary, both yarn have different meterages, you have to calculate the total amount of yarn required from the total meterage in Air and the meterage of Big Merino - use our yarn converter or read more here. So that in size L you need 350 g DROPS Air but 700 g DROPS Big Merino - 1 ball Air is approx. 150 m while 1 ball Big Merino is approx. 75 m. Happy knitting!
26.01.2021 - 14:47