
Categorías populares
¿Buscas un hilo?


Comentarios / Preguntas (92)
![]() Emiliep escribió:
Emiliep escribió:
Je dis ça car à compter du rang 10 il reste 6 rang à faire pour 10 motifs centraux ?
20.05.2018 - 21:54
![]() Emiliep escribió:
Emiliep escribió:
Bonjour, le diagramme est A1b est faux, non ? il comporte une ligne de plus que le A1a sur les motifs centraux ?
20.05.2018 - 21:46DROPS Design respondió:
Bonjour Emiliep, je compte bien 16 rangs pour A.1b et autant pour A.1a. Bon crochet!
22.05.2018 - 08:46Nourhan Osama escribió:
Continue A.3 in the round (repeat the 9 rounds vertically) until square measures 68-70-72-74-76-78 cm in the part of jacket , do you mean about vertically that i work in 2 corner back and forth OR in the 4 corner like before ?thanks and sorry for more question
15.05.2018 - 07:55DROPS Design respondió:
Dear Mrs Osama, you continue working A.3, ie you repeat the 9 rows in A.3 (= in height) over all sts in the round until square measures 68-70-72-74-76-78 cm x 68-70-72-74-76-78 cm. Happy crocheting!
15.05.2018 - 09:41Nourhan Osama escribió:
I am sorry , but i don't understand about the measures ,, like the first in Jacket ( When entire diagram A.2a and A.2b have been worked, square measures approx. 36 x 36 cm / 14 1/4" x 14 1/4''.) what this numbers /14 1/4" * 14 1/4" is refers to ?
14.05.2018 - 06:33DROPS Design respondió:
Hi Nourham, The first measurement (36 x 36) is in centimetres, the second measurement (14 1/4 x 14 1/4) is in inches. Happy crocheting!
14.05.2018 - 08:09Nourhan Osama escribió:
In round 17 you begin with a rectangle 4 chain stitches but i don't see it in the picture of jacket you are done,, can i dispensing this rectangle ??
07.05.2018 - 10:21DROPS Design respondió:
Dear Mrs Osama, this is the 17th symbol under diagram text (which looks like a square there), ie: round begins with 4 chain stitches and finishes with 1 slip stitch in 4th chain stitch at beginning of round Fasten off. Begin next round around chain space between the last treble group worked - fasten yarn with 1 slip stitch in chain space. Happy crocheting!
07.05.2018 - 10:48
![]() Mary Houlihan escribió:
Mary Houlihan escribió:
Would you say this pattern is only for the ‘experienced’ crocheter?
05.05.2018 - 02:22DROPS Design respondió:
Dear Mary, I would say this is for the intermediate. As it appears to be complicated, and there are a number of stitches and stitch combinations to follow, and you have to be able to read the chart. However the chart you help you visually what stitch / stitch combination goes where, and the most complicated stitch is a triple trble, and two trebles worked together. There are turtorials to help you (links on the left, just below the picture, and do not forget, you can always ask for help on person in the store you bought your DROPS yarn from. Happy Crafting!
06.05.2018 - 08:57
![]() Evelyne escribió:
Evelyne escribió:
Bonjour j'essaie desperement de faire ce modèle et pour une novice comme moi je ne parviens pas à comprendre le diagramme existe t'il des explications plus détaillées? Merci pour votre réponse
03.05.2018 - 16:10DROPS Design respondió:
Bonjour Evelyne, n 'hésitez pas à poser vos questions ici, ou, pour toute aide complémentaire individuelle, merci de contacter le magasin où vous avez acheté votre fil. Bon tricot!
04.05.2018 - 08:27
![]() Sue Towler escribió:
Sue Towler escribió:
Hi,I\'m really confused with your chart. I have 16 stitches after round 3, but your symbol says I should have 14? Also, why is there a space between the treble stitches on round 4? You have 3 then a big gap before making 11 more. It doesn\\\'t look like the crochet charts I\\\'m used to.
02.05.2018 - 18:28DROPS Design respondió:
Dear Mrs Towler, at the end of row 3 you should have *5 ch, 11 tr in the ch-space and 3 tr in 4-ch-space* x 4. (= 4 repeats of A.1) + the 3 ch from beg of round. There are some gaps in the chart due to the placement of symbols, simply follow symbols in diagram as they appear. For any individual assistance reading diagrams, you are welcome to contact the store where you bought your yarn. Happy crocheting!
03.05.2018 - 09:05Nourhan Osama escribió:
My queastion about the step between 5th and 6th round .....in th 5th round in figure A.1b i will make 3 chains 12 times between every single crochet in stitches ,, but do i make 3 chain then slip stitch it or make single crochet ? and Then i finish it,,and go above the 5 chain stitches do i make slip stitches in it also or make 5 chain st ?
28.04.2018 - 22:28DROPS Design respondió:
Dear Mrs Osama, on round 5 you repeat only 11 times (1 sc, 3 ch), then work 1 sc in last ch-space and work now 5 ch and repeat round from beg: (1 sc, 3 ch) x 11, 1 sc in last ch-space, 5 ch. At the end of round, after the last 5 ch, work 1 sl st in 1st ch from beg of round, then work sl st to the first ch-space (as at the beg of round 4). Happy crocheting!
30.04.2018 - 10:24Nourhan Osama escribió:
What is the different between those two symbols?? /symbols/069.gif= round begins with 3 chain stitches and finishes with 1 slip stitch in 3rd chain stitch at beginning of round = round begins with 3 chain stitches and finishes with 1 slip stitch in 3rd chain stitch at beginning of round, then work slip stitches until first chain space i can\'t understand it clearly .. and thank you for your effort
25.04.2018 - 22:15DROPS Design respondió:
Dear Mrs Osama, in the first one you start with 3 ch and finish with 1 sl st in 3rd ch from beg of round, for the 2nd one you will start the same way but at the end of round, after joining with a sl st in 3rd ch from beg of round you will now work sl st until first ch-space so that next round starts in the first ch-space on previous round. Happy crocheting!
26.04.2018 - 08:45
|
|||||||||||||||||||||||||||||||||||||||||||||||||||||||||||||||||||||||||||||||||||||
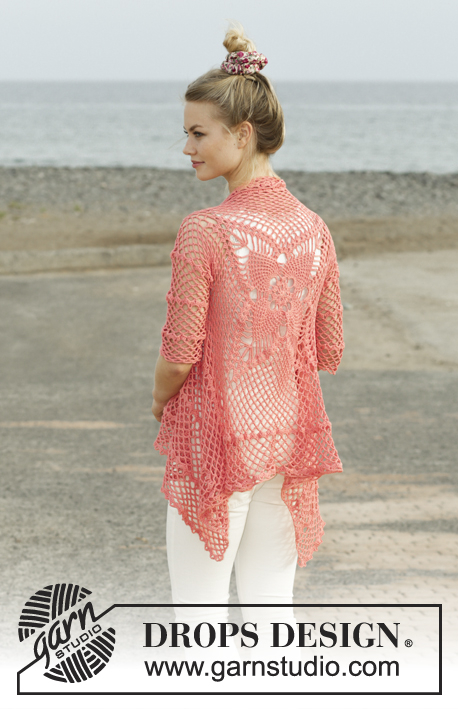
Butterfly Queen#butterflyqueenjacket |
|||||||||||||||||||||||||||||||||||||||||||||||||||||||||||||||||||||||||||||||||||||
 |
 |
||||||||||||||||||||||||||||||||||||||||||||||||||||||||||||||||||||||||||||||||||||
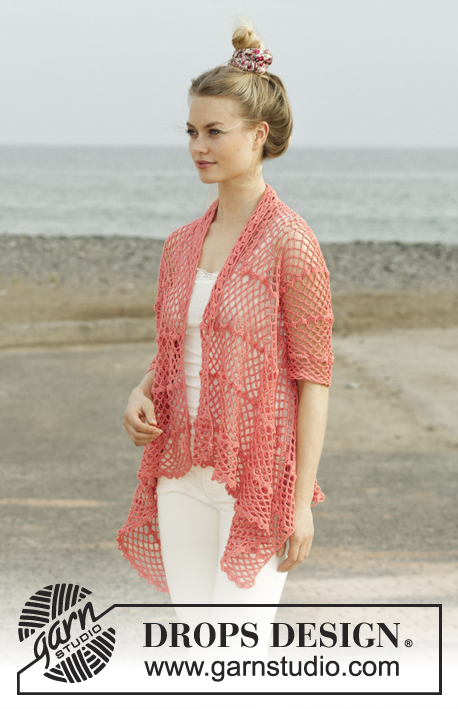
Chaqueta a ganchillo trabajada en un cuadrado con patrón de calados. Talla: S - XXXL. La prenda está realizada en DROPS Flora.
DROPS 186-11 |
|||||||||||||||||||||||||||||||||||||||||||||||||||||||||||||||||||||||||||||||||||||
|
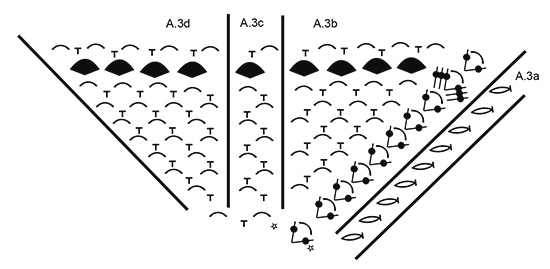
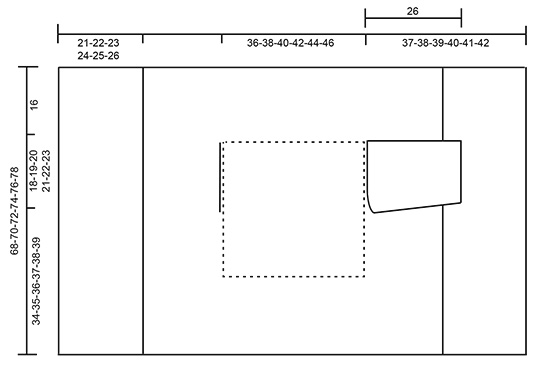
INFORMACIÓN PARA REALIZAR EL PATRÓN: PATRÓN: Ver los diagramas A.1 a A.4. INFORMACIÓN PARA TRABAJAR A GANCHILLO (aplicar a A.4): Sustituir el primer punto bajo al inicio de la vuelta por 1 punto de cadeneta. Sustituir el primer punto alto triple al inicio de la vuelta por 5 puntos de cadeneta. TIP PARA LAS DISMINUCIONES (aplicar al centro bajo la manga): Trabajar 5 puntos de cadeneta, saltar 1 punto bajo + 1 arco de cadeneta, trabajar 1 punto bajo alrededor del siguiente arco de cadeneta + 1 arco de cadeneta (= 1 repetición disminuida), continuar el patrón como antes hasta que quede 1 arco de cadeneta + 1 punto bajo en la fila anterior, saltar estos puntos y finalizar con 1 punto alto doble en el primer punto de cadeneta de la fila anterior ( = 1 repetición disminuida). ---------------------------------------------------------- CHAQUETA: Trabajar en redondo desde la mitad de la espalda y hacia fuera como un cuadrado. Después trabajar de ida y vuelta los delanteros. Trabajar las mangas de ida y vuelta desde el cuerpo, después coserlas bajo la manga. Trabajar 4 puntos de cadeneta con 1 ganchillo de 3.5 mm y Flora y formar un anillo con 1 punto enano en el 1er punto de cadeneta. Después trabajar el patrón en redondo según el diagrama A.1b un total de 4 veces en la vuelta - el diagrama A.1a muestra cómo comienzan y terminan las vueltas y se trabaja complementando a A.1b. RECORDAR MANTENER LA TENSIÓN DEL GANCHILLO! Cuando los diagramas A.1a y A.1b se hayan completado, cortar el hilo, y comenzar la siguiente vuelta alrededor del arco de cadenetas entre el último grupo de puntos altos trabajado y asegurar el hilo con 1 punto enano en este arco de cadenetas. Ahora trabajar en redondo según el diagrama A.2 como sigue: * Trabajar A.2b, repetir A.2c 7 veces en horizontal, A.2d*, repetir de * a * 4 veces en total en la vuelta - el diagrama A.2a muestra cómo comienzan y finalizan las vueltas y se trabaja complementando a A.2b/c/d. Cuando se hayan completado los diagramas A.2a y A.2b, el cuadrado mide aprox. 36 x 36 cm. Hay ahora 4 arcos de cadenetas en las esquinas ( 1 punto alto + 6 puntos de cadeneta + 1 punto alto) y 15 arcos de cadeneta en cada lado del cuadrado. LEER EL RESTO DEL CUERPO ANTES DE CONTINUAR! Continuar trabajando como sigue: *A.3b alrededor del arco de la esquina, repetir A.3c hasta que quede 1 arco de cadenetas antes de la esquina, trabajar A.3d alrededor del siguiente arco de cadenetas*, repetir de * a * un total de 4 veces en la vuelta - el diagrama A.3a muestra cómo comienzan y terminan las vueltas y se trabaja complementando a A.3b/c/d. AL MISMO TIEMPO cuando la labor mida aprox. 36-38-40-42-44-46 cm x 36-38-40-42-44-46 cm trabajar las sisas como sigue: Trabajar A.3 como antes hasta la 1ª esquina, trabajar alrededor del arco de cadenetas como antes. Ahora trabajar puntos de cadeneta hasta la mitad del siguiente lado (es decir, en el medio entre la 1ª y 2ª esquina) como sigue: Trabajar 1 punto de cadeneta por cada punto de cadeneta/ punto bajo saltado. Después trabajar el patrón como antes hasta la mitad entre la 3ª y 4ª esquina. Ahora trabajar puntos de cadeneta hasta la 4ª esquina como sigue: Trabajar 1 punto de cadeneta por cada punto de cadeneta/ punto bajo saltado, trabajar alrededor del arco de cadenetas en la esquina y el resto de la vuelta como antes. En la siguiente vuelta trabajar A.3 como antes sobre todos los puntos otra vez ( es decir, ajustar el patrón sobre las sisas para que la vuelta quede correcta). Continuar A.3 en redondo (repetir las 9 vueltas en vertical) hasta que el cuadrado mida 68-70-72-74-76-78 cm x 68-70-72-74-76-78 cm (es decir, aprox. 16 cm desde la sisa en todas las tallas) - ajustar para finalizar con una vuelta de puntos altos. Cortar el hilo e insertar 1 marcapuntos en la labor ( entre la 1ª y la 2ª esquina). DELANTERO: Ahora trabajar de ida y vuelta entre la 1ª y la 2ª esquina. NOTA! Trabajar los delanteros sin aumentos. Leer INFORMACIÓN PARA TRABAJAR A GANCHILLO! Trabajar A.4a alrededor de la esquina, repetir A.4b hasta que quede 1 arco de cadeneta antes de la esquina, trabajar A.4c alrededor de este arco de cadenetas y alrededor de la esquina. Continuar el patrón como se muestra en el diagrama y repetir A.4 en vertical hasta que la fila de puntos altos se haya trabajado 2 veces en vertical, después repetir sólo las filas con arcos de cadenetas hasta que la labor mida aprox. 19-20-21-22-23-24 cm desde el marcapuntos, después trabajar la fila de puntos altos 1 vez en todas las tallas. La labor mide ahora 21-22-23-24-25-26 cm desde el marcapuntos. Asegurar. Trabajar de la misma manera en el otro lado (es decir, de ida y vuelta entre la 3ª y la 4ª esquina). MANGA: Trabajar la manga directamente desde la sisa en el cuerpo. Trabajar de ida y vuelta, de arriba a abajo y coser al finalizar. Comenzar en el centro bajo la manga y trabajar como sigue: Recordar la INFORMACIÓN PARA TRABAJAR A GANCHILLO! Trabajar A.4a alrededor del 1er arco de cadenetas, repetir A.4b un total de 15-16-17-18-19-20 veces en horizontal (ajustar para distribuir A.4b proporcionalmente a lo largo de la sisa, es decir, trabajar 2 arcos de cadeneta alrededor del mismo arco de cadeneta o saltar 1 arco de cadeneta), trabajar A.4c alrededor de los últimos 2 arcos de cadeneta. Continuar con A.4 de ida y vuelta - AL MISMO TIEMPO cuando la labor mida 4 cm (ajustar para que la siguiente fila a trabajar sea de puntos de cadenetas/ puntos bajos) disminuir 1 repetición a cada lado - leer TIP PARA LAS DISMINUCIONES. Disminuir de esta manera aprox. cada 8-8-8-6-6-6 cm un total de 3-3-3-4-4-4 veces = 12-13-14-15-16-17 arcos de cadeneta de 6 puntos después de la última disminución. Continuar hasta que la labor mida aprox. 28 cm en todas las tallas - finalizar después de una fila de arcos de cadeneta. Asegurar. Trabajar la otra manga de la misma manera en el otro lado de la labor. TERMINACIÓN: Hacer las costuras bajo las mangas, coser los puntos más externos y asegurarse de que la costura no tense la prenda. |
|||||||||||||||||||||||||||||||||||||||||||||||||||||||||||||||||||||||||||||||||||||
Explicaciones del diagrama |
|||||||||||||||||||||||||||||||||||||||||||||||||||||||||||||||||||||||||||||||||||||
|
|||||||||||||||||||||||||||||||||||||||||||||||||||||||||||||||||||||||||||||||||||||
 |
|||||||||||||||||||||||||||||||||||||||||||||||||||||||||||||||||||||||||||||||||||||
 |
|||||||||||||||||||||||||||||||||||||||||||||||||||||||||||||||||||||||||||||||||||||
 |
|||||||||||||||||||||||||||||||||||||||||||||||||||||||||||||||||||||||||||||||||||||
 |
|||||||||||||||||||||||||||||||||||||||||||||||||||||||||||||||||||||||||||||||||||||
¿Terminaste este patrón?Entonces, etiqueta tus fotos con #dropspattern #butterflyqueenjacket o envíalas a la galería #dropsfan. ¿Necesitas ayuda con este patrón?Encontrarás 12 videos tutoriales, un espacio para comentarios/preguntas y más visitando la página del patrón en garnstudio.com © 1982-2026 DROPS Design A/S. Todos los derechos reservados. Este documento, incluyendo todas sus sub-secciones, está protegido por los derechos de autor (copyright). Lee más acerca de lo que puedes hacer con nuestros patrones en la parte de abajo de cada patrón de nuestro sitio. |
|||||||||||||||||||||||||||||||||||||||||||||||||||||||||||||||||||||||||||||||||||||


Con más de 40 años en el diseño de modelos de punto y de ganchillo, DROPS Design ofrece una de las más vastas colecciones de patrones gratuitos en el internet - traducidos en 17 idiomas. Al día de hoy, contamos con 324 catálogos y 12239 patrones - de los cuales 11619 están traducidos en español.
Nosotros trabajamos con mucho esmero para brindarte lo mejor que las labores de punto y ganchillo tienen para ofrecer,inspiración y consejos, así como hilos de magnífica calidad a precios increíbles! Te gustaría usar nuestros patrones para otro fin además del uso personal? Puedes leer acerca de lo que estás permitida a hacer en el texto de Copyright en la parte de abajo de todos nuestros patrones. Felices labores!
Escribe un comentario sobre DROPS 186-11
¡Nos encantaría saber qué piensas acerca de este patrón!
Si quieres escribir una pregunta referente al patrón, por favor asegúrate de elegir la categoría correcta en el formulario debajo, para acelerar el proceso de respuesta. Los campos obligatorios están marcados con un *.