
Categorías populares
¿Buscas un hilo?


Comentarios / Preguntas (26)
![]() Amanda escribió:
Amanda escribió:
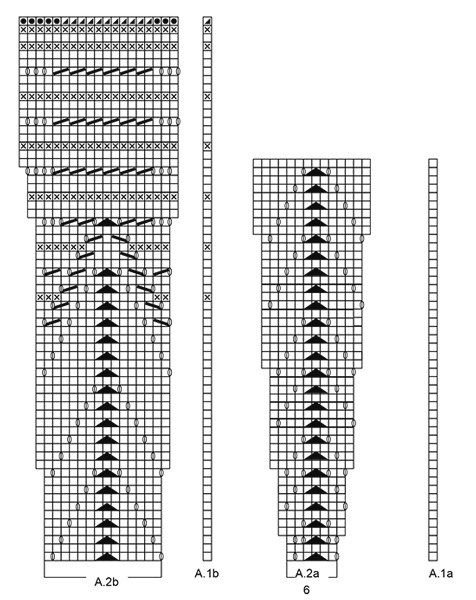
Hej, i början av arbetet ska det sitta två stick markörer i början av arbetet, 3 maskor in. När man sen ska göra omslag ska man göra ett omslag på vardera sida om markörerna, eller vart ska de två ökningarna som beskrivs som att de ska sitta i mitten av arbetet göras?
28.02.2025 - 15:14DROPS Design respondió:
Hej Amanda, du ökar 2 maskor på varje sida om de mittersta 55 maskorna. Yttersta omslaget är alltid innanför 2 rätstickade maskor i varje sida - och de 2 andra omslagen är alltid på varje sida om de mittersta maskorna :)
06.03.2025 - 13:35
![]() Marie escribió:
Marie escribió:
Bonjour. Est-ce normal qu’il n’y ai qu’une seule augmentation à gauche dans le A2b la 3ème fois. Merci pour votre réponse
01.04.2024 - 23:36DROPS Design respondió:
Bonjour Marie, tout à fait, on n'augmente ici qu'une seule maille. Bon tricot!
02.04.2024 - 16:00
![]() Morel escribió:
Morel escribió:
Bonjour Je voudrais savoir si ce magnifique châle peut être transformé en cape ( fermé autour du cou ) Merci beaucoup et bravo pour votre travail 🥰
07.02.2024 - 08:22DROPS Design respondió:
Bonjour Mme Morel, probablement, il vous faudrait juste faire les ajustements nécessaires. Bon tricot!
08.02.2024 - 08:05
![]() Amanda Karlsson escribió:
Amanda Karlsson escribió:
If I am supposed to increase 2 every other row, and knit 62 rows. How does that become 62 increased stitches, wouldn't it be double the amount of rows?
04.03.2023 - 13:48DROPS Design respondió:
Dear Amanda, since you increase 2 stitches every other row you only increase on every 2 rows (for example, on even rows - work 1 row with no increases, work 1 row with increases, work 1 row with no increase, 1 row with increases...). So you increase 2 stitches on 31 rows = 62 stitches increased. Happy knitting!
05.03.2023 - 19:18
![]() Anna escribió:
Anna escribió:
Hei, eg har lagt opp til sjalet, men e usikker på hvordan man øker etter pinne 1 og 2. Skal man strikke 2 masker kast, så strikke 3 masker eller skal man øke 2 masker, kast, strikk 1 og så et kast
26.04.2022 - 20:57DROPS Design respondió:
Hei Anna, Du gjentar pinner 1 og 2. Så pinne 3: 2 masker rille, 1 kast, strikke riller fram til 1. merket, 1 kast, riller fram til 2. merke, 1 kast, riller til det gjenstår 2 masker og 2 masker rille. God fornøyelse!
27.04.2022 - 07:06
![]() Uschi escribió:
Uschi escribió:
Hallo, sind im Diagranm die Hin- und Rückreihen gezeigt, oder stricke ich die Rückreise wie sie auf der Nadel erscheint? Viele Grüße Uschi
25.02.2021 - 23:21DROPS Design respondió:
Liebe Uschi, die Hin- sowie die Rückreihen sind im Diagram gezeichnet, Rückreihen lesen Sie links nach rechts. Viel Spaß beim stricken!
26.02.2021 - 08:24
![]() Brenda escribió:
Brenda escribió:
The graph is wrong. I had to work the pattern to prove it to some one else. Never mind.
06.01.2021 - 19:01
![]() Brenda escribió:
Brenda escribió:
Ok to follow up. When you look at the pattern of adding and decreases the stitches it looks right but with actual knitting the increase is on the inside between the middle SKP and YO. Thus stitches get moved over one and then the YO misses a stitch. Gee this is hard to explain. When I added the extra row. The holes now flowed continuously across the shawl. Maybe you have to do a trial run to figure out what I mean. I repeated mine 3 times. We can zoom?
05.01.2021 - 17:29DROPS Design respondió:
Dear Brenda, the diagrams just should be worked as follows, ie the yarn overs should be worked as shown in the diagram - on which row do you have this kind of worry? To get any individual assistance please feel free to contact your yarn store - even per mail or telephone, showing them your work so that it might be easier for them to see what you did. Happy knitting!
06.01.2021 - 08:13
![]() Brenda escribió:
Brenda escribió:
Hi. I rewrote... You need an extra row so that the YO’s all follow in a row. When you did the extra stitches the yo is ok. The next row after adding the stitches you miss a stitch with the yarn over. Therefore you have to repeat the last row over once more . Ok look at it this way. What I did to get it....Forget the pattern. Just do the YO to follow that pattern to hold the line. The line after the yarn over and on the pattern you miss the continuing the YO holes. You m
05.01.2021 - 15:14
![]() Brenda escribió:
Brenda escribió:
I do have every pattern sectioned off with markers. When you add a stitch there’s a yarn over missing. I can send a picture. There’s a spot where there’s a stitch and no yarn over. The pattern has to be adjusted I think. Unless the yarn over flow shows a separation? Is that it? I know I commented on this before and I’m trying once more to get it to work. I can not
05.01.2021 - 13:39DROPS Design respondió:
Dear Brenda, I'm sorry, I'm not following you - as examples showing the increases: you will increase 2 sts on row 3 in A.2a (= there are 4 yarn overs but only 2 sts are decreased); you will increase 2 sts on row 11 in A.2b working a total of 4 yarn overs but decreasing also only 2 sts. Hope this can help. Happy knitting!
05.01.2021 - 14:43
|
|||||||||||||||||||||||||
Majesty#majestyshawl |
|||||||||||||||||||||||||
 |
 |
||||||||||||||||||||||||
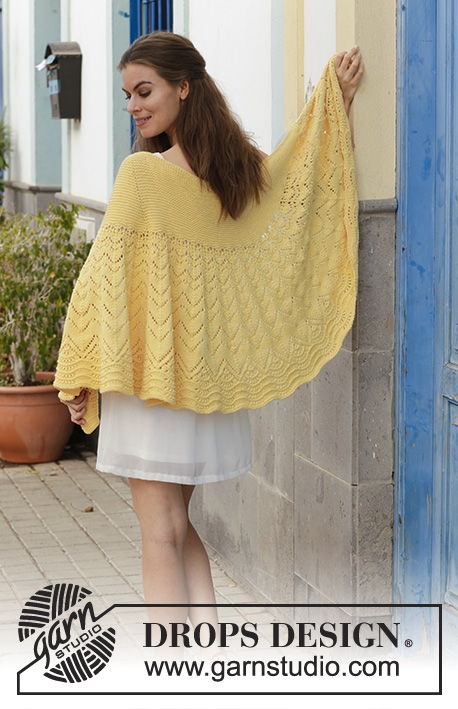
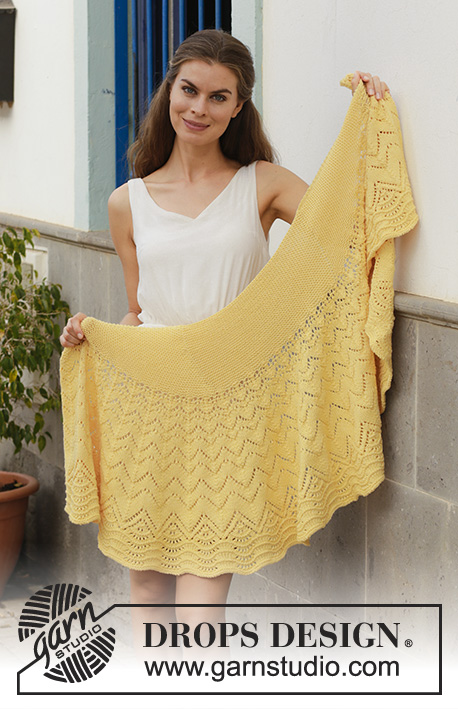
Chal de punto con patrón de calados, patrón de ondas y punto musgo. La prenda está realizada en DROPS Merino Extra Fine.
DROPS 187-23 |
|||||||||||||||||||||||||
|
INFORMACIÓN PARA REALIZAR EL PATRÓN: PUNTO MUSGO (de ida y vuelta): 1 pliegue = 2 filas de derecho. PATRÓN: Ver los diagramas A.1 y A.2. Los diagramas muestran todas las filas del patrón vistas por el lado derecho. ---------------------------------------------------------- CHAL: Trabajar de ida y vuelta en agujas circulares. Montar 61 puntos en agujas circulares de 4 mm con Merino Extra Fine. Insertar 1 marcapuntos a 3 puntos de cada lado (= 55 puntos entre los marcapuntos). Trabajar como sigue: FILA1 (= lado derecho): Trabajar 2 puntos en PUNTO MUSGO - ver explicación arriba, 1 hebra (=1 punto aumentado), trabajar en punto musgo hasta el 1er marcapuntos, 1 hebra antes del marcapuntos (=1 punto aumentado), trabajar 55 puntos en punto musgo (el 2º marcapuntos queda aquí), 1 hebra después del marcapuntos (= 1 punto aumentado), trabajar en punto musgo hasta que queden 2 puntos, 1 hebra (= 1 punto aumentado), finalizar con 2 puntos en punto musgo (= un total de 4 puntos aumentados en la fila). FILA 2 (= lado revés): Trabajar en punto musgo sobre todos los puntos, la primera y la última hebra no se trabajan retorcidas, deben quedar agujeros, las 2 hebras centrales se trabajan retorcidas, NO deben formar agujeros. Es decir, queda 1 fila de ojales dentro de 2 puntos en punto musgo a cada lado de la labor. Repetir las filas 1 y 2. RECUERDE MANTENER LA TENSIÓN DEL TEJIDO! Trabajar un total de 31 pliegues (= 62 filas en total), es decir se han aumentado 62 puntos a cada lado de los 55 puntos centrales = 185 puntos en la fila. La labor mide aprox. 15 cm medidos a lo largo de la dirección del tejido. Trabajar la siguiente fila como sigue por el lado derecho: Trabajar 2 puntos orillo en punto musgo, A.1a sobre el siguiente punto, trabajar A.2a (= 6 puntos) hasta que queden 2 puntos (= un total de 30 veces en horizontal), finalizar con 2 puntos orillo en punto musgo. Continuar el patrón de esta manera. Cuando A.1a y A.2a se hayan trabajado 1 vez en vertical, trabajar A.1b sobre A.1a y A.2b sobre A.2a. Cuando se hayan aumentado todos los puntos de A.2, tendremos 575 puntos en la aguja. Rematar como se explica en el diagrama, rematar con agujas de 1 número más grande si los bordes de remate quedan tensos. |
|||||||||||||||||||||||||
Explicaciones del diagrama |
|||||||||||||||||||||||||
|
|||||||||||||||||||||||||
 |
|||||||||||||||||||||||||
¿Terminaste este patrón?Entonces, etiqueta tus fotos con #dropspattern #majestyshawl o envíalas a la galería #dropsfan. ¿Necesitas ayuda con este patrón?Encontrarás 19 videos tutoriales, un espacio para comentarios/preguntas y más visitando la página del patrón en garnstudio.com © 1982-2026 DROPS Design A/S. Todos los derechos reservados. Este documento, incluyendo todas sus sub-secciones, está protegido por los derechos de autor (copyright). Lee más acerca de lo que puedes hacer con nuestros patrones en la parte de abajo de cada patrón de nuestro sitio. |
|||||||||||||||||||||||||


Con más de 40 años en el diseño de modelos de punto y de ganchillo, DROPS Design ofrece una de las más vastas colecciones de patrones gratuitos en el internet - traducidos en 17 idiomas. Al día de hoy, contamos con 324 catálogos y 12290 patrones - de los cuales 11685 están traducidos en español.
Nosotros trabajamos con mucho esmero para brindarte lo mejor que las labores de punto y ganchillo tienen para ofrecer,inspiración y consejos, así como hilos de magnífica calidad a precios increíbles! Te gustaría usar nuestros patrones para otro fin además del uso personal? Puedes leer acerca de lo que estás permitida a hacer en el texto de Copyright en la parte de abajo de todos nuestros patrones. Felices labores!
Escribe un comentario sobre DROPS 187-23
¡Nos encantaría saber qué piensas acerca de este patrón!
Si quieres escribir una pregunta referente al patrón, por favor asegúrate de elegir la categoría correcta en el formulario debajo, para acelerar el proceso de respuesta. Los campos obligatorios están marcados con un *.