
Categorías populares
¿Buscas un hilo?


Comentarios / Preguntas (57)
![]() Michelle escribió:
Michelle escribió:
Bonjour. Ce modèle m interesse... j aimerais savoir si dans le dos vu qu il n y a pas de photo du dos. il y a de la dentelle ou est ce du jersey? merci 😁😁
25.09.2020 - 13:13DROPS Design respondió:
Bonjour Michelle, le point fantaisie ajouré est le même dans le dos que devant. Bon tricot!
25.09.2020 - 14:38
![]() Richard escribió:
Richard escribió:
HELP! I am in need of 3 x 50g balls of 'Drops Cotton Merino' - Colour 17- Dye Lot 52848. Any help or suggestions, gratefully received. Also, If I make a hat using Cotton Merino, but the pattern calls for 'Fingering Merino' will it make much difference?? Thank you. Richard.
27.01.2020 - 13:12DROPS Design respondió:
Dear Richard, please contact your DROPS store (and more stores if necessary) or even our DROPS Workshop - CottonMerino is a 8 ply/Dk/Worsted yarn - see shadecard - see here all patterns you can use for Cotton Merino. Happy knitting!
27.01.2020 - 14:24
![]() Richard escribió:
Richard escribió:
Sorry, the last comment should read with "I placed the marker to the side (on my RIGHT)!" Thanks.
24.01.2020 - 15:28
![]() Richard escribió:
Richard escribió:
Hi, Thanks for your replies & I've mastered the difficult start - as you say, with double-pointed needles. The raglan decreasing is another matter. As I look at the sleeve (to my left), I have placed a marker on the stitch nearest to the side. I have then placed another marker on the 1st stitch of the side (which is to my left). Now, you say to start 3 stitches before this marker- yes? Where to I start on the sleeve decrease, please.
24.01.2020 - 15:25DROPS Design respondió:
Dear Richard, you should have 1 marker between each piece; so if you look at the sleeve, there is 1 marker at the end of body (either back or front piece) = before the first stitch on sleeve and 1 marker at the end of sleeve, after the last stitch on sleeve = before the first stitch on front/back piece. Start 3 sts before the first of these 2 markers, K2 tog, = 1 stitch remain before marker, work this stitch + the next st (= first after marker) and dec = there are 2 sts decreased at the marker and K2 between the dec (with marker in the middle of these K2). Repeat at each marker. Happy knitting!
24.01.2020 - 16:04
![]() Richard escribió:
Richard escribió:
Hi, once more. I've placed markers at the sleeves & sides & now trying to knit the raglan decreases! I understand the pattern for instructions for the sides, but starting 3 stitches before the marker (does this include the marker), I end up, after the decrease, taking the first stitch of the sleeve. Your assistance once again would be very much appreciated. Thank you. Richard.
24.01.2020 - 12:29DROPS Design respondió:
Dear Richard, there should be 1 stitch on each side of marker on each piece between the raglan decreases, ie you will work at each transition: K2 tog (1 dec), K2 (= Knit the stitch before marker + the stitch after marker), slip 1 as if to K, K1, psso. So starting at the transition between back and one sleeve, you will start (and end) round with K1, Hope it helps, Happy knitting!
24.01.2020 - 14:23
![]() Richard escribió:
Richard escribió:
Good morning. I have completed the body & both sleeves. But now that I have joined them on one needle, I find that when trying to knit the sleeves, the stitches are stretched (almost impossible to do)! I've had to use double-pointed needles to help me out! I don't remember having this trouble when I made the first one of this pattern (in size medium). Please can you help. Thanks. Richard.
24.01.2020 - 10:15DROPS Design respondió:
Dear Richard, that's right, the first few rounds at the beginning of yoke can be somewhat tricky, you can use the double pointed needles or circular needles if you like to, after few rounds, all stitches will have enough place on the circular needle to work them on the round. Happy knitting!
24.01.2020 - 14:08
![]() Richard escribió:
Richard escribió:
Thank you for the reply to my question. I sent a sketch via email, showing how I was knitting the round. So, from what you are saying, I have to knit A1 (1st row), (only for the complete round)! Then for the next round, I have to knit A1 (2nd row), for the complete round! Then 3rd row, 4th row & so on.... This makes sense. Please can you confirm this for me.. Thanks a million. Richard.
13.01.2020 - 20:17DROPS Design respondió:
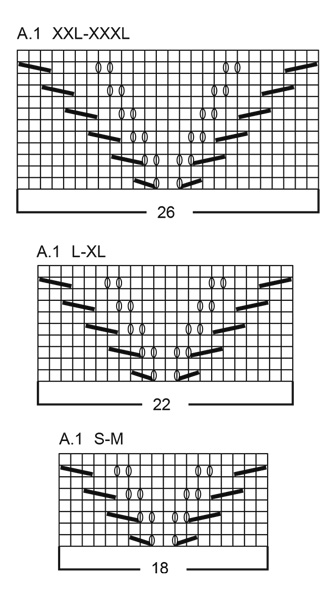
Dear Richard, that's how you should work the diagrams (row 1 in A.1 on all diagrams, then row 2 in A.1 on all diagrams and so on). Happy knitting!
14.01.2020 - 07:50
![]() Richard escribió:
Richard escribió:
Good morning, again. Continuing from the two Ridge rows, I began the round, as per your instructions. But, I find that the *A1* pattern, repeats 3 times (2 with odd row numbers, 1 even row number. in the first half, up to 124 stitches. But for the continuing *A1* pattern, there is only 1 odd number row! But, there are 2 even row numbers! Is this so? Please. Richard. I have made a drawing which explains better. If I may upload it.
13.01.2020 - 11:03DROPS Design respondió:
Dear Richard, not sure I'm getting this properly, when working A.1 in the round, you should work same round in each diagram all the round = round 1 A.1 when working round 1 on yoke, then work round 2 in A.1 and so on. What do I misunderstand?
13.01.2020 - 11:34
![]() Richard escribió:
Richard escribió:
Sadly, (Hi again). I'm still struggling after completing the two ridges! It is written that I knit 20, purl 3 (23 stitches), then *A1 (22 stitches, purl 6! (A1 = 10 rows @22 stitches) = 220 stitches. But adding the first 23 stitches to the 220 stitches = 243 stitches? Yet it is written, that I then purl 6! Doing this gives a total of 249 stitches! What am I doing wrong please? Forgive me, I am nearly 78 years old. Have a good day.
09.01.2020 - 12:22DROPS Design respondió:
Dear Richard, you should work the 248 sts in size L as follows: knit 20, purl 3, *A.1 (= 22 sts), purl 6*, repeat from *-* a total of 2 times (= 28 sts x 2= 56 sts), A.1 (= 22 sts), purl 3, knit 40 , purl 3, repeat from *-* (= 56 sts), A.1 (= 22 sts), purl 3, knit 20 = 20+3 + 56+22 + 3+40+3 + 56+22 +3+20=248 sts. Try to add markers between each section, it can help you to check the number of stitches. Happy knitting!
09.01.2020 - 14:07
![]() Richard escribió:
Richard escribió:
Hi (once again). This should be the last for awhile. I understand the A1 block now, working from the bottom up! But, please tell me: Do I follow the pattern from left to right or right to left?? I ask this, because, I am reading the block from right to left! I don't believe it makes much difference (but, there again, you are the Expert). Thank you. Richard.
07.01.2020 - 22:07DROPS Design respondió:
Dear Richard, diagrams are read bottom up starting from the right corner to the left, ie you will read every row in diagrams from the right towards the left (since you are working in the round) - read more about diagrams here (link is now working). Happy knitting!
08.01.2020 - 09:04
|
|||||||||||||||||||
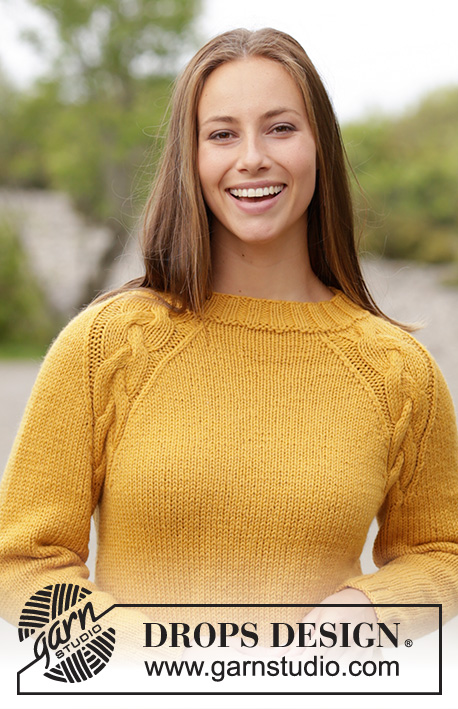
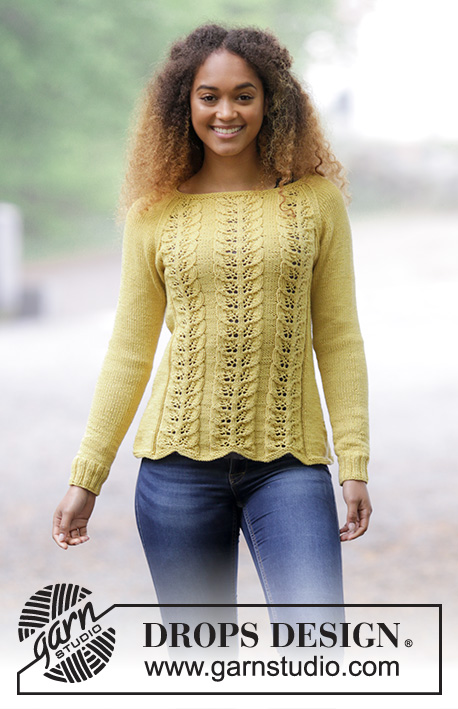
Lemon Parfait#lemonparfaitsweater |
|||||||||||||||||||
 |
 |
||||||||||||||||||
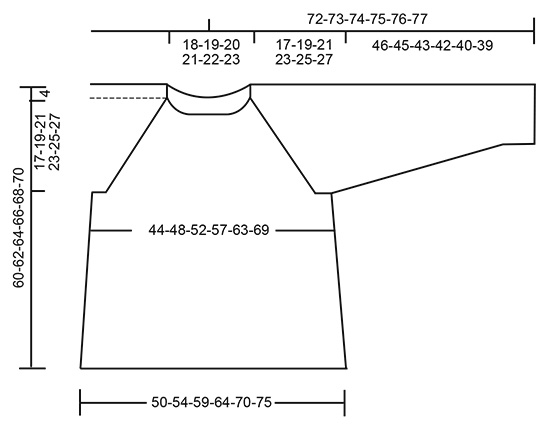
Jersey de punto con patrón de hojas y raglán. Tallas S - XXXL. La prenda está realizada en DROPS Cotton Merino.
DROPS 180-1 |
|||||||||||||||||||
|
INFORMACIÓN PARA REALIZAR EL PATRÓN: PLIEGUE/PUNTO MUSGO (en redondo): 1 pliegue = 2 vueltas. Trabajar 1 vuelta de derecho y 1 vuelta de revés. PATRÓN: Ver el diagrama A.1. Trabajar el diagrama correspondiente a la talla. TIP PARA DISMINUCIONES (aplicar a los lados): Comenzar 3 puntos antes del marcaùntos en el lado: 2 puntos juntos de derecho, 2 derechos (el marcapuntos está entre estos 2 puntos), deslizar 1 punto como de derecho, 1 derecho, pasar el punto deslizado por encima. TIP PARA LOS AUMENTOS: Aumentar como sigue en el centro bajo la manga - comenzar 1 punto antes del marcapuntos: Hacer 1 hebra, 2 derechos (el marcapuntos queda entre estos 2 puntos), 1 hebra. En la siguiente vuelta trabajar las hebras como puntos rertorcidos para evitar agujeros. RAGLÁN: Disminuir 2 puntos en cada transición entre el cuerpo y las mangas. Comenzar 3 puntos antes del marcapuntos: 2 puntos juntos de derecho, 2 derechos (el marcapuntos queda entre estos 2 puntos), deslizar 1 punto como de derecho, 1 derecho, pasar el punto deslizado por encima. TIP PARA TEJER: Si la tensión del tejido no es correcto en vertical y éste resulta demasiado prieto, el canesú quedará demasiado corto y la sisa demasiado pequeña. Para ajustarlo al tamaño correcto trabajar algunas vueltas extra sin disminuciones de modo regular entre las vueltas con disminuciones. ---------------------------------------------------------- CUERPO: La labor se trabaja en redondo con aguja circular, de abajo arriba. Montar 212-228-248-268-292-316 puntos con aguja circular tamaño 4 mm y Cotton Merino. Trabajar 2 PLIEGUES - ver explicaciones arriba. Continuar trabajando como sigue: 17-21-20-25-25-31 derechos, 3 revés, *A.1 (= 18-18-22-22-26-26 puntos), 6 revés*, trabajar de * a * un total de 2 veces, A.1, 3 revés, 34-42-40-50-50-62 derechos, 3 revés, *A.1, 6 revés*, trabajar de * a * un total de 2 veces, A.1, 3 revés, 17-21-20-25-25-31 derechos. Insertar 1 marcapuntos al inicio de la vuelta y 1 después de 106-114-124-134-146-158 puntos = en los lados. Continuar con este patrón hacia arriba. RECUERDE MANTENER LA MISMA TENSIÓN DEL TEJIDO. Cuando la labor mida 8 cm disminuir 1 punto a cada lado de los marcapuntos de los lados (= 4 puntos disminuidos) - LEER TIP PARA LAS DISMINUCIONES. Disminuir cada 4½ cm un total de 7 veces en todas las tallas = 184-200-220-240-264-288 puntos. Cuando la labor mida 39-39-39-39-39-39 cm cerrar 8-8-10-10-12-14 puntos a cada lado (= 4-4-5-5-6-7 puntos a cada lado del marcapuntos). Ahora hay 84-92-100-110-120-130 puntos para la espalda y el delantero. Dejar la labor en espera y trabajar las mangas. MANGA: La labor se trabaja en redondo con agujas de doble punta, cambiar a aguja circular corta cuando hay suficientes puntos. Montar 48-52-56-56-60-64 puntos con aguja de doble punta tamaño 3,5 mm y Cotton Merino. Trabajar 1 vuelta de derecho. después trabajar punto elástico: 2 derecho/ 2 revés. Cuando la labor mida 6 cm cambiar a aguja de doble punta tamaño 4 mm. Trabajar 1 vuelta de derecho y al mismo tiempo disminuir 4-6-8-6-8-10 puntos repartidos en la vuelta = 44-46-48-50-52-54 puntos. Insertar 1 marcapuntos al inicio de la vuelta (= centro bajo la manga). Continuar en punto jersey. Cuando la labor mida 10-7-7-10-7-7 cm aumentar 2 puntos en el centro bajo la manga - VER TIP PARA LOS AUMENTOS: Aumentar cada 3-2½-2-1½-1½-1½ cm un total de 12-15-18-19-20-21 veces = 68-76-84-88-92-96 puntos. Cuando la labor mida 46-45-43-42-40-39 cm (medidas más cortas para las tallas más grandes debido a una mayor largura de canesú) cerrar los 8-8-10-10-12-14 puntos centrales bajo la manga = 60-68-74-78-80-82 puntos. Dejar la labor en espera y trabajar otra manga. CANESÚ: Pasar las mangas a la misma aguja circular que el cuerpo donde se cerró para las sisas = 288-320-348-376-400-424 puntos. Insertar un marcapuntos en cada transición entre el cuerpo y las mangas (= 4 marcapuntos). Continuar con el patrón como antes y disminuir para el RAGLÁN - ver explicaciones arriba. Disminuir cada 4ª vuelta 5-5-6-6-6-7 veces, después cada 2ª vuelta 14-16-18-21-23-24 veces = un total de 19-21-24-27-29-31 veces - los puntos del diagrama A.1 que no se se ajustan a una repetición después de las disminuciones se trabajan en punto jersey Después de todas las disminuciones hay 136-152-156-160-168-176 puntos en la vuelta. Trabajar 2 pliegues sobre todos los puntos, pero en la primera vuelta trabajar juntos de derecho, de 2 en 2 los 22-26-26-24-22-20 puntos sobre cada manga, y disminuir de modo adicional 18-28-26-28-34-40 puntos repartidos en la vuelta = 96-98-104-108-112-116 puntos. Rematar de derecho. TERMINACIÓN: Coser las aberturas bajo las mangas |
|||||||||||||||||||
Explicaciones del diagrama |
|||||||||||||||||||
|
|||||||||||||||||||
 |
|||||||||||||||||||
 |
|||||||||||||||||||
¿Terminaste este patrón?Entonces, etiqueta tus fotos con #dropspattern #lemonparfaitsweater o envíalas a la galería #dropsfan. ¿Necesitas ayuda con este patrón?Encontrarás 27 videos tutoriales, un espacio para comentarios/preguntas y más visitando la página del patrón en garnstudio.com © 1982-2026 DROPS Design A/S. Todos los derechos reservados. Este documento, incluyendo todas sus sub-secciones, está protegido por los derechos de autor (copyright). Lee más acerca de lo que puedes hacer con nuestros patrones en la parte de abajo de cada patrón de nuestro sitio. |
|||||||||||||||||||


Con más de 40 años en el diseño de modelos de punto y de ganchillo, DROPS Design ofrece una de las más vastas colecciones de patrones gratuitos en el internet - traducidos en 17 idiomas. Al día de hoy, contamos con 325 catálogos y 12298 patrones - de los cuales 11698 están traducidos en español.
Nosotros trabajamos con mucho esmero para brindarte lo mejor que las labores de punto y ganchillo tienen para ofrecer,inspiración y consejos, así como hilos de magnífica calidad a precios increíbles! Te gustaría usar nuestros patrones para otro fin además del uso personal? Puedes leer acerca de lo que estás permitida a hacer en el texto de Copyright en la parte de abajo de todos nuestros patrones. Felices labores!
Escribe un comentario sobre DROPS 180-1
¡Nos encantaría saber qué piensas acerca de este patrón!
Si quieres escribir una pregunta referente al patrón, por favor asegúrate de elegir la categoría correcta en el formulario debajo, para acelerar el proceso de respuesta. Los campos obligatorios están marcados con un *.