
Categorías populares
¿Buscas un hilo?


Comentarios / Preguntas (50)
Richard escribió:
Hi again. I followed your instructions from the start of the decreasing, but having completed 4 ROUNDS, the total number of stitches are greatly reduced. I now have 27 for the front and 26 for the back. The sleeves have 20? Something is seriously wrong! I am knitting A9 for ALL the rounds. I assume that after 7 rounds, I continue only in stocking stitch. A 'Chart' layout would be most useful, please?
07.02.2018 - 19:41DROPS Design respondió:
Dear Richard, after 4 rounds with raglan decrease in size S, M and XL you should have decrease a total of 8 sts on both front and back piece (= 4 sts every other round) and 2 sts on each sleeve (= 2 sts every 4th round on each sleeve), ie 16+4= 20 sts have been decrased after the first 4 rounds. Dec at the beg of the piece to dec after A.9 (see RAGLAN) and dec at the end of the piece to dec before next A.9, make sure you will decrease 2 sts on each piece when it needs to dec, you will someetimes dec 8 sts (2 sts on each piece) or only 4 sts (only on front and on back piece). Happy knitting!
08.02.2018 - 08:44Richard escribió:
FRONT AND BACK PIECES: Decrease 1 stitch every 2nd round (= 4 stitches decreased on the round) a total of 18-20-25 times - THIS I UNDERSTAND. But - SLEEVES: Decrease 1 stitch every 4th round a total of 2-2-1 times and every 2nd round (= 4 stitches decreased on the round) a total of 13-16-23 times. - I do not understand? Is the decreasing for every 4th and 2nd round, (2 times)?
06.02.2018 - 18:43DROPS Design respondió:
Dear Richard, you will decrease differently on body and on sleeve, ie on body decrease every other round a total of 18-20-25 times and at the same times decrease on sleeve first every 4th round 2-2-1 times in total then every other round 13-16-23 times, on the first decrease round on raglan you will sometimes dec only 4 sts (= only body) and sometimes 8 sts (body and sleeves). Happy knitting!
07.02.2018 - 08:33Richard escribió:
Help - I have now placed the sleeves onto the circular needle, as the body and the number of stitches are correct. For size M, when decreasing for the sleeves, do I decrease 1 stitch AT EACH END (4/round) - both sleeves. Is A9 repeated for all the sleeve stitches?
06.02.2018 - 10:23DROPS Design respondió:
Dear Richard, on the sleeves you will decrease at the beg of each sleeve (after A.9) and at the end of the sleeve (before A.9), ie decrease 2 sts per sleeve = 4 sts for both sleeve. You will work A.9 to the end of yoke, A.9 = transition between body and sleeves. Happy knitting!
06.02.2018 - 11:32
![]() Richard. escribió:
Richard. escribió:
Thanks for your reply. So my work is correct as it measures approximately 27cm. So shaping the raglan for the sleeves will then give the finished length of 56cm. Thanks..... Richard.
03.02.2018 - 12:35Richard escribió:
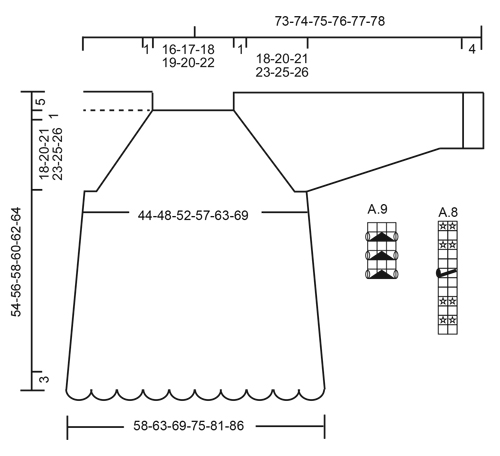
I have completed all the 'blocks' from No.1 to No.6 and I am concerned, as the measurement is approximately 27cm. I have 4/5 rounds to complete which I will 'set aside' ready with 'markers' for the two sleeves!Your diagram on page 4 (of the pattern), is showing that the measurement is 56cm! Richard.
02.02.2018 - 15:04DROPS Design respondió:
Dear Richard, 56 cm is the total length in size M, from shoulder down to edge. From cast on row to armhole, piece should measure 27 cm (= 56 - (3 cm wave edge + 20 cm armhole + 1+5 cm neckline/shoulders). Happy knitting!
02.02.2018 - 15:39
![]() Karin escribió:
Karin escribió:
Die 270 M Anschlag sind für die kleinste Größe. Ich benötige die Größte. Wenn ich die Maschenprobe für das Wellenmuster zugrunde lege, dann ergibt sich folgendes, bei den angegeben Maßen, in meinem Fall 86 cm = 172 cm Umfang: 20 M = 10 cm, 20 x 17,2 = 344 Maschen und nicht wie in der Anleitung angegeben 405 Maschen. Was ist jetzt richtig?
11.12.2017 - 20:23DROPS Design respondió:
Liebe Karin, genau diese Maschenanzahl (also 345 M) haben Sie nach A.1. Schlagen Sie 405 M in der letzten Größe, dann stricken Sie die 5 Runden M.1, dann haben Sie 345 M (4 M werden in der 3. Reihe A.1 in jedem Rapport abgenommen). Viel Spaß beim stricken!
12.12.2017 - 07:58
![]() Karin escribió:
Karin escribió:
Kann es sein, dass die Maschenprobe nicht zu diesem Modell gehört? Nach der angegeben Maschenprobe, ohne dass Muster zu berücksichtigen, müsste man bei der größten Größe 275 Maschen anschlagen. Oder habe ich irgendwo einen Denkfehler?
10.12.2017 - 02:33DROPS Design respondió:
Liebe Karin, es werden 270 M angeschlagen, dann A.1 gestrickt. Nach A.1 bleiben 230 M und mit 20 M im Wellenmuster = 10 cm, haben Sie dann 115 cm Umfang, dh wie in der Skizze. Viel Spaß beim stricken!
11.12.2017 - 09:43
![]() Tone escribió:
Tone escribió:
Alle som klager på at denne er for kort har rett. Her må det strikkes flere A6 for å få rette lengden. Dere ber om tilbakemeldinger men når dere får det så gidder dere ikke ta det til etterretning. Skjerp dere. Når så mange gir tilbakemelding på at lengden ikke stemmer så kan ikke det være en tilfeldighet. Mvh. Tone Sundland
21.11.2017 - 12:34
![]() Dorthe escribió:
Dorthe escribió:
Kommer der en rettelse til denne opskrift. Jeg har her 10 dage stadig ikke hørt noget fra jer....
23.10.2017 - 11:40
![]() Dorthe escribió:
Dorthe escribió:
Følger man opskrift bliver længde op til ærmegab 23 cm. Iflg stregtegning skal længden være 37 cm op til ærmegab så der er en STOR fejl i opskriften. Bittert at have brugt penge på en ubrugelig opskrift og penge på garn også......
12.10.2017 - 10:52
|
|||||||||||||||||||
Spring Forest#springforestsweater |
|||||||||||||||||||
 |
 |
||||||||||||||||||
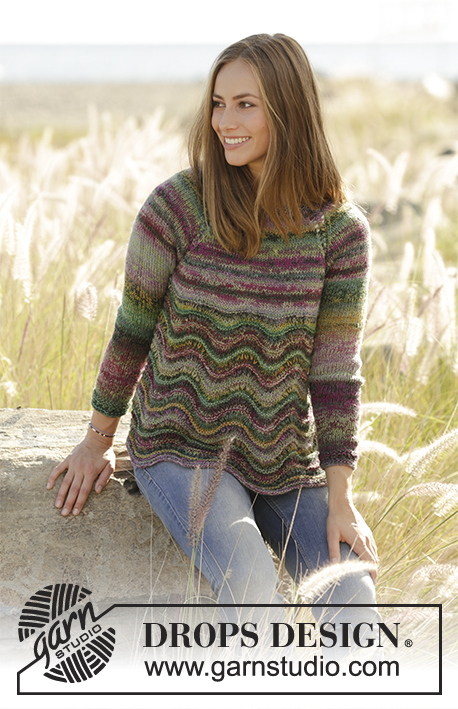
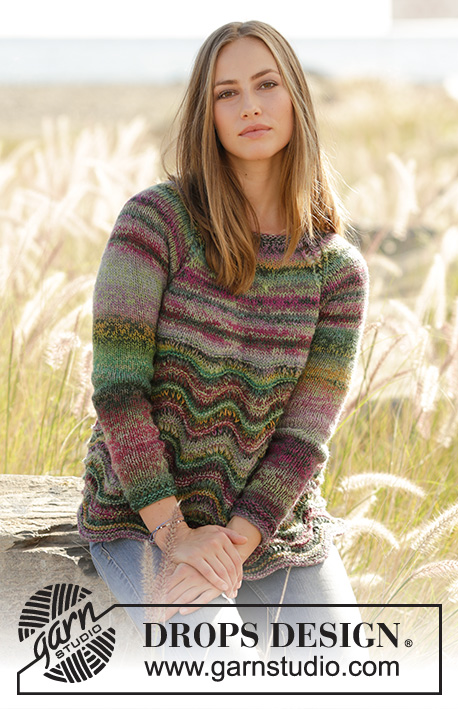
Pulóver con patrón de ondas y raglán, tejido de abajo para arriba con 2 hilos DROPS Delight. Tallas: S – XXXL.
DROPS 178-27 |
|||||||||||||||||||
|
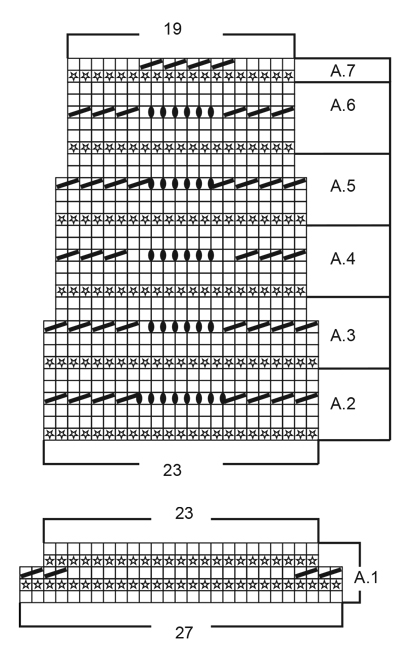
SURCO/PUNTO MUSGO (tejido de ida y vuelta): 1 surco = tejer 2 hileras de derecho. TIP PARA CAMBIAR DE OVILLO: Para que las transiciones entre los colores en Delight queden lo más impecable posible cuando se cambia de ovillos, es importante buscar un ovillo que comience con el color con el que terminó el ovillo anterior. PATRÓN: Ver diagramas A.1 a A.9. Los diagramas muestran todas las hileras en el patrón vistas por el lado derecho. TIP PARA AUMENTAR (aplica al centro bajo la manga): Comenzar 2 puntos antes del hilo marcador, hacer 1 lazada, 4 derechos (el hilo marcador está en el centro de estos 4 puntos), hacer 1 lazada. En la vuelta siguiente, tejer las lazadas retorcidas de derecho para evitar agujeros. TIP PARA DISMINUIR: Disminuir 1 punto tejiendo 2 puntos juntamente de derecho. Para calcular cómo disminuir equitativamente, contar el número total de puntos en la aguja (p. ej. 88 puntos) y dividir el número de puntos entre el número de disminuciones a hacer (p. ej. 5) = 17.6. En este ejemplo, tejer aprox cada 17º y 18º punto juntamente. RAGLÁN: Disminuir para el raglán en cada transición entre el cuerpo y las mangas. NOTA: En las tallas S, M y XXL las disminuciones son diferentes en el cuerpo y en las mangas como se describe en el texto. Disminuir de la manera siguiente después de A.9: Deslizar 1 punto como de derecho, 1 derecho, pasar el punto deslizado por encima (= 1 punto disminuido). Disminuir de la manera siguiente antes de A.9: Comenzar 2 puntos antes de A.9 y tejer 2 puntos juntamente de derecho (= 1 punto disminuido). ----------------------------------------------------- PULÓVER: La pieza se teje en redondo con aguja circular, de abajo para arriba. Las mangas se tejen con agujas de doble punta. CUERPO: Montar 270-297-324-351-378-405 puntos con aguja circular tamaño 5.5 mm con 1 hilo de cada color (= 2 hilos). Tejer A.1 (= 27 puntos) 10-11-12-13-14-15 veces a lo ancho. Cuando se ha tejido todo el diagrama A.1 en altura, hay 230-253-276-299-322-345 puntos en la vuelta. Tejer A.2 (= 23 puntos) sobre cada repetición de A.1. Continuar de esta manera hasta haber completado A.2 3-3-3-3-3-4 veces en altura – LEER TIP PARA CAMBIAR DE OVILLO! RECORDARSE DE MANTENER LA MISMA TENSIÓN DE TEJIDO DE LA MUESTRA! Tejer A.3 (= 23 puntos) 1 vez en altura. Cuando se ha tejido todo el diagrama A.3 en altura, hay 210-231-252-273-294-315 puntos en la vuelta. Tejer A.4 (= 21 puntos) 2 veces en altura en todas las tallas. Tejer A.5 (= 21 puntos) 1 vez en altura. Cuando se ha tejido todo el diagrama A.5 en altura, hay 190-209-228-247-266-285 puntos en la vuelta. Tejer A.6 (= 19 puntos) 3 veces en altura en todas las tallas. Después tejer A.7 (= 19 puntos). Cuando se ha tejido A.7 en altura, hay 150-165-180-195-210-225 puntos en la vuelta. Tejer 1 vuelta de derecho y, al mismo tiempo, disminuir 10-11-14-13-8-5 puntos distribuidos equitativamente a lo largo de la vuelta = 140-154-166-182-202-220 puntos. Después tejer la vuelta siguiente de la manera siguiente: Tejer 32-35-38-42-47-52 puntos derechos e insertar 1 hilo marcador en el último punto tejido, rematar 6 puntos para la sisa, tejer 64-71-77-85-95-104 puntos derechos e insertar 1 hilo marcador en el primer y en el último punto tejido, rematar 6 puntos para la sisa, tejer 32-36-39-43-48-52 puntos derechos e insertar 1 hilo marcador en el primer punto tejido. Dejar la pieza a un lado y tejer las mangas. MANGAS: Montar 32-34-36-40-42-46 puntos con agujas de doble punta tamaño 4.5 mm con 1 hilo de cada color (= 2 hilos). Tejer el patrón en redondo de acuerdo al diagrama A.8. Cuando se ha tejido A.8 1 vez en altura, cambiar a agujas de doble punta tamaño 5.5 mm. Insertar 1 hilo marcador al principio de la vuelta y dejar que el hilo marcador siga la labor hacia arriba. Tejer en punto jersey en redondo. Cuando la pieza mida 10-12-7-5-5-10 cm, aumentar 2 puntos al centro bajo la manga – LEER TIP PARA AUMENTAR. Aumentar de esta manera a cada 7ª-5ª-5ª-5ª-4ª-4ª vuelta un total de 10-12-14-14-14-14 veces = 52-58-64-68-70-74 puntos. Cuando la pieza mida 46-44-44-42-41-40 cm (medidas más cortas en las tallas más grandes debido a que el escote es más ancho y el canesú es más largo) rematar 6 puntos al centro bajo la manga (es decir, rematar 3 puntos a cada lado del hilo marcador) = 46-52-58-62-64-68 puntos. Dejar la pieza a un lado y tejer la otra manga de la misma manera. CANESÚ: Colocar las mangas en la misma aguja circular del cuerpo donde se remataron los puntos para las sisas (hacer esto sin tejer los puntos) = 220-246-270-294-318-344 puntos en la aguja. Tenemos ahora 4 hilos marcadores en la pieza (1 hilo marcador en cada transición entre el cuerpo y las mangas). Continuar tejiendo punto jersey y A.9 en cada transición entre el cuerpo y las mangas (los puntos con hilos marcadores son los puntos centrales de A.9). AL MISMO TIEMPO, en la primera vuelta, comenzar las disminuciones para el RAGLÁN – ver la descripción arriba. NOTA: Las disminuciones varían en las diferentes tallas. TALLAS S, M, XXL: Las disminuciones son diferentes en el cuerpo y en las mangas. FRENTE Y ESPALDA: Disminuir 1 punto a cada 2ª vuelta (= 4 puntos disminuidos en la vuelta) un total de 18-20-25 veces. MANGAS: Disminuir 1 punto a cada 4ª vuelta un total de 2-2-1 veces y a cada 2ª vuelta (= 4 puntos disminuidos en la vuelta) un total de 13-16-23 veces. Cambiar a una aguja circular corta tamaño 5.5 mm cuando el número de puntos ha sido reducido suficientemente. TALLAS L, XL, XXXL: Disminuir 1 punto a cada lado de cada A.9 (= 8 puntos disminuidos en la vuelta). Disminuir de esta manera a cada 2ª vuelta un total de 21-23-26 veces. Cambiar a una aguja circular corta tamaño 5.5 mm cuando el número de puntos ha sido reducido suficientemente. TODAS LAS TALLAS: Cuando se han completado todas las disminuciones, hay 88-94-102-110-122-136 puntos en la vuelta. Tejer 1 vuelta y, al mismo tiempo, disminuir 5-8-12-16-24-34 puntos distribuidos equitativamente a lo largo de la vuelta – LEER TIP PARA DISMINUIR = 83-86-90-94-98-102 puntos. Cambiar a una aguja circular corta tamaño 4.5 mm. Tejer 2 SURCOS – ver descripción arriba y rematar. Asegurarse de que la orilla de remate no quede apretada! ENSAMBLAJE: Coser las aberturas bajo las mangas. |
|||||||||||||||||||
Explicaciones del diagrama |
|||||||||||||||||||
|
|||||||||||||||||||
 |
|||||||||||||||||||
 |
|||||||||||||||||||
¿Terminaste este patrón?Entonces, etiqueta tus fotos con #dropspattern #springforestsweater o envíalas a la galería #dropsfan. ¿Necesitas ayuda con este patrón?Encontrarás 26 videos tutoriales, un espacio para comentarios/preguntas y más visitando la página del patrón en garnstudio.com © 1982-2026 DROPS Design A/S. Todos los derechos reservados. Este documento, incluyendo todas sus sub-secciones, está protegido por los derechos de autor (copyright). Lee más acerca de lo que puedes hacer con nuestros patrones en la parte de abajo de cada patrón de nuestro sitio. |
|||||||||||||||||||


Con más de 40 años en el diseño de modelos de punto y de ganchillo, DROPS Design ofrece una de las más vastas colecciones de patrones gratuitos en el internet - traducidos en 17 idiomas. Al día de hoy, contamos con 324 catálogos y 12290 patrones - de los cuales 11685 están traducidos en español.
Nosotros trabajamos con mucho esmero para brindarte lo mejor que las labores de punto y ganchillo tienen para ofrecer,inspiración y consejos, así como hilos de magnífica calidad a precios increíbles! Te gustaría usar nuestros patrones para otro fin además del uso personal? Puedes leer acerca de lo que estás permitida a hacer en el texto de Copyright en la parte de abajo de todos nuestros patrones. Felices labores!
Escribe un comentario sobre DROPS 178-27
¡Nos encantaría saber qué piensas acerca de este patrón!
Si quieres escribir una pregunta referente al patrón, por favor asegúrate de elegir la categoría correcta en el formulario debajo, para acelerar el proceso de respuesta. Los campos obligatorios están marcados con un *.