
Categorías populares
¿Buscas un hilo?


Comentarios / Preguntas (24)
![]() Conni Jørgensen escribió:
Conni Jørgensen escribió:
Hvorfor står der i opskriften “ der er rettelser- klink her” - men linket virker ikke.
02.08.2024 - 22:43DROPS Design respondió:
Hej Conni, Jo når du klikker på linket ser du at vi har skrevet at det er 1 kantmaske retstrik i hver side :)
06.08.2024 - 14:01
![]() Ruth escribió:
Ruth escribió:
Hallo, wenn ich den Rand kraus rechts stricke, rollt er sich ein. Was kann ich gegen das Einrollen tun? // Hi there, I am doing a garter stitch at the end of each row. The cardigan now rolls itself inwards at the end of each row. What can I do about it? Thanks, best, Ruth
09.12.2023 - 09:41DROPS Design respondió:
Liebe Ruth, danach werden Sie die Maschen für die Blende auffsassen, dann wird der Rand nicht mehr rollen. Viel Spaß beim stricken!
11.12.2023 - 10:02
![]() Jane Milton escribió:
Jane Milton escribió:
I'm knitting thin in the smallest size. After the yoke A1 pattern, and I have begun the body, the instructions say to knit 3cm then do the increases. Then it says to increase every 7cm three times. in my counting, this means that there would be 3+21 cm, a total of 24 cms. However, the instructions say to continue after the last increase until piece measures 19cm. I'm confused as that is a 5cm difference! Can you please clarify the instructions for me?
17.02.2023 - 23:08DROPS Design respondió:
Dear Jane, you increase for the first time when the piece measures 3 cm and every 7 cm 2 more times (so you have increased 3 times in total; 138 + 12 (= 4 increases 3 times) = 150 sts. So, after the increases, the piece will measure 3+7+7= 17 cm. That is, you will have to work 2 cm more after the last increase. Happy knitting!
19.02.2023 - 22:22
![]() Poonam Kirpal escribió:
Poonam Kirpal escribió:
How much should be the length of the bodice after A1 pattern for adults say Height 5 ft 3 inches
06.06.2022 - 12:23DROPS Design respondió:
Dear Poonam, we don't make custom patterns. You can check a similar pattern for adults here: https://www.garnstudio.com/pattern.php?id=7107&cid=19. Happy knitting!
06.06.2022 - 13:33
![]() Marie escribió:
Marie escribió:
Placer 1 marqueur de chaque côté, au milieu des 6 nouvelles m montées. Continuer en jersey avec 1 m point mousse de chaque côté. À 3 cm, augmenter 1 m de chaque côté des marqueurs (= 4 augmentations). je ne comprends pas pour les marqueurs et augm, doit on poser un marq, 3mailles,un marqueur,3 mailles ,1marqueurs,les augmentations se font au mileu des 6 m? Merci pour votre aide
26.01.2022 - 17:07DROPS Design respondió:
Bonjour Marie, cette leçon montre comment tricoter un pull de haut en bas; et notamment à partir de la photo 17 comment reprendre les manches, monter les mailles sous la manche (18A) et diminuer (21, 22) au milieu sous la manche (cf cette vidéo). Bon tricot!
26.01.2022 - 17:19
![]() Marianne Plaskett escribió:
Marianne Plaskett escribió:
I can see the rows where I have to increase the number of stitches but there is no instruction on how many stitches need to be increased. I have read the pattern several times and cannot find the details about increasing.
19.02.2021 - 13:20DROPS Design respondió:
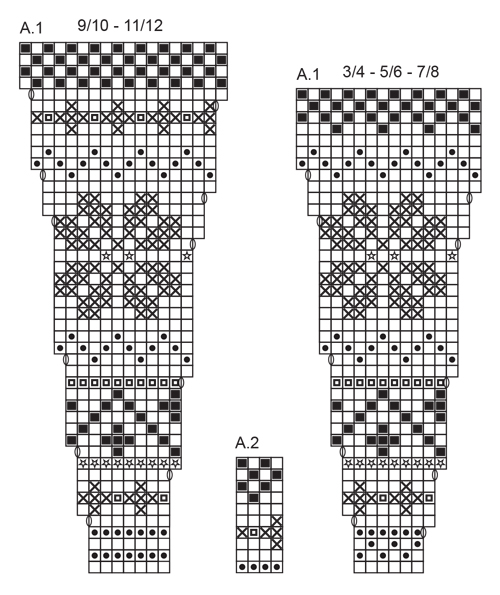
Dear Mrs Plasket, when working diagram A.1, the increases are drawn in the diagram (with the last symbole = a yarn over made either at the beg or at the end of a repeat). This means you just have to work the diagram appropriate to the size increasing as the diagram is showing. Hope this helps. Happy knitting!
19.02.2021 - 15:09
![]() Berit Forsberg Tripkou escribió:
Berit Forsberg Tripkou escribió:
I can not print the whole diagram for DROPS Children 27-5. It is just coming the first 11 rows, That is making the whole knitting a little bit complex. It is not easy to read the pattern if I take a photo from the picture at the computer,,, So can you tell me what is wrong. I have tried 2 times to print the whole diagram...
31.10.2020 - 20:05DROPS Design respondió:
Dear Mrs Forsberg Tripkou, we could print this pattern succesfully (in Swedisch and in English) - remember to check that some previous settings weren't savec and do not allow you to print all pages. Happy knitting!
02.11.2020 - 08:07
![]() Mary escribió:
Mary escribió:
I’m on row 12 in A1 size 7/8 the pattern does not work for me if I finish the previous row with the last two stitches being the first stitch in diagram and a garter stitch. Any tips as to what I’m doing wrong?
12.02.2020 - 12:54DROPS Design respondió:
Dear Mary, do you have 10 sts in each A.1 (= 1 edge st, 15 x 10 sts (A.1), 1st st in A.1, 1 edge st = 153 sts on needle)? 12th row should be a WS row, this means you work: 1 edge st, 1st st in A.1 (= P with off-white), then repeat A.1 (= P1 with beige, P2 with off white, P3 with beige, P2 with off white, P1 with beige, P1 with off white) , 1 edge st in garter st. Hope this can help you. Happy knitting!
12.02.2020 - 14:38
![]() Götze Sigrid escribió:
Götze Sigrid escribió:
Könnte ich die Wolle bei Ihnen kaufen für diesen Pulli in Gr. 104. Gleiche Farbe wie angegeben.
13.11.2019 - 12:58DROPS Design respondió:
Liebe Frau Götze, hier finden Sie einen DROPS Laden in Deutschlang, wo Sie die Wolle finden können. Viel Spaß beim stricken!
13.11.2019 - 13:59
![]() Evelyn escribió:
Evelyn escribió:
I am trying to knit this pattern, however, I don’t understand the first parts of starting the chart. IE; knit 1 edge stitch, A1 chart.....(finish with a knit first stitch from chart and 1 edge stitch. I have tried and the second row doesn’t work.
06.04.2019 - 05:40DROPS Design respondió:
Dear Evelyn, for the jacket from RS work: 1 edge st in garter stitch, then repeat A.1 (reading diagram from the bottom corner on the right side towards the left) until 2 stitches remain, work now the first stich in A.1 (the stitch on the right side) and finish with 1 edge stitch. From WS work the first stitch in A.1 (the one on the right side), then repeat A.1 reading from the left towards the right. Learn more about reading diagrams here. Happy knitting!
08.04.2019 - 09:13
|
||||||||||||||||||||||
Prairie Fairy#prairiefairycardigan |
||||||||||||||||||||||
 |
 |
|||||||||||||||||||||
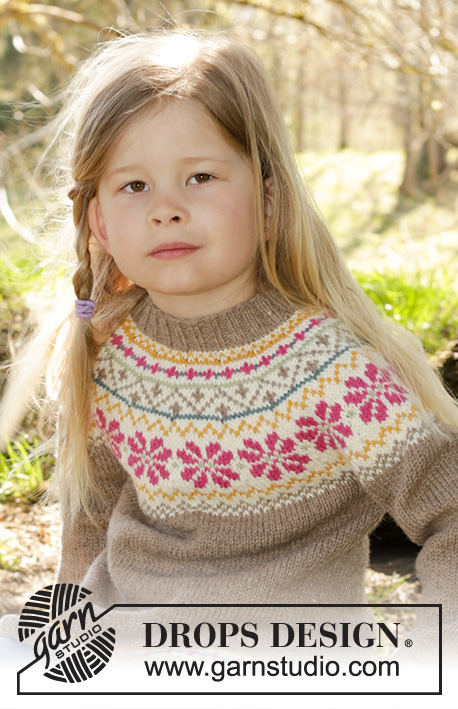
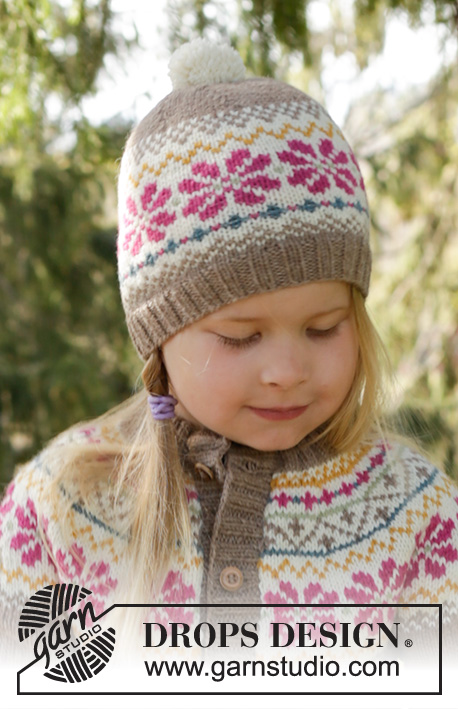
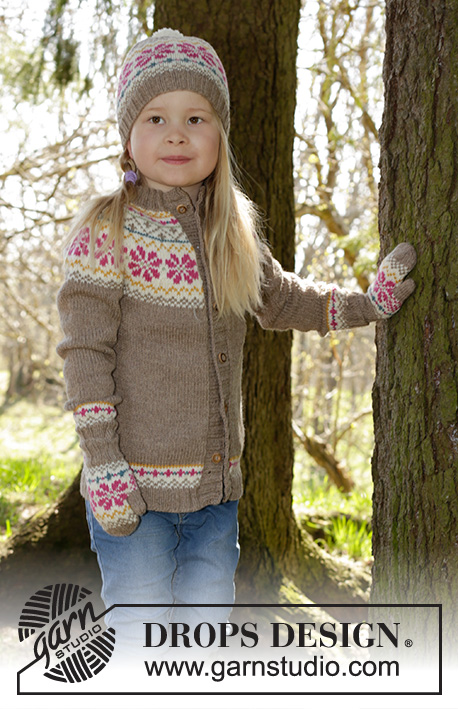
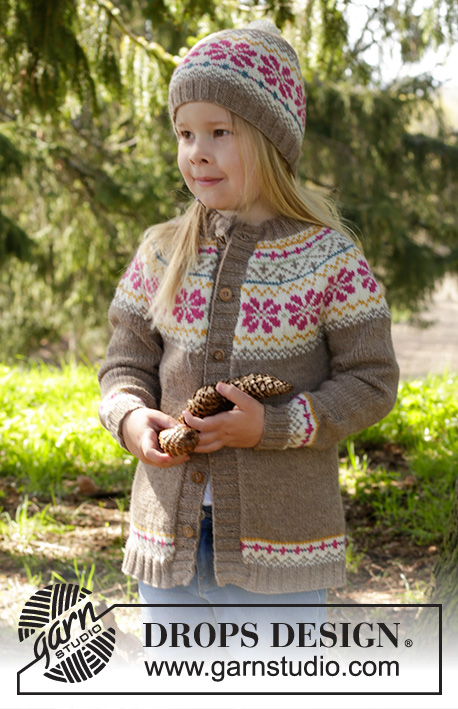
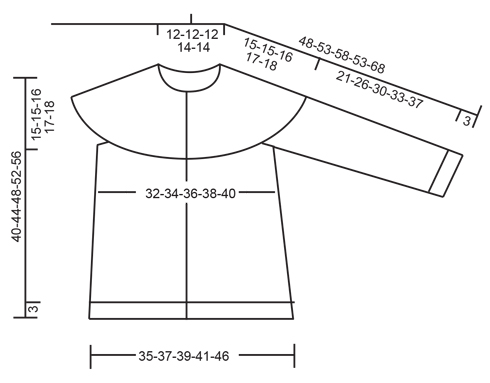
Chaqueta de punto con canesú redondo y punto jacquard nórdico en DROPS Lima. Talla niños 3 - 12 años.
DROPS Children 27-5 |
||||||||||||||||||||||
|
PT MUSGO (de ida y vta): Trabajar todas las filas de derecho. 1 pliegue = 2 filas de derecho. PATRÓN: Ver diagramas A.1 y A.2. Los diagramas se trabajan en pt jersey. Ve el diagrama para la talla correspondiente. TIP PARA LA REALIZACIÓN DEL TRABAJO: Para evitar una tensión del tejido demasiado prieta al trabajar el patrón, es importante no estirar los hilos en el revés de la labor. Cambiar a un nº de ag mayor al trabajar el patrón si notamos que queda prieto. -------------------------------------------------------- CHAQUETA: Se trabaja de ida y vta con ag circular, de arriba abajo. CANESÚ: Mont 84-88-92-96-100 pts con ag circular corta tamaño 3 mm y color beige. Trabajar 1 pt en PT MUSGO - ver explicaciones arriba, 2 d., *2 r., 2 d.*, repetir de *a* y finalizar con 1 pt en pt musgo. Trabajar 3-3-4-4-5 cm en pt elástico (= borde del escote). Cambiar a ag circular corta tamaño 4 mm. Trabajar una fila de derecho y al mismo tiempo ajustar el nº de pts hasta 81-87-93-101-108. Insertar 1 MP (marcapuntos) después de 40-43-46-50-54 pts = centro de la espalda. Ahora trabajar una elevación en la espalda en pt jersey como sigue: Trabajar de derecho 8 pts desde el MP, girar, estirar el hilo y trabajar de vta 16 r., girar, estirar el hilo y trabajar 24 d., girar, continuar trabajando 8 pts más en cada giro hasta haber trabajado 24-24-32-32-40 pts a cada lado del MP en el centro de la espalda, girar y trabajar de derecho el resto de la fila, 1 fila de revés. Ahora trabajar como sigue: 1 pt orillo en pt musgo, A.1 (= 13-14-15-14-15 repeticiones en el ancho) finalizar con el 1er pt del diagrama y 1 pt orillo en pt musgo - ver el diagrama para la talla correspondiente. LEER TIP PARA LA REALIZACIÓN DEL TRABAJO. RECUERDE MANTENER LA MISMA TENSIÓN DEL TEJIDO. Cambiar a ag circular larga cuando sea necesario. Cuando se ha completado A.1 hay 211-227-243-255-273 pts en ag. Trabajar 0-1-2-0-1 cm con beige. La labor mide ahora aprox 15-16-17-17-18 cm en el centro del delantero (medido sin el pt elástico de la cenefa del escote). Continuar la labor con beige y en pt jersey. Primero trabajar 1 fila y AL MISMO TIEMPO aum 3-3-3-11-9 pts repartidos = 214-230-246-266-282 pts. Trabajar la sig fila como sigue: Trabajar 32-34-36-38-40 pts (= delantero), desl los sig 44-48-52-58-62 pts a un gancho aux para la manga (sin trabajarlos primero), mont 6 pts nuevos, trabajar 62-66-70-74-78 pts (= espalda), desl los sig 44-48-52-58-62 pts a un gancho aux para la manga (sin trabajarlos primero), mont 6 pts nuevos, trabajar 32-34-36-38-40 pts (= delantero). CUERPO: = 138-146-154-162-170 pts. AHORA MEDIR LA LABOR DESDE AQUÍ! Insertar 1 MP a cada lado, en el centro de los 6 pts nuevos montados. Continuar en pt jersey con 1 pt en pt musgo a cada lado. Cuando la labor mida 3 cm, aum 1 pt a cada lado de los MPs (= 4 pts aumentados). Repetir los aum cada 7-9-10-12-13 cm un total de 3 vcs = 150-158-166-174-182 pts. Continuar trabajando hasta que la labor mida 19-23-26-29-32 cm. Trabajar A.2 con 1 pt orillo a cada lado. Cambiar a ag circular tamaño 3 mm. Trabajar 1 fila de derecho por el LD y AL MISMO TIEMPO aum 14 pts repartidos = 164-172-180-188-196 pts. Trabajar 1 fila por el LR. Ahora trabajar como sigue: 1 pt en pt musgo, 2 d., *2 r., 2 d.*, repetir de *a* y finalizar con 1 pt en pt musgo. Trabajar 3 cm de pt elástico. Después rematar con derecho sobre derecho y revés sobre revés. MANGA: Desl los pts de un gancho aux a ag de doble punta tamaño 4 mm, mont de modo adicional 6 pts en el centro bajo la manga (insertar 1 MP en el centro de estos pts) = 50-54-58-64-68 pts. AHORA MEDIR LA LABOR DESDE AQUÍ. Trabajar en pt jersey en redondo con color beige. Cuando la manga mida 2 cm, dism 1 pt a cada lado del MP. Repetir las dism cada 4½-3½-4-3-3½ cm un total de 5-7-7-10-10 vcs = 40-40-44-44-48 pts. Cuando la labor mida 18-23-27-30-34 cm trabajar el diagrama A.2, cambiar a aguja de doble punta tamaño 3 mm, trabajar 3 cm de pt elástico = 2 d., 2 r y rematar con derecho sobre derecho y revés sobre revés. Trabajar de la misma manera sobre los pts en el otro gancho aux CENEFA: Recoger por el LD aprox 84 - 118 pts a lo largo el delantero derecho dentro de 1 pt orillo con ag circular tamaño 3 mm y color beige. Trabajar 1 fila de revés por el LR y AL MISMO TIEMPO aum de forma repartida hasta 102-110-118-130-142 pts. Trabajar la sig fila como sigue por el LD: 2 pts del borde en pt musgo, *2 d., 2 r.*, repetir de *a* hasta que queden 4 pts y finalizar con 2 d. y 2 pts del borde en pt musgo. Continuar con el elástico de esta manera. AL MISMO TIEMPO después de 1 cm, cerrar para 6-6-7-7-7 ojales distribuidos equitativamente. 1 ojal = trabajar 2 pjd y hacer 1 HEB (cerrando 2 r. visto por el LD quedará mejor). El ojal superior debe quedar a aprox 1 cm del borde del escote y el inferior a aprox. 8-8-10-10-10 cm del borde inferior. Cuando la cenefa mida 3 cm rematar con derecho sobre derecho y revés sobre revés. Repetir a lo largo de la cenefa izquierda pero sin trabajar los ojales. TERMINACIÓN: Coser las aberturas bajo las mangas. Coser los botones en la cenefa izquierda. |
||||||||||||||||||||||
Explicaciones del diagrama |
||||||||||||||||||||||
|
||||||||||||||||||||||
 |
||||||||||||||||||||||
 |
||||||||||||||||||||||
¿Terminaste este patrón?Entonces, etiqueta tus fotos con #dropspattern #prairiefairycardigan o envíalas a la galería #dropsfan. ¿Necesitas ayuda con este patrón?Encontrarás 32 videos tutoriales, un espacio para comentarios/preguntas y más visitando la página del patrón en garnstudio.com © 1982-2026 DROPS Design A/S. Todos los derechos reservados. Este documento, incluyendo todas sus sub-secciones, está protegido por los derechos de autor (copyright). Lee más acerca de lo que puedes hacer con nuestros patrones en la parte de abajo de cada patrón de nuestro sitio. |
||||||||||||||||||||||


Con más de 40 años en el diseño de modelos de punto y de ganchillo, DROPS Design ofrece una de las más vastas colecciones de patrones gratuitos en el internet - traducidos en 17 idiomas. Al día de hoy, contamos con 325 catálogos y 12298 patrones - de los cuales 11726 están traducidos en español.
Nosotros trabajamos con mucho esmero para brindarte lo mejor que las labores de punto y ganchillo tienen para ofrecer,inspiración y consejos, así como hilos de magnífica calidad a precios increíbles! Te gustaría usar nuestros patrones para otro fin además del uso personal? Puedes leer acerca de lo que estás permitida a hacer en el texto de Copyright en la parte de abajo de todos nuestros patrones. Felices labores!
Escribe un comentario sobre DROPS Children 27-5
¡Nos encantaría saber qué piensas acerca de este patrón!
Si quieres escribir una pregunta referente al patrón, por favor asegúrate de elegir la categoría correcta en el formulario debajo, para acelerar el proceso de respuesta. Los campos obligatorios están marcados con un *.