
Categorías populares
¿Buscas un hilo?


Comentarios / Preguntas (54)
![]() Ada escribió:
Ada escribió:
Goedemiddag, ben de poncho in maat M/L aan het maken. Nu bij de 3e herhaling t/m toer 7 en ben 67 cm hoog (dus bijna bij de 71 cm). Zag dat je in ieder geval bij een toer met stokjes moet stoppen. 2 vragen: 1. Ik neem aan dat dit ook halverwege het patroon kan? 2. Maakt het nog uit of dit dan toer 12 of 13 is? Alvast bedankt voor de reactie. Groet, Ada
21.03.2020 - 14:41DROPS Design respondió:
Dag Ada,
Ja hoor, dit kan halverwege het patroon en toer 12 of 13 maakt ook niet uit want het zijn beide toeren met stokjes.
22.03.2020 - 16:53
![]() Cathie escribió:
Cathie escribió:
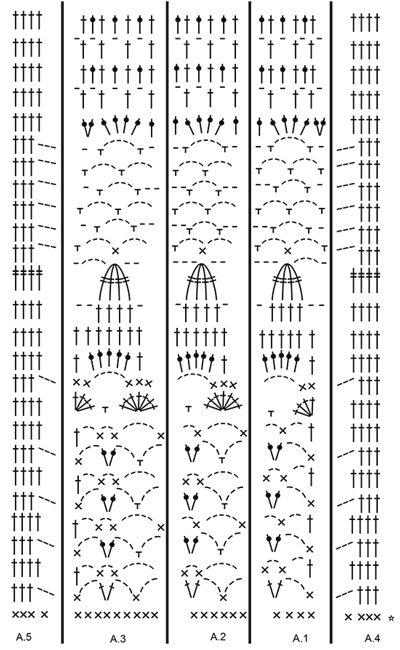
I have been crocheting for 50 years. I do not know how to read a diagram. I only use written instructions. However, I have no clue what you are talking about after the 2nd row. What is A.4 over the next 4 stitches, etc? What is the A. ? Help please. I am so lost!
08.03.2020 - 03:40DROPS Design respondió:
Dear Cathie, it is well worth the time and effort to figure out how to read pattern diagrams, because they not only tell you what to do at the very next step, but also show you how the stitches AND the rows relate to each other. In this case pattern A.4 shows you the trebles stitches at the right of the diagram. HERE you can find a lesson on how to read crochet diagrams, and do not forget, that you can always ask for help (in person or over teh phone) for help in the store where you bought your DROPS yarn from. Happy Crafting!
08.03.2020 - 22:56
![]() Imelda Parra Suarez escribió:
Imelda Parra Suarez escribió:
Quisiera elaborar el poncho con patron de calados en Paris pero no entiendo las abreviasiones que colocan me gustaría algo más claro o una fotografia donde se observe claramente las puntadas. Muchas gracias por su atención quedo atenta.
14.11.2019 - 21:03DROPS Design respondió:
Hola Imelda. No disponemos de más fotos que las que están publicadas de este modelo. Tienes bajo el patrón varios vídeos explicativos y el diccionario de abreviaturas está en este link https://www.garnstudio.com/dictionary.php?lang=es
17.11.2019 - 19:34
![]() Phoebe Musa escribió:
Phoebe Musa escribió:
Kindly give us the pattern in writing, diagrams are kind of confusing
15.10.2019 - 10:15DROPS Design respondió:
Dear Mrs Musa, when there are only diagrams in a pattern, such as this one for example, you will find help with crochet diagrams here. Happy crocheting!
15.10.2019 - 10:25
![]() Birgitta escribió:
Birgitta escribió:
Hej. Jag skulle vilja veta bredden på "halsduken". Mvh Birgitta
26.08.2019 - 11:08DROPS Design respondió:
Hej. Du hittar alla mått i de olika storlekarna på måttskissen längst ner på mönstret. Lycka till!
27.08.2019 - 08:15
![]() SAROJ escribió:
SAROJ escribió:
Hi there Is there any way I can get this pattern fully written out, I get extremely confused reading a diagram. Please assist.
23.07.2019 - 11:20DROPS Design respondió:
Dear Mrs Saroj, there are only diagrams to this pattern but you will find here how to read crochet diagrams, should you need any further assistance reading diagrams, feel free to contact your DROPS store even per mail or telephone. Happy crocheting!
06.08.2019 - 09:45
![]() Carrie escribió:
Carrie escribió:
Hello again! I’m just about to finish the first part of the diagram. When starting the diagram again, to get the length, do I start with the rows of single crochets at the very bottom, or do I start with the second row of 3 dc, chain 3 on top of the top most row of dc? Thank you! I think I’m going to like diagrams much better than the US way of writing every line out! :)
14.06.2019 - 02:57DROPS Design respondió:
Dear Carrie, when repeating the diagrams in height, start from 2nd row in diagram, ie skip the single crochets row from the very bottom. Happy crocheting!
14.06.2019 - 07:27
![]() Carrie escribió:
Carrie escribió:
I have gotten up to the 4th row above the row of single crochets and have torn it out 3 times. Where does the 4th DC in stitch go? The first of the chain 3 below? I am assuming that this row goes from A4-A5. I can’t tell where single crochets go between A1 and A2. Do they go into each of the DC around chain below? The diagram looks like one DC in the first DC around and the second in the first of chain 3. That just doesn’t seem right. Thank you, Carrie
11.06.2019 - 02:20DROPS Design respondió:
Dear Carrie, on row 3 (5, 7..) in A.4/A.5 the 4th dc (in A.4) and the first dc (in A.5) will be worked in the first chain (A.4)/last chain (= next to the dc) in A.5. So that there are either 3 or 4 dc in A.4/A.5. Happy crocheting!
11.06.2019 - 12:32
![]() Hedi escribió:
Hedi escribió:
Ich möchte wissen wie ich dieses teil zusammen nähe
02.05.2019 - 21:49DROPS Design respondió:
Liebe Hedi, dieses Video zeigt wie man einen gestrickten Poncho zusammennäht - beim gehäkelten wird es die gleiche Technik. Viel Spaß beim häkeln!
03.05.2019 - 09:00
![]() Gemma escribió:
Gemma escribió:
Leuk patroon. Om de juiste hoogte, 84 cm voor maat XXL, te krijgen, veronderstel ik dat ik na de gegeven toeren ik weer ergens aan het begin van de tekening werder moet haken. Klopt dat? Bij welke toer moet ik dan weer verder haken? Alvast bedankt voor jullie antwoord.
20.04.2019 - 21:50DROPS Design respondió:
Dag Gemma,
Je kan inderdaad, nadat je A.x 1 keer in de hoogte hebt gebreid, gewoon weer opnieuw beginnen onderaan, dus bij de eerste toer na de toer met het sterretje.
21.04.2019 - 16:51
|
|||||||||||||||||||||||||||||||
Sky Love#skyloveponcho |
|||||||||||||||||||||||||||||||
 |
 |
||||||||||||||||||||||||||||||
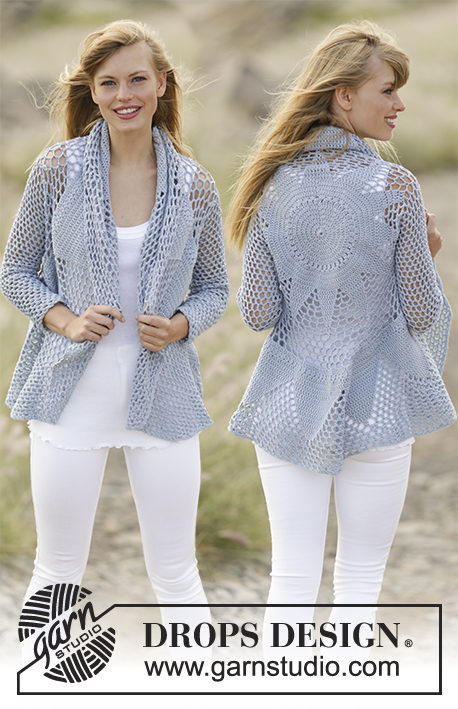
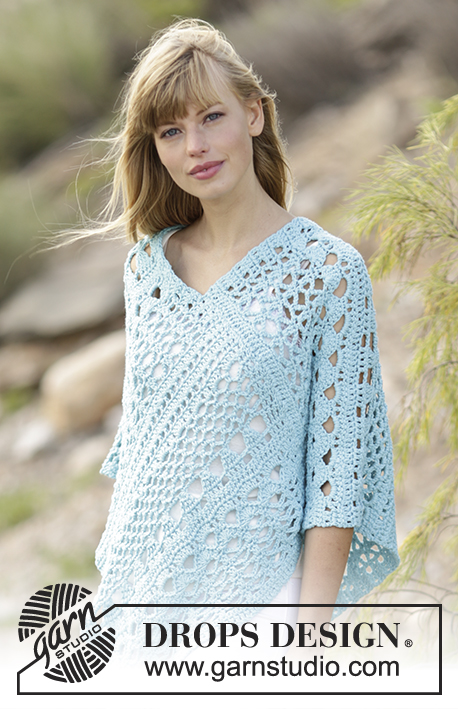
Poncho a ganchillo DROPS con patrón de calados en ”Paris”. Talla: S - XXXL.
DROPS 168-13 |
|||||||||||||||||||||||||||||||
|
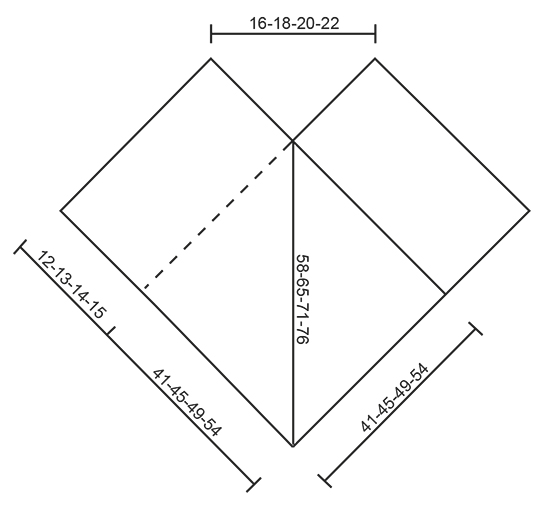
INFORMACIÓN PARA REALIZAR EL TRABAJO: Comenzar cada fila de p.b. con 1 p.de cad. (sustituye al 1er p.b.) Comenzar cada fila de p.a. con 3 p.de cad. (sustituyen al 1er p.a.) Comenzar cada fila de p.a.d. con 4 p.de cad. (sustituyen al 1er p.a.d.) PATRÓN: Ver los diagramas A.1-A.5 ----------------------------------------------------------------------- PONCHO: La labor se trabaja como 2 bufandas y al finalizar se cosen formando el poncho. Trabajar 77-85-93-101 p.de cad. con ag de ganchillo tamaño 5 mm con Paris. Trabajar 1 p.a. en el 4º p.de cad. del ganchillo (= 2 p.a.), 1 p.a. en el sig p.de cad., *saltar 1 p.de cad, 1 p.a. en cada uno de los sig 3 p.de cad*, repetir de * a * en toda la fila = 57-63-69-75 p.a. Trabajar 1 p.b. en cada p.a. (= LR) - leer INFORMACIÓN PARA REALIZAR EL TRABAJO = 57-63-69-75 p.b. Ahora trabajar como sigue: A.4 sobre los primeros 4 p.b., A.1 sobre los sig 4 p.b., A.2 sobre los sig 36-42-48-54 p.b. (= 6-7-8-9 vcs en el ancho), A.3 sobre los sig 9 p.b., finalizar con A.5 sobre los últimos 4 p.b. Continuar con el patrón de la misma manera, RECUERDE MANTENER LA MISMA TENSIÓN DEL TEJIDO! Trabajar hasta que la labor mida 65-71-77-84 cm, finalizar con 1 fila de p.a. del diagrama, asegurar el hilo. Trabajar la segunda parte de la misma manera. TERMINACIÓN: Unir el borde de remate de la 1ª parte con el lado largo derecho de la 2ª parte - en la parte inferior, hacia el borde de montaje y 41-45-49-54 cm hacia arriba - asegurate de no estirar la labor en exceso. Coser las 2 partes con pequeñas puntadas. Después coser el borde de remate de la 2ª parte al lado derecho de la 1ª parte de la misma manera. |
|||||||||||||||||||||||||||||||
Explicaciones del diagrama |
|||||||||||||||||||||||||||||||
|
|||||||||||||||||||||||||||||||
 |
|||||||||||||||||||||||||||||||
 |
|||||||||||||||||||||||||||||||
¿Terminaste este patrón?Entonces, etiqueta tus fotos con #dropspattern #skyloveponcho o envíalas a la galería #dropsfan. ¿Necesitas ayuda con este patrón?Encontrarás 8 videos tutoriales, un espacio para comentarios/preguntas y más visitando la página del patrón en garnstudio.com © 1982-2026 DROPS Design A/S. Todos los derechos reservados. Este documento, incluyendo todas sus sub-secciones, está protegido por los derechos de autor (copyright). Lee más acerca de lo que puedes hacer con nuestros patrones en la parte de abajo de cada patrón de nuestro sitio. |
|||||||||||||||||||||||||||||||


Con más de 40 años en el diseño de modelos de punto y de ganchillo, DROPS Design ofrece una de las más vastas colecciones de patrones gratuitos en el internet - traducidos en 17 idiomas. Al día de hoy, contamos con 324 catálogos y 12290 patrones - de los cuales 11685 están traducidos en español.
Nosotros trabajamos con mucho esmero para brindarte lo mejor que las labores de punto y ganchillo tienen para ofrecer,inspiración y consejos, así como hilos de magnífica calidad a precios increíbles! Te gustaría usar nuestros patrones para otro fin además del uso personal? Puedes leer acerca de lo que estás permitida a hacer en el texto de Copyright en la parte de abajo de todos nuestros patrones. Felices labores!
Escribe un comentario sobre DROPS 168-13
¡Nos encantaría saber qué piensas acerca de este patrón!
Si quieres escribir una pregunta referente al patrón, por favor asegúrate de elegir la categoría correcta en el formulario debajo, para acelerar el proceso de respuesta. Los campos obligatorios están marcados con un *.