
Categorías populares
¿Buscas un hilo?


Comentarios / Preguntas (24)
![]() Lise escribió:
Lise escribió:
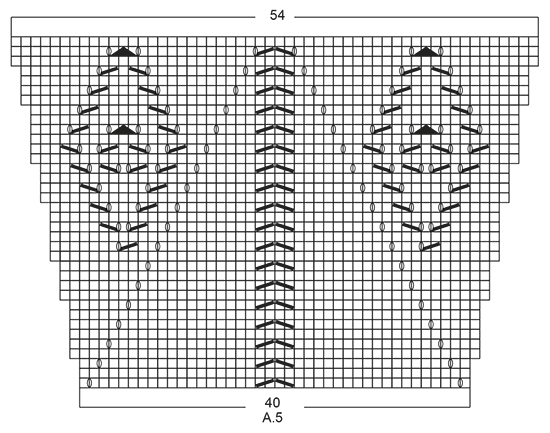
Je suis dans le modèle 170-12 ,dans la séquence A5 et cela fait trois fois que je détricote le troisième rang. Je comprends qu’il ne faut pas faire les augmentations,mais dans A4, A6 et A7 il y a des mailles glissé et des mailles tricoter ensemble. Donc ma question est les augmentations ont les fait plus mais les diminutions elles oui?
07.06.2018 - 12:00DROPS Design respondió:
Bonjour Lise, tricotez les diagrammes comme indiqué: 3 m point mousse, A.4 (= 3 m), *A.5 (= 40 m), A.6 (= 5 m) *, répétez de *-* encore 4 fois, terminez par A.5, A.7 (= 3 m) et 3 m point mousse. Les augmentations vont se faire dans A.4, A.6 et A.7 mais sont reportées au rang suivant sur les diagrammes A.5. Veillez à toujours bien tricoter A.4 et A.7 sur les mêmes 3 mailles et A.6 sur les mêmes 5 mailles (= pour que les jours soient bien alignés). Bon tricot!
07.06.2018 - 13:26
![]() Lorraine escribió:
Lorraine escribió:
Autre question 170-12 je suis à la section A.5 première section il me faut 48 mailles et j'en ai que 45 comment j'intègre le A.4 car il me faut 45 mailles pour le A.5A.6 et j'aurai le même problème à la fin pour A.7 merci
19.08.2017 - 04:14DROPS Design respondió:
Bonjour Lorraine. Avant de commencer le diagramme A.5, vous avez 277 m. Vous tricotez le rang suivant ainsi: 3 m point mousse, A.4 1 fois (=3 m), vous répétez A.5 (=40m) + A.6 (=5 m) 5 fois en total, puis A.5 (40 m), A.7 (3m) et enfin 3 m point mousse. En total : 3+3+(40+5)*5+40+3+3= 277 m. Bon tricot.
20.08.2017 - 17:14
![]() Lorraine escribió:
Lorraine escribió:
Je fais le modèle 170-12 présentement et je voulais savoir si je comprends bien je suis à la séquence A.5 je pense que l'on exécute A.4 A.5A.6 A.5A.6 A.5A.6 A.5A.6 A.5A.6 A.5 A.7 alors ma question que si je calcule le nombre de mailles je n'arrive pas au même nombre qu'indiqué à la fin ceci doit me donner 361 et j'ai 301 je voudrais savoir ce qui me manque merci.
19.08.2017 - 02:06DROPS Design respondió:
Bonjour Lorraine. Après avoir tricoté le diagramme A.5 1 fois en verticale, vous avez 54 m dans le diagramme A.5. Vous avez pourtant: 3 m point mousse, A.4 (=3 m), A.5 (= 54 m) + A.6 (=5 m) 5 fois en total, A.5 (54 m), A.7 (3m) et enfin 3 m point mousse. En total : 3+3+(54+ 5)*5+54+3+3= 361 m. Bon tricot.
20.08.2017 - 17:21
![]() Bonita escribió:
Bonita escribió:
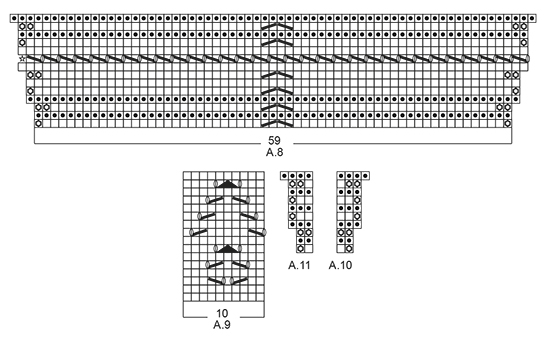
I am having trouble starting A10 and A11
11.06.2017 - 00:45DROPS Design respondió:
Hi Bonita, A.10 and A.11 are only 2 stitches in width on the first row, knit from right side and purl from wrong side (in A.10 you start with knit from the right side and in A.11 you start with purl from wrong side. To start A.10, work 3 stitches in garter stitch, then A.10, then garter stitch until 2 stitches are left before the marker, decrease as before, garter stitch until 2 stitches before marker, the A.11 (2 stitches) followed by A.10 as you have started on your repeat and so on....Continue like this upwards according to A.10 and A.11. I hope this helps, Kind regards, Deirdre
12.06.2017 - 12:58Eleni Sideri escribió:
Where we use A5 in this pattern?
23.11.2016 - 10:16DROPS Design respondió:
Hi Eleni, the English version should be corrected. Please see the US language version. When the piece measures approx. 38 cm, you will start A.5. Happy knitting!
24.11.2016 - 18:48
![]() Kathy Griffin escribió:
Kathy Griffin escribió:
Thank you for your answers to my questions. They were most helpful. My misunderstanding was to do with the explanation at the beginning of the pattern which states: INCREASE TIP: Inc 1 St by making 1 YO, on next row work YO twisted to avoid holes. I assumed that I should follow this, even when following the charts. I guess that it simply applied to the start of the chart as you increased from 6 St to 18 St.
04.10.2016 - 18:55Kathy Griffin escribió:
When working 2 stitches in one stitch, do you knit and then purl the same stitch? Thanks, Kathy from Canada
03.10.2016 - 19:43DROPS Design respondió:
Dear Mrs Griffin, if you click on the video tab, on the top under the pattern title, next to the materials, you can find all the video related to this pattern. In particular, you can work 2 sts in 1 st knitting the same st in the front and in the back loop. Happy knitting!
04.10.2016 - 08:37Vicki escribió:
There is an error late in this pattern when starting the section with A.9. It says " Inc made in A.4/A.6/A.7 are drawn as extra sts in **A.5** so that the patterns align.". There is no A.5 is this section. Can you please confirm that directions should read : inc made in A.4/A.6/A.7 are drawn in as extra sts on each side of the 60 stitch blocks of A.9 as stocking stitch. Thanks.
19.09.2016 - 17:27DROPS Design respondió:
Dear Vicki, you are correct, the extra sts not included in A.4/A.6 and A.7 should be worked in stocking st. Happy knitting!
06.10.2016 - 13:06
![]() Gardien escribió:
Gardien escribió:
Bonjour Comme Christine, je suis bloquée dans la même section. Si je comprends bien, je ne m'occupe pas des augmentations faites dans A4,A6 et A7. Elles sont tricotées en jersey le rang suivant. Merci de m'eclairer. Ça fait 3 fois que je detricote le 3ème rang de A9
15.06.2016 - 18:28DROPS Design respondió:
Bonjour Mme Gardien, les augmentations faites dans A.4/A.6 et dans A.6/A.7 (= de chaque côté d'un motif de A.5) sont dans le diagramme A.5, vous pouvez placer un marqueur entre chaque diagramme pour bien vous repérer et ainsi continuer les diagrammes comme indiqués. Bon tricot!
16.06.2016 - 08:42
![]() Christine escribió:
Christine escribió:
Bonjour, ce modèle de châle est magnifique, j'ai quasiment fini de le tricoter, le résultat est splendide mais je ne comprends pas l'explications de l'avant dernière section, celle qui utilise les diagrammes A4, A9, A6 et A7. Pouvez-vous me donner leur succession de manière claire ? Je vous remercie d'avance pour votre réponse et vos superbes modèles :-)
16.02.2016 - 11:20DROPS Design respondió:
Bonjour Christine et merci. Tricotez les diagrammes dans l'ordre indiqué, en alignant bien tous les diagrammes les uns au-dessus des autres au fur et à mesure, c'est-à-dire que les augmentations faites dans A.4/A.6 et A.7 vont s'intercaler entre les diagrammes (tricotez les en jersey). Placez un marqueur entre chaque diagramme pour bien repérer ces augm. et bien aligner les motifs les uns au-dessus des autres sans les décaler. Bon tricot!
16.02.2016 - 12:58
|
|||||||||||||||||||||||||
Spring Splendor#springsplendorscarf |
|||||||||||||||||||||||||
|
|
|||||||||||||||||||||||||
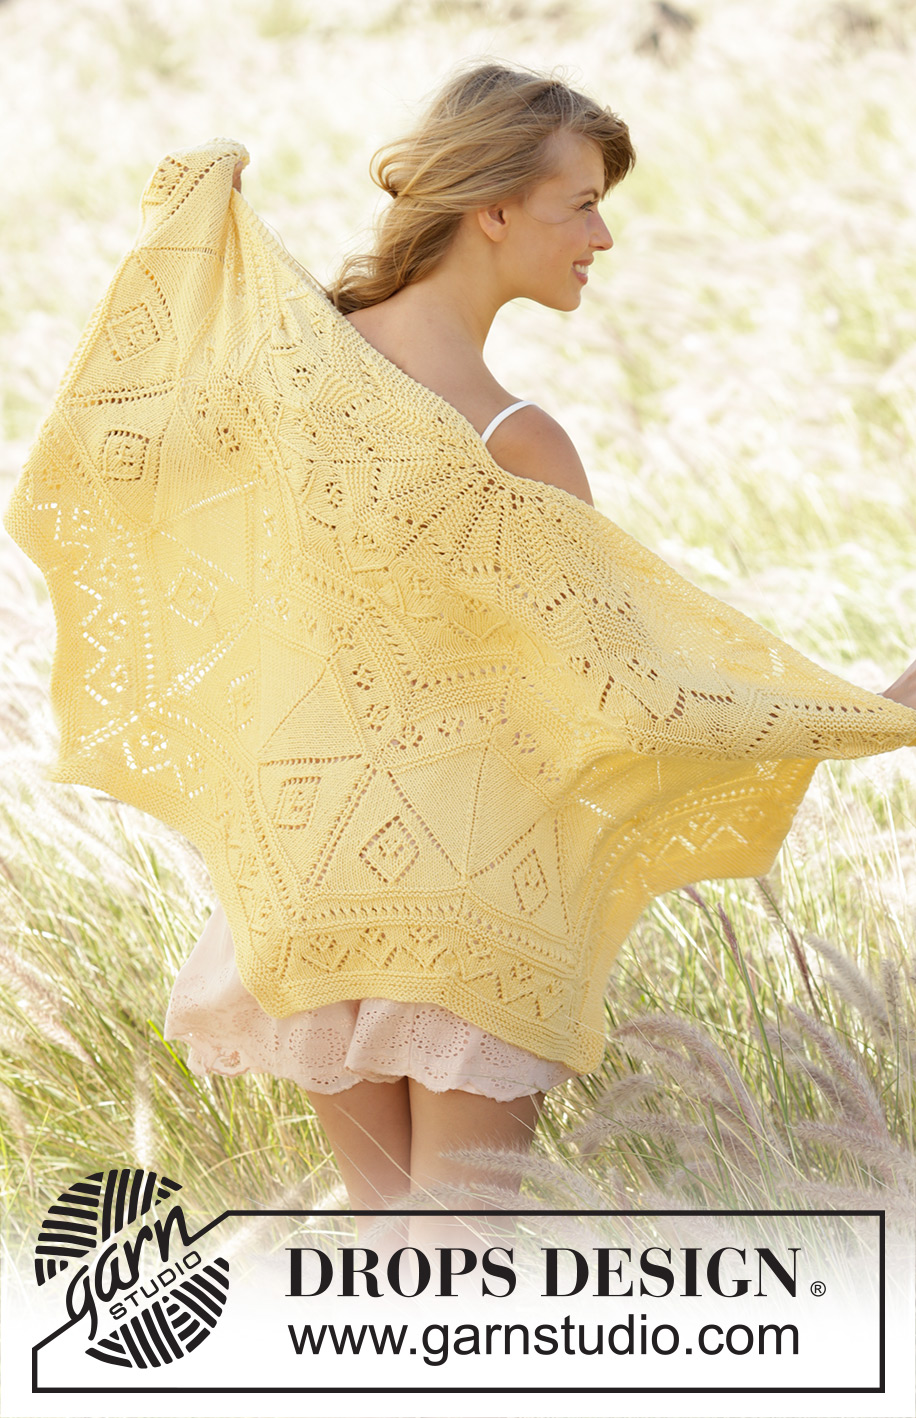
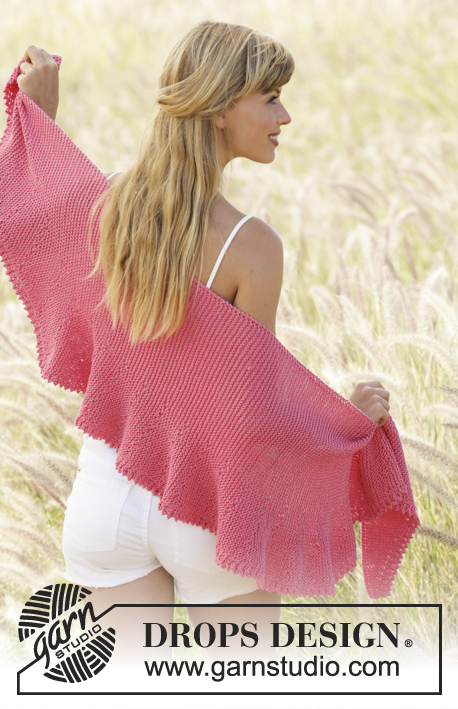
Chal DROPS en punto musgo con patrón de calados y patrón zigzag, en “Cotton Merino”.
DROPS 170-12 |
|||||||||||||||||||||||||
|
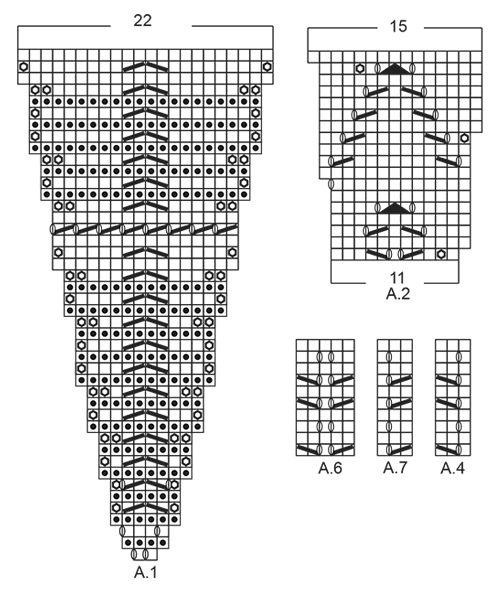
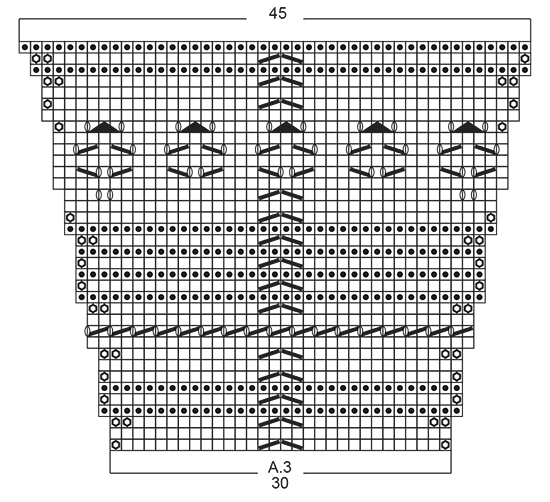
PATRÓN: Ver diagramas A.1 a A.11. Los diagramas muestran todas las hileras en el patrón vistas por el LD. PT MUSGO (de ida y vuelta): Tejer todas las hileras de derecho. 1 surco = 2 hileras tejidas de derecho. TIP PARA AUMENTAR: Aumentar 1 pt haciendo 1 HEB (lazada). En la vta siguiente, tejer la HEB retorcida para evitar agujeros. ------------------------------------------------------ CHAL: Tejido de ida y vuelta, de arriba para abajo. Montar 6 pts en ag circular tamaño 4.5 mm con Cotton Merino. Tejer 3 surcos en PT MUSGO – ver explicación arriba, y aumentar 4 pts distribuidos equitativamente en cada hilera por el LD – LEER TIP PARA AUMENTAR = 18 pts. Tejer la hilera siguiente, de la manera siguiente, por el LD: Tejer 3 pts en PT MUSGO – ver explicación arriba, insertar 1 marcapuntos, * A.1 (= 2 pts), insertar 1 marcapuntos *, repetir de *a* 5 veces más, terminar con 3 pts en pt musgo = 7 marcapuntos en la pieza. Mover los marcapuntos hacia arriba a medida que se va tejiendo. Continuar con A.1 y 3 pts en pt musgo de cada lado de la pieza. RECORDARSE DE MANTENER LA MISMA TENSIÓN DE TEJIDO DE LA MUESTRA! Cuando A.1 ha sido tejido 1 vez verticalmente, hay 138 pts en la ag. Tejer la hilera siguiente, de la manera siguiente, por el LD: 3 pts en pt musgo, A.2 (= 11 pts) hasta que resten 3 pts (= 12 veces a lo ancho), terminar con 3 pts en pt musgo. Cuando A.2 ha sido tejido 1 vez verticalmente, hay 186 pts en la ag. Tejer la hilera siguiente, de la manera siguiente, por el LD: 3 pts en pt musgo, A.3 (= 30 pts) hasta que resten 3 pts (= 6 veces a lo ancho), terminar con 3 pts en pt musgo. En la última hilera por el LD en A.3, aumentar 1 pt con 1 HEB después de los 3 pts en pt musgo al principio de la hilera. Cuando A.3 ha sido tejido 1 vez verticalmente, hay 277 pts en la ag. La pieza mide aprox 38 cm en la parte más larga (medida a lo largo del centro). Tejer la hilera siguiente de la manera siguiente por el LD: 3 pts en pt musgo, tejer A.4 (= 3 pts), * A.5 (= 40 pts), A.6 (= 5 pts) *, repetir de *a* 4 veces más, tejer A.5, A.7 (= 3 pts), terminar con 3 pts en pt musgo. Los aumentos en A.4/A.6/A.7 figuran en A.5 para que el patrón calce. Repetir A.4/A.6/A.7 verticalmente hasta que A.5 ha sido tejido 1 vez verticalmente. Cuando A.5 ha sido tejido 1 vez verticalmente, hay 361 pts en la ag. La pieza mide aprox 53 cm en la parte más larga (medida a lo largo del centro). Tejer de la manera siguiente por el LD: 3 pts en pt musgo, 1 pt en pt musgo (este pt es tejido en pt musgo cuando se teje en pt musgo en A.8 y en pt jersey cuando se teje en pt jersey en A.8), repetir A.8 (= 59 pts) hasta que resten 3 pts (= 6 veces a lo ancho), terminar con 3 pts en pt musgo. NOTA: La hilera de agujeros en A.8 no calza en el diagrama, mas sí corresponde al número total de pts en la hilera, el 1er pt después de los 3 pts en pt musgo debe ser tejido en pt jersey por el LD. En la última hilera por el LD, insertar 1 hilo marcador en el centro de cada repetición de A.8, es decir, entre: Deslizar 1 pt como de derecho, 1 d, pasar el pt desl por encima, insertar 1 marcapuntos y tejer 2 pjd. Mover los hilos marcadores hacia arriba a medida que se va tejiendo. Cuando A.8 ha sido tejido 1 vez verticalmente, hay 397 pts en la ag. La pieza mide aprox 58 cm en la parte más larga (medida a lo largo del centro). Tejer de la manera siguiente en la hilera siguiente por el LD: 3 pts en pt musgo, A.4 sobre los 3 pts siguientes, * repetir A.9 (= 10 pts) 6 veces en total a lo ancho, A.6 sobre los 5 pts siguientes *, repetir de *a* 4 veces más, repetir A.9 (= 10 pts) 6 veces en total, A.7 sobre los 3 pts siguientes, terminar con 3 pts en pt musgo. Los aumentos hechos en A.4/A.6/A.7 son tejidos en pt jersey. Repetir A.4/A.6/A.7 verticalmente (asegurarse que A.4/A.6/A.7 queden alineados, unos por encima de los otros) hasta que A.9 ha sido tejido 1 vez verticalmente. Cuando A.9 ha sido tejido 1 vez verticalmente, hay 433 pts en la ag. La pieza mide aprox 65 cm en la parte más larga (medida a lo largo del centro). Después tejer la pieza en pt musgo de la manera siguiente por el LD: Tejer 3 pts en pt musgo, * A.10 (= 2 pts), tejer en pt musgo hasta que resten 2 pts antes del hilo marcador, disminuir como antes (es decir, deslizar 1 pt como de derecho, 1 d, pasar el pt desl por encima, tejer juntos de derecho los 2 pts siguientes), tejer en pt musgo hasta que resten 2 pts antes del marcador, tejer A.11 sobre los 2 pts siguientes *, repetir de *a* hasta que resten 3 pts, terminar con 3 pts en pt musgo. Continuar de esta manera hasta que la pieza mida 70 cm en la parte más larga. Rematar flojo. |
|||||||||||||||||||||||||
Explicaciones del diagrama |
|||||||||||||||||||||||||
|
|||||||||||||||||||||||||
 |
|||||||||||||||||||||||||
 |
|||||||||||||||||||||||||
 |
|||||||||||||||||||||||||
 |
|||||||||||||||||||||||||
¿Terminaste este patrón?Entonces, etiqueta tus fotos con #dropspattern #springsplendorscarf o envíalas a la galería #dropsfan. ¿Necesitas ayuda con este patrón?Encontrarás 18 videos tutoriales, un espacio para comentarios/preguntas y más visitando la página del patrón en garnstudio.com © 1982-2026 DROPS Design A/S. Todos los derechos reservados. Este documento, incluyendo todas sus sub-secciones, está protegido por los derechos de autor (copyright). Lee más acerca de lo que puedes hacer con nuestros patrones en la parte de abajo de cada patrón de nuestro sitio. |
|||||||||||||||||||||||||


Con más de 40 años en el diseño de modelos de punto y de ganchillo, DROPS Design ofrece una de las más vastas colecciones de patrones gratuitos en el internet - traducidos en 17 idiomas. Al día de hoy, contamos con 324 catálogos y 12290 patrones - de los cuales 11685 están traducidos en español.
Nosotros trabajamos con mucho esmero para brindarte lo mejor que las labores de punto y ganchillo tienen para ofrecer,inspiración y consejos, así como hilos de magnífica calidad a precios increíbles! Te gustaría usar nuestros patrones para otro fin además del uso personal? Puedes leer acerca de lo que estás permitida a hacer en el texto de Copyright en la parte de abajo de todos nuestros patrones. Felices labores!
Escribe un comentario sobre DROPS 170-12
¡Nos encantaría saber qué piensas acerca de este patrón!
Si quieres escribir una pregunta referente al patrón, por favor asegúrate de elegir la categoría correcta en el formulario debajo, para acelerar el proceso de respuesta. Los campos obligatorios están marcados con un *.