
Categorías populares
¿Buscas un hilo?


Comentarios / Preguntas (221)
![]() Hazel escribió:
Hazel escribió:
Hi, I really love this pattern but I would like to knit it on straight needles, is there a way to convert it to seperate pieces? Many thanks, Hazel
30.10.2024 - 13:18DROPS Design respondió:
Dear Hazel, body is here worked back and forth on a circular needle to get enough room for all stitches, so that you can use a straight needle instead - read more about circular needles here. Happy knitting!
30.10.2024 - 13:50
![]() Caroline Boileau escribió:
Caroline Boileau escribió:
Explication incomplète pour les mailles glissées et que reste t'il pour dos et devant Comment je dois faire Merci
16.04.2024 - 13:42DROPS Design respondió:
Bonjour Mme Boileau, à quel niveau en êtes-vous précisément? Et quelle taille tricotez-vous? Ce sera ainsi plus facile de pouvoir vous aider avec ces infos complémentaires, merci pour votre compréhension.
16.04.2024 - 15:44
![]() Veronika Hammeke escribió:
Veronika Hammeke escribió:
Meine Fragen zur Anleitung: Nach „lesen Sie die Anleitung“ folgt: 1 Krausrippe Stricken, der Rest wird nicht gestrickt .Heißt das, ich wende,Stricke 5 Maschen ,wende wieder und eine ganze Reihe folgt?… weiter eine 1Kr-Rippe über die ersten 5 Maschen auf der anderen Seite..??? Wie stelle ich mir das vor ? Über eine Hilfestellung bin ich Ihnen dankbar. Mit freundlichen Grüßen Veronika Hammeke
10.04.2024 - 12:44DROPS Design respondió:
Liebe Frau Hammeke, meinen Sie nach 15-17-18 (20-21) cm ? Dann richtig, stricken Sie die ersten 5 Maschen bei der nächsten Hin-Reihe, wenden und diese 5 Maschen stricken (verkürzte Reihe), wenden, alle Masche wie zuvor stricken, wenden die ersten 5 Maschen stricken, wenden und diese 5 Maschen stricken = so haben Sie 1 extra Krausrippe über die Blenden-Maschen beidseitig gestrickt. Bei der nächsten Hin-Reihe beginnen die Abnahmen für den V-Halsausschnitt. Viel Spaß beim Stricken!
10.04.2024 - 13:55
![]() Dorette Henning escribió:
Dorette Henning escribió:
Es geht um die Abnahme für den Arm Ausschnitt nach Abnahme der 10 Maschen mittig zwischen den 20 Maschen der Krausrippe . Ich habe jetzt 5 Maschen für das Rückenteil auf jeder Seite. Wo nehme ich nun weiter für den Arm Ausschnitt ab. Wo muss ich abnehmen. Ich habe ja am Anfang die 5 Maschen der Krausrippe. Nehme ich da ab, dann reduziere ich ja die Krausrippe
01.04.2024 - 20:12DROPS Design respondió:
Liebe Frau Henning, man muss immer diese 5 Maschen krausrippe beidseitig beim Rückenteil behalten, dh die Abnahmen für den Armausschnitt werden am Anfang einer Hin-Reihe nach diesen 5 Maschen und am Anfang der Hin-Reihe vor diesen 5 Maschen - siehe ABNAHME FÜR DEN V-AUSSCHNITT UND DAS ARMLOCH IM DOPPELTEN PERLMUSTER: am Anfang der schriftlichten Anleitung. Viel Spaß beim Stricken!
02.04.2024 - 15:45
![]() Christa Strinert escribió:
Christa Strinert escribió:
Ich komme nicht weiter und zwar beim Arm Ausschnittn. Die Abnahme der mittleren 10 Maschen ist das genau von der Mitte der 144 maschen zu.machen oder jeweils nach dem Marker, dann 10 Maschen Krausrippe?
28.03.2024 - 15:56DROPS Design respondió:
Liebe Frau Strinert, vor dem Abkette für den Armausschnitt werden 20 Maschen (in 2. bis 5. Größe) = 10 Maschen beidseitig von den beiden Markierungen krausrechts gestrickt, dann werden die mittleren 10 Maschen = 5 Maschen beidseitig von den beiden Markierungen abgekettet, so bleiben 5 Maschen krausrechts am Armausschnitt. Viel Spaß beim Stricken!
02.04.2024 - 13:49
![]() Doris escribió:
Doris escribió:
I’m working on the 6/9 months size and am confused about the instructions under the body heading; after Dec 1 st every other row… everything afterwards is confusing. At what point in the pattern do you not work the back stitches? Thanks
28.03.2024 - 00:56DROPS Design respondió:
Dear Doris, for the 6/9 m size, after the "decrease 1 stitch" on the BACK, you knit with the double moss stitch and the edge stitches in garter stitch (as you knitted those stitches previously) until the piece 26 cm. Then knit with garter stitch on every stitch, but after another cm (when your piece is 27 cm) you cast off the middle 18 stitches. Now take the 11 stitches left on one side and knit with garter stitch for 1 more cm (the whole piece is 28 cm) and cast off. Now, repeat with the 11 stitch you have left on teh other side. Happy Knitting!
28.03.2024 - 09:04
![]() Anna Maria escribió:
Anna Maria escribió:
Tack för tidigare svar. Nu är jag på bakstycket (dvs efter att det står att man ska sticka fram- och bakst var för sig). Tråden är ju dock på framkanten, och jag har alla maskor på samma rundstickor. Ska man sticka sig fram till bakstycket och sen sätta framsidans maskor på en tråd och spara till senare? Eller hur är det tänkt att man ska fortsätta med bakstycket separat från detta? Och är meningen att man redan nu ska ha maskat av 16 gånger i kanterna enl tidigare stycke?
20.03.2024 - 15:04DROPS Design respondió:
Hei Anna Maria. Om du har tråden på forstykket og skal strikke bakstykket, må du klippe tråden og så starte på bakstykket. Evnt kan du strikke venstre forstykket først, om det er der du har tråden. mvh DROPS Design
02.04.2024 - 11:44
![]() Anna Maria escribió:
Anna Maria escribió:
Hej. Jag stickar Juniorvästen, och undrar över meningen ”Maska av 1 m på vartannat v (dvs på varje v från rätsidan) totalt 5-6-6 (6-6) gånger = 36-40-44 (52-60) m.” Om jag förstår rätt blir det två maskor mindre på varje varv med minskningar, men ska man alltså minska totalt 12 maskor (dvs minska 6 varv med två minskningar per varv)? Eller hur många gånger, med hur många maskor ska man minska totalt?
19.03.2024 - 14:41DROPS Design respondió:
Hej Anna Maria. Ja det stämmer ( om du stickar någon av de 4 största storlekarna). Du minskar 1 maska i varje sida 6 gånger, så du minskar totalt 12 maskor. Mvh DROPS Design
20.03.2024 - 08:10
![]() Rene Gould escribió:
Rene Gould escribió:
Hi nearly finishesd with your kind help but I’m stuck agin in pocket flap don’t understand where it says do rib k2/p2 then it says do 1garter stitch an k2 in each side really don’t understand please help thank you
13.03.2024 - 21:47DROPS Design respondió:
see below =)
14.03.2024 - 08:36
![]() Rene Gould escribió:
Rene Gould escribió:
Hi nearly finishesd with your kind help but I’m stuck agin in pocket flap don’t understand where it says do rib k2/p2 then it says do 1garter stitch an k2 in each side really don’t understand please help thank you
13.03.2024 - 21:32DROPS Design respondió:
Dear Mrs Gould, work as follows: 1 edge stitch in garter stitch, work rib *K2, P2* until 3 sts remain, then work K2 and 1 edge stitch in garter stitch. Happy knitting!
14.03.2024 - 08:35
|
|
Junior#juniorvest |
|
 |
 |
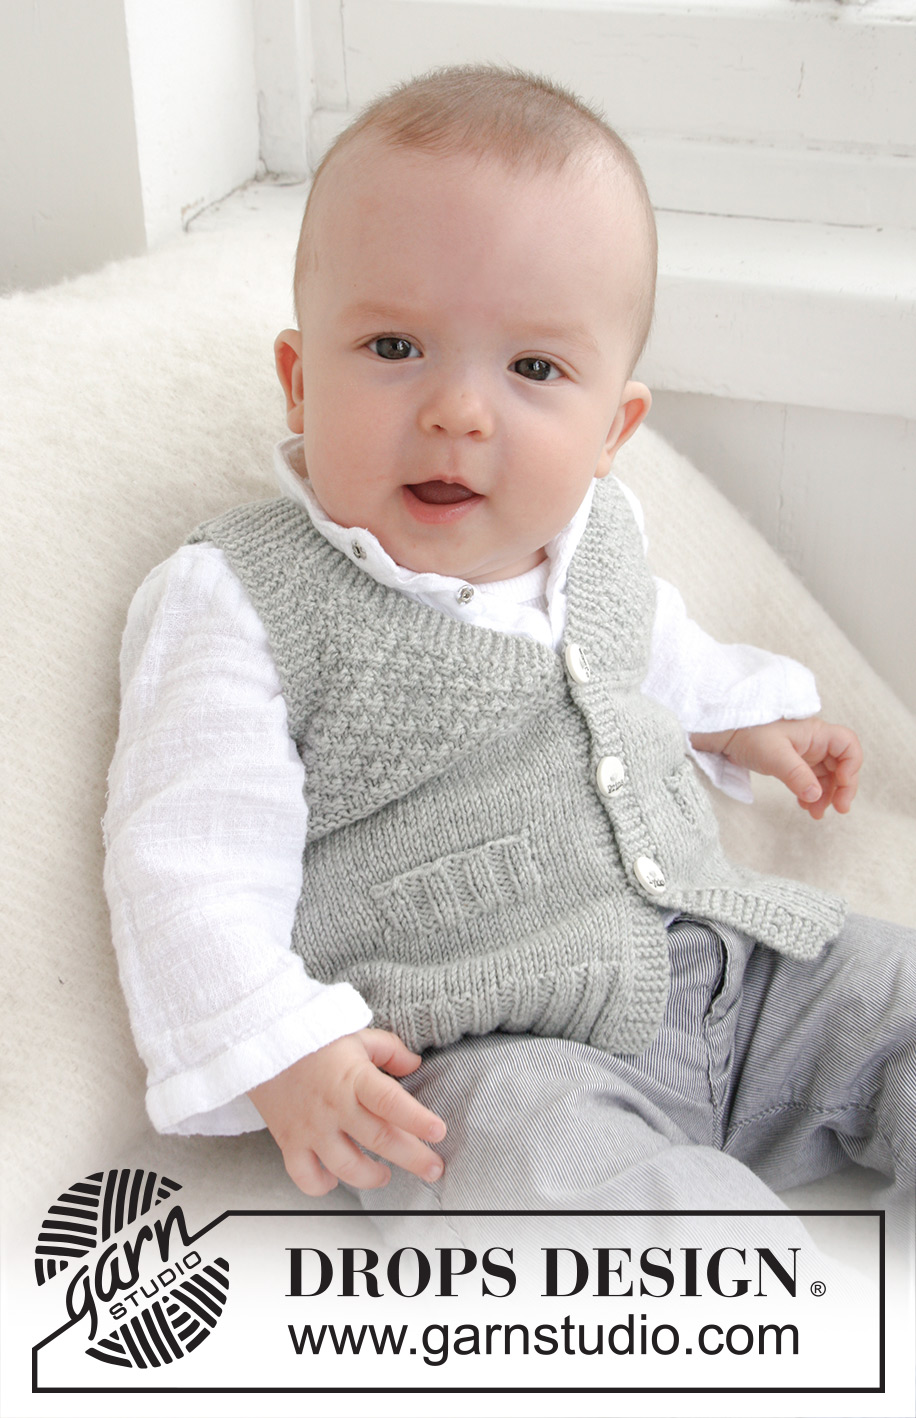
Chaleco de punto con escote en V y patrón para realzar textura para bebé y niños en DROPS BabyMerino o DROPS BabyAlpaca Silk
DROPS Baby 21-8 |
|
|
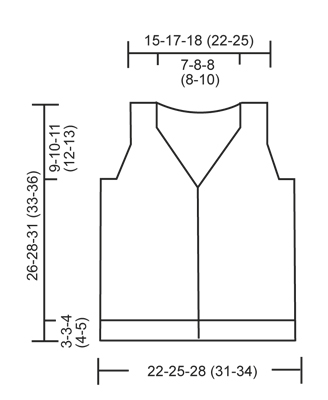
PT MUSGO (de ida y vuelta en la ag): Todas las vtas de derecho. PT ARROZ DOBLE: Vuelta 1: * 2d, 2r *, repetir de *a*. Vuelta 2: derecho sobre derecho y revés sobre revés. Vuelta 3: revés sobre derecho y derecho sobre revés. Vuelta 4: Como la vuelta 2. Repetir vueltas 1 a 4. OJALES: Rematar para los ojales en el borde derecho. 1 ojal = tejer juntos de derecho el 2º y 3er pt a partir de la orilla y hacer 1 HEB (lazada). Rem para los ojales cuando la pieza mida: TALLA 1/3 MESES: 2, 6, 10 y 14 cm. TALLA 6/9 MESES: 2, 7, 11 y 16 cm. TALLA 12/18 MESES: 2, 7, 12 y 17 cm. TALLA 2 AÑOS: 2, 8, 13 y 19 cm. TALLA 3/4 AÑOS: 2, 8, 14 y 20 cm. DISM PARA CUELLO-V Y SISAS EN PT ARROZ DOBLE: Todas las dism son hechas por el LD! DISM DE LA MANERA SIGUIENTE ANTES DEL BORDE/ORILLA DE MANGA: Cuando el último pt debe ser un derecho: Tejer 2 pjd. Cuando el último pt debe ser un revés: Tejer 2 pjr DISM DE LA MANERA SIGUIENTE DESPUÉS DEL BORDE/ORILLA DE MANGA: Cuando el primer pt debe ser un derecho: Deslizar 1 pt de derecho, 1d, pasar el pt desl por encima. Cuando el primer pt debe ser un revés: Tejer 2 pts juntos retorcidos de revés (es decir, tejer por atrás del pt en vez de adelante). ------------------------------------------------------ ------------------------------------------------------ CUERPO: Tejido de ida y vuelta en ag circular a partir del centro del frente. Mon 148-168-184 (204-224) pts en ag circular tamaño 2.5 mm con Baby Merino. Tejer la primera vta, de la manera sig, por el LD: 5 pts en PT MUSGO (= borde) – ver explicación arriba, * 2d, 2r *, repetir de *a* hasta que resten 7 pts, terminar con 2d y 5 pts en PT MUSGO (= borde). Continuar el resorte de esta manera con 5 pts en pt musgo en cada lado hasta que la pieza mida 3-3-4 (4-5) cm – RECUERDE LOS OJALES en el borde – ver explicación arriba. Cambiar a ag circular tamaño 3 mm y tejer en pt jersey, mas continuar los bordes en pt musgo como antes. AL MISMO TIEMPO, en la 1ª vta después del resorte, dism 32-36-40 (44-52) pts distribuidos equitativamente (no dism sobre los bordes) = 116-132-144 (160-172) pts. Insertar un marcapuntos (MP) a 31-35-39 (43-45) pts de cada lado (= 54-62-66 (74-82) pts entre los MP en la pieza de la espalda). RECUERDE MANTENER LA MISMA TENSIÓN DE TEJIDO DE LA MUESTRA! Cuando la pieza mida 7-7½-8 (9-10) cm, tejer la vta sig, de la manera sig, por el LD: 5 pts en pt musgo, 21-21-27 (27-31) pts en pt jersey, deslizar los últimos 16-16-20 (20-24) pts que fueron tejidos en un gancho o seguro aux para la orilla del bolsillo, tejer hasta que resten 10-10-12 (12-12) pts en la ag, deslizar los últimos 16-16-20 (20-24) pts que fueron tejidos en un gancho o seguro aux para la orilla del bolsillo, tejer 5-5-7 (7-7) pts en pt jersey y terminar con 5 pts en pt musgo. En la vta sig, mon 16-16-20 (20-24) pts nuevos sobre cada uno de los 2 ganchos o seguros aux con pts = 116-132-144 (160-172) pts. Continuar en pt jersey y en pt musgo hasta que la pieza mida 13-14-16 (16-18) cm. Ahora tejer 4 vtas de derecho sobre todos los pts (= 2 surcos). Después, tejer PT ARROZ DOBLE – ver explicación arriba (continuar los bordes en pt musgo como antes). LEER TODA LA SECCIÓN SIGUIENTE ANTES DE CONTINUAR! Cuando la pieza mida 15-17-18 (20-21) cm, tejer 2 vtas en pt musgo sobre los primeros 5 pts en la ag (no tejer los otros pts en la ag). Después, tejer 1 vta sobre todos los pts antes de tejer 2 vtas en pt musgo sobre los primeros 5 pts en la ag en el otro lado de la pieza (esto se hace para que el cuello-V tenga una apariencia más bonita). Después, dism para el cuello-V – ver explicación arriba: Dism 1 pt en vtas alternas (es decir, en cada vta por el LD) un total de 12-13-16 (16-16) veces. AL MISMO TIEMPO, cuando la pieza mida 16-17-19 (20-22) cm, tejer 4 vtas en pt musgo sobre los 18-20-20 (20-20) pts centrales en cada lado (es decir, sobre 9-10-10 (10-10) pts en cada lado de ambos MP) – tejer los otros pts como antes. En la vta sig, rem los 8-10-10 (10-10) pts centrales en cada lado para la sisa y terminar las piezas del frente y espalda por separado. ESPALDA: = 46-52-56 (64-72) pts. Tejer pt arroz doble con 5 pts en pt musgo en cada lado (= orillas de las mangas). AL MISMO TIEMPO, dism para las sisas – ver explicación arriba: Dism 1 pt en vtas alternas (es decir, en cada vta por el LD) un total de 5-6-6 (6-6) veces = 36-40-44 (52-60) pts. Continuar en pt arroz doble y en pt musgo hasta que la pieza mida 24-26-29 (31-34) cm. Ahora tejer en pt musgo sobre todos los pts hasta completar las medidas. AL MISMO TIEMPO, cuando la pieza mida 25-27-30 (32-35) cm, rem los 16-18-20 (20-24) pts centrales para el escote = 10-11-12 (16-18) pts restantes en cada hombro. Ahora terminar cada hombro por separado. Continuar con pt musgo hasta que la pieza mida 26-28-31 (33-36) cm. Rem. DELANTERO IZQUIERDO: Continuar con pt arroz doble y en pt musgo, y, AL MISMO TIEMPO, dism para la sisa en el lado (como lo hizo en la pieza de la espalda) y continuar dism para el cuello-V como antes. Después de la última dism, restan 10-11-12 (16-18) pts en la ag. Tejer pt musgo sobre todos los pts hasta que la pieza mida 26-28-31 (33-36) cm y rem. DELANTERO DERECHO: Tejer como la pieza del delantero izquierdo, pero a la inversa. ORILLA DEL BOLSILLO: Deslizar los 16-16-20 (20-24) pts del gancho o seguro aux de una de las piezas del frente de regreso en la ag tamaño 2.5 mm. Tejer resorte 2d/2r con 1 pt en pt musgo y 2d en cada lado (visto por el LD). Cuando la orilla del bolsillo mida 2½-2½-3 (3-3) cm, rem flojamente con derecho sobre derecho y revés sobre revés. Coser la orilla del bolsillo a la pieza del frente, con punto malla, en cada lado de la pieza. Coser la abertura del bolsillo a la parte de abajo de la orilla (donde los pts fueron colocados en un gancho o seguro aux) por el revés de la pieza. Tejer otra orilla de bolsillo de la misma manera en la otra pieza del frente. TERMINACIÓN: Hacer las costuras de los hombros. Coser los botones. |
|
 |
|
¿Terminaste este patrón?Entonces, etiqueta tus fotos con #dropspattern #juniorvest o envíalas a la galería #dropsfan. ¿Necesitas ayuda con este patrón?Encontrarás 13 videos tutoriales, un espacio para comentarios/preguntas y más visitando la página del patrón en garnstudio.com © 1982-2026 DROPS Design A/S. Todos los derechos reservados. Este documento, incluyendo todas sus sub-secciones, está protegido por los derechos de autor (copyright). Lee más acerca de lo que puedes hacer con nuestros patrones en la parte de abajo de cada patrón de nuestro sitio. |
|


Con más de 40 años en el diseño de modelos de punto y de ganchillo, DROPS Design ofrece una de las más vastas colecciones de patrones gratuitos en el internet - traducidos en 17 idiomas. Al día de hoy, contamos con 325 catálogos y 12298 patrones - de los cuales 11698 están traducidos en español.
Nosotros trabajamos con mucho esmero para brindarte lo mejor que las labores de punto y ganchillo tienen para ofrecer,inspiración y consejos, así como hilos de magnífica calidad a precios increíbles! Te gustaría usar nuestros patrones para otro fin además del uso personal? Puedes leer acerca de lo que estás permitida a hacer en el texto de Copyright en la parte de abajo de todos nuestros patrones. Felices labores!
Escribe un comentario sobre DROPS Baby 21-8
¡Nos encantaría saber qué piensas acerca de este patrón!
Si quieres escribir una pregunta referente al patrón, por favor asegúrate de elegir la categoría correcta en el formulario debajo, para acelerar el proceso de respuesta. Los campos obligatorios están marcados con un *.