
Categorías populares
¿Buscas un hilo?


Comentarios / Preguntas (106)
![]() Jonee escribió:
Jonee escribió:
I have a question about the following part: Now work the foot in sc as follows – insert a marker in the middle st: (ROW 1, ROW 2, ROW 3, ROW 4, Repeat 3rd and 4th row until piece measures approx. 22-24-27 cm / 8 3/4"-9½"-10½" in length - measured when piece is folded double.) Do you still need to crochet a turning chain at the beginning of each of these rows?
16.10.2014 - 23:54DROPS Design respondió:
Dear Jonee, you will replace first sc by a turning ch at the beg of every row, even for dec rows. Happy crocheting!
17.10.2014 - 09:47
![]() Jesie escribió:
Jesie escribió:
I'm confused a little on this pattern. Where it says to DEC 2sts, 1 at the beginning of the row and 1 in the middle of the row. 29-31-33 on row then continue until piece measures 19-20-21cm. Are you saying to continue DEC rows until your piece has reached its desired measurements or are you saying to go back to the pattern of 1 row sc and 1 row DC till you've reached your desired measurement?
18.09.2014 - 20:37DROPS Design respondió:
Dear Jesie, after you have dec 2 sts and get 29-31-33 sts, continue over these 29-31-33 sts without dec anymore until piece reaches 19-20-21 cm in pattern as before with 1 row sc/1 row dc. Happy crocheting!
19.09.2014 - 09:12
![]() Patty escribió:
Patty escribió:
On the cuff do you chain one at the end of each row for your turning chain?
12.09.2014 - 05:10DROPS Design respondió:
Dear Patty, working the cuff alternately in dc and sc, there will be at beg of each dc row 2 turning ch and at beg of each sc row 1 turning ch. Happy crocheting!
12.09.2014 - 09:23
![]() Vicki Tenn escribió:
Vicki Tenn escribió:
Having trouble getting patern to print. Are patterns available in PFD format. I press print all thr way through the pattern and nothing happens. I don't know where it goes. Thank you. (I really like working from a written patern.)
07.09.2014 - 05:28DROPS Design respondió:
Dear Mrs Tenn, to print our patterns click on the "print" button, a new window will open - make sure your brower allows pop up windows- in this new window, click again on "print pattern" to launch printing. You can then either choose to use your printer or a virtual printer to save it as a PDF. Happy crocheting!
08.09.2014 - 09:05
![]() Jordan escribió:
Jordan escribió:
I am having some problems with an area in the pattern. This is the part of the pattern I am having problems understanding (dec 2 sts on the row as follows: Work the first 2 sts tog-see explanation above-and the 2 middle sts tog=29-31-33 sts on row. Then continue until piece measures 19-20-21 cm / 7½"-8"-8 1/4". Now work the foot in sc as follows–insert a marker in the middle st) Please help. Maybe explain it a little better. Thank you.
24.02.2014 - 07:35DROPS Design respondió:
Dear Jordan, when piece measures 10 cm, dec 2 sts : 1 st at beg of row and 1 st in the middle of row (crochet 2 sts tog). Then continue as before (1 st in each st, without dec/inc) until piece measures the height required for your size. Happy crocheting!
24.02.2014 - 09:53
![]() Monique escribió:
Monique escribió:
Sorry the pattern I am referring to is your DROPS Extra 0-888
29.01.2014 - 20:33
![]() Monique escribió:
Monique escribió:
Love this pattern...I just need some clarification regarding the part where it says "continue in established pattern" Means I repeat rows 2 & 3 alternately until the piece reaches 6 in then I decrease on the 4th. Repeat 2, 3 & 4 until the piece reaches 10 inches?
29.01.2014 - 20:29DROPS Design respondió:
Dear Monique, in 0-888, work as stated from * to* in dc until works measures 6 inches, dec then 2 sts as explained and continue as before (= from *to*) until piece measures 10 (29 sts). Happy crocheting!
30.01.2014 - 10:23
![]() DOISNEAU escribió:
DOISNEAU escribió:
Dans les fournitures vous ne proposez pas les semelles. J'aurais bien envie d'acheter la laine mais à condition d'avoir les semelles !!
09.12.2013 - 20:09DROPS Design respondió:
Bonjour Mme Doisneau, la partie "semelle" du chausson est réalisée en DROPS Eskimo (100 g pour toutes les tailles), au crochet, et le reste du chausson en DROPS Symphony. Bon crochet!
10.12.2013 - 09:08
![]() Christina escribió:
Christina escribió:
Super fine tøfler; skal der bare vendes med en enkelt vendemaske, hvor der ikke står andet (i foden)? Tak!
01.12.2013 - 12:30DROPS Design respondió:
Hej Christina. Ja, hvis du haekler fm vender du med 1 lm
04.12.2013 - 17:25
![]() Karen escribió:
Karen escribió:
Ik ben bezig deze sloffen te maken. Ik heb net voor de eerste maal TOER 3 gehaakt. Ik zou nu dus 4 moeten doen en dan herhalen tot ik 22cm heb. Maar wat wordt er bedoeld met 'meten als het werk dubbelgevouwen wordt'? Want ik heb nu al zo'n 21 cm na TOER 3... Hoe vouw ik het werk dan correct om te meten?
15.03.2013 - 13:00DROPS Design respondió:
U meet niet de hoogte van het breiwerk, maar de lengte van de voet; vouw het werk dubbel zodat u goed kunt meten hoelang het werk is van de teen naar de achterkant gemeten.
16.03.2013 - 07:57
|
|
Pocahontas#pocahontasslippers |
|
|
|
|
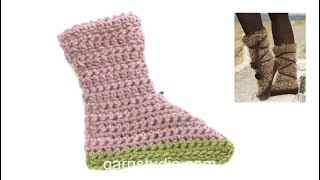
Pantuflas DROPS en ganchillo en “Snow” y “Symphony” o “Melody”.
DROPS 133-9 |
|
|
TRABAJAR 2 PTS JUNTOS: Trabajar el primer pt, mas no hacer la última lazada y extracción de bucle, trabajar el pt siguiente y en la última extracción de bucle pasar el hilo a través de todos los 3 bucles. ------------------------------------------------------ PANTUFLA: Trabajar de ida y vuelta, de arriba para abajo. Mon 32-34-36 cad flojas en ag de ganchillo tamaño 8 mm con 2 hilos Symphony (1 hilo café y 1 hilo beige claro) o Melody (2 hilos beige). Virar la pieza. Hacer 1 p.b. en la 2ª cad a partir de la ag, después hacer 1 p.b. en cada cad en toda la vta = 31-33-35 p.b. Continuar trabajando de la manera sig: * 2 cad, virar la pieza, hacer 1 p.a. en cada pt, 1 cad, virar la pieza, hacer 1 p.b. en cada pt *, repetir de *a* - RECUERDE MANTENER LA MISMA TENSIÓN DE TEJIDO DE LA MUESTRA! – esto es importante para obtener el tamaño correcto de las pantuflas. AL MISMO TIEMPO cuando la pieza mida 10-10-10 cm, dism 2 pts en la vta de la manera sig: Trabajar los primeros 2 pts juntos – ver explicación arriba – y los 2 pts centrales juntos = 29-31-33 pts en la vta. Después continuar hasta que la pieza mida 19-20-21 cm. Ahora trabajar el pie en p.b. de la manera sig – insertar un marcapuntos (MP) en el pt central: VUELTA 1: Hacer 1 p.b. en cada pt hasta el pt precedente al pt central, 2 p.b. en el pt sig, 1 cad (= pt central), saltar el pt sig, 2 p.b. en el pt sig, 1 p.b. en cada uno de los últimos pts, virar la pieza. VUELTA 2: Hacer 1 p.b. en cada uno de los primeros pts hasta la cad, hacer 7 p.a. en la cad central (el 4º p.a. de los 7 p.a. es ahora el pt central) y 1 p.b. en cada uno de los últimos pts, virar la pieza. VUELTA 3: Hacer 1 p.b. en cada uno de los pts sig hasta el pt precedente al pt central, hacer 2 p.b. en el pt sig, 1 cad (= pt central), saltar el pt sig, hacer 2 p.b. en el pt sig, 1 p.b. en cada uno de los últimos pts, virar la pieza. VUELTA 4: Hacer 1 p.b. en cada pt hasta el pt central, 7 p.a. en la cad y 1 p.b. en cada uno de los últimos pts, virar la pieza. Repetir la 3ª y 4ª vta hasta que la pieza mida aprox 22-24-27 cm de largo – doblar la pieza en dos para medir. Cambiar a Snow y ahora medir la pieza desde aquí. * Hacer 1 vta con p.b., terminar la vta con 1 cad y virar la pieza *, repetir de *a* hasta que la pieza mida aprox 4-4.5-5 cm – al mismo tiempo en la última vta, trabajar los primeros 2 y los últimos 2 pts juntos – ver explicación arriba. Cortar el hilo. TERMINACIÓN: Doblar la pantufla en dos, coser orilla con orilla por la hebra delantera del pt externo, para evitar que se forme una costura abultada. Trabajar flojamente una vta con p.b. en la parte de arriba de la pierna con Snow. Mon una hilera de cad con Snow de aprox 150 cm, sujetar un pompón pequeño en cada extremo – Tip: Antes de insertar el último pompón en la hilera de cad, pasar el cordón a través de un pt en la parte de abajo de la pierna, en la transición entre Symphony / Melody y Snow, para que quede asegurado firmemente. Enrollar y atar esta hilera de cad alrededor de la pierna. |
|
¿Terminaste este patrón?Entonces, etiqueta tus fotos con #dropspattern #pocahontasslippers o envíalas a la galería #dropsfan. ¿Necesitas ayuda con este patrón?Encontrarás 7 videos tutoriales, un espacio para comentarios/preguntas y más visitando la página del patrón en garnstudio.com © 1982-2026 DROPS Design A/S. Todos los derechos reservados. Este documento, incluyendo todas sus sub-secciones, está protegido por los derechos de autor (copyright). Lee más acerca de lo que puedes hacer con nuestros patrones en la parte de abajo de cada patrón de nuestro sitio. |


Con más de 40 años en el diseño de modelos de punto y de ganchillo, DROPS Design ofrece una de las más vastas colecciones de patrones gratuitos en el internet - traducidos en 17 idiomas. Al día de hoy, contamos con 324 catálogos y 12245 patrones - de los cuales 11625 están traducidos en español.
Nosotros trabajamos con mucho esmero para brindarte lo mejor que las labores de punto y ganchillo tienen para ofrecer,inspiración y consejos, así como hilos de magnífica calidad a precios increíbles! Te gustaría usar nuestros patrones para otro fin además del uso personal? Puedes leer acerca de lo que estás permitida a hacer en el texto de Copyright en la parte de abajo de todos nuestros patrones. Felices labores!
Escribe un comentario sobre DROPS 133-9
¡Nos encantaría saber qué piensas acerca de este patrón!
Si quieres escribir una pregunta referente al patrón, por favor asegúrate de elegir la categoría correcta en el formulario debajo, para acelerar el proceso de respuesta. Los campos obligatorios están marcados con un *.