


Komentáře / Otázky (109)
![]() Vashti Schmahl napsala:
Vashti Schmahl napsala:
Could I mix Drops Melody in Beige with Drops Brushed Alpaca Silk in Beige for the fluffy part of the boot? If so how much of each yarn would I need?
09.07.2020 - 21:06Odpověď DROPS Design :
Dear Mrs Schmahl, we already used 2 strands Brushed Alpaca Silk to replace 1 strand Melody in some patterns, so that you might work here with 1 strand Melody + 2 strands Brushed Alpaca Silk instead of 2 strands Melody - but remember to check/keep your tension - read more about alternatives here. Happy crocheting!
10.07.2020 - 07:58
![]() Lory napsala:
Lory napsala:
Grazie per la sua disponibilita'. le chiedo se all'inizio e troppo stretto con 32 maglie , come posso fare ?
07.03.2019 - 19:56Odpověď DROPS Design :
Buongiorno Lory, deve prima di tutto verificare che il suo campione corrisponda a quello indicato, altrimenti non otterrà le misure corrette. Può eventualmente provare a lavorare una taglia più grande. Buon lavoro!
19.08.2019 - 18:16
![]() Lory napsala:
Lory napsala:
Scusami non capisco quando spieghi 10-10-10- cm e diminuire 2 all'inizio e 2 centrali . devo fare 30 cm e poi diminuire sempre 2 all'inizio e 2 centrali ? o quando devo iniziare a farlo ? misura piede 37 . grazie aspetto risposta
07.03.2019 - 16:03Odpověď DROPS Design :
Buongiorno Lory. L'indicazione 10-10-10 cm è la misura riferita ad ognuna delle taglie. In questo caso è uguale per tutte e tre le taglie. Quando il suo lavoro misura 10 cm, deve lavorare insieme le prime 2 maglie e le 2 maglie centrali. Sui ferri rimangono 29 maglie. Prosegue senza ulteriori diminuzioni finchè il lavoro non misura 19 cm (per la taglia 35/37). Buon lavoro!
07.03.2019 - 16:16
![]() Majbritt Borup napsala:
Majbritt Borup napsala:
Er det rigtigt at der skal bruges ialt 300 gr symphony men kun 150 g melodi?
18.02.2017 - 17:14Odpověď DROPS Design :
Hej Majbritt. Ja, det er korrekt, for Melody löber 140 m per 50 gr og Symphony löb kun 70 m.
21.02.2017 - 16:18
![]() Tracy napsala:
Tracy napsala:
I made these for my daughter and was so much fun! She loves them!
11.10.2015 - 06:14
![]() Niki napsala:
Niki napsala:
What yarn can I use if I cannot find the Symphony on here? Maybe I missed it, but the only one I see is the Eskimo.
27.07.2015 - 17:02Odpověď DROPS Design :
Dear Niki, DROPS Symphony is now discontinued - click here for alternatives and yarn requirements. Your DROPS store will help you with tips & advices. Happy crocheting!
27.07.2015 - 18:08
![]() Andrea napsala:
Andrea napsala:
I love these! I was wondering though, could you the pattern for soles please?
22.02.2015 - 04:33Odpověď DROPS Design :
Dear Andrea, the pattern for sole starts from the part worked in Eskimo. Happy crocheting!
23.02.2015 - 10:03
![]() MaryAnn napsala:
MaryAnn napsala:
What does it mean when you saw "folded double "? Just folded like you would wear it around your leg?
25.01.2015 - 00:50Odpověď DROPS Design :
Dear MaryAnn, that's correct, so that you can sew tog beg/end of rows along the back of leg and on bottom of foot. Happy crocheting!
26.01.2015 - 10:06
![]() Shelly Moses napsala:
Shelly Moses napsala:
I've only been crocheting a few months so could you explain what 32-34-36 etc. means?
14.12.2014 - 23:51Odpověď DROPS Design :
Dear Mrs Moses, each number refers to the matching size, the slippers are in size 35/37, 35/40 and 41/43. If you work 1st size, you will start with 32 ch and have 31 dc at the end of 1st row, in 2nd size, you start with 34 ch and have 33 dc at the end of 1st row, and in larger size, you start with 36 ch and have 35 dc at the end of 1st row. Happy crocheting!
15.12.2014 - 10:27
![]() Shara napsala:
Shara napsala:
Sorry, assembly unclear. Foot done. Assembly says fold in half. When I do it is extremely pointed, even with just 5 DC. Does the toe assemble to look envelope with a square end on the end or pointed? in the us, and didn't buy garn yarn. In Missouri. So I can't ask them. Could you email?
14.11.2014 - 22:26Odpověď DROPS Design :
Dear Shara, after having crocheted sole (sc rows worked "straight"), you then fold last row double and sew sole together on the bottom (and along mid back). Click here to get yarn in the U.S.. Happy crocheting!
15.11.2014 - 09:47
|
|
Pocahontas#pocahontasslippers |
|
|
|
|
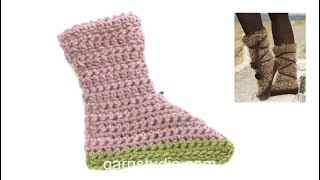
DROPS háčkované papučky z příze „Symphony“ a z příze „Snow“.
DROPS 133-9 |
|
|
2 OKA SPOJENÁ V JEDNO: Háčkujeme první oko – nedokončíme – háčkujeme druhé oko a při dokončování protáhneme nit všemi oky na háčku. ---------------------------------------------------------------------- PAPUČKY: Háčkujeme ve směru shora dolů. Dvojitou přízí Symphony, háčkem č. 8 háčkujeme 32-34-36 volných řo. Práci otočíme. Do druhého řo od háčku háčkujeme KS, dále do každého řo v řadě háčkujeme vždy KS = 31-33-35 KS. Pokračujeme: * 2 řo, práci otočíme, do každého oka háčkujeme DS, řo, práci otočíme, do každého oka háčkujeme KS*, mezi *-* opakujeme, PAMATUJTE NA SPRÁVNÉ NAPĚTÍ PŘÍZE – důležité pro správnou velikost papučky. SOUČASNĚ ve výšce 10-10-10 cm, ujmeme v řadě 2 oka: první dvě oka spojíme v jeden – viz TIP, dvě středová oka spojíme v jedno = 29-31-33 ok v řadě. Háčkujeme do výšky 19-20-21 cm. Následuje tvarování chodidla, háčkujeme KS – do středového oko umístíme značku: 1. řada: KS před oko se značkou, do následujícího oka 2 KS, řo (= středové oko), další oko vynecháme, do dalšího oka 2 KS, do konce řady háčkujeme KS. Práci otočíme. 2. řada: KS před řo, do středového řo háčkujeme 7 DS (4. DS ze 7 je nyní středové oko), KS do konce řady, práci otočíme. 3. řada: KS před středové oko, do následujícího oka 2 KS, řo (= středové oko), další oko vynecháme, KS do konce řady, práci otočíme. 4. řada: KS před středové oko, do řo 7 DS a do konce řady KS, práci otočíme. Řady 3 a 4 opakujeme do celkové výšky 22-24-27 cm – měříme přeložený díl. Změníme přízi na Snow a díl měříme od tohoto místa. *1 řada KS, řadu končíme řo a práci otočíme*, mezi *-* opakujeme do výšky 4-4,5-5 cm, SOUČANSĚ v oslední řadě spojíme první dvě oka v jedno – viz popis výše. Přízi ustřihneme. DOKONČENÍ: Papučku přeložíme na polovinu, sešijeme lemy k sobě, sešíváme za vnější čísti krajových ok. Horní lem lýtkové části obháčkujeme volně řadou KS z příze Snow. Přízí Snow uháčkujeme řetízek o délce asi 150 cm, na oba konce připevníme malou bambulku – TIP: před přišitím druhé bambulky provlékneme řetízek skrz řadu řo a skrz přechod mezi přízí Symphony a Snow.Řetízek obtočíme kolem lýtka. Přišijeme bambulku. |
|
Dokončili jste tento model?Pak označte své fotky tagem #dropspattern #pocahontasslippers nebo je pošlete do galerie #dropsfan. Potřebujete s tímto návodem poradit?Otevřete-li si návod na stránce garnstudio.com, najdete tam 6 výukových video-ukázek, Komentáře/Dotazy a další užitečné informace. © 1982-2025 DROPS Design A/S. Vyhrazujeme si veškerá práva. Tento dokument, včetně všech jeho dílčích částí, podléhá autorským právům. Podrobnější komentář k možnostem užití našich návodů najdete dole pod každým návodem na našich stránkách. |


V oblasti pletené a háčkované módy působí DROPS Design více než 40 let. Díky tomu vám můžeme nabídnout jednu z nejrozsáhlejších kolekcí modelů s bezplatnými návody dostupnými na internetu - navíc v 17 jazycích. K dnešnímu dni máme na 314 katalogů a 11822 návodů celkem - z nich je už 7048 dostupných v [češtině].
Přidejte komentář k návodu DROPS 133-9
Rádi bychom věděli, co si o tomto modelu myslíte!
Pokud se chcete na něco zeptat, dbejte prosím na to, abyste ve formuláři níže vybrali správnou kategorii - díky tomu se dříve dozvíte, co potřebujete vědět. Povinná pole jsou označena *.